Main
Getting Started
Thank you for choosing Delivery Solutions! This section is designed to help you get up and running with Delivery Solutions (DS) as quickly as possible.
Delivery Solution’s Quick Introduction
If you haven’t already, watch our intro walkthrough before you dive into Delivery Solutions.
How Delivery Solution Works
Delivery Solutions enables retailers access, orchestrate and optimize last mile deliveries for forward deployed inventory. Delivery Solutions unlocks last mile deliveries for retailers using their own e-commerce assets. No matter where the retailer is in their delivery journey, Delivery Solutions has something of value to take them to the next step.

- Access One connection to the Delivery Solutions API and you have access to all last mile delivery providers in the nation.We also provide technology if a retailer wants to deliver using their own fleet.
- Orchestrate Delivery Solutions has innovative capabilities that lets retailers configure their delivery strategy on the platform which can be customized down to the store and various departments within the store level.
- Optimize Delivery Solution helps you "tech up" your existing Private Fleet delivery, and layer that on with 3rd party where it makes sense for elasticity and economics and you can now optimize the total cost of delivery by routing the right order, in the right store for the right department for the right cost.
- Intelligence Delivery Solution has inbuilt intelligence to select the most efficient and cost-effective quotes from Third-party service providers for the deliveries.Ultimately, completely eliminates any manual intervention in the process of Order creation, Quote selections and Delivery Provider selections in order to place an order.
- White Label Preferences Delivery Solution mainly focuses on powering retail with white label last mile solutions and provides the SaaS middleware for anytime and anywhere local delivery, direct from retailer to customer.
- Private Fleet & 3rd Party Integration Delivery Solutions has the capability to integrate with extensive list of third-party delivery service providers out of the box. Hence Retail enterprises need to integrate only with Delivery Solutions in order to enable the services of multiple delivery providers saving them both time and cost of the integration.
- Forecast It also forecasts whether the delivery is possible in a given area on a given date and time with additional checks like whether alcohol delivery is permissible in the area or not.
- Real-Time It enables real-time tracking for order status, while order is going through delivery cycle and highlights if any operational issues in the delivery cycle for orders via SMS and emails, so that appropriate action can be taken on the same.
Browser Support
Desktop
- Chrome last 5 versions
- Firefox last 5 versions
- Edge last 2 versions
- Safari last 2 versions
Mobile
- iOS 12+ Safari
- iOS 12+ Chrome
- Android X (10.0), Pie (9.0), Oreo (8.0), Nougat (7.0)
- Android Chrome 10,0, 9,0, 8,0, 7.0
Table Of Content
Account
Our Account Section lets you manage your Profile, Businesses, API Keys and so on.
Account
Login
Now you can login to Delivery Solutions on Desktop, or by using Android or iPhone.
Logging In
During login, you'll be asked to verify that you are not a robot on your first login attempt. You'll also be asked to complete verification steps if your browser is in private or incognito mode, or if you cleared your browsing history since your last login to DS. You need to wait for all images to load in each verification step before you click Verify.
To learn more take a look at this or review the information below:
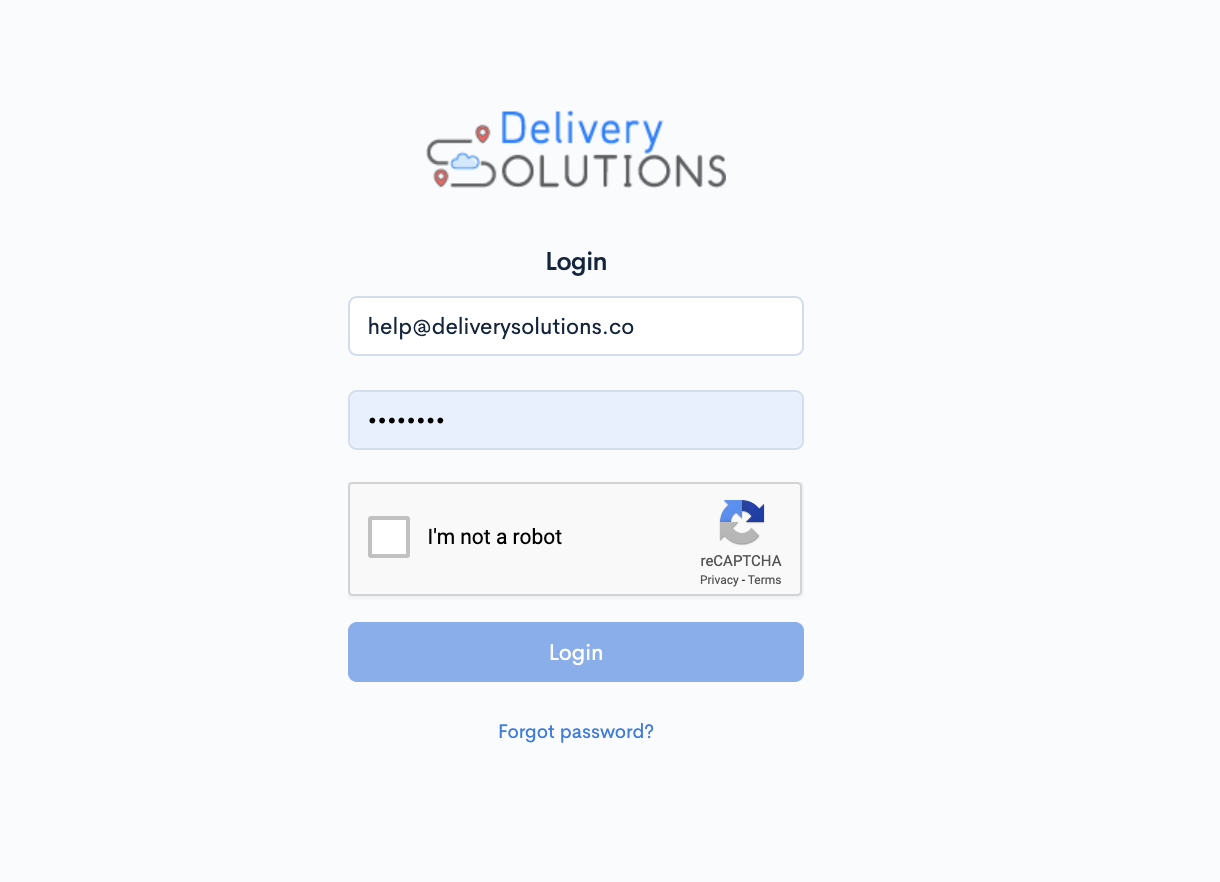
- Go to Delivery Solution Login Page.
- Enter your registered Email and Password.
- Complete the recaptcha verification steps
- Click on "Login"
Important
If you've logged into your account on the same device before, then your account might already be listed on the login page. In that case you can log in by your credentials, and you won't be prompted again to verify your account
Forgot Your password
You can reset your login password if you forget it. The steps to reset a password are the same with two-step authentication enabled.
This is how our forgot password page looks like..
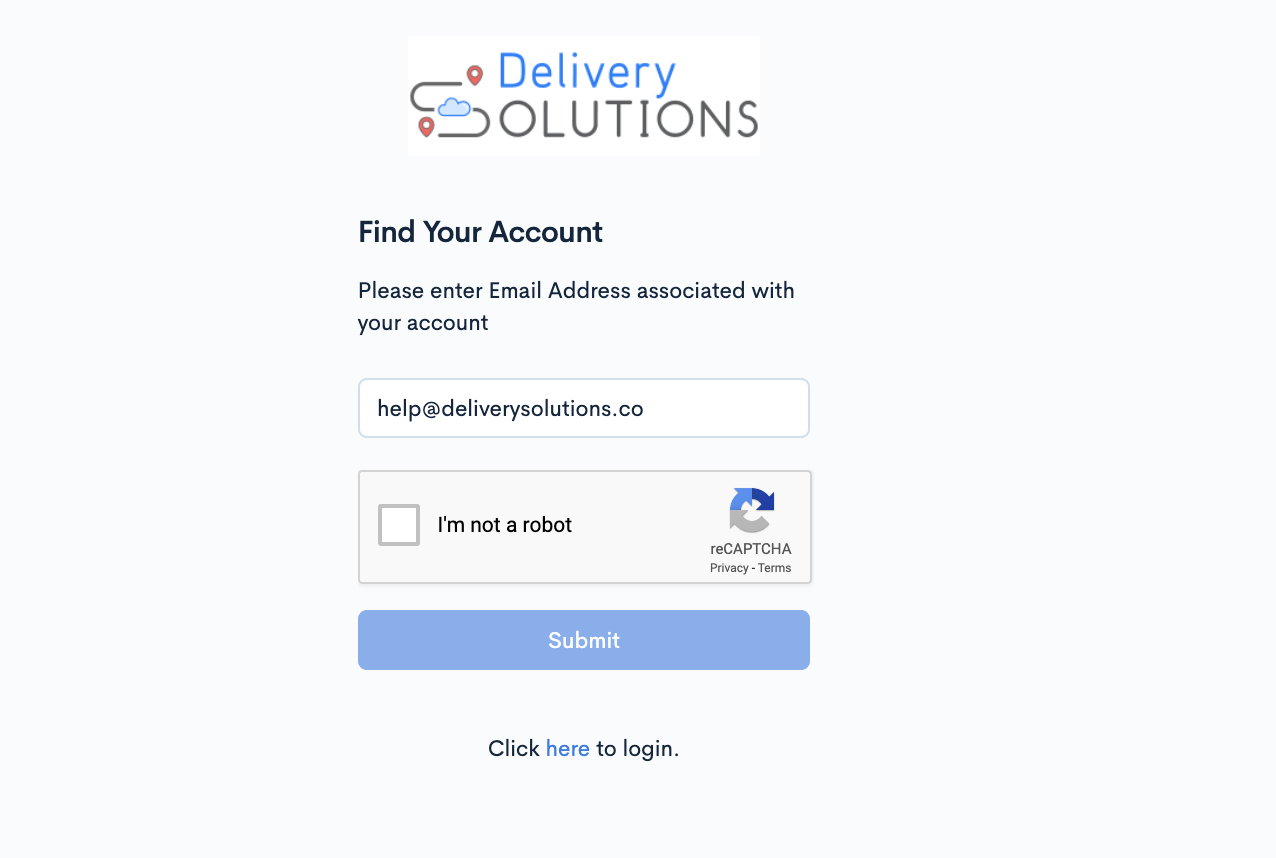
- From the Delivery Solutions login page, Click on "Forgot Password" option
- Enter your Email registered with Delivery Solutions
- Complete the recaptcha verification steps
- Click on "Submit"
- You're sent an email with a link to reset your password. In the email, click Reset password.
- Enter your new password again in the Confirm password field.
- Click on "Reset password".
- Go back to Delivery Solution login page and log in with your new password.
Caution
Each of your passwords should be unique. Avoid using the same password for more than one account, even if the accounts are related.
Table Of Content
Account
Account Profile
Account Profile page shows details added while creating an account. Platform admin can modify these details if required.
It takes basic details about Account such as Name, Contact Name, Email, Phone and Address
This is how our Account Profile page looks like..

Edit Account Profile
Account Profile lets you modify your basic information pertaining to Account such as Name, Contact Name, Email, Address and so on.
To learn more take a look at this or review the information below:
- After Successful login to Delivery Solutions page
- Click on the Profile Picture on upper right corner
- Click on theAccount Profile Tab from the list
- Click on Edit Details button
- You will be redirected to Edit Profile Form as below. And this is how Create Business form looks like
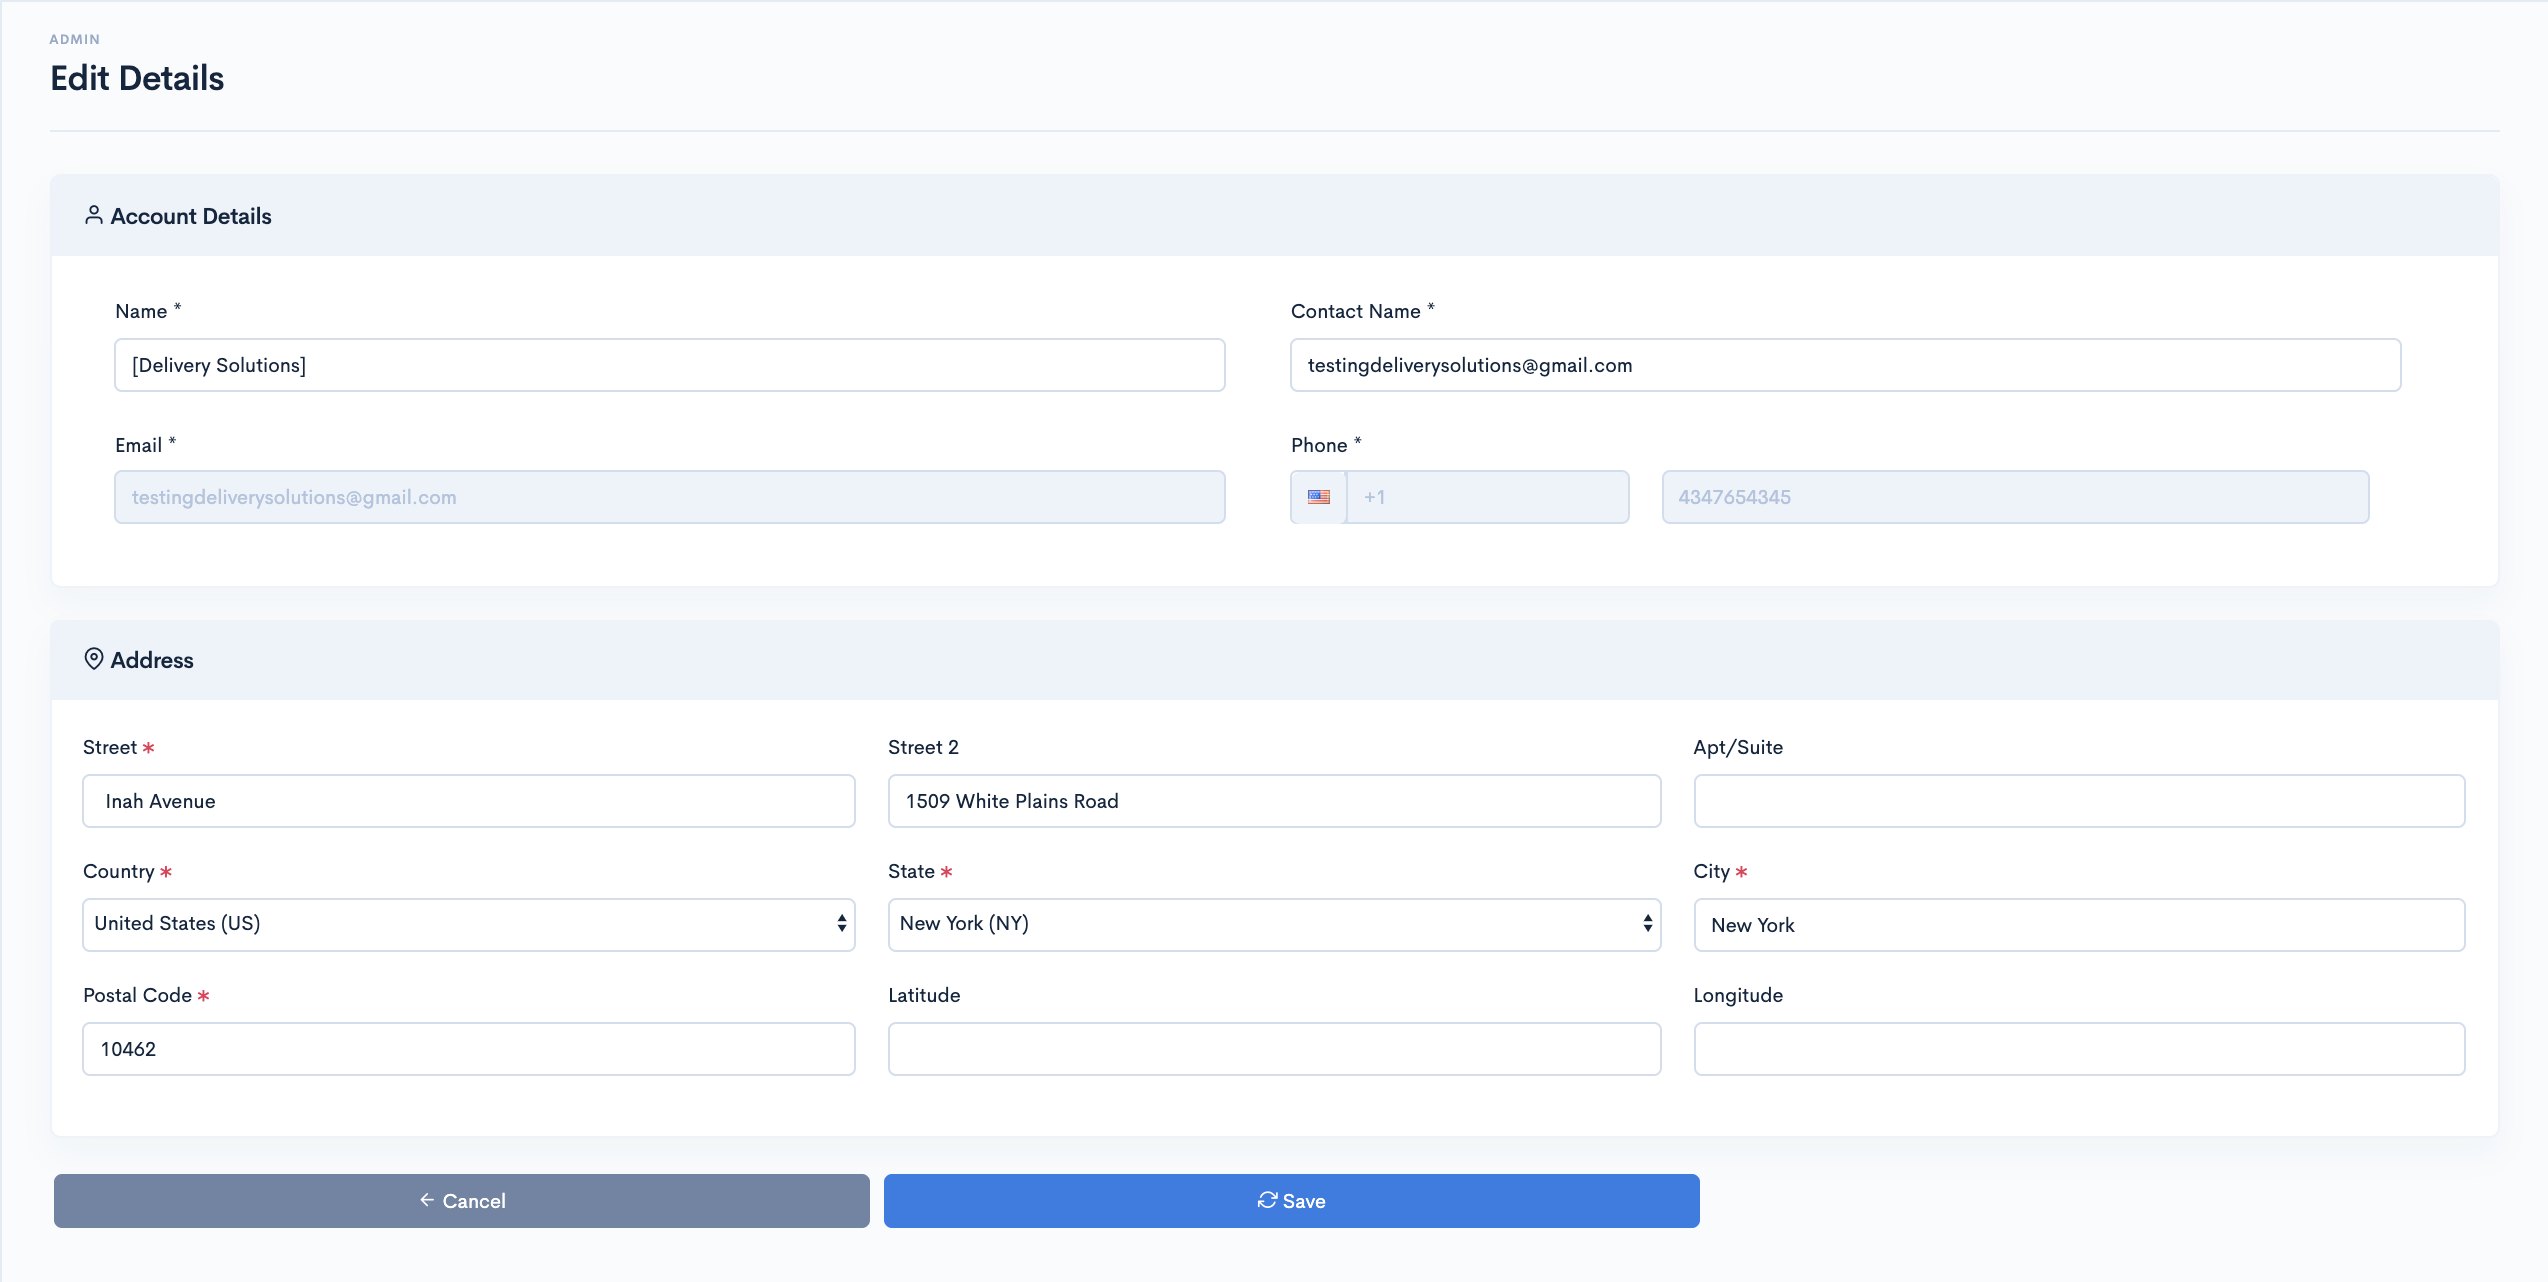
- Fill in the details in the form.
- Click on Save button to save details
Table Of Content
Account
Businesses
Business profile data can be altered from this interface. For example, Business Name, Contact Details, Email etc. On this interface Business Admin can set below important Configurations for order and notifications.
This is how our Businesses page looks like..
Create Business
Businesses page lets you add businesses under your account. Typically this module takes details such as Business Name, Email, Logo, Address and so on.
To learn more take a look at this or review the information below:
- After Successful login to Delivery Solutions page
- Click on the Profile Picture on upper right corner
- Click on theBusinesses Tab from the left side panel
- Click on Create Business button
- You will be redirected to Create Business Form as below. And this is how Create Business form looks like

- Fill in the details in the form.
- Click on Save button to create the business
Edit Business
Business details can be modified under Edit Business Section.
- After Successful login to Delivery Solutions page
- Click on the Profile Picture on upper right corner
- Click on theBusinesses Tab from the left side panel
- Click on
 button
- You will be redirected to Edit Business Form as below. And this is how Create Business form looks like
- Fill in the details in the form.
- Click on Save button to create the business
Table Of Content
Account
API Keys
When an Account gets created a default API key gets generated and sent to Account Manager for accessing Delivery Solutions APIs.
In this section user can create multiple API keys for the Account, which he can extend to different systems at their end, for example website or mobile app or separate API key for his digital partner to track the orders getting generated thought them separately.
Please note, Account Manager who is accessing these APIs needs to mention Tenant ID of business at the time of creating store or order under that business.
This is how our API & Services page looks like..
Create API Keys
Account Manager can create API Keys under API Key section.
- After Successful login to Delivery Solutions page
- Click on the Business Tab from the left side panel
- Select API Keys under the Business Section
- Click on Create API Keys button
- You will be redirected to Create API Key Form as below
- Click onSave button to create new attribute.
The Attribute Form seeks information for below fields:
| Field Name | Description |
|---|---|
| Key Name | Name of the API Key |
| API Key | A unique identification of the API Key It can be alphanumeric. It must start with Character. No Special Characters allowed.(except '_') |
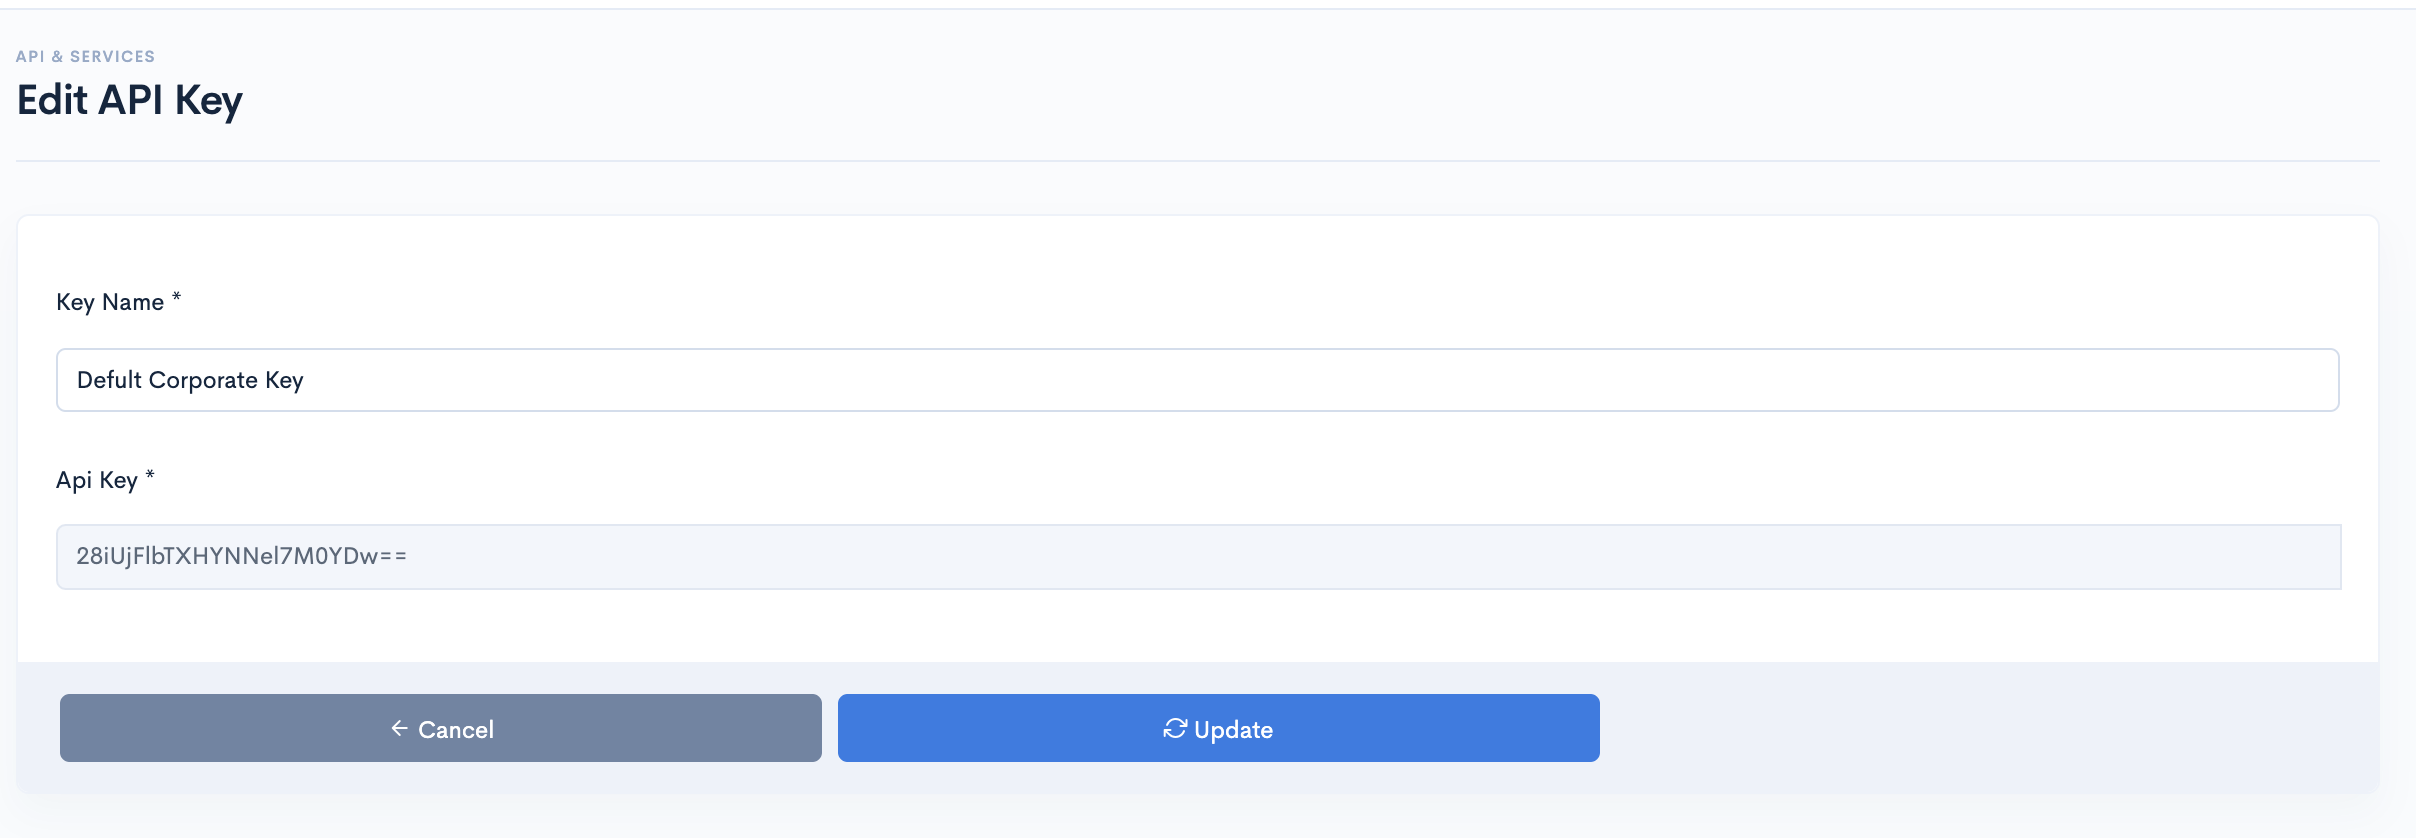
Edit API Key
An existing API Key can be edited.
- After Successful login to Delivery Solutions page
- Click on theBusiness Tab from the left side panel
- Select API Keys under the Business Section
- Click on button against the API Key
- You will be redirected to Edit API Key Form shown as below
- Click on “Update” once the changes have been done
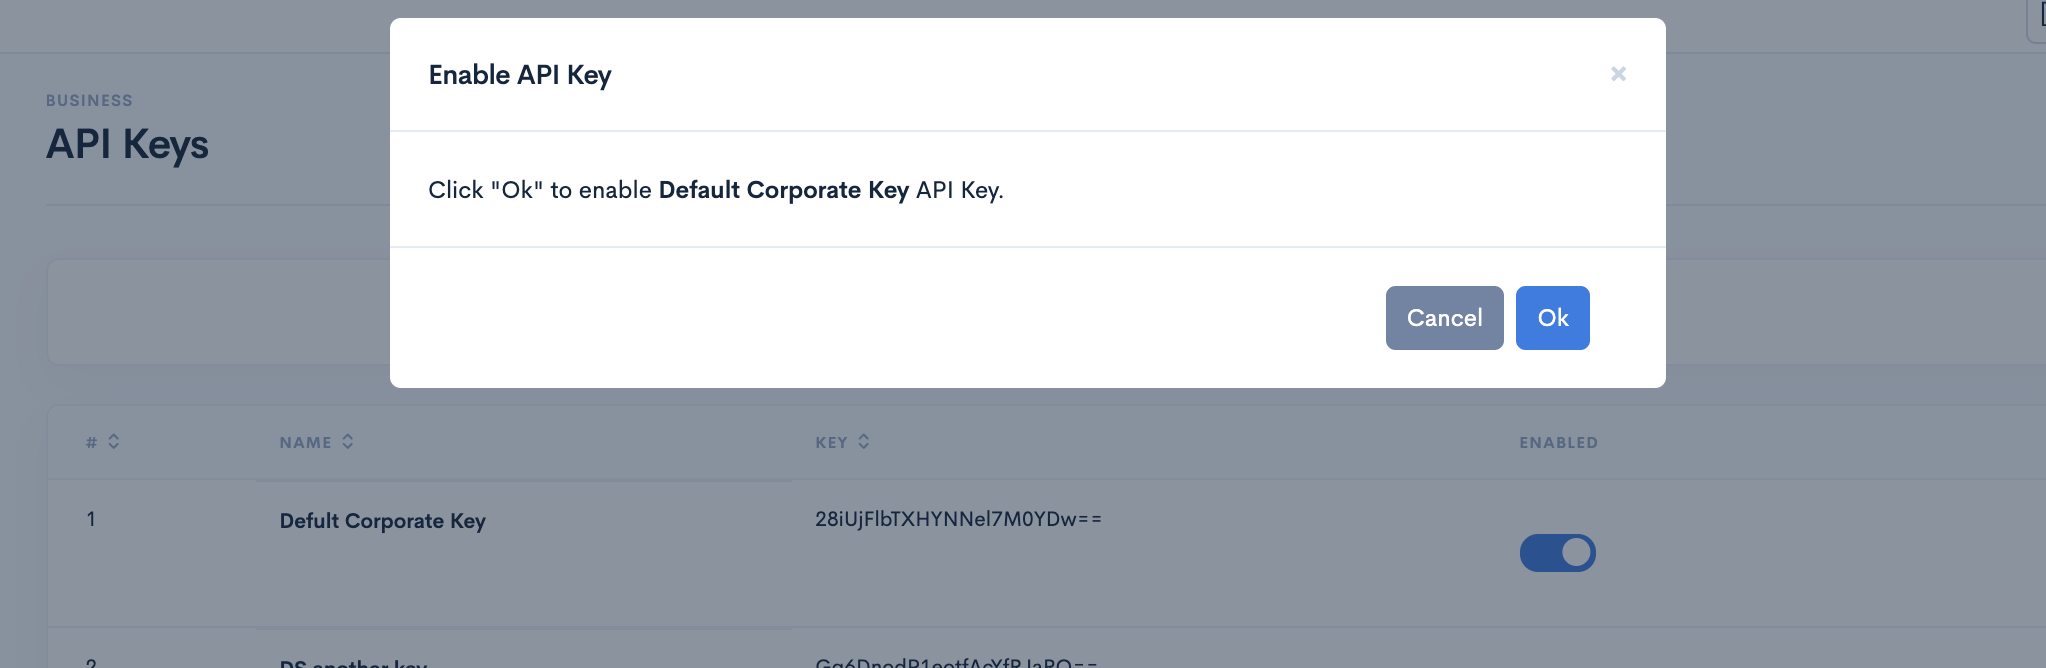
Enable or Disable API Keys
Instead of removing, Businesss can opt to make an API Key Enable or Disable.
- After Successful login to Delivery Solutions page
- Click on the Business Tab from the left side panel
- Select API Keys under the Business Section
- Click on the toggle button against the order API Keys to make it enabled for use.
- A dialog box will open shown as below to seek confirmation
- An Enabled API Keys Toggle Icon will look like this

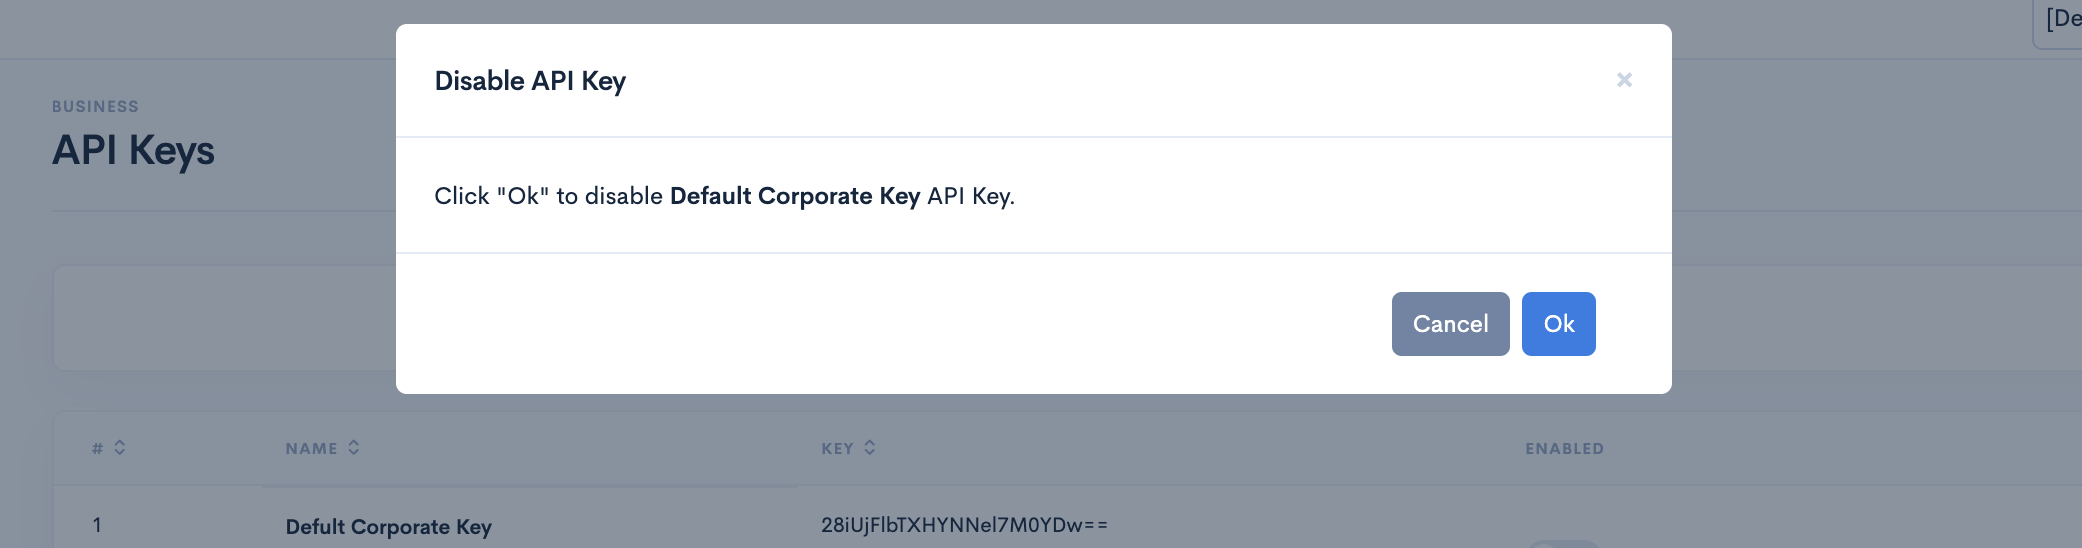
- Click on the toggle button against the order attribute to make it disable from use.
- A dialog box will open shown as below to seek confirmation
- A Disabled API Key Toggle Icon will look like this

Delete API Key
You can permanently remove an API Key.
- After Successful login to Delivery Solutions page
- Click on the Business Tab from the left side panel
- Select API Keys under the Business Section
- Click on the bin button
 against API Key Name to remove the API Key permanently
- A popup window will open as below to confirm the deletion
- Click on Ok button to delete the API Key permanently.
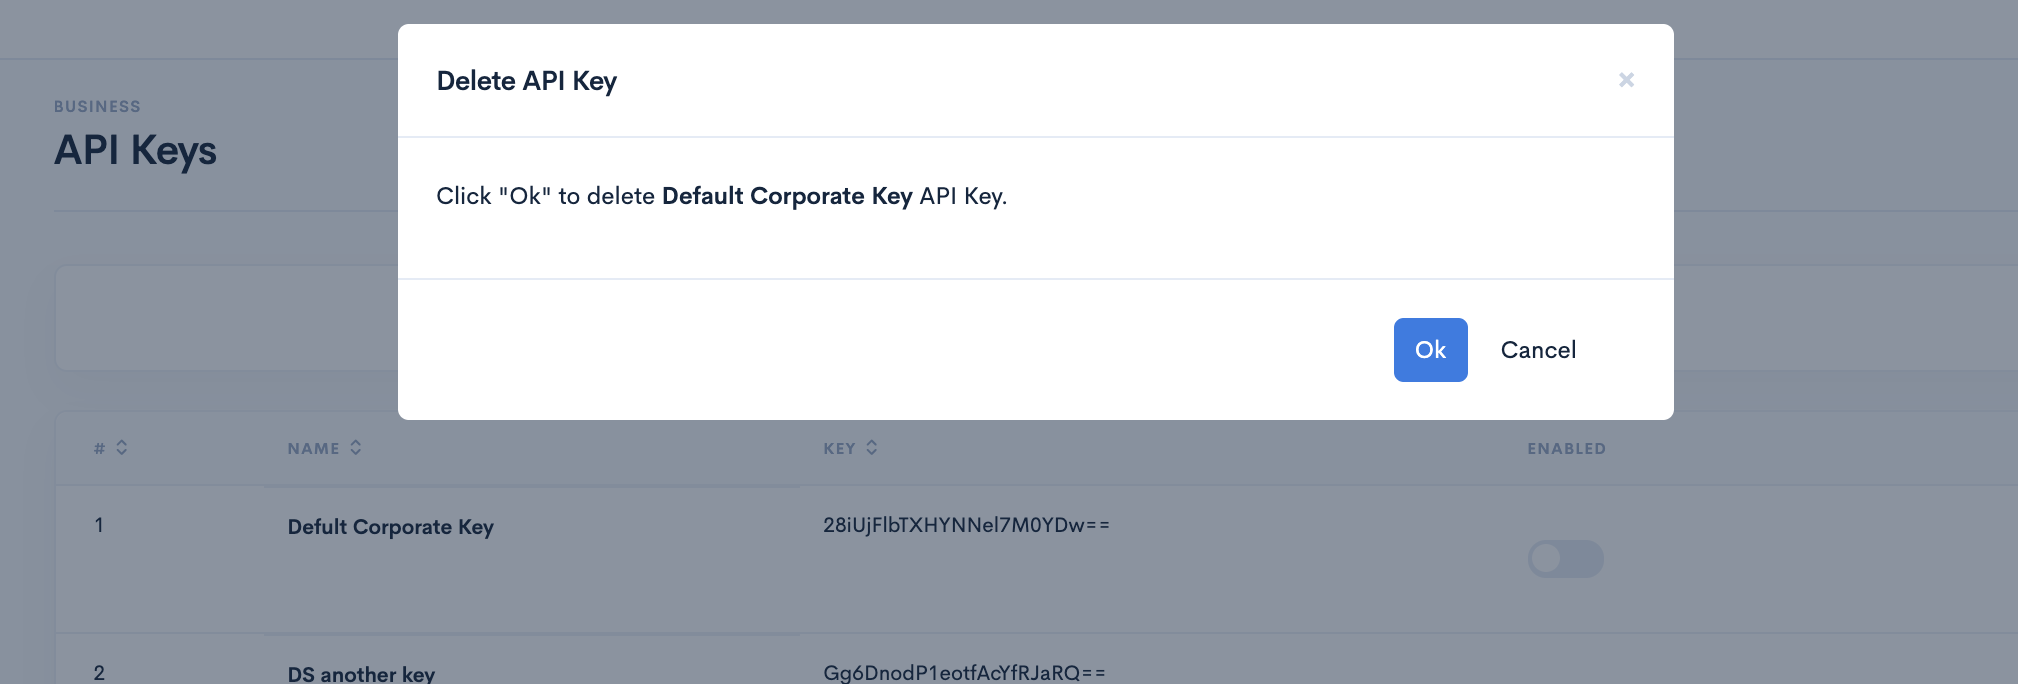
Table Of Content
Business
Our Business Section lets you manage your Profile, Brands, Pick Up Location, API Keys and so on.
Business
Profile
Profile interface shows business-specific configurations for your Orders and Notifications. For example, Business Name, Business Email, Notifications and so on.
- After Successful login to Delivery Solutions page
- Click on the Business Tab from the left side panel
- Select Profile under the Business Section
- You can view your Profile details on the right side panel.
This is how our Profile Section looks like..

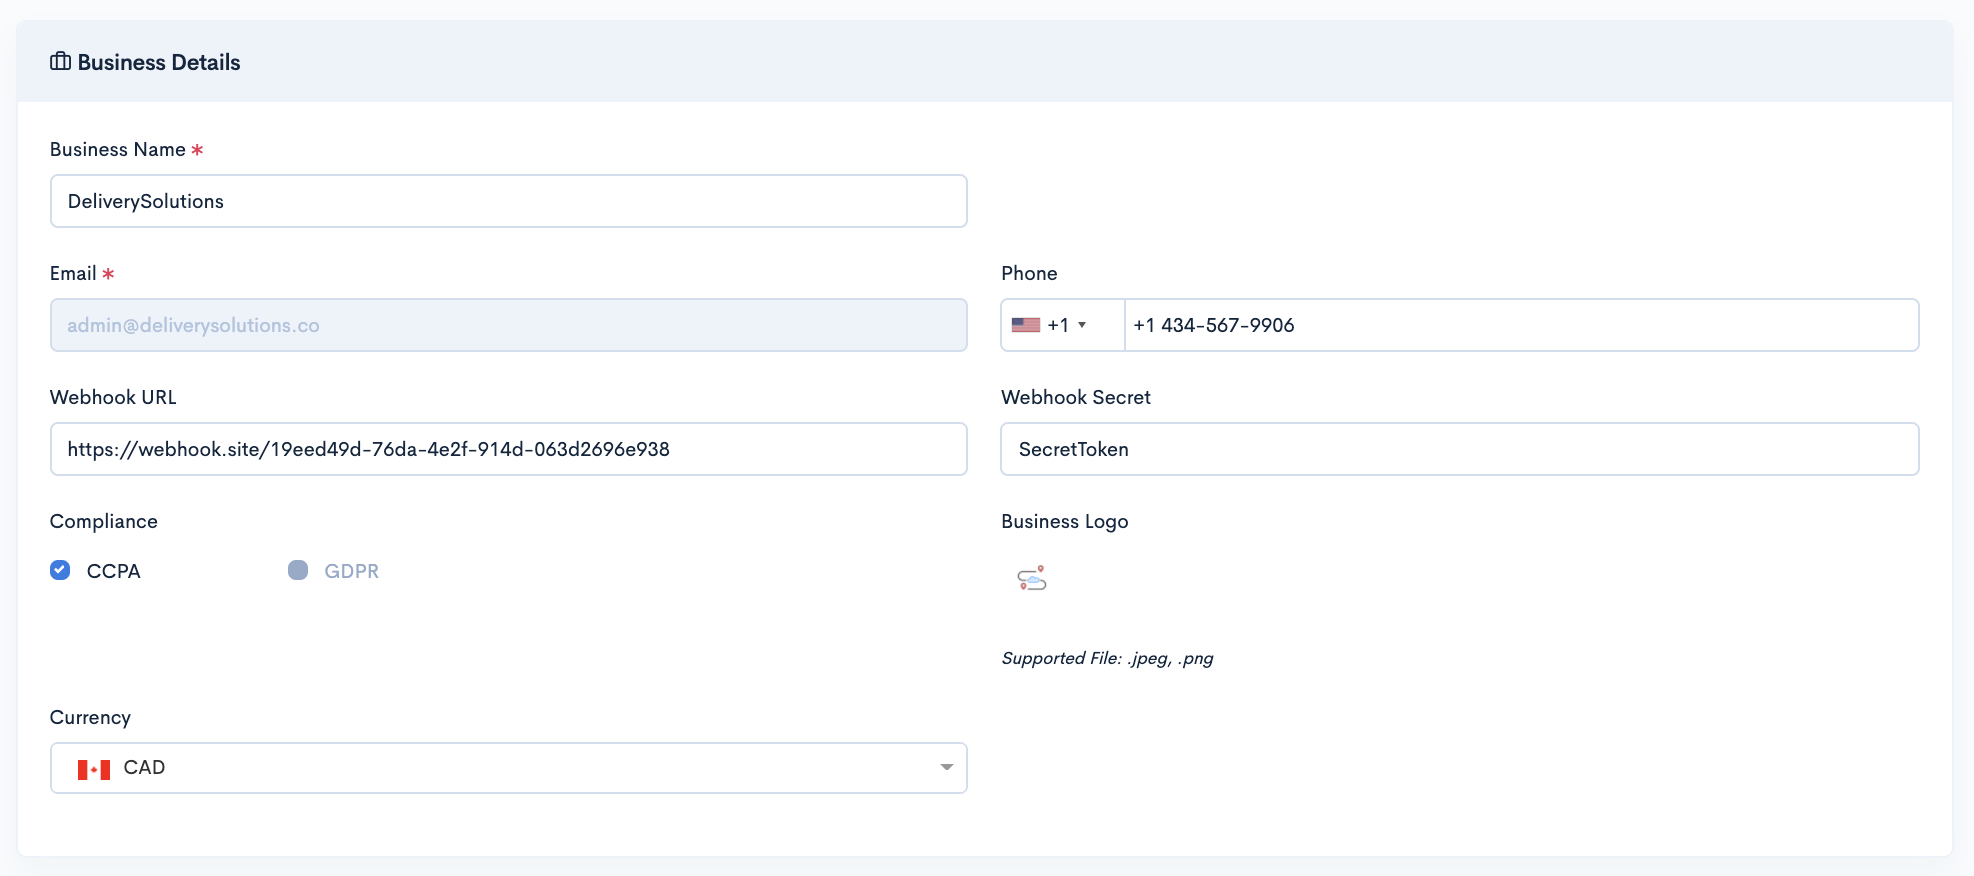
Business Details
Your Business details includes your Business name, registered Business email, phone number and webhook details. If you need to update your Business details, you can access it through edit option on the profile page.
To enter your details or update your current details, head to your Business section on your sidebar and select the Profile section. Once inside, you will be able to edit or fill in your profile details.
This is how your business details looks like..
- After Successful login to Delivery Solutions page
- Click on the Business Tab from the left side panel
- Select Profile under the Business Section
- Click on button.
- In the same panel, now your Profile details is in Edit mode.
- You can update your basic profile details under Profile Section.
Basic
The Update Profile seeks information for below fields:
| Field Name | Description |
|---|---|
| Business Name | Name of the Business |
| Business Email | Registered Email of Business |
| Phone | Registered Contact Number of Business |
| Webhook URL | URL to be configured in Delivery Solutions to send webhooks to Tenants |
| Webhook Secret | Secret Token to secure webhook requests |
| Compliance | CCPA and GDPR Compliance can be opted through this option |
Business Settings
Delivery Solutions Orders can be accesses through APIs using unique Order ID. These Order ID can be either External Business's Order ID or Delivery Solutions's own Order ID. Business Setting section lets you enable the External Business Order ID to be used to access Delivery Solutions orders.
This is how your business settings looks like..

- After Successful login to Delivery Solutions page
- Click on the Business Tab from the left side panel
- Select Profile under the Business Section
- Click on button.
- In the same panel, now your Profile details is in Edit mode.
- You can update your business settings details under Profile Section.
- Swipe Right the Unique External ID toggle to enable your ID ro access Delivery Solutions orders.
Important
If there are any duplicate orders exists in your delivery account prior to enabling Unique External ID. It will not allow you to do so. Please contact Delivery Solutions Support to enable the same for your account.
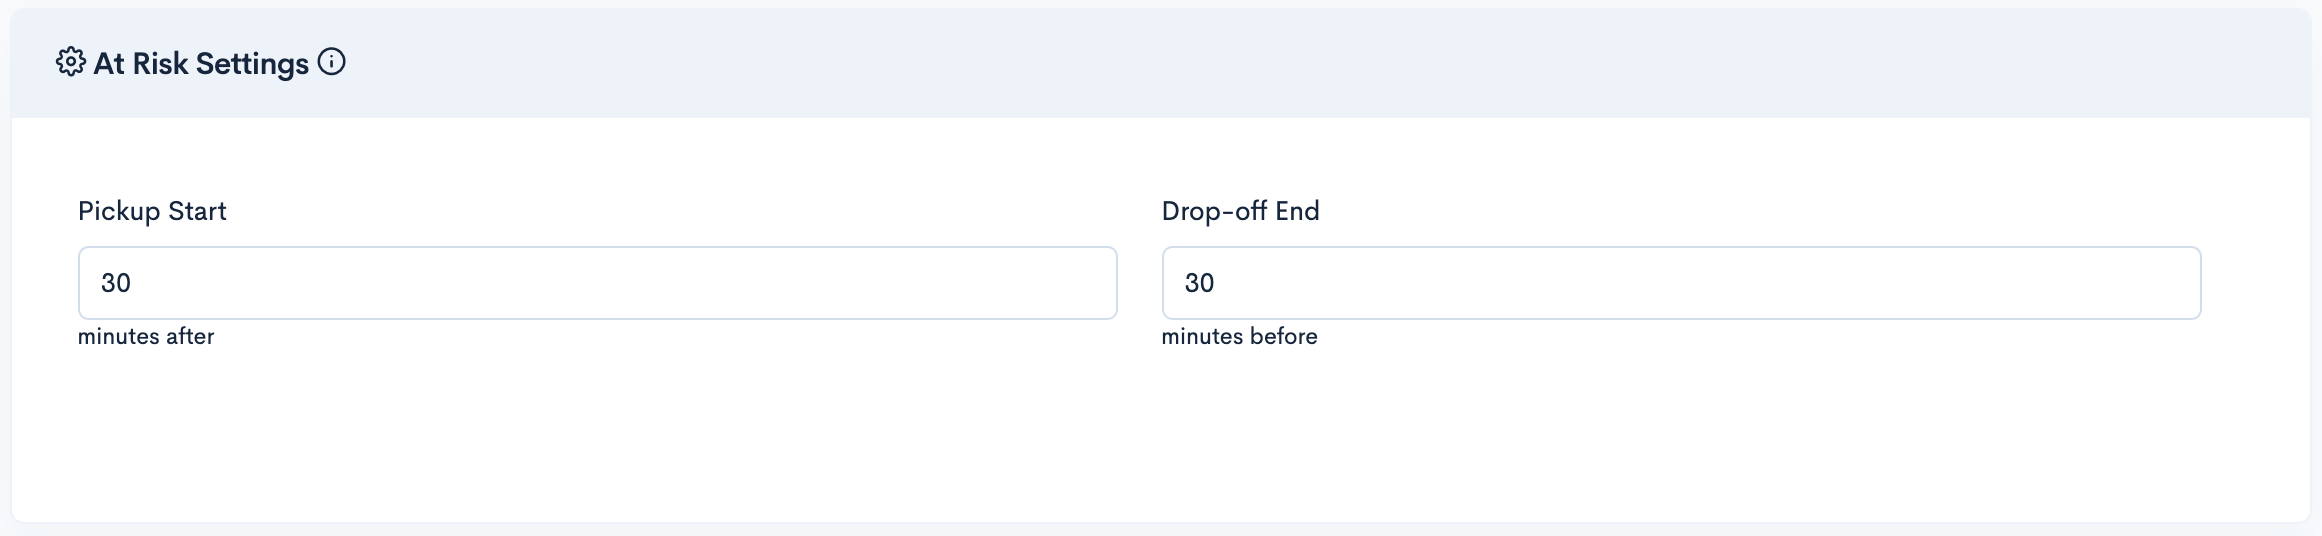
At Risk Settings
At Risk Settings section allows you to configure Order At Risk Settings. In this section you can set the limit on Status in minutes before/after which an order will be considered at Risk if remains in same status for long. The At Risk Settings are also available at the Store and Order level. The settings configured at the Business level will automatically inherited by the Stores and each of its Orders unless it is forcefully overridden.
This is how your At Risk Settings Section looks like..
- After Successful login to Delivery Solutions page
- Click on the Business Tab from the left side panel
- Select Profile under the Business Section
- Click on button.
- In the same panel, now your Profile details is in the Edit mode.
- You can update your At Risk settings under At Risk Settings Section
Basic
The At Risk section seeks information for below fields:
| Field Name | Description |
|---|---|
| Pickup Start | Pickup Start Time of Delivery in Minutes |
| Drop-off End | Drop Off End Time of Delivery in Minutes |
Important
At Risk Settings sections can only be visible in Edit mode.
Address
This section shows the correspondence address details
This is how your Address Section looks like..

- After Successful login to Delivery Solutions page
- Click on the Business Tab from the left side panel
- Select “Profile” under the Business Section
- Click on button.
- In the same panel, now your Profile details is in the Edit mode.
- You can update your address details under Address Section.
Basic
The Address section seeks information for below fields:
| Field Name | Description |
|---|---|
| Street | Street Address having Apartment Number and Street Name |
| Street1 | Street Name |
| City | City Name |
| State | State Name |
| Zip Code | Area Zip Code |
Configure Delivery Assurance
This section lets you set the priority of the Delivery Assurance. The Delivery Assurance Priority can be either Zips or Polygon.
This is how your Delivery Assurance Section looks like..

- After Successful login to Delivery Solutions page
- Click on the "Business” Tab from the left side panel
- Select “Profile” under the Business Section
- Click on button.
- In the same panel, now your Profile details is in the Edit mode.
- You can update your DS priority under Delivery Assurance Section.
Basic
The Delivery Assurance section seeks information for below fields:
| Field Name | Description |
|---|---|
| Priority | Zip Code or Polygon can be given as a default priority |
Profile
Smart Windows
Smart Windows helps to configure the operating hours of Business, Brands and Pick Up Locations. It can be set at Business, Brand and at Pick Up Location level.
Smart Windows API generates Slots for a given day. Based on that, Business, Brand and Pick Up Location operational hours can be set.
Timings Category
Operational Timings can be set for below categories.
- Business: Timings created under this category becomes applicable to all the Brands and Pick Up Locations under the business.
- Brand: Timings created under this category becomes applicable to all the Pick Up Locations under the Brand.
- Pick Up Location: Timings created under this category becomes applicable to the Pick Up Location for which Timing has been created.
There are other categories which is common in all the levels (Business, Brand and Pick Up Location).
- Curbside Pickup: Timings created under this category becomes applicable to orders which are placed online and picked up at the store.
- Delivery: Timings created under this category becomes applicable to all the orders which are scheduled for deliveries through DSPs.
- After Successful login to Delivery Solutions page.
- Click on the Business Tab from the left side panel.
- Select Smart Windows under the Profile Section to set Business level operating hours.
Or
- After Successful login to Delivery Solutions page.
- Click on the Business Tab from the left side panel.
- Click on the Brand ID or View icon under Brands to see the Smart Windows section.
Or
- After Successful login to Delivery Solutions page.
- Click on the Business Tab from the left side panel.
- Click on the Pick Up Location ID or View icon under Pick Up Locations to see the Smart Windows section.
This is how our Smart Window page looks like..

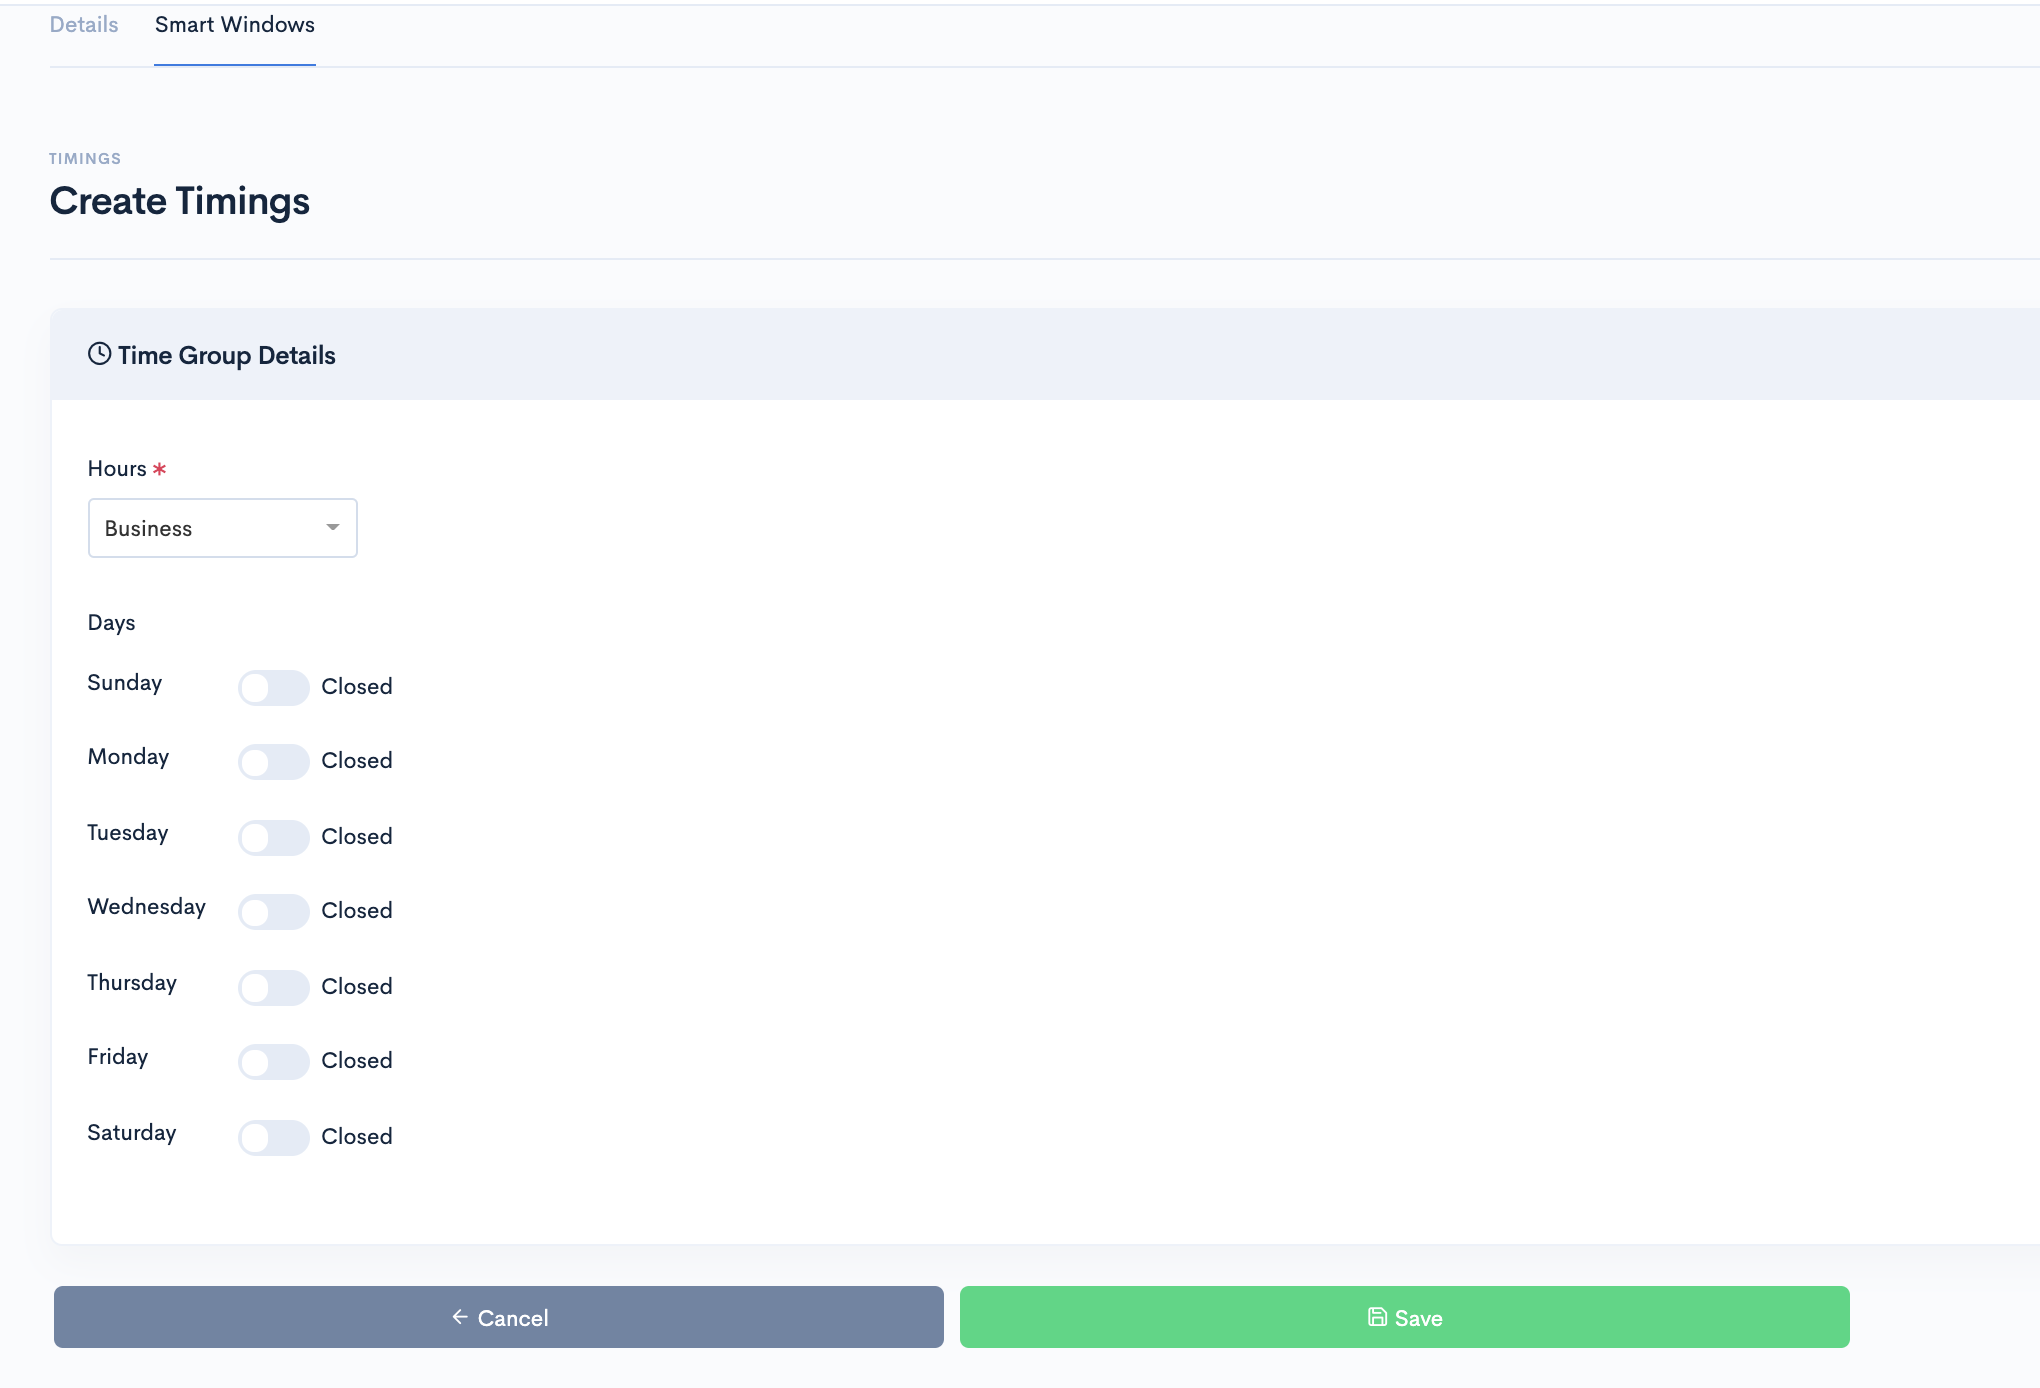
Create Timings
Create Timings option is available at each level. As mentioned earlier Timings can be created for different categories. Delivery Solutions allows to create them for a week and same will be repeated by default.
This is how your create timings page looks like..
Basic
The Create Timings form seeks information as below:
| Field Name | Description |
|---|---|
| Hours | Category in which timing needs to be created. In case of Curbside Pickup and Delivery, pick and pack time can be set. |
| Days | Days for which it needs to be enabled and set. |
Edit Timings
A few fields under existing Timings can be updated through Edit option.
Edit Timings page looks just like create Timings page.
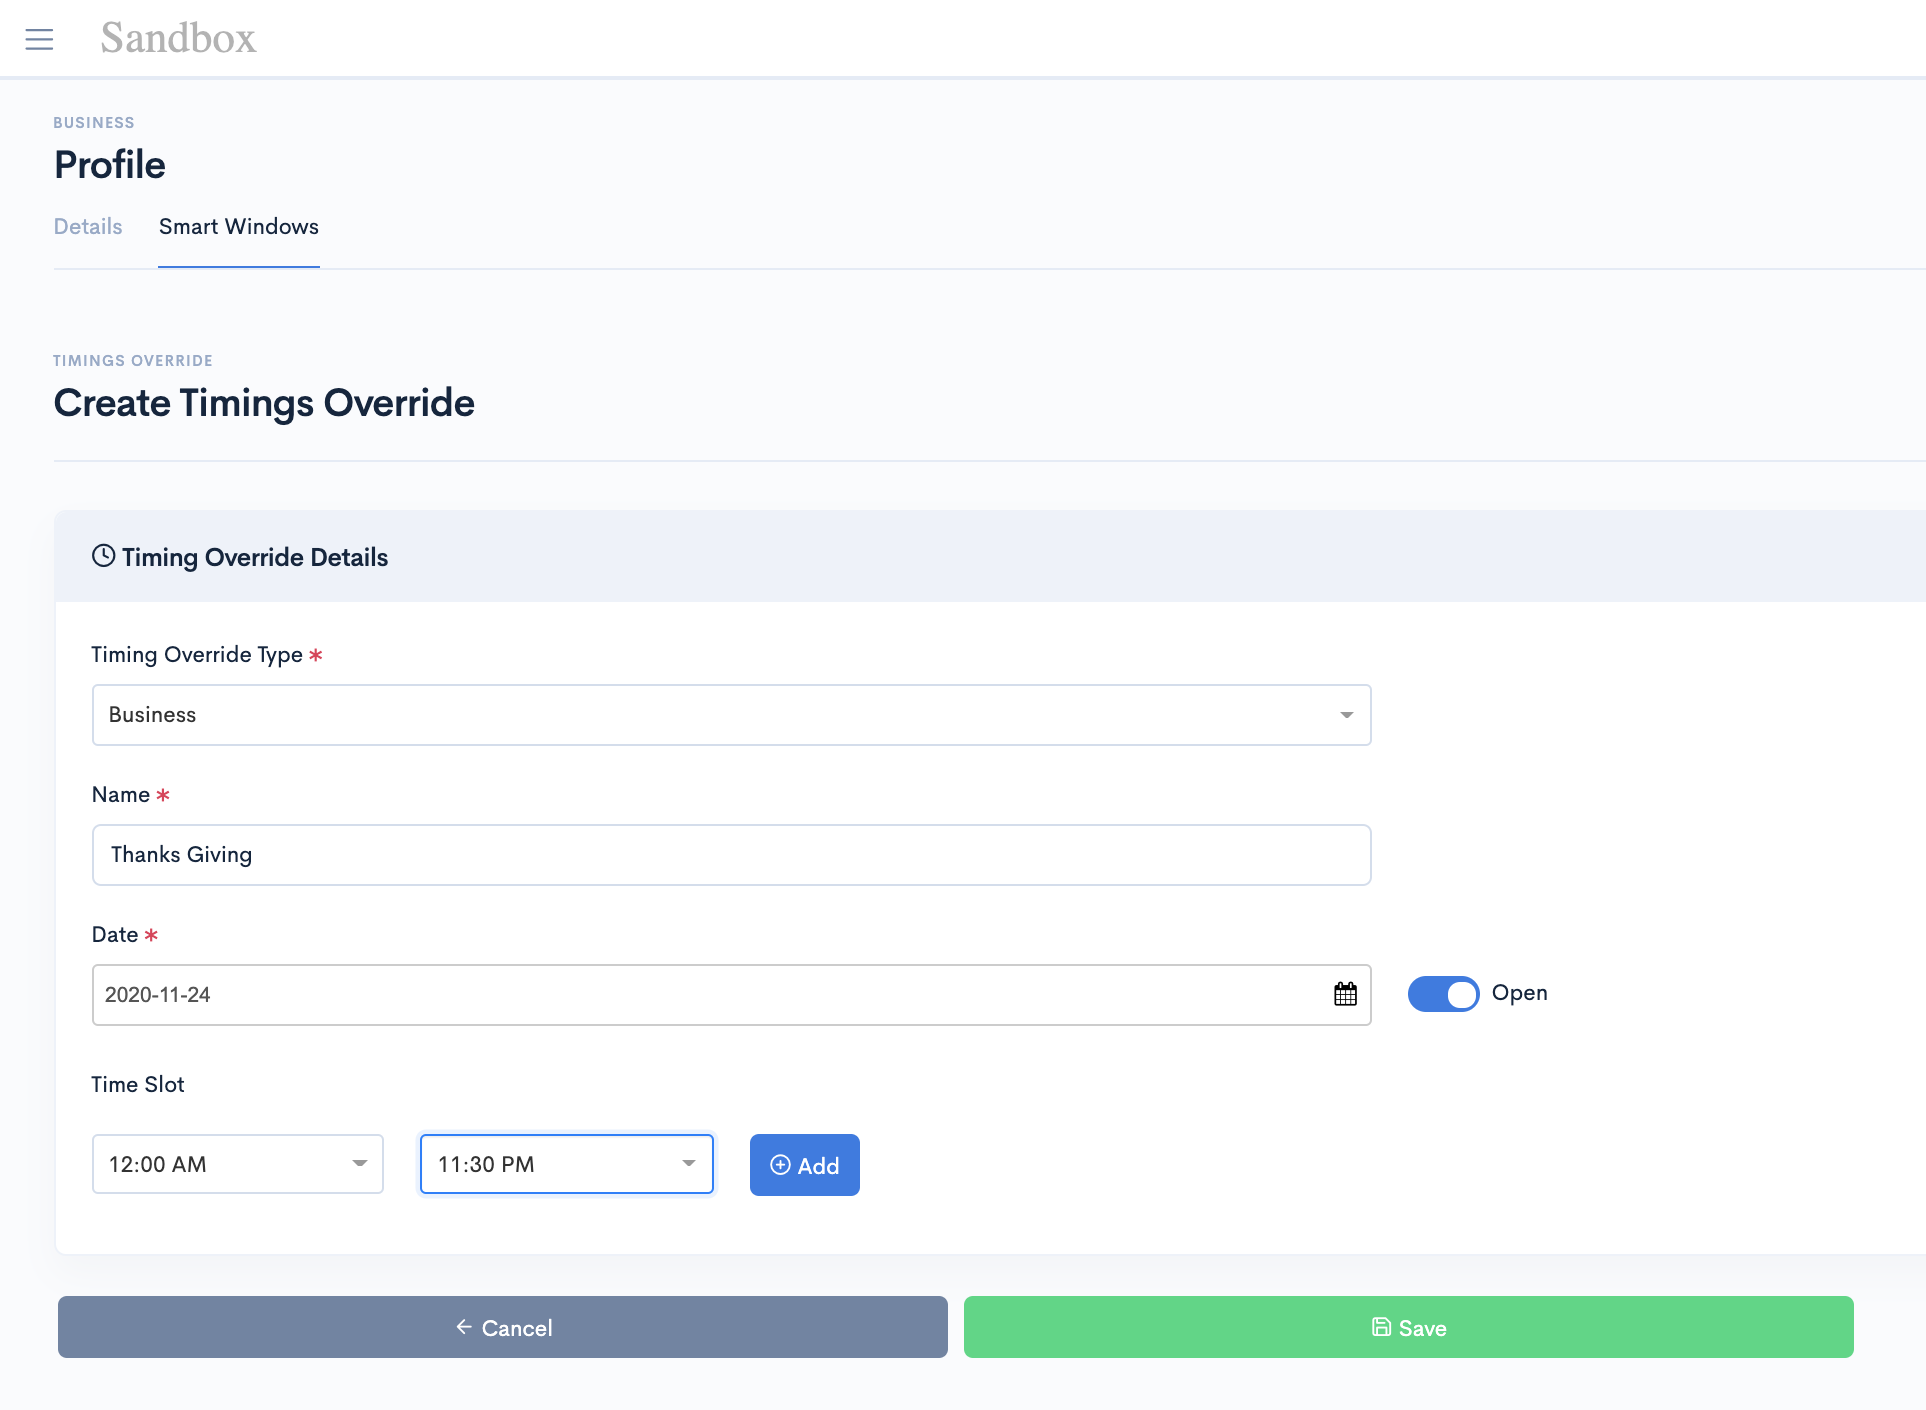
Create Override
Override will let you create exceptional timings which will override the existing timings. Eg. Creating a new override to define the store operational hours during Thanksgiving.
Override timings can be created at all the level i.e Business, Brands and Pick Up Locations.
This is how your create brand page looks like..
Basic
The Create Override form seeks information as below:
| Field Name | Description |
|---|---|
| Timing Override Type | This option lets you select the categories like Business, Brands, Stores, Curbside Pickup and Delivery. |
| Name | Override Name |
| Date | Date for which override needs to be created. |
| Tim Slot | A Time Range or 24 hours option. |
| Pick and Pack Time | Time taken to pick and pack. |
Edit Override
A few fields under existing Override can be updated through Edit option.
Edit Timings page looks just like Create Override page.
Business
Brands
Brands interface shows business-specific configurations for your Orders and Notifications. For example, Brand Name, Brand ID and so on.
Brand Name mainly identifies a brand under business, Brand ID is a unique identification in Delivery Solutions for a particular brand under business. While creating store under any brand “Brand ID” enforces that the store gets created under that brand only. Delivery Solutions allow Business Admin to define brand logo as well which gets printed on label of Packages.
- After Successful login to Delivery Solutions page
- Click on the “Business” Tab from the left side panel
- Select “Brands" under the Business Section
- You can view your Profile details on the right side panel.
This is how our Brand Section looks like..

Create Brand
Your Brand details includes your Brand name, Brand ID, registered Brand email, phone number and Address details. If you need to update your Business details, you can access it through edit option on the profile page.
To enter your details or update your current details, head to your Business section on your sidebar and select the Brand section. Once inside, you will be able to edit or fill in your Brand details.
This is how your create brand page looks like..

- After Successful login to Delivery Solutions page
- Click on the "Business” Tab from the left side panel
- Select “Brands” under the Business Section
- Click on button.
- In the same panel, now your Brand is in Edit mode.
- You can update your brand details under Create Brand Section.
Basic
The Create Brand Form seeks information as below:
| Field Name | Description |
|---|---|
| Brand Name | Name of the Brand |
| Brand ID | Unique ID of Brand |
| Description | A brief description about brand. |
| Brand Logo | Logo of a Brand to identify it. |
| Address | Address of the Store or Brand Location. |
- At Risk Settings
- Address
At Risk Settings
At Risk Settings section allows you to configure Order At Risk Settings. In this section you can set the limit on Status in minutes before/after which an order will be considered at Risk if remains in same status for long. by default this setting is inherited from Business level. If particular Brand need customised At Risk Settings, you can uncheck "Business Settings (Default)" and can set your priority timings for At Risk Settings here.
This is how your At Risk Settings Section looks like..

- After Successful login to Delivery Solutions page
- Click on the "Business” Tab from the left side panel
- Select “Brands” under the Business Section
- Click on button.
- In the same panel, now your brand is in the Edit mode.
- You can update your At Risk details under At Risk Settings Section
Basic
The At Risk section seeks information for below fields:
| Field Name | Description |
|---|---|
| Pickup Start | Pickup Start Time of Delivery in Minutes |
| Drop-off End | Drop Off End Time of Delivery in Minutes |
Important
At Risk Settings sections can only be visible in Edit mode.
Address
This section shows the correspondence address details
This is how your Address Section looks like..
- After Successful login to Delivery Solutions page
- Click on the Business Tab from the left side panel
- Select “Brands” under the Business Section
- Click on button.
- In the same panel, now your Profile details is in the Edit mode.
- You can update your brand address under Address Section.
Basic
The Address section seeks information for below fields:
| Field Name | Description |
|---|---|
| Street | Street Address having Apartment Number and Street Name |
| Street1 | Street Name |
| City | City Name |
| State | State Name |
| Zip Code | Area Zip Code |
Edit Brand
A few fields under existing brand can be updated through Edit option in Brand Page. Please note that brandExternalId once created cannot be updated.
This is how your Edit Brand Section looks like..
- After Successful login to Delivery Solutions page
- Click on the "Business” Tab from the left side panel
- Select “Brands” under the Business Section
- Click on button.
- In the same panel, now your Profile details is in the Edit mode.
- You can update your brand details under Edit Brand Section.
Basic
The Edit Brand will open the Edit Brand form seeking the same information as of Create Brand.
Enable or Disable Brand
A brand can be enabled or disabled but cannot be deleted. Since all the stores are required to be under a brand. It is prohibited to delete a brand. Once the brand is disabled, customers cannot place order with stores under that brand.
This is how your Brand Page Section looks like..

- After Successful login to Delivery Solutions page
- Click on the "Business” Tab from the left side panel
- Select “Brand” under the Business Section
- Swipe left the toggle button to disable the brand.
- After Successful login to Delivery Solutions page
- Click on the "Business” Tab from the left side panel
- Select "Brands" under the Business Section
- Swipe right the toggle button to enable the brand.
Set Default Brand
A brand can be set as default. This will help orders to use default brand when brandExternalId is not passed in Create Delivery. It will automatically show default brand in the list.
This is how your Brand Page Section looks like..
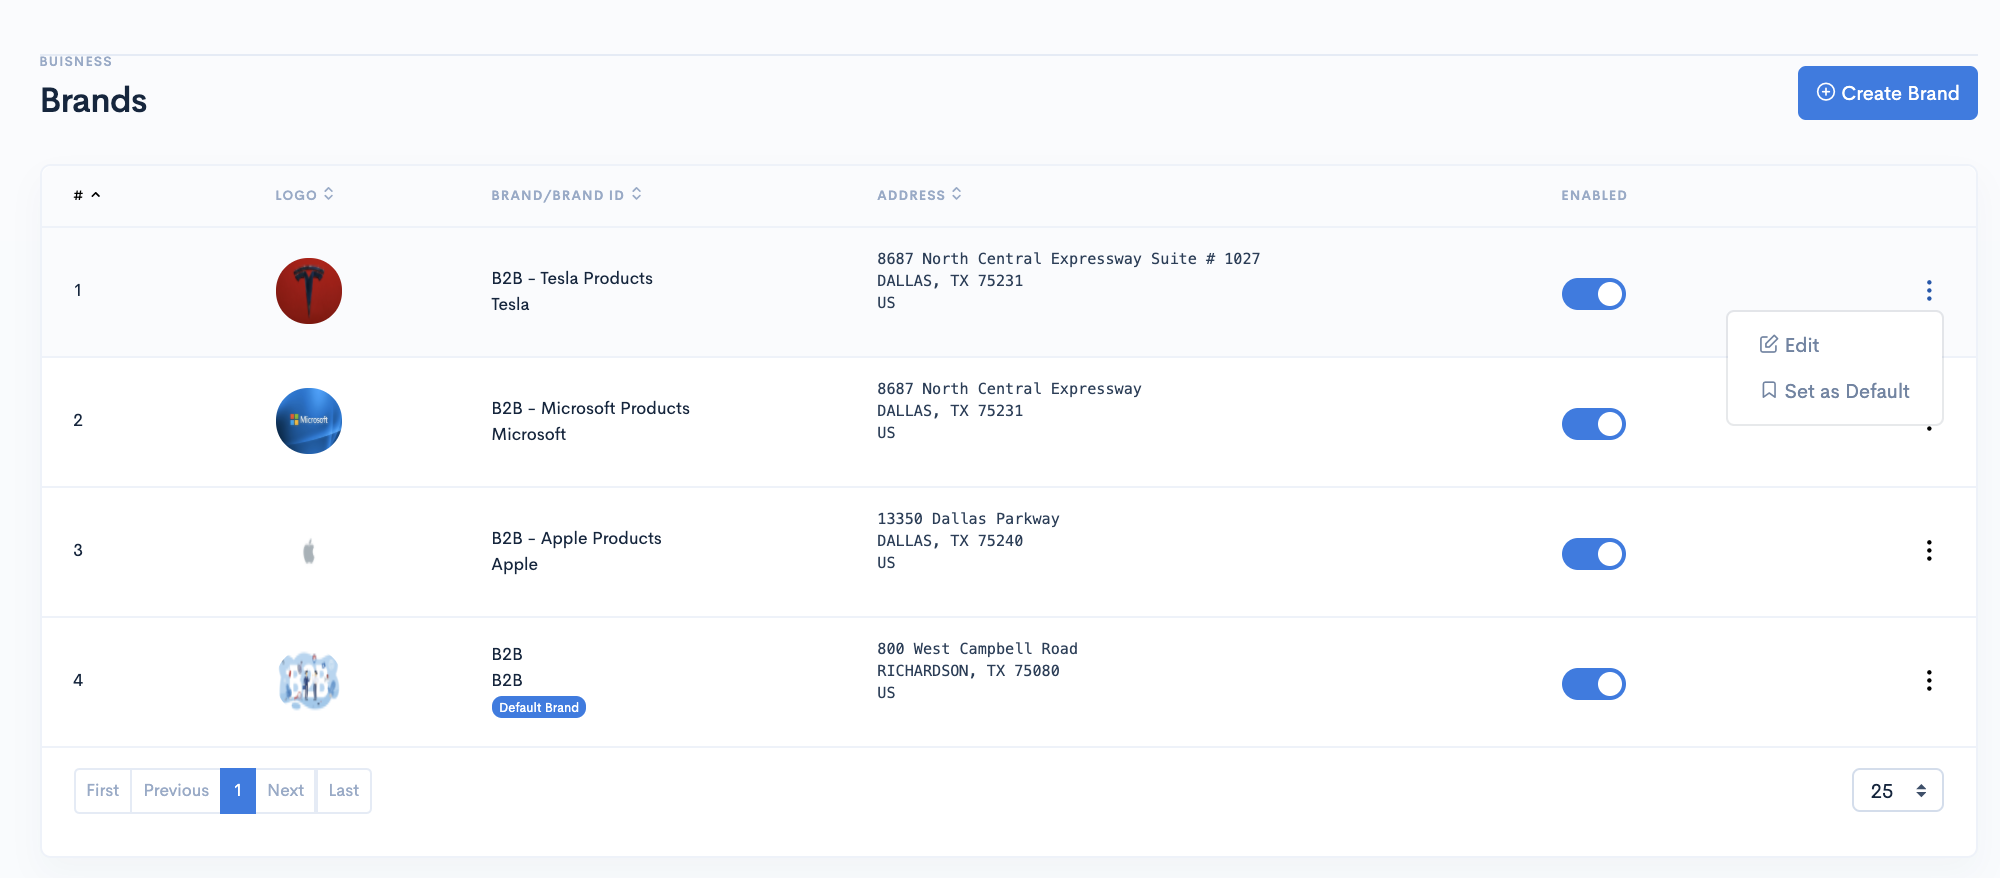
- After Successful login to Delivery Solutions page
- Click on the "Business” Tab from the left side panel
- Select “Brand” under the Business Section
- Click on options button (3 vertical dots) against the brand name.
- Click on Set As Default to set the brand as Default.
Table Of Content
Business
Pick Up Location
To manage your pickup location details or update your current store details, head to your Business Section on your left sidebar and select the Pick Up Location section. Once inside, you'll be able to edit or fill in your card details.
This is how our Pick Up Location page looks like..
- After Successful login to Delivery Solutions page
- Click on the Business Tab from the left side panel
- Select Pick Up Location under the Business Section
- You can view your Pick Up Location details on the right side panel.
Create Store
This interface lets you create a new store. It seeks basic details of the store location.
This is how your Create Store Page looks like..
- After Successful login to Delivery Solutions page
- Click on the “Business” Tab from the left side panel
- Select “Pick Up Location” under the Business Section
- Click on the Create Store button in Pick Up Location Page
- You will be redirected to a Create Store Form
- Fill in the Mandatory Store Details
- Click on “Save” to save the changes.
- You can view your newly created store in Store Listing
Store Details:
Store details section takes basic details of the store such as store name, description of the store, store id and so on.
This is how your Store Details Section looks like
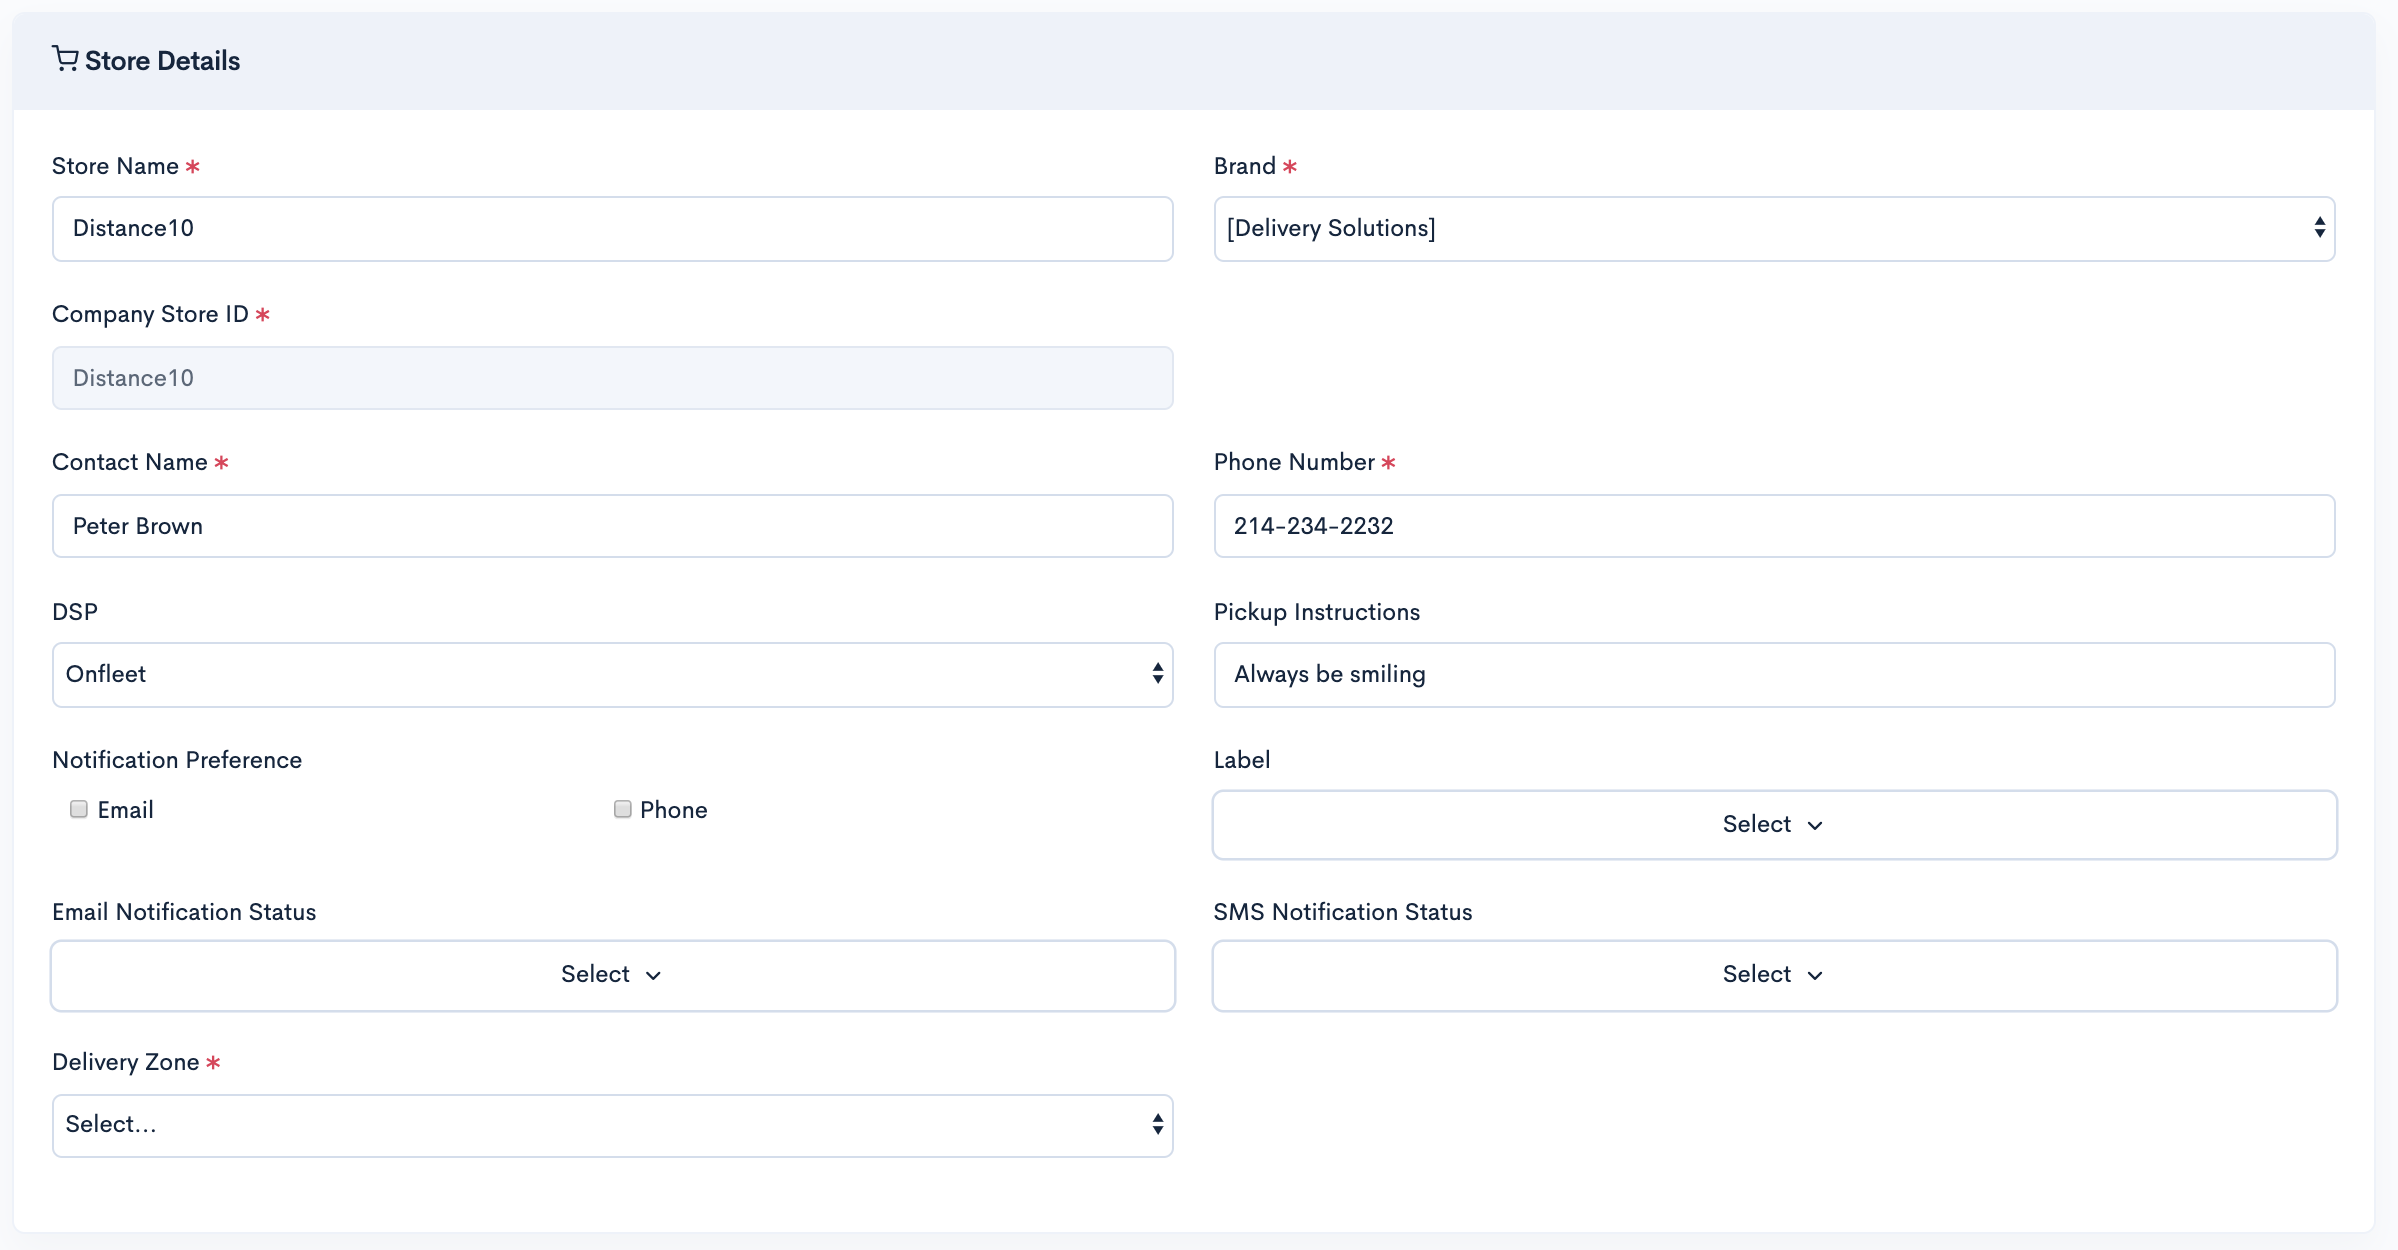
Basic
The Store Details section seeks information for below fields:
| Field Name | Description |
|---|---|
| Store Name | Name of the store |
| Description | A brief description about the store |
| Company Store ID | Unique Store ID |
| Contact Name | Store Manager/Contact Person Name |
| Phone | Phone number of the Store Contact Person |
| DSP | Delivery Service Provider of the Store |
| Pickup Instructions | Additional information regarding Pickup |
| Label | Single or Multiple Store Label options |
At Risk Settings:
At Risk Section allows you to set the minutes for the orders which can possibly at Risk After Pickup or Before Drop-Off. The delay in minutes mentioned in this section will measure how much the delivery of an order is at risk.
This is how your Store Details Section looks like

Basic
The At Risk Settings section seeks information for below fields:
| Field Name | Description |
|---|---|
| Profie Settings (Default) | Business can override Business level settings at store level by checking this option |
| Pickup Start | An order to be considered at risk after crossing no. of minutes post pickup |
| Drop-off End | An order to be considered at risk after crossing no. of minutes before drop-off |
Dispatch Settings:
Dispatch Settings section allows you to configure Default Dispatch Settings of an order from this store.
This is how your Store Details Section looks like
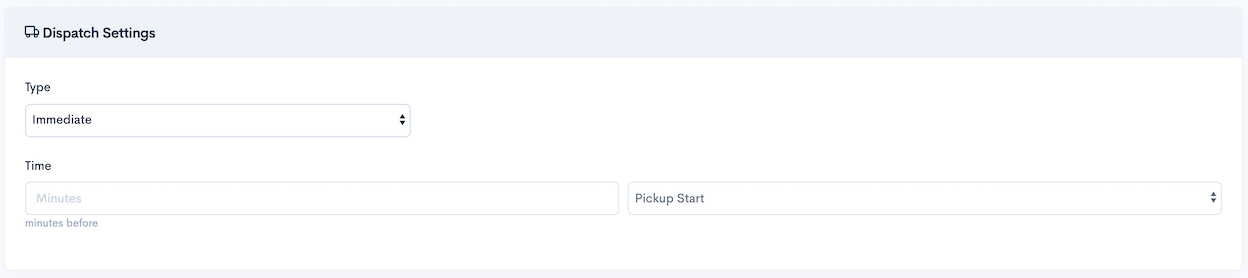
Basic
The Dispatch Settings section seeks information for below fields:
| Field Name | Description |
|---|---|
| Type |
Business Settings (Immediate): Default settings set in Business section for stores Immediate: Dispatch Order to DSP Immediately Manual: DS stores the order and wait for the manual intervention to release it to DSP Schedule: DS stores the order and releases to DSP as per scheduling |
| Time | In case of Scheduled type, DS stores minutes before pickup starts |
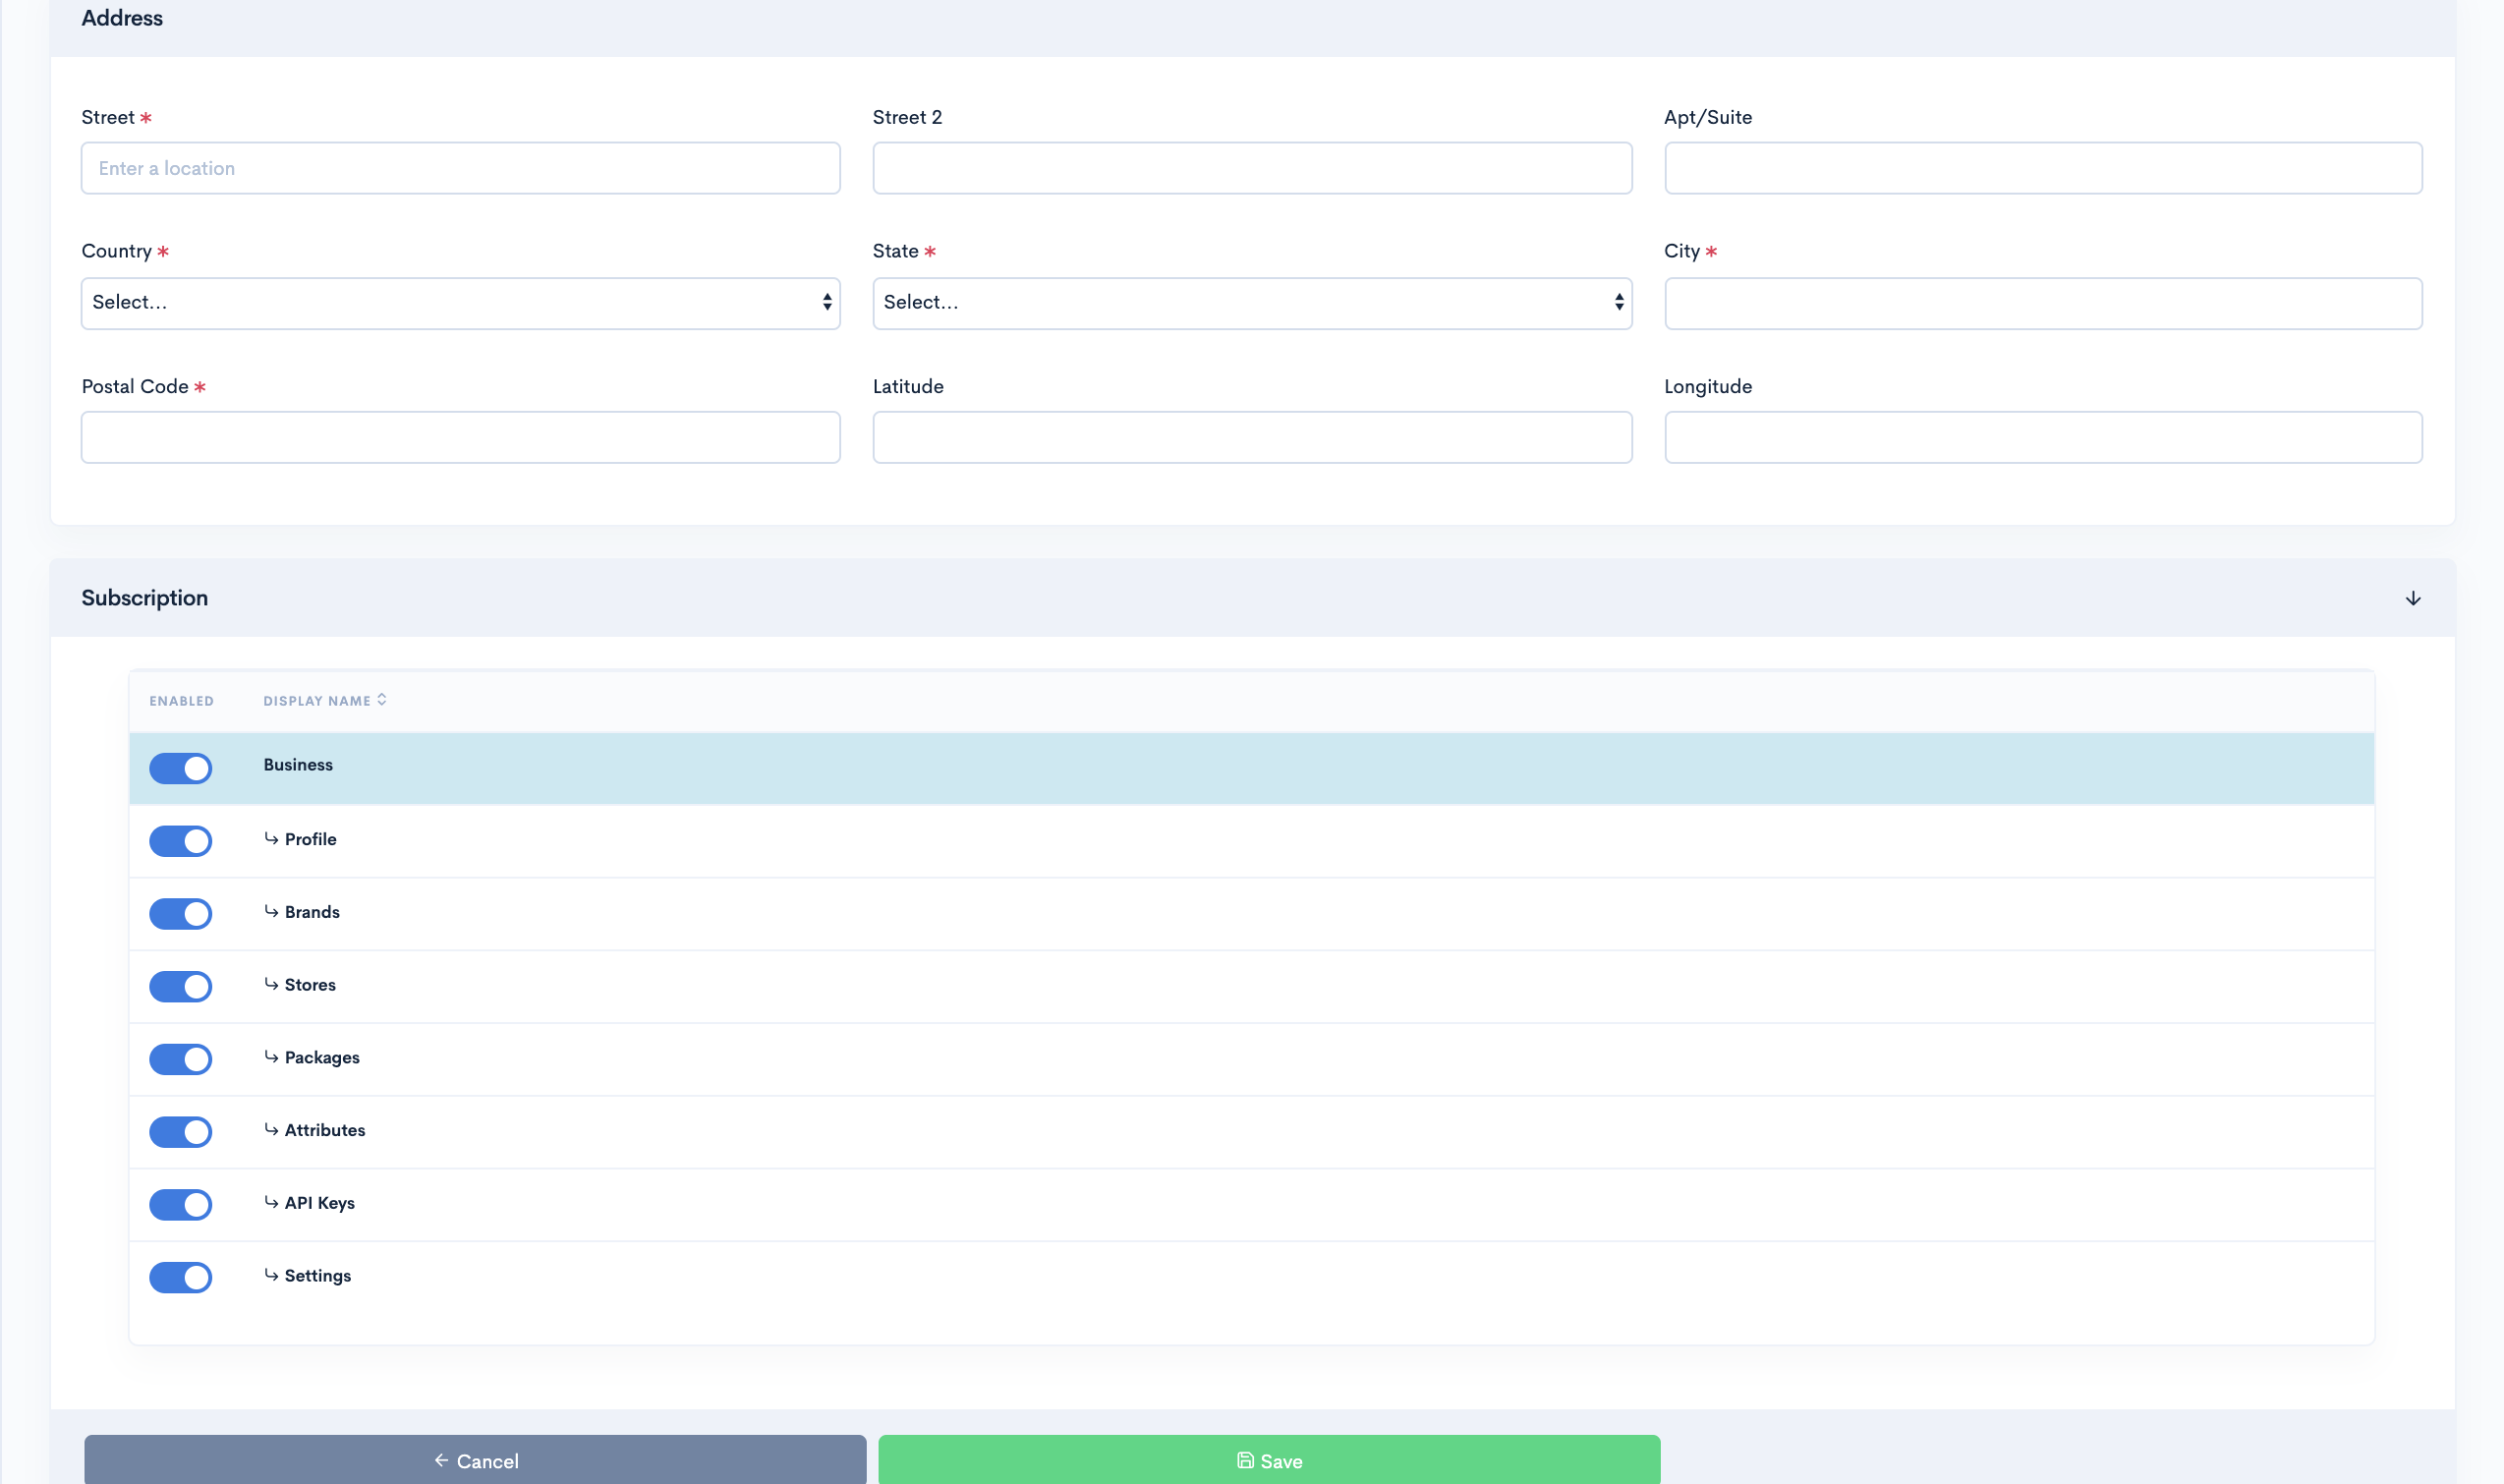
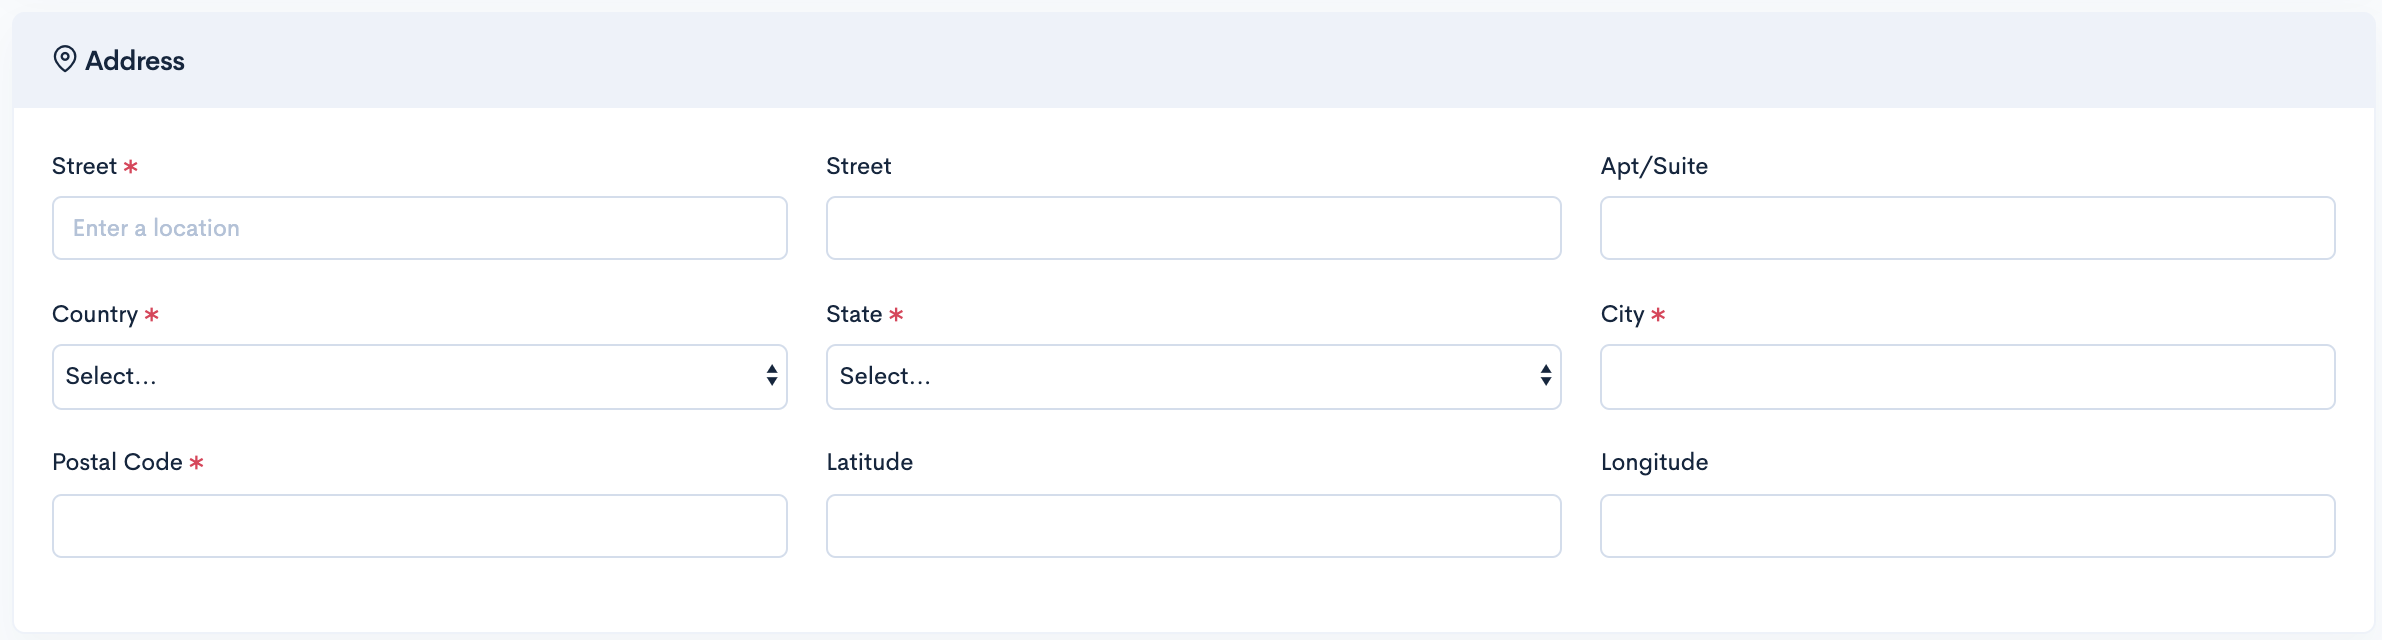
Address
This section shows the correspondence address details of the store.
This is how your Address Section looks like
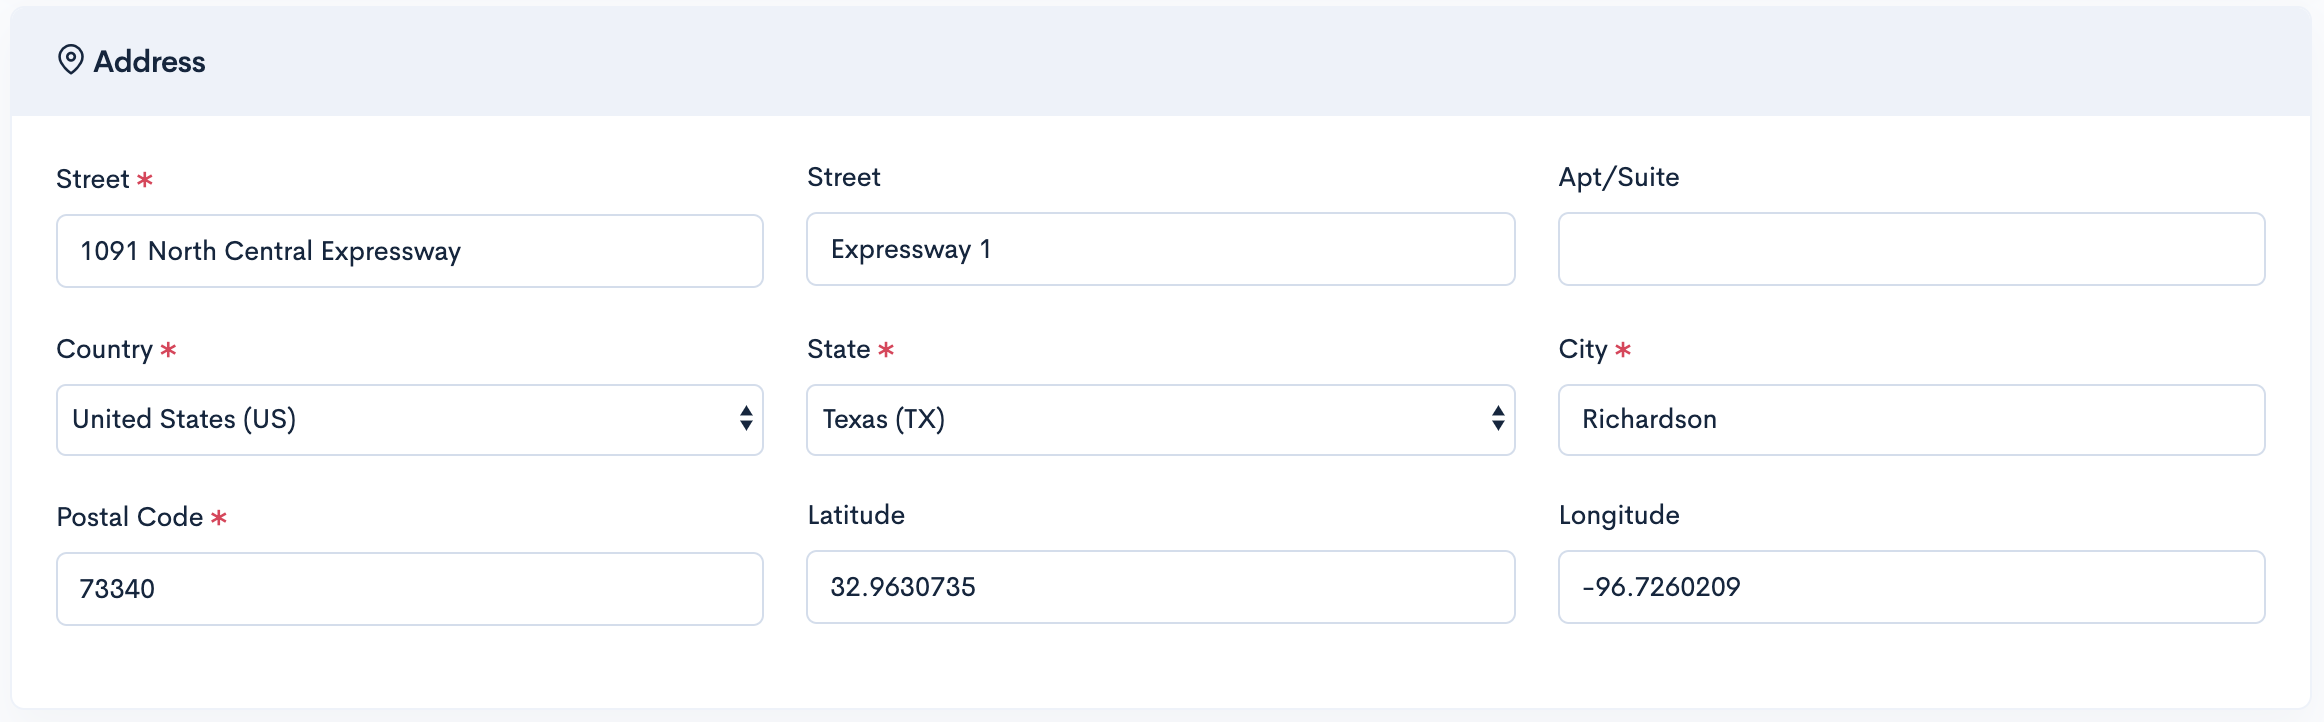
Basic
The Address section seeks information for below fields:
| Field Name | Description |
|---|---|
| Street | Street Name or Landmark Details |
| Street2 | Street Name |
| Apt/Suite | Apartment or Suite Number |
| City | City Name |
| State | State Name |
| Country | Country Name |
| Postal Code | Area Zip Code |
| Latitude | Latitude Details of the Store |
| Longitude | Longitude Details of the Sore |
Departments
This section allows you to create multiple departments for a store during the store creation process. You can add as many departments as you want for a store.
This is how your Departments Section looks like
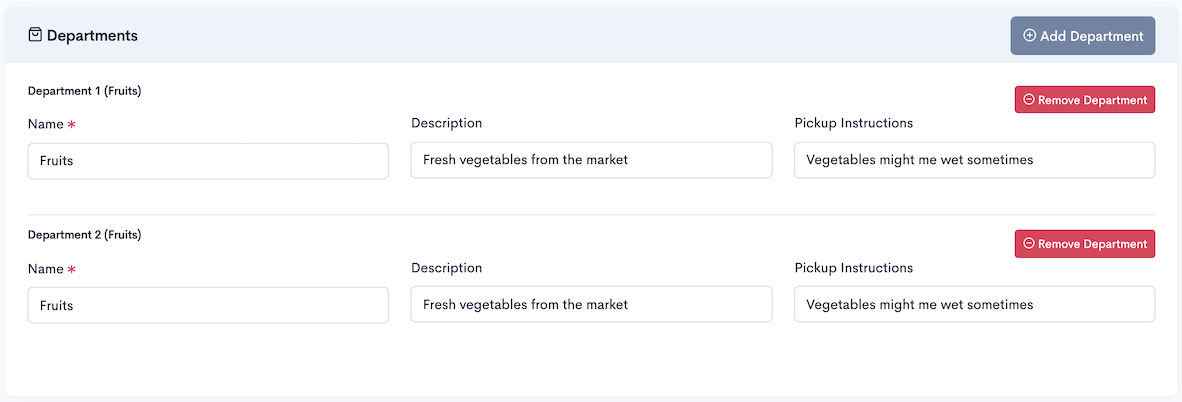
Basic
The Departments section seeks information for below fields:
| Field Name | Description |
|---|---|
| Name | Name of the department |
| Description | Brief description about the department |
| Pickup Instruction | Pickup instructions for the department such as pickup time is between 6 to 7 PM |
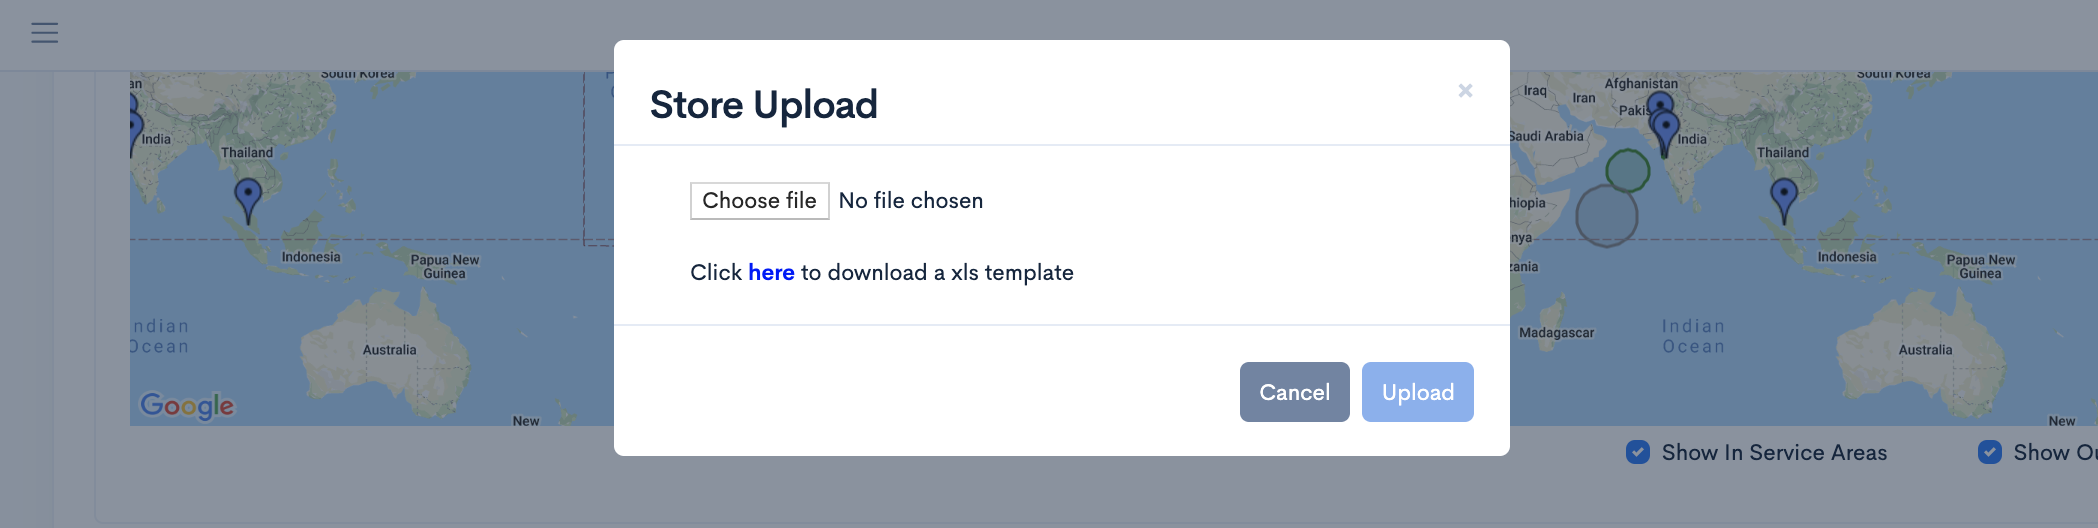
Upload Store
In case you wish to create multiple stores, our upload store feature lets you create multiple stores just at one click by uploading list of stores in a CSV/Excel file.
- After Successful login to Delivery Solutions page
- Click on the “Business” Tab from the left side panel
- Select “Pick Up Location” under the Business Section
- Click on the Upload button in Pick Up Location Page
- A dialog box will open to upload the file as below.
- You can download the Store Template in case you do not know the format.
- In order to upload the stores, upload xlsx/csv file using “Choose File” option
- Fill in the Mandatory Store Details
- Click on “Save” to save the changes.
- You can view your newly created stores in Store Listing.
Enable or Disable Store(s)
Enable or Disable the store just by clicking the toggle button. The disabled stores will not be reflected in the Service Coverage.
- After Successful login to Delivery Solutions page
- Click on the “Business” Tab from the left side panel
- Select “Pick Up Location” under the Business Section
- Filter the store by Store Filters on the page
- Once the store is listed in the store listing table
- If the store is disabled, the toggle button of the store will look like this
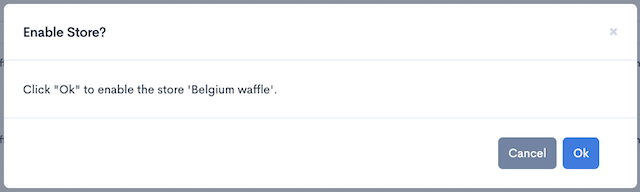
- Click on the Toggle button to Enable the Store.
- A dialog box will get open for confirmation as below.
- Your enabled store icon will look like this
- After Successful login to Delivery Solutions page
- Click on the “Business” Tab from the left side panel
- Select “Pick Up Location” under the Business Section
- Filter the store by Store Filters on the page
- Once the store is listed in the store listing table
- If the store is enabled, the toggle button of the store
will
look
like this
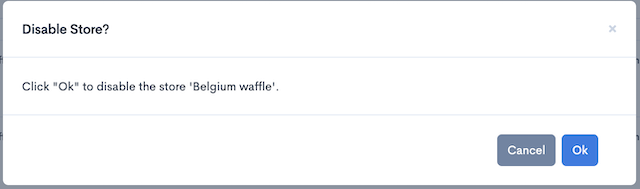
- Swipe Left Toggle button to Disable the Store.
-
- A dialog box will get open for confirmation as below.
- Your disabled store icon will look like this
Important
Visit the Service Coverage section under Pick Up Location for more details.
Edit Store
You can edit the existing store from the Pick Up Location Section.
- After Successful login to Delivery Solutions page
- Click on the “Business” Tab from the left side panel
- Select “Pick Up Location” under the Business Section
- Filter the store by Store Filters on the page
- Once the store is listed in the store listing table
- Click on button.
- You will be redirected to the Edit Store page.
- Click on “Save” to save the changes.
Important
Visit the Create Store section under Pick Up Location in order to understand sections and fields of Store Form.
Search Stores
Pick Up Location Page also provides a variety of filters to narrow down your search for a particular store.
Pick Up Location page has below filters to filter out the stores.
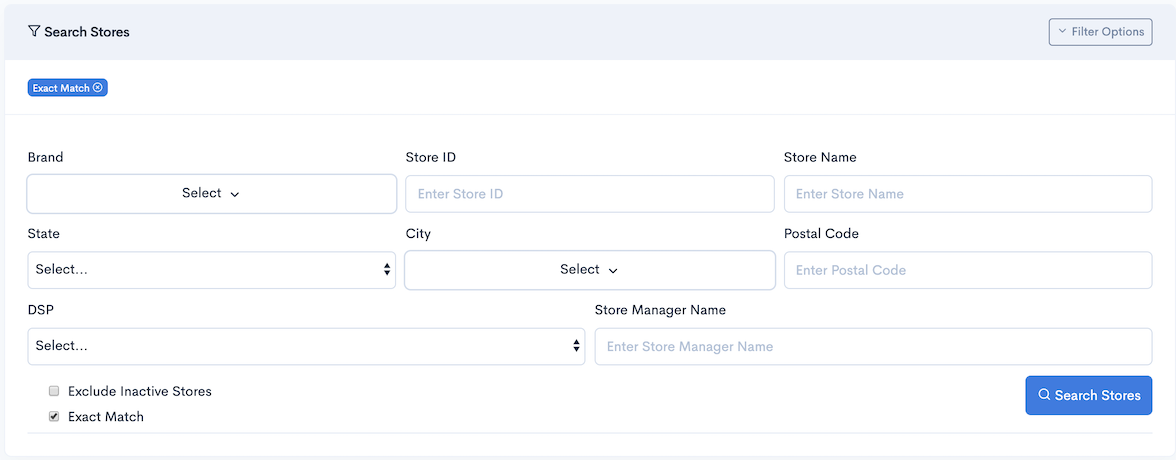
Below are the filters available on the Pick Up Location Page
| Field Name | Description |
|---|---|
| Store ID | Filters the store(s) by Store ID entered in the Input Box |
| Store Name | Filters the store(s) by store name entered in the Input Box |
| City | Filters the store(s) based on the City selected in DropDown |
| State | Filters the store(s) based on the State selected in Drop Down |
| Zip Code | Filters the store(s) by Zip Code entered in the Input Box |
| DSP | Filters the store(s) based on the DSP selected in the DropDown |
| Store Manager | Filters the store(s) based on the Store Manager name entered in the Input Box |
| Exclude Inactive Store | Filters the store(s) based on their status as "Enabled" or "Disabled" |
| Exact Match | Filters the store(s) which matches exactly with search keywords, if checked. |
Important
All the filters available in the Stores are now merged with Service Coverage filters.
Store List
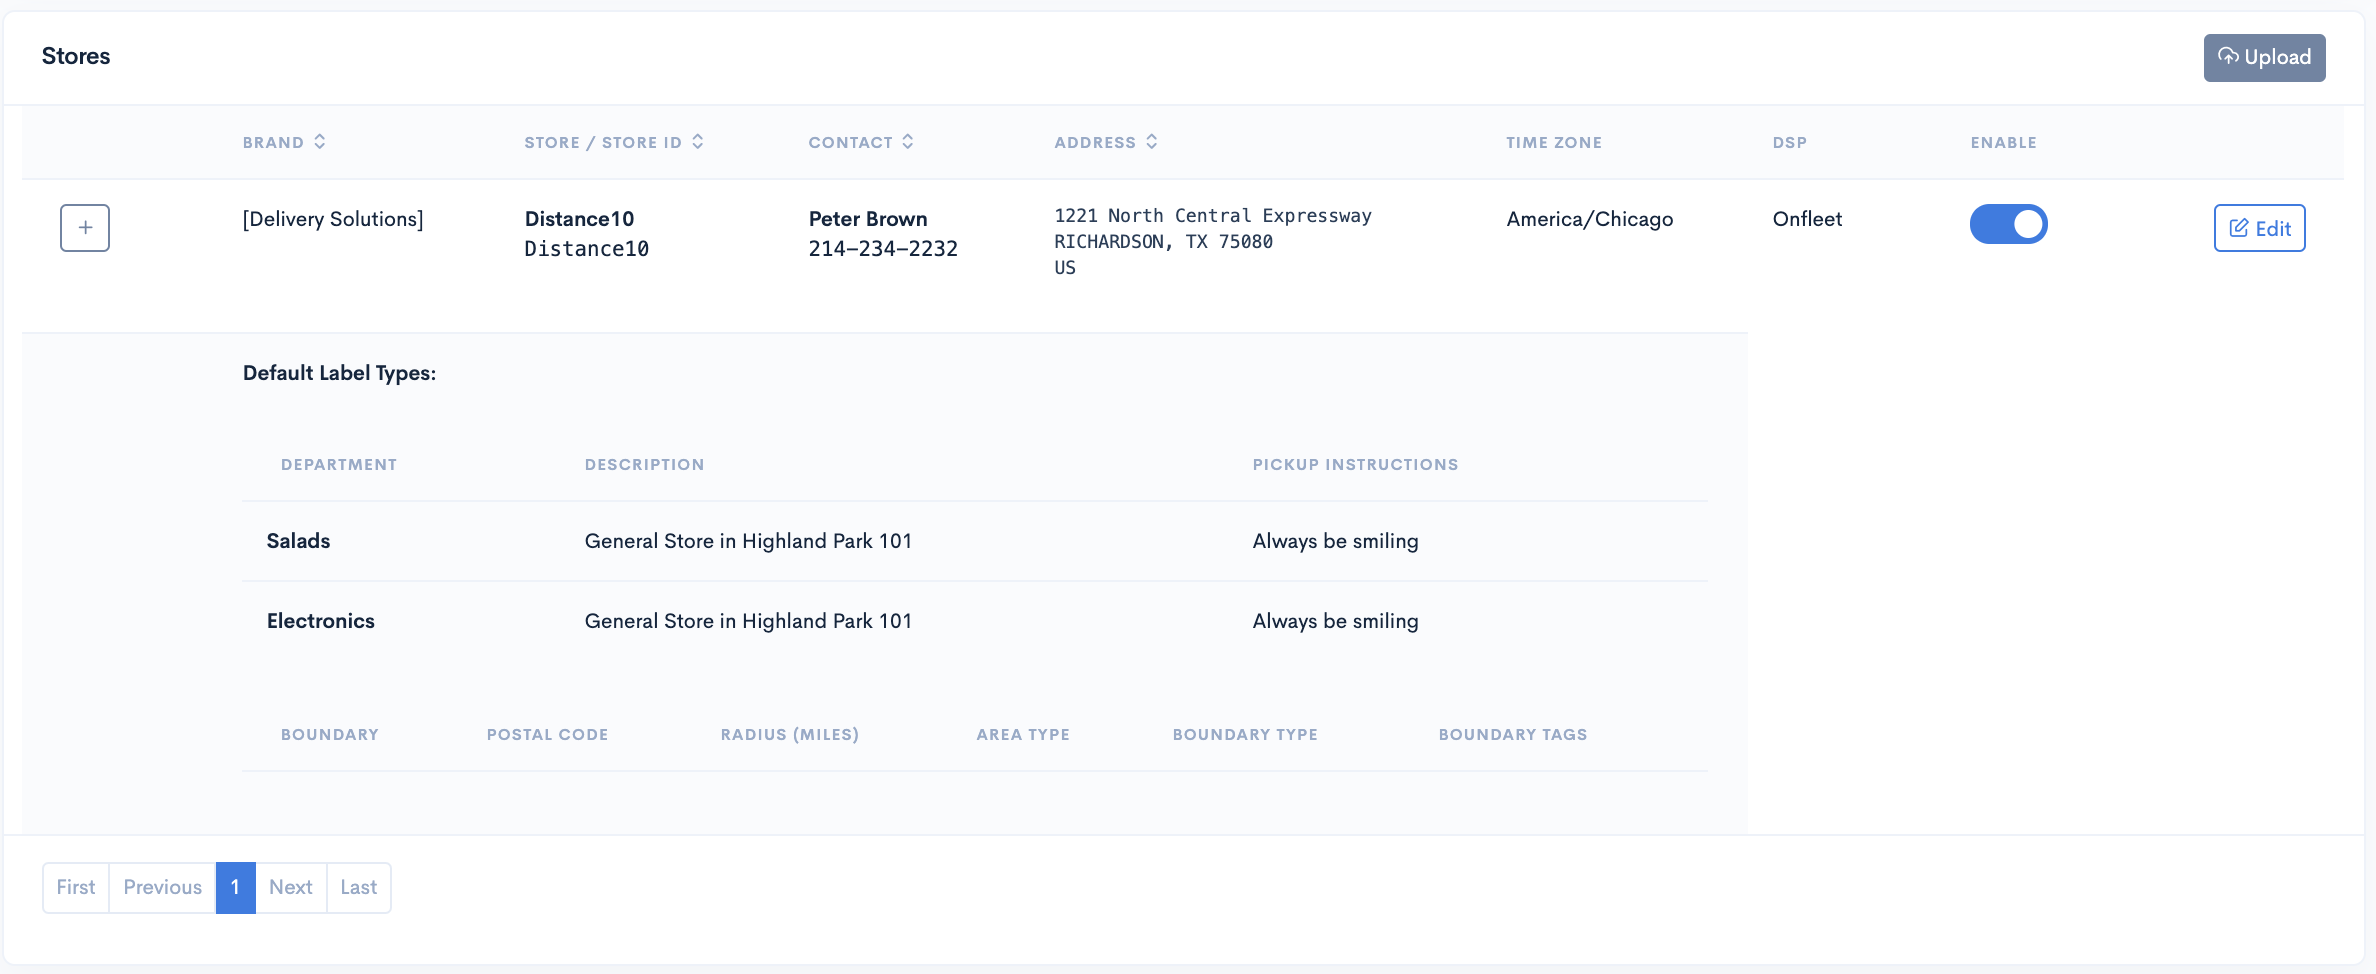
- You can click the boundaries in Store Listing to view it on the map
- Once Store Boundaries are saved, they will be reflected in the Store Listing under Boundary Table
Pick Up Location
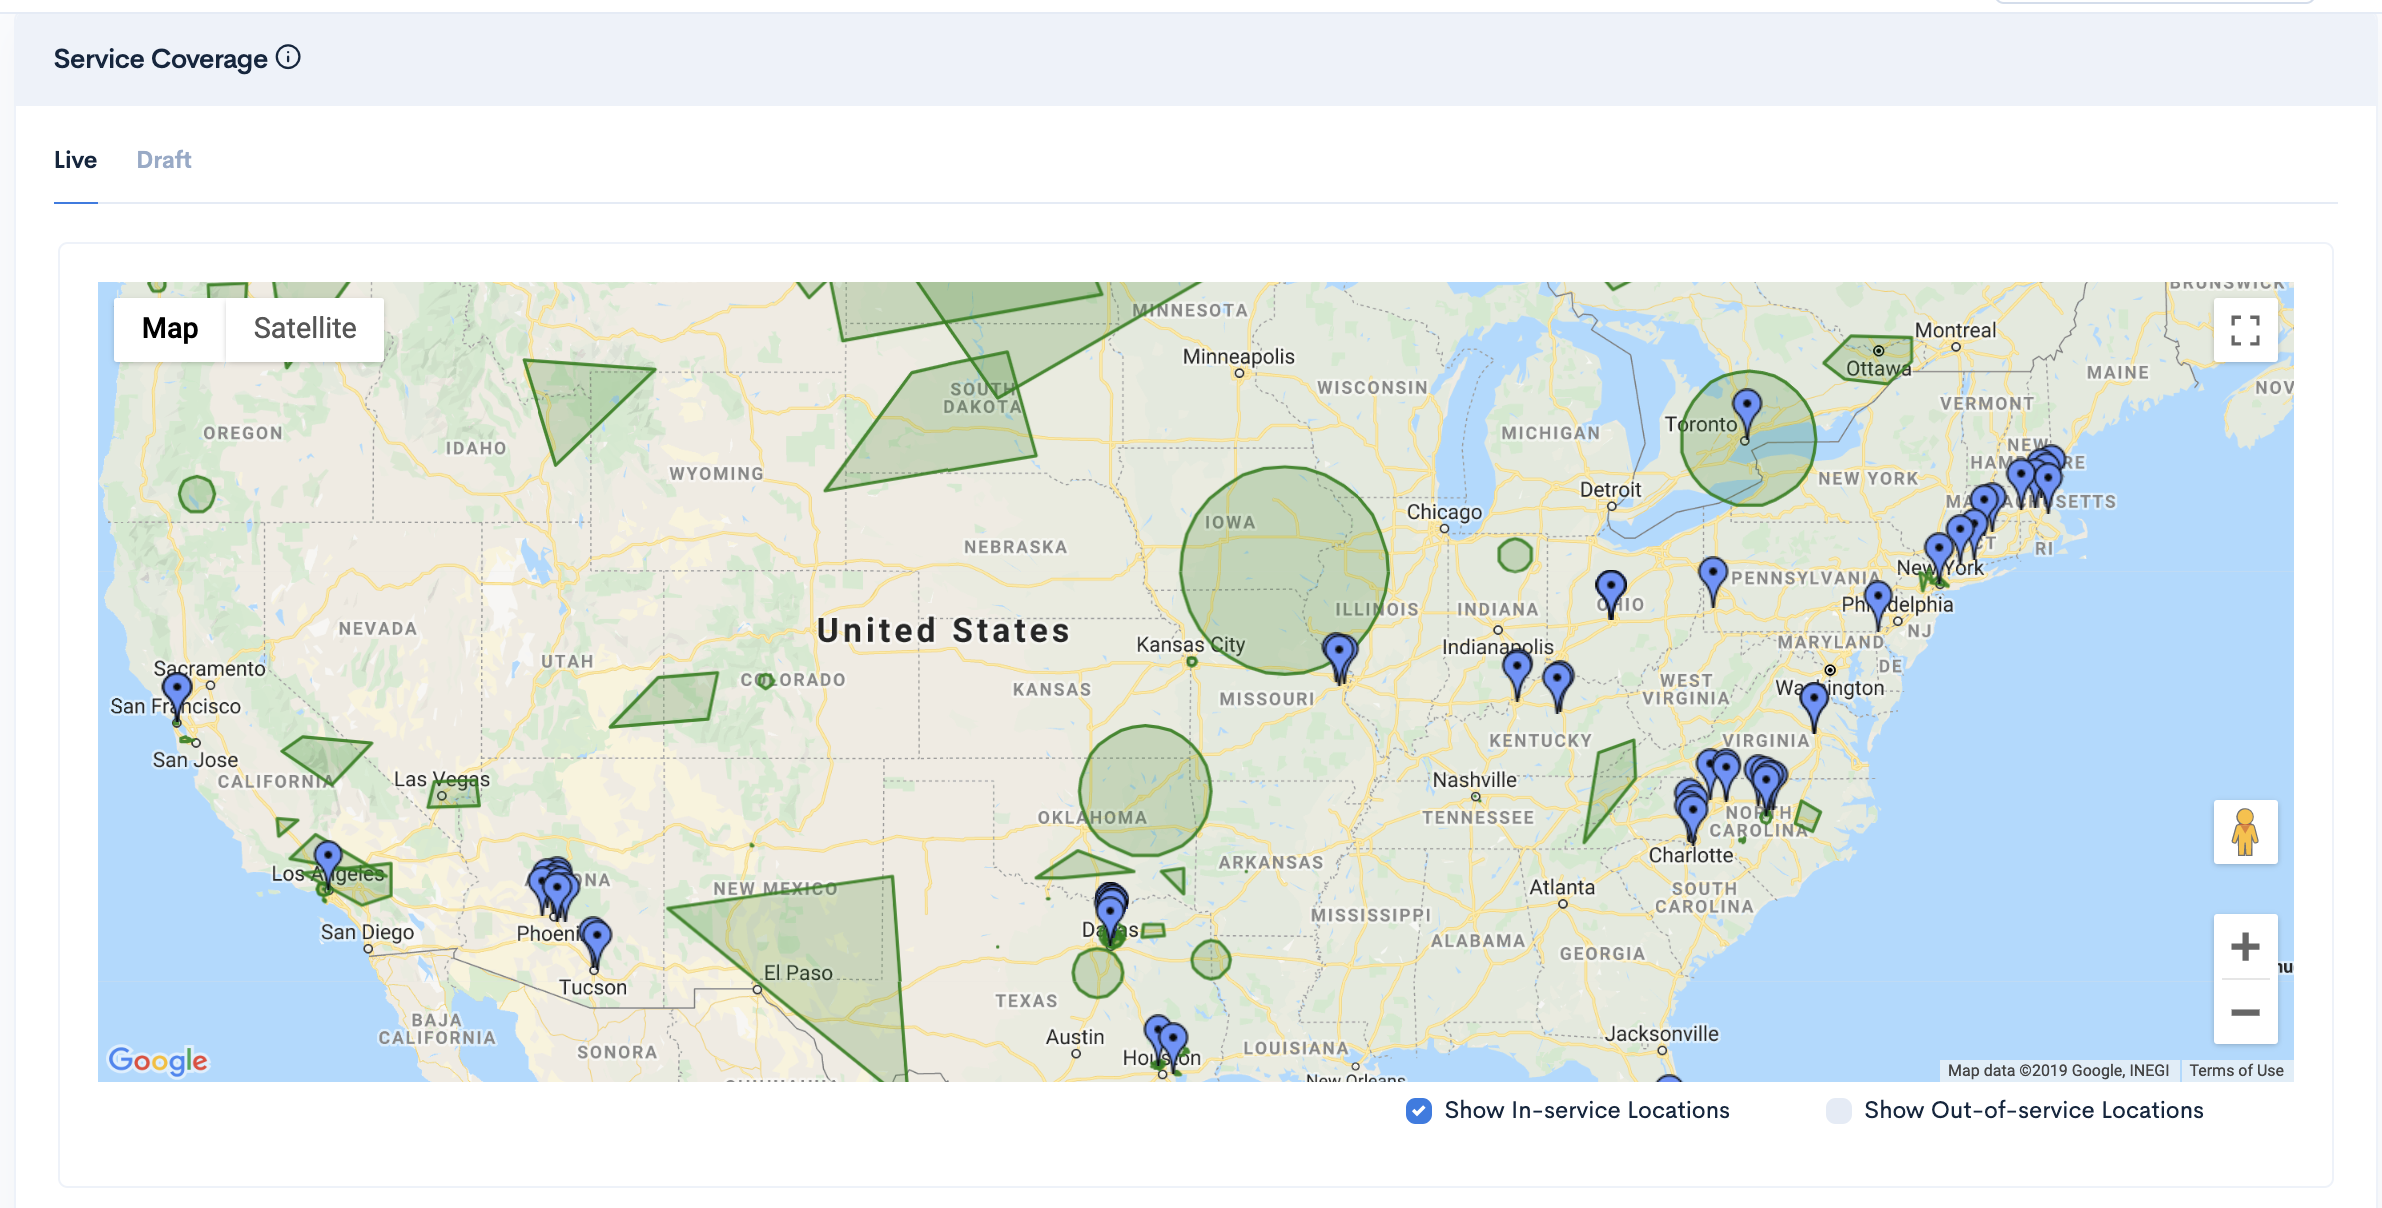
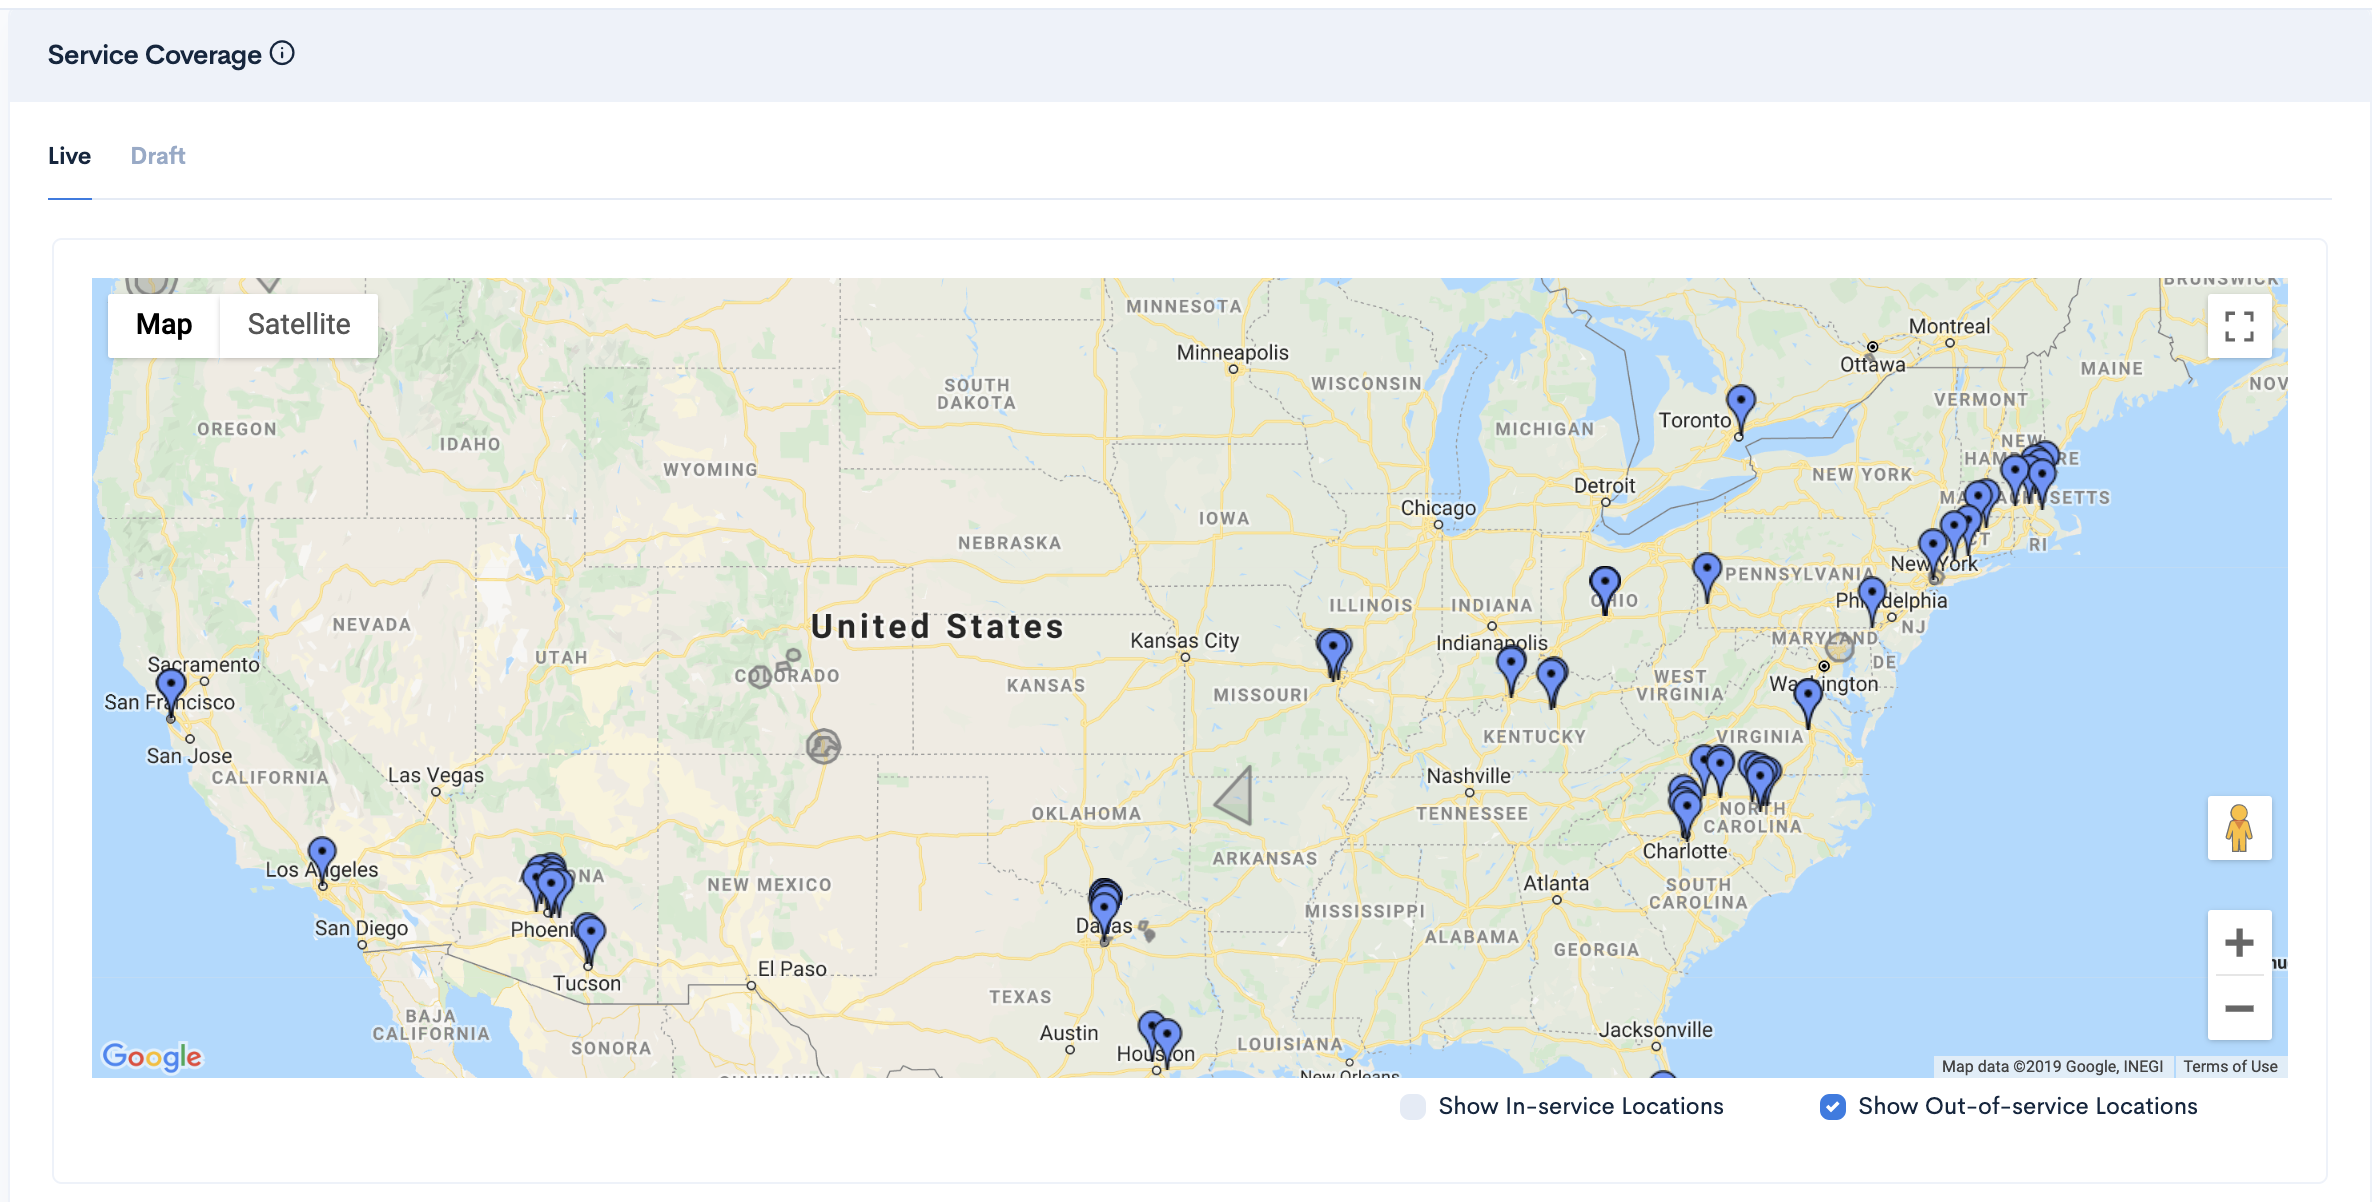
Service Coverage
To manage your store boundaries under service coverage, head to your Business Section on your left sidebar and select the Pick Up Location section. Once inside, you'll be able to view the Service Coverage section
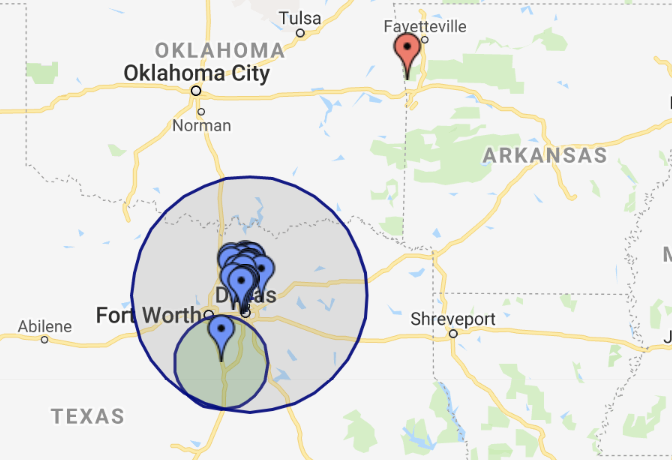
Delivery Solution uses the service area feature which is specifically designed for Business Admin who deliver their products to local customers/retailers. It uses coverage map to indicate the the store markers and boundaries of the stores based on the region in order to check whether the delivery services are available in the region or not.
Delivery Solutions has set the service area based on the cities, states and postal code. Store Managers can create the store and their boundary to indicate the services they provide in a particular region.
This is how your Service Coverage Section looks like.
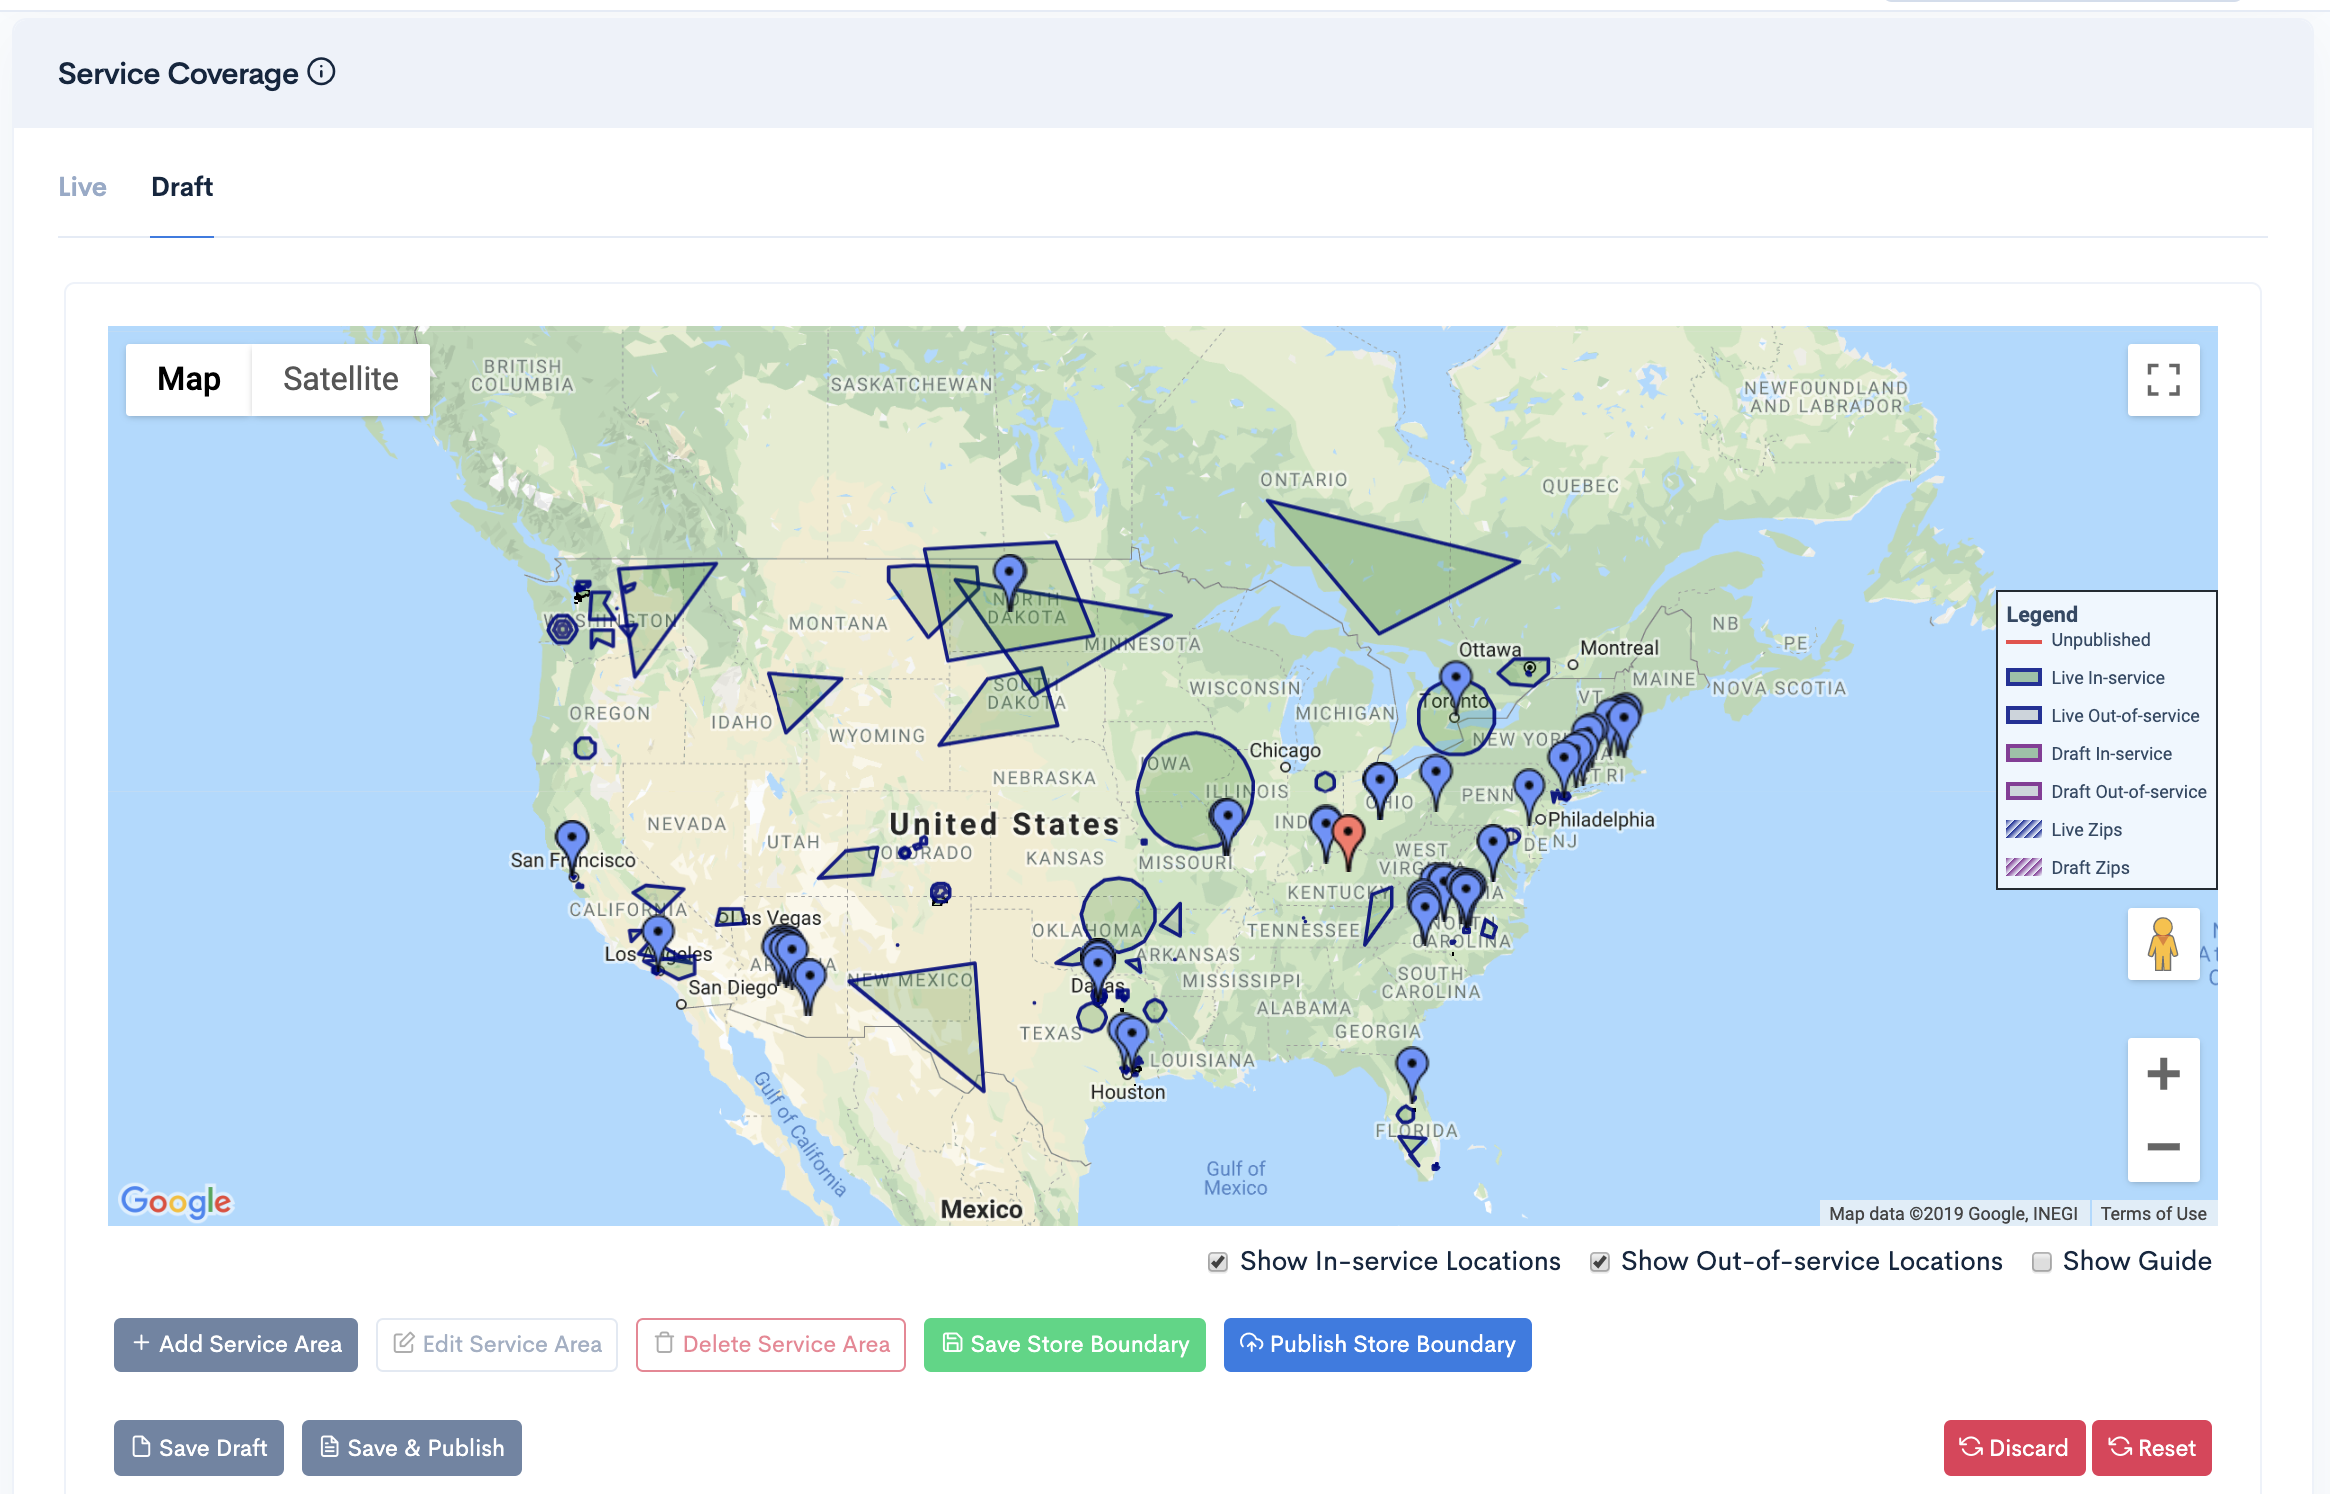
There are two modes of the Service Coverage Map:
- Live
- Draft
Important
Our Service Coverage has been merged with Business Pick Up Location page.
Delivery Assurance
Search the stores available near the address throughour Service Coverage page.
Delivery Solution uses geocoding in order to convert the street address into geographic coordinates like latitude and longitude to place the store markers and their boundaries on the map. If the Lat Long of the address falls under any store boundary coordinates stored in our system. we use reverse geocoding to convert the geographic coordinates into human readable store address in return
- After Successful login to Delivery Solutions page
- Click on the Business Tab from the left side panel
- Select Pick Up Location under the Business Section
- Go to Delivery Assurance Section
- Enter the address along with Zip
- Click on Search button.
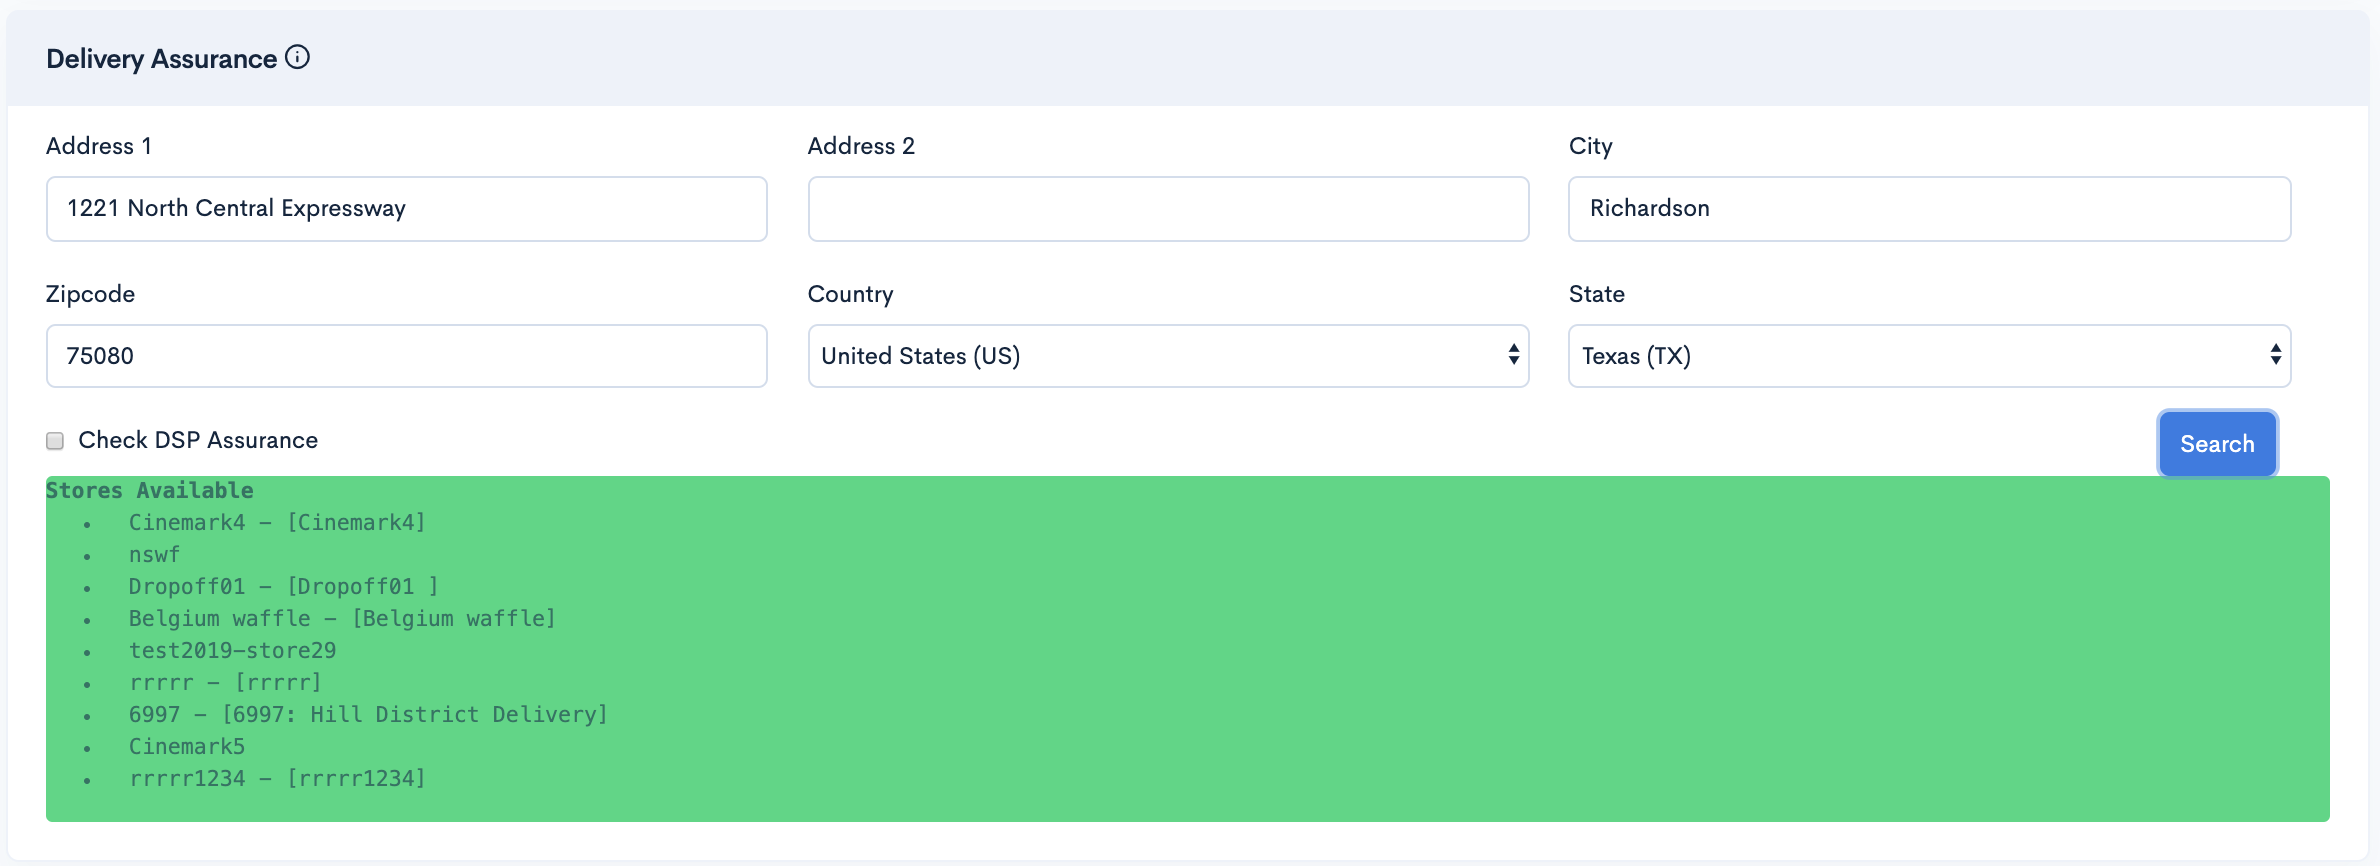
- If there are stores available near the address, then list of Stores will be shown with message as Store Matched .
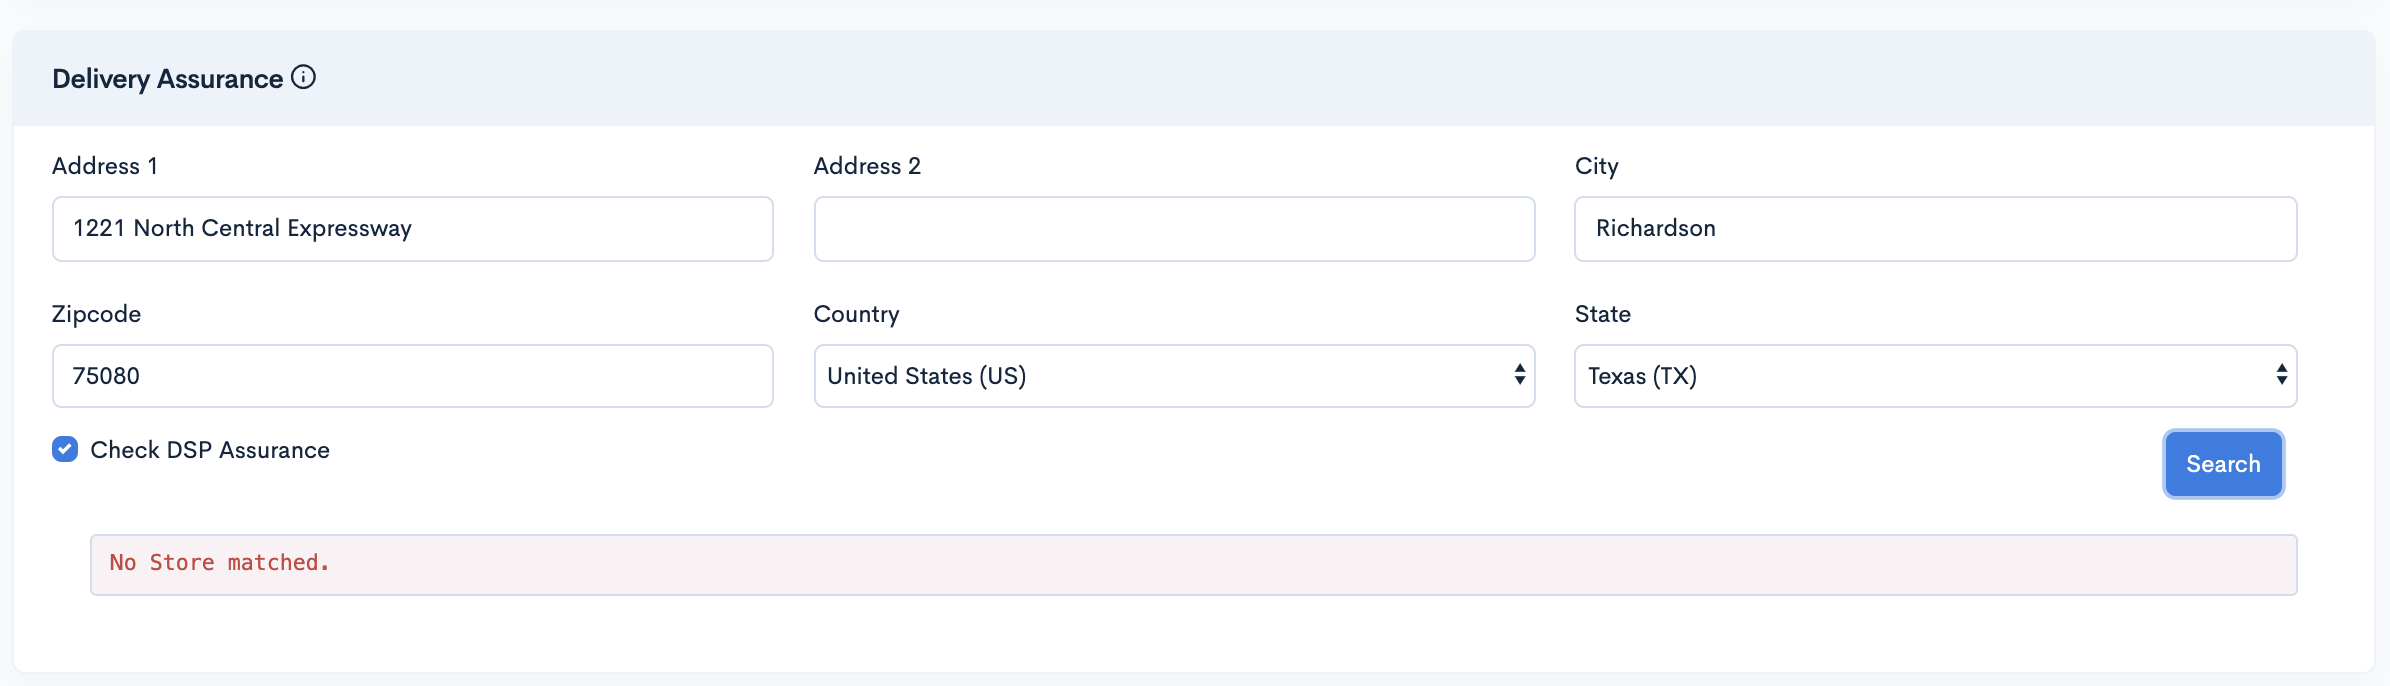
- If there are no store available, It will display a message as No Store Matched
- Use full address for better results.
Example: Searched with address “1221 North Central Expressway” The results will be shown as below upon finding a store.
Example: Searched with address “1221 North Central Expressway” The results will be shown as below in case stores are not matched
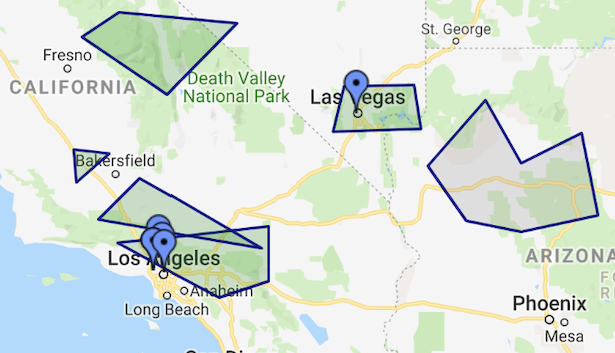
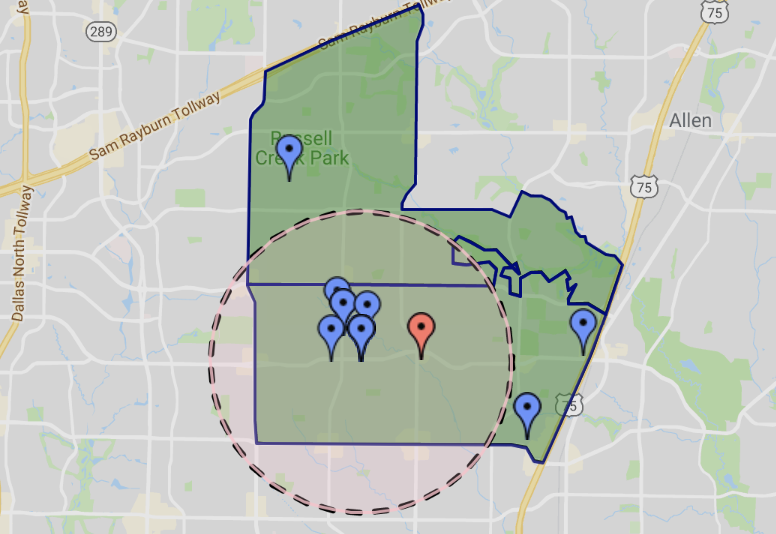
Add Service Area
Delivery Solutions allows Business Admins to create their store’s boundaries in order to highlight the region they provide services.
Our draft tool allows you to add geographic boundaries of your store to the map. You can then easily associate your data to the individual borders that are on the map. This lets you compare the serviceable areas of your stores on the map with just a few clicks.
- After Successful login to Delivery Solutions page
- Click on the Business Tab from the left side panel
- Select Pick Up Location under the Business Section
- Go to Draft mode in Maps
- Select the Store Marker
 of the Store on the Map for which you want to create boundary
 - Click on
 button below the Map.
- A collapsible window will be opened to seek information as below.
- In-service Locations
- Out-of-service Locations
- Polygon
- Circles
- Zips
- Address
- Select the appropriate option and click on
- Select this icon
 option above the map.
- Draw a Polygon on the map where you want to create your store boundary.
- A new uncommitted boundary will be created on the map.
- Click on
 button to save your changes.
- Click on
 button to make your changes Live
- Click on
 button to take your changes back to last saved version in the draft.

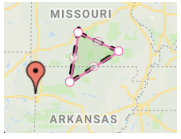
Area Type
Boundary Type
Example: Newly added Polygon store boundary will look as below
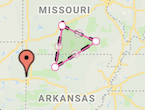
Important
Please visit the Area and Boundary Type section for more details
Edit Service Area
Edit the existing boundaries on the map for your stores.
Once your boundaries have been created, they can be easily edited in real-time right from within your map.
- After Successful login to Delivery Solutions page
- Click on the “Business” Tab from the left side panel
- Select “Pick Up Location” under the Business Section
- Go to Draft mode in Maps
- Select the Store Marker or one of the boundaries of the Store on the Map for which you want to Edit the boundary.
- All the boundaries pertaining to the store will be highlighted along with the store as below
- Pull the boundary point to expand the boundaries. The edited boundaries will look like below
- Click on to save your changes in Draft. Edited boundary will look as below.
- Click on to make the changes Live on Map.
The published store boundaries as below in Draft and Live Map respectively. - Repeat the same steps to edit the published store boundaries.
Delete Service Area
Remove your store’s existing boundaries on the map.
Once your boundaries have been created, they can be easily removed in real-time right from within your map.
- After Successful login to Delivery Solutions page
- Click on the “Business” Tab from the left side panel
- Select “Pick Up Location” under the Business Section
- Go to Draft mode in Maps
- Select the Store Marker or one of the boundaries of the Store on the Map for which you want to Edit the boundary.
- All the boundaries pertaining to the store will be highlighted along with the store as below
- Click on the Boundary you wish to remove from the map.
- The bin button
 on the lower left panel will be activated.
- Click on the bin button to remove the boundary
- Click on “Save” to save your changes in Draft.
- Click on “Publish” to make the changes Live on Map.
Save or Publish Store Boundary
There are two ways store related changes on Service Coverage can be saved or published.
- Save or Publish Specific Store Boundary
- Save or Publish All Stores Boundary
Let's have a look at the icons available in Draft mode to Save or Publish Store Boundaries
Save or Publish Store Boundary
You can save or publish specific store's boundaries.
- After Successful login to Delivery Solutions page
- Click on the Business Tab from the left side panel
- Select Pick Up Location under the Business Section
- Go to Draft mode in Maps
- Select the Store marker for which you wish to draw or edit boundary
- Draw or Edit Store boundary.
Refer Add Service Area or Edit Service Area for more details
- Select the Store Marker You wish to save changes
- Click on button to save the changes
- A Dialog Box will open asking for the confirmation as shown below
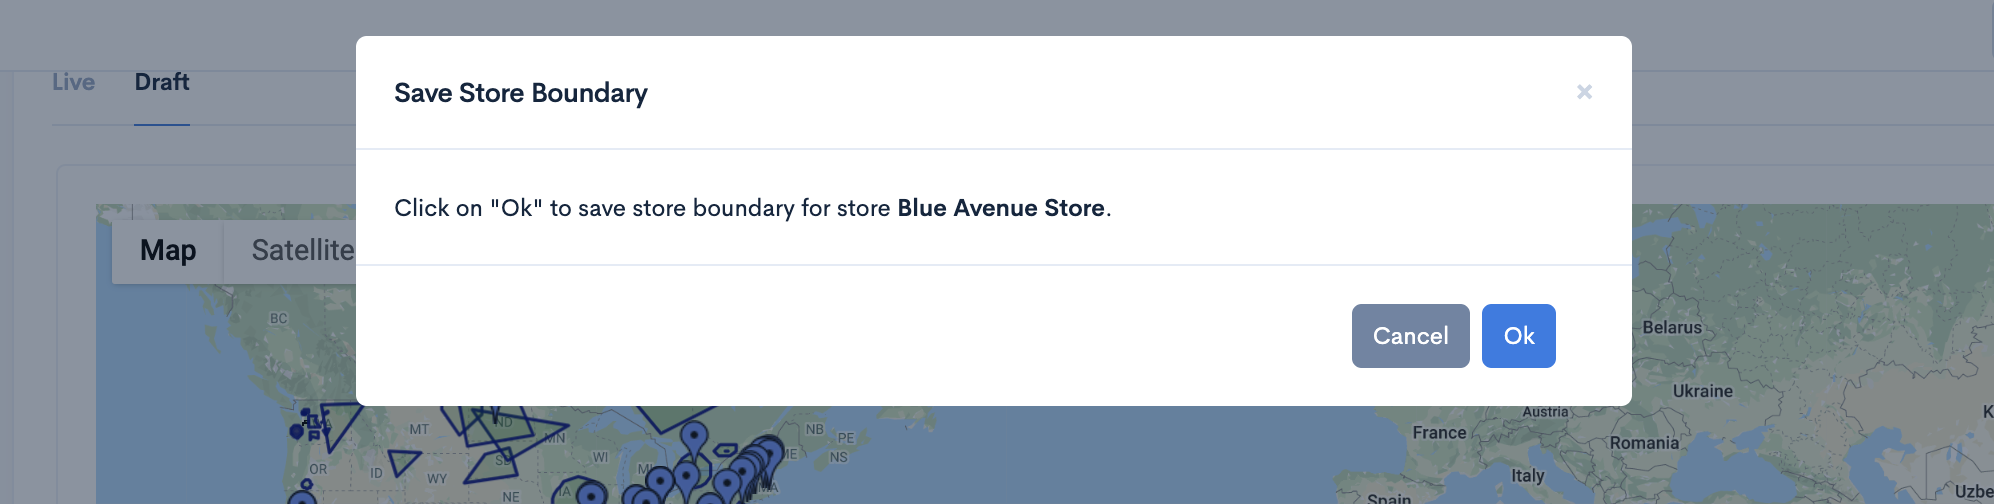
- Click on Ok to save the store specific changes.
- In order to make your saved changes to Live/Publish. Follow the below instruction
- Click on the Store Marker for which you wish to publish the changes
- Click on to publish the changes
- A Dialog Box will open asking for the confirmation as shown below
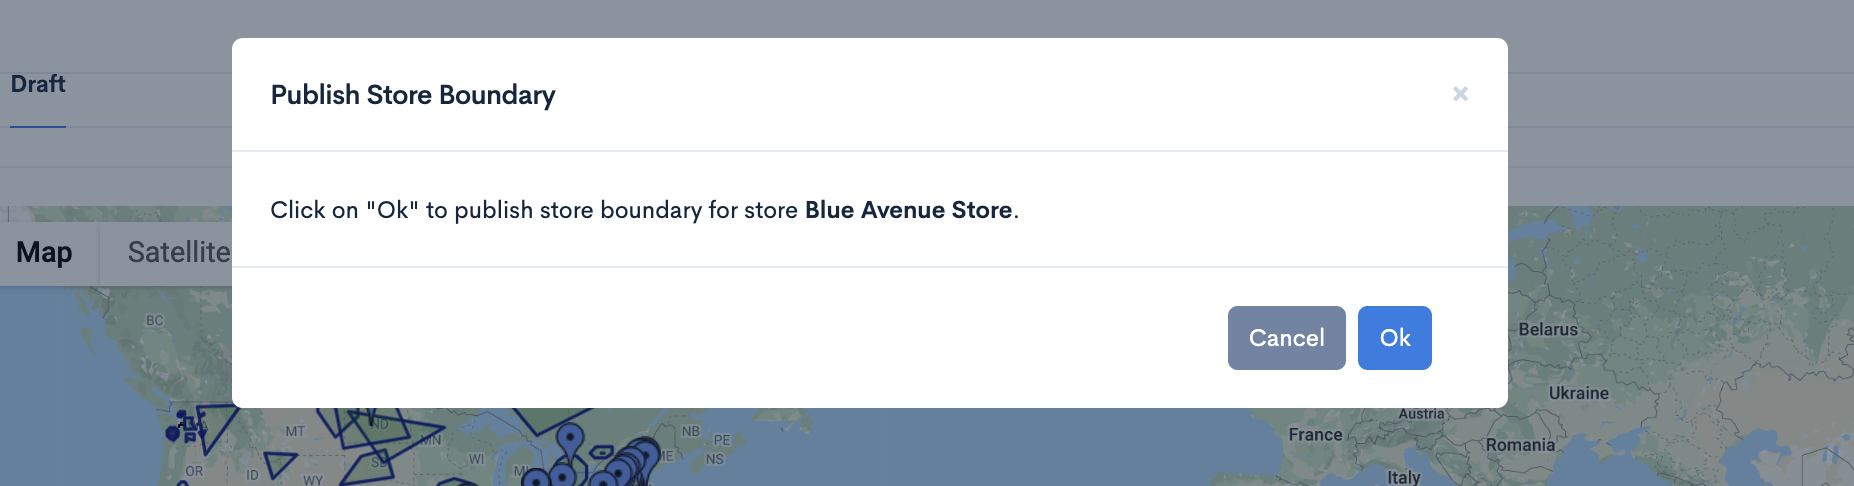
- Click on Ok to Publish all Store's changes.
Save or Publish All Stores Boundary
There are two ways store related changes on Service Coverage can be saved or published.
- After Successful login to Delivery Solutions page
- Click on the Business Tab from the left side panel
- Select Pick Up Location under the Business Section
- Go to Draft mode in Maps
- Draw or Edit multiple Stores' boundary.
Refer Add Store Boundary or Add Store Boundary for more details
- Click on the map area
- Click on
 button to save the changes made to all the stores
- A Dialog Box will open asking for the confirmation as shown below
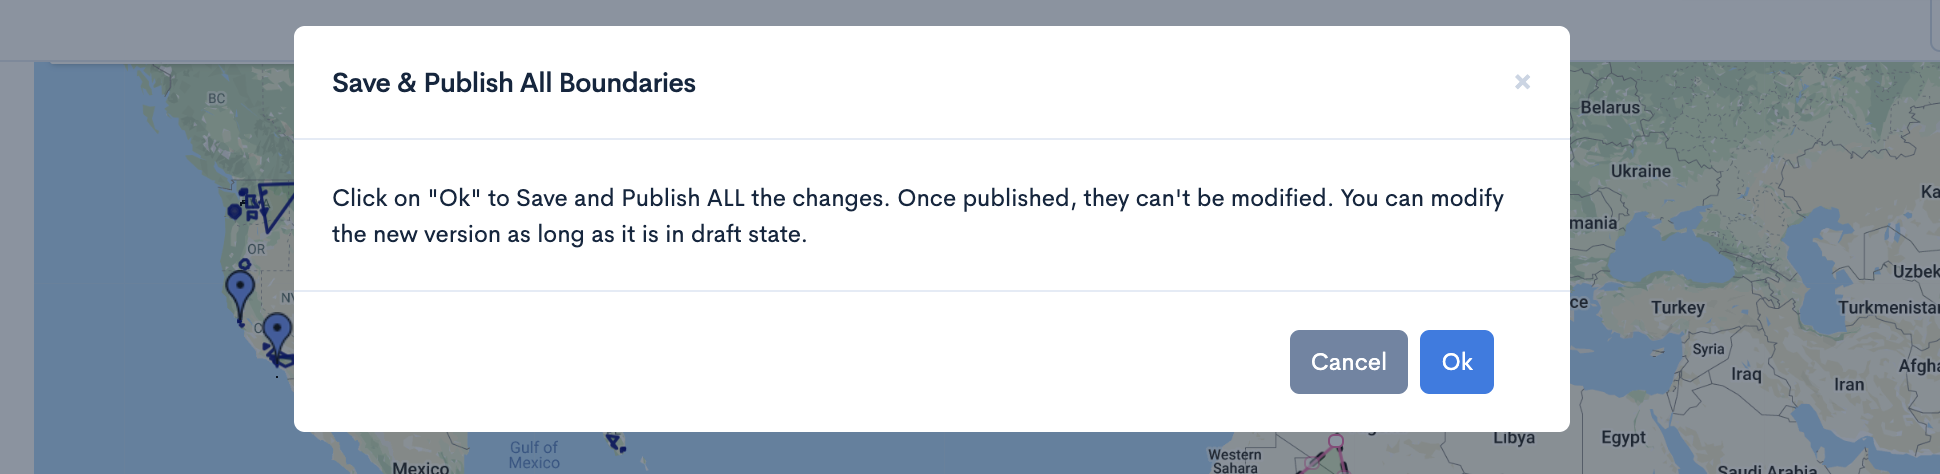
- Click on Ok to Save and Publish all the store specific changes.
Boundary Guide
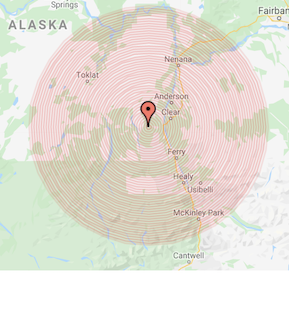
Circular boundary around the store can be highlighted with Show Guide toggle button shown below the Service Coverage Map
- After Successful login to Delivery Solutions page
- Click on the Business Tab from the left side panel
- Select Pick Up Location under the Business Section
- Go to Draft mode in Maps
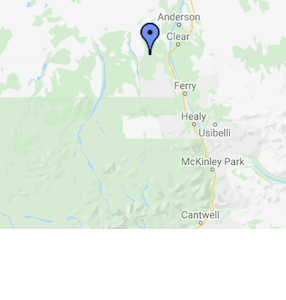
- Select the Store marker for which you would like to see the guide.This is how the store marker will look when the Show Guide checkbox is unchecked.
- Click on the Show Guide checkbox below the map
- This is how the guide will look like
Boundary Tags
Boundaries can be given tags
- After Successful login to Delivery Solutions page
- Click on the Business Tab from the left side panel
- Select Pick Up Location under the Business Section
- Go to Draft mode in Maps
- Select the boundary for which you would like to add the tag.
- Click on
 button
 - A dialog box will get open as shown below
- Enter a tag name in the textarea
- Click on
 button to Save the Tag.

Boundary Types
Store boundaries indicates their services in that area. These boundaries can be defined in different shapes on the map.
Boundaries are useful for determining where certain points on your map lie, how far one map point is from other points on your map, and seeing how many points on your map exist within various distance increments. Ultimately Stores can have boundaries as below
Polygon
The Polygon boundaries are the free form boundaries of Pick Up Locations which is used to define coverage area of a store/Pick Up Location
Circles
The Circle Boundary shows the radius circle in miles or kilometers from the Pick Up Location. This type of boundary is drawn around the Pick Up Location/Store marker considering the marker as the center point of the radius.

Zips
Delivery Solutions provides the outline of all the approximately 38,000 ZIP Codes that exist in the United States of America. All you need to enter is Zip Code and our map will automatically highlight the boundaries of the Zips.
Address
The address boundary is a radius circle in miles or kilometers from any specific address in order to quickly determine distances.
Boundary Legends
Your boundary width, boundary color, fill color, fill opacity, and shapes are now available for your specific needs and preferences.
Store Boundaries on the Map defines whether the store services are available or not in a particular area. These boundaries represents the metrics and ultimately helps Business Admin to understand where in the Map their stores resides and what area they serviceable.
Our boundary legends appears as a box to the right your graph. The box contains small samples of each boundary and fill color on the Map as well as a short description of what each color means.
This is how the boundary legend box looks like.
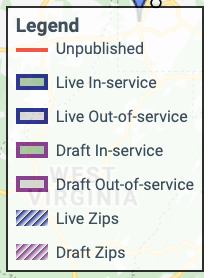
The legend box shows color coding for..
- Boundary Borders
- Area Fill
Boundary Borders:
The outlining of the store boundaries defines the state of the boundaries whether they are published, modified, saved or in draft mode.
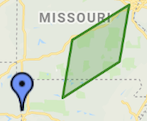
Published Boundaries:
The Published store boundaries which are committed ones and will be Live on the map.
In Draft, these boundaries can be visible with blue outlinings..
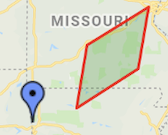
Modified Boundaries:
The Modified store boundaries can be visible with Red outlinings in the Draft. These boundaries were once Live but now modified in draft and saved. Please note that these store boundaries are not yet published.
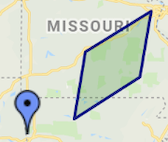
Unpublished Boundaries:
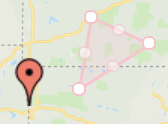
The Unpublished store boundaries are the ones that are newly drawn and saved in the draft but yet to be published. Such boundaries can be visible with purple outlinings in the Draft.
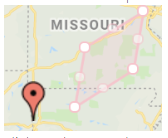
Uncommitted Boundaries:
The Uncommitted boundaries are the ones that are newly drawn or modified on the Draft but not yet Saved and Published.
Area Fill:
The type of area within the boundaries can be determined by the fill color used in it. The areas can be whitelisted or blacklisted. Similarly, the boundaries changes its fill color based on whether they are currently selected on the Map or not.
In-service area:
The unselected In-service area boundaries will be filled with Green color.
Out-of-service area:
The selected Out-of-service area boundaries will be filled with Grey color.
Zips:
The Zip Code area boundaries will be filled with Strips
In-service Vs Out-of-service Areas
Delivery Solutions lets you set the areas as whitelisted or blacklisted within your store boundaries.
There are few areas which are located near the stores but the deliveries are prohibited in those areas. Such areas often called as blacklisted areas where delivery of certain products are prohibited.
Delivery Solutions not only allow Business Admins to draw the boundaries around their stores. But, it also let them define the type of area. This is where the concept of whitelist and blacklist area came into the picture.
In-service Area
In-service areas’ boundary on the maps states that the stores provide services in such areas. These areas are highlighted in Green Color on the map. A Business Admin can draw such boundaries within their serviceable areas to indicate the availability of their services.
- After Successful login to Delivery Solutions page
- Click on the Business Tab from the left side panel
- Select Stores under the Business Section
- Go to Draft mode in Maps
- Select the Store Marker or one of the boundaries of the Store on the Map for which you want to Edit the boundary.
- Click on button below the Map.
- A dialog box will be open to ask you below details
- SelectIn-service Locations option.
- Click on button.
- Select this icon option above the map.
- Draw a Polygon on the map where you want to create your store boundary.
- A new uncommitted boundary will be created on the map.
- Click on button to save your changes.
- Click on button to make your changes Live
- Click on the checkbox “Show In Service Locations” on the map to view all In-service Store boundaries
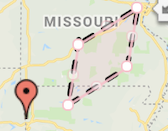
Example: Newly added Serviceable(In-service) Polygone store boundary will look as below
Out-of-service Area
Out-of-service areas’ boundary on the maps states that the stores do not provide services in such areas regardless the area falls under the serviceable boundaries of the stores or not. Such areas are highlighted in Grey Color on the map. A Business Admin can draw such boundaries within their serviceable areas to indicate the unavailability of their services.
- After Successful login to Delivery Solutions page
- Click on the Business Tab from the left side panel
- Select Stores under the Business Section
- Go to Draft mode in Maps
- Select the Store Marker or one of the boundaries of the Store on the Map for which you want to Edit the boundary.
- Click on button below the Map.
- A dialog box will be open to ask you below details
- Select Out-of-service Area option.
- Click on button.
- Select this icon option above the map.
- Draw a Polygon on the map where you want to create your store boundary.
- A new uncommitted boundary will be created on the map.
- Click on button to save your changes.
- Click on button to make your changes Live
- Click on the checkbox Out-of-service Locations on the map to view all Out-of-service Store boundaries
Example: Newly added Out-of-service Polygone store boundary will look as below
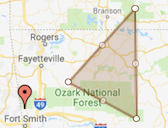
Table Of Content
- Service Coverage
- Delivery Assurance
- Add Service Area
- Edit Service Area
- Delete Service Area
- Save or Publish Store Boundary
- Save or Publish Specific Store Boundary
- Save or Publish All Stores Boundary
- Boundary Tags
- Boundary Guide
- Boundary Types
- Boundary Legends
- In-service Vs Out-of-service Areas
- In-service Area
- Out-of-service Area
Business
Packages
Packages are nothing but the containers in which the items will be delivered to the customer. The measurement of the order packages can be managed in Packages page under deliveries section. You can Create, Edit and Delete the packages based on the requirement.
This is how our API & Services page looks like..
Create Package
Adding a packages in the Delivery Solutions can be done through few clicks.
This is how Create Package page looks like

- After Successful login to Delivery Solutions page
- Click on the “Business” Tab from the left side panel
- Select "Packages" under the Business Section
- Click on“Create Package” button
- You will be redirected to Create Package Form form
- Fill up the package measurement details
- Click on “Save” to create a package
The Package Details section seeks information for below fields:
| Field Name | Description |
|---|---|
| Package Type | Type of Package such as Small, Large |
| Weight in (LB) | Package Weight in Pounds |
| Length (inches) | Package Length in Inches |
| Width (inches) | Package Width in Inches |
| Height (inches) | Package Height in Inches |
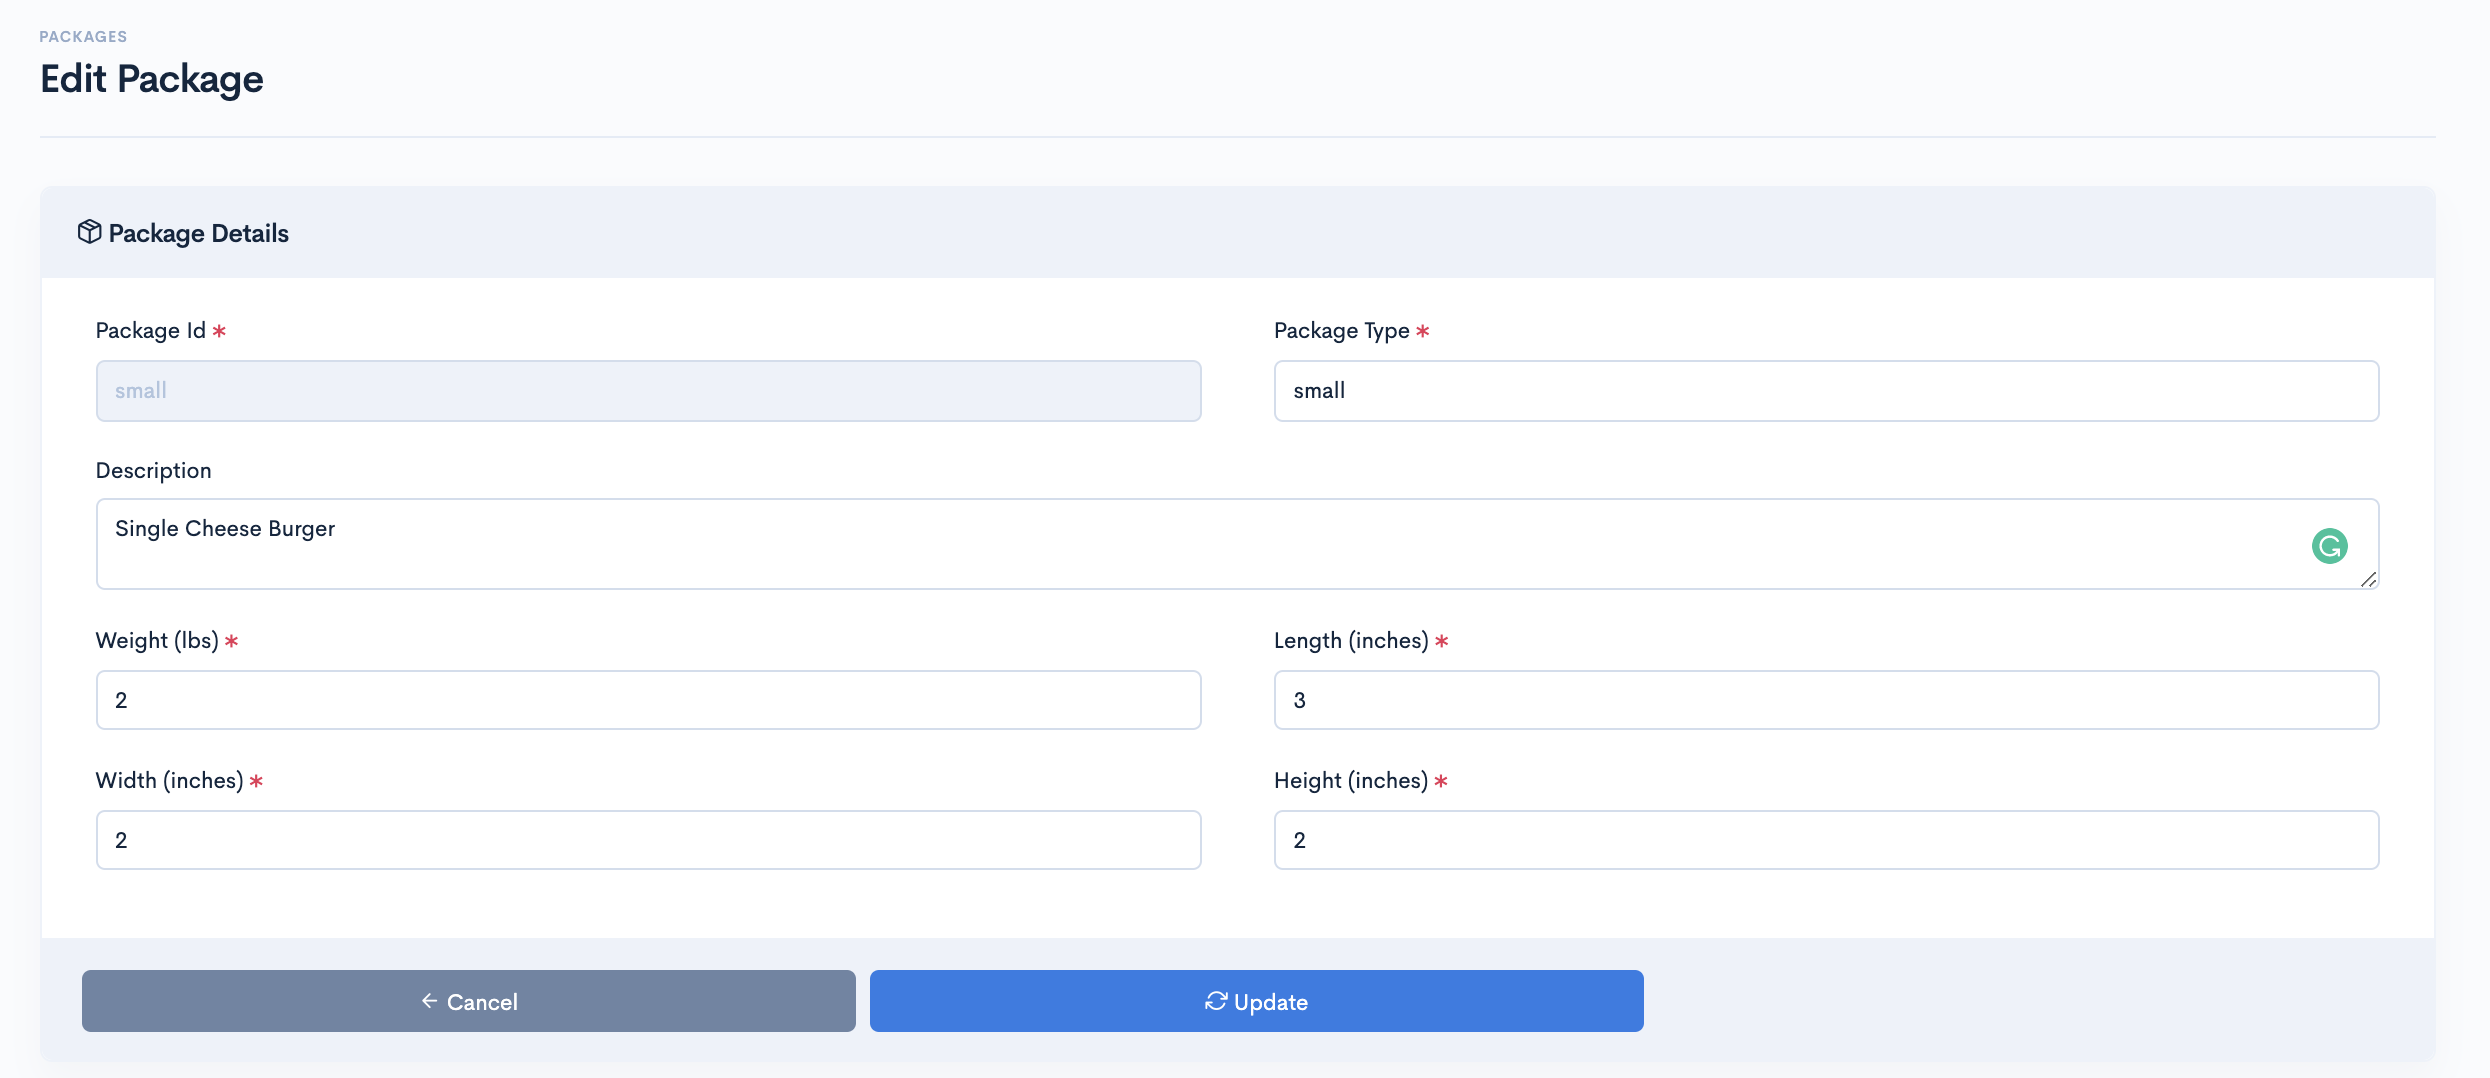
Edit Package
Existing packages can be edited under Packages page
- After Successful login to Delivery Solutions page
- Click on the “Business” Tab from the left side panel
- Select“Packages” under the Business Section
- Click on button against package name to Edit the package
- You will be redirected to Edit Package form
- Edit the package measurement details
- Click on “Save” to save the changes
Delete Package
Existing packages can be set as deleted under Packages page
- After Successful login to Delivery Solutions page
- Click on the “Business” Tab from the left side panel
- Select“Packages” under the Business Section
- Click on "Delete" icon
against package name to delete the package
- A dialog box will open named Delete Package
to confirm the deletion as below.
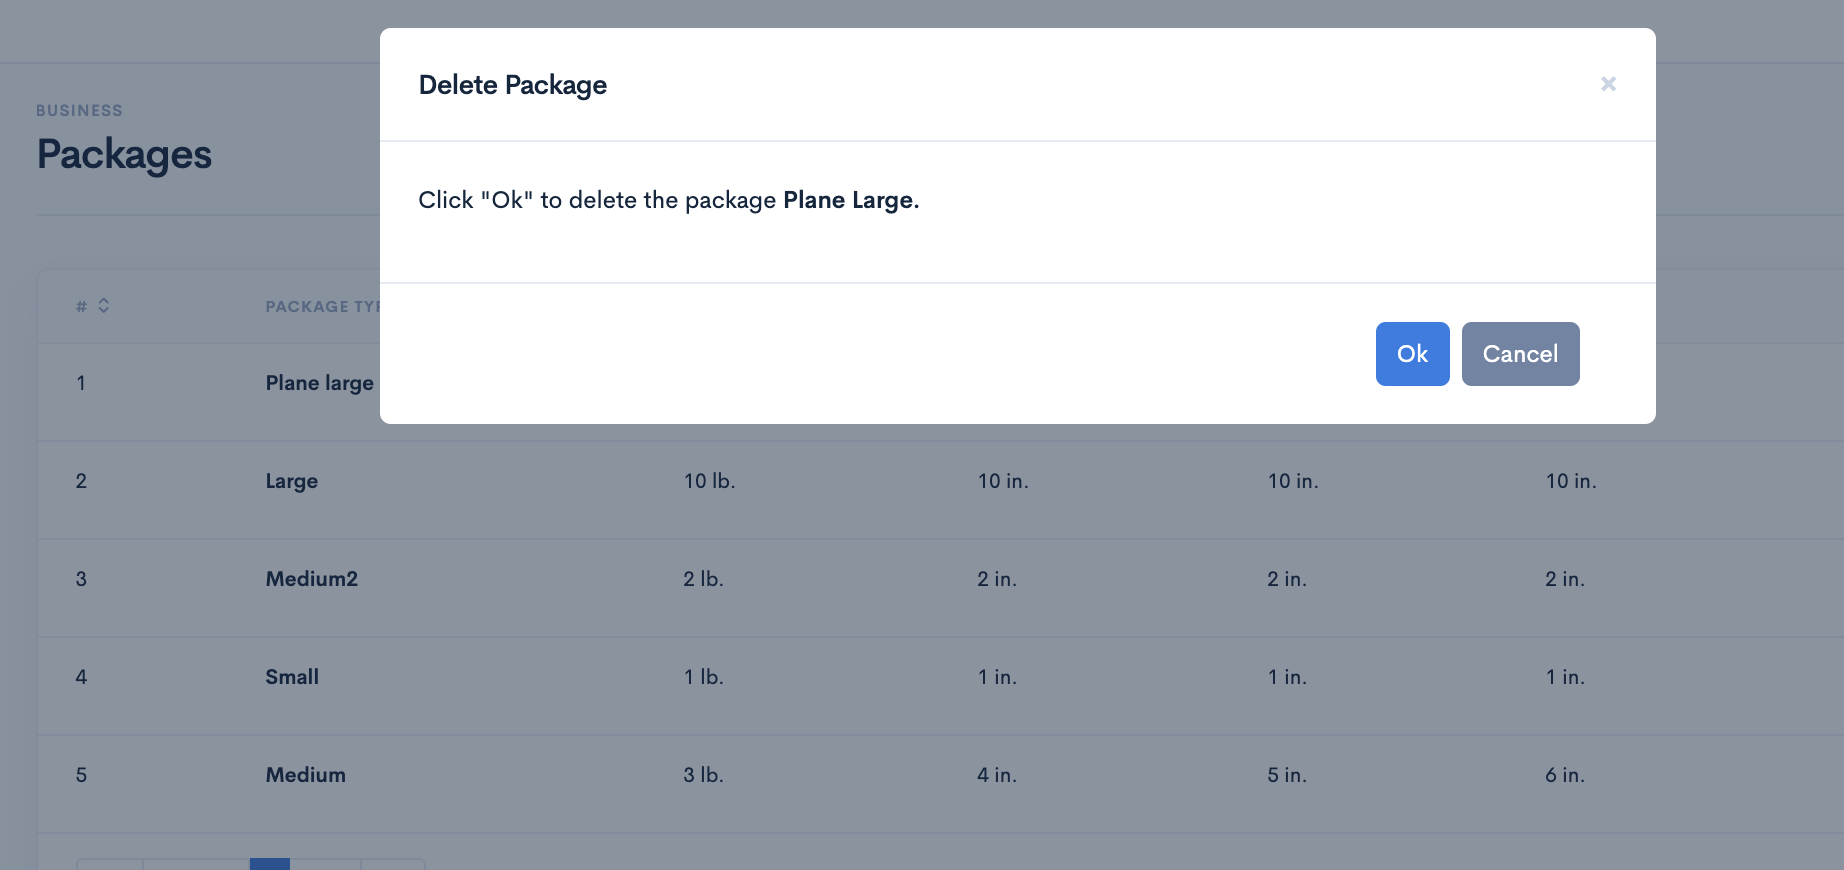
- Click on Ok to delete the selected package.
- Click on “Save” to save the changes
Table Of Content
Business
Attributes
Gathering order related data and analyzing it for making smart decisions is the way to success in any business. Now you can simply predefine and add custom order attribute fields to your checkout page and automatically receive all necessary data. Creating as many additional order attributes as you need enables you with a rich feedback tool. Use such field input types as text field, date, yes/no, dropdown, etc. and quickly process collected data on the backend.
- Create numerous order attributes of diverse types
- Customize settings for the attribute fields during checkout
- Utilize the order attributes in Orchestration for DSP selections
This is how our API & Services page looks like..
Create Attribute
Businesss can create order attributes in Order Attribute.
- After Successful login to Delivery Solutions page
- Click on the Business Tab from the left side panel
- Select Attributes under the Business Section
- Click on Create Attribute button
- You will be redirected to Add New Attribute Form as below
- Click onSave button to create new attribute.
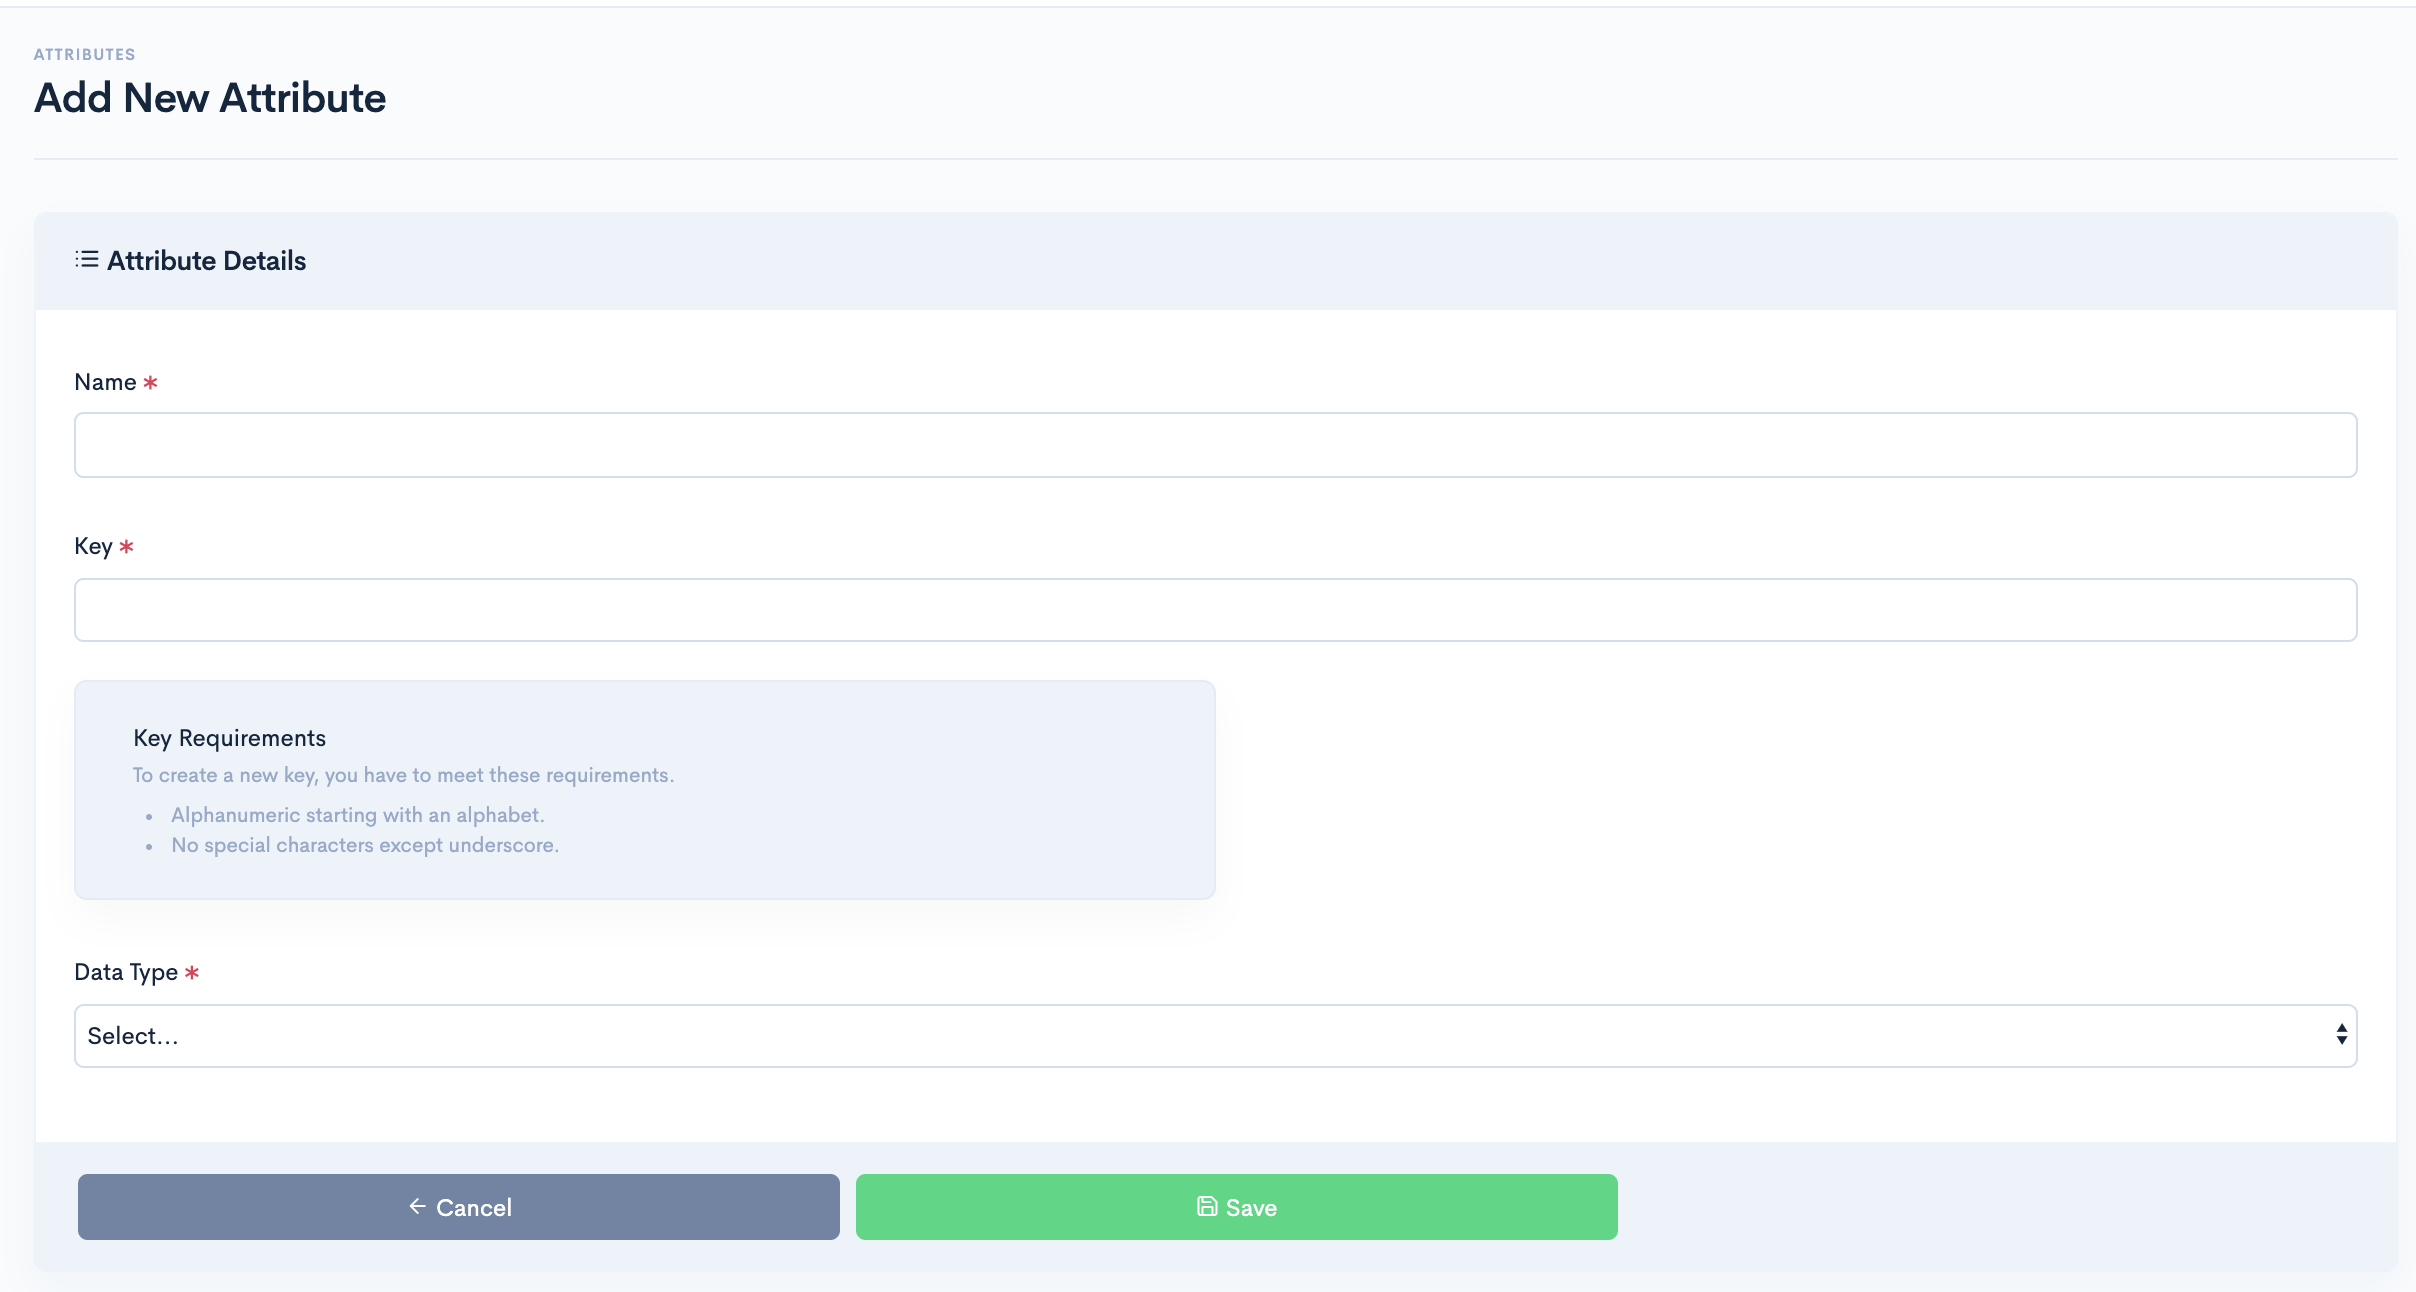
The Attribute Form seeks information for below fields:
| Field Name | Description |
|---|---|
| Name | Name of the Attribute |
| Key | A unique identification of the Attribute It can be alphanumeric. It must start with Character. No Special Characters allowed.(except '_') |
| Data Type | Type of the Attribute String Boolean Array Number |
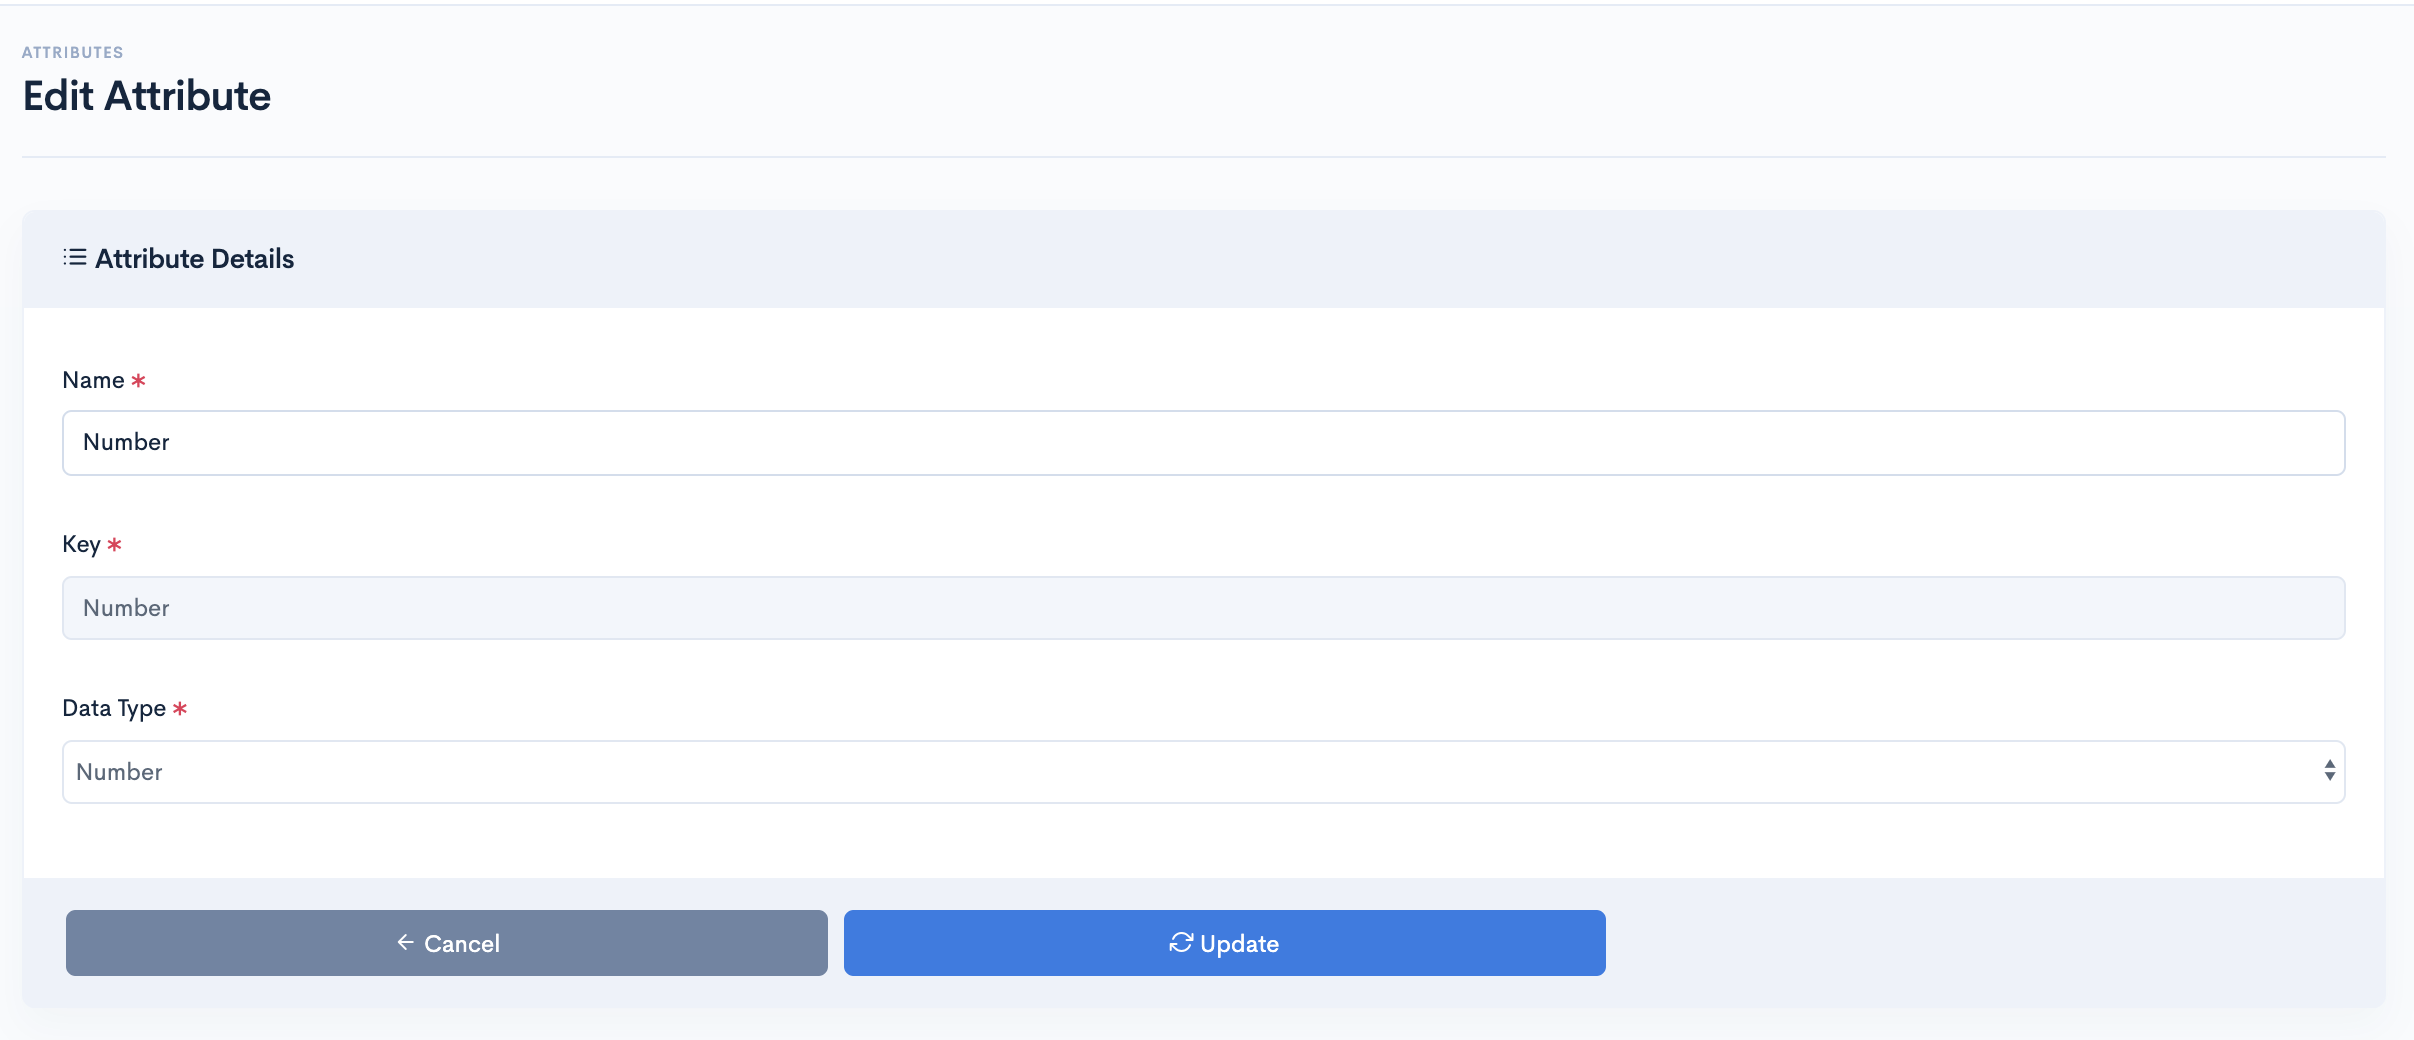
Edit Attributes
An existing order attribute can be edited.
- After Successful login to Delivery Solutions page
- Click on theBusiness Tab from the left side panel
- Select “Attributes” under the Business Section
- Click on button against the order attribute
- You will be redirected to Edit Attribute Form shown as below
- Click on “Update” once the changes have been done
Enable or Disable Attribute
Instead of removing, Businesss can opt to make an attribute inactive or activate.
- After Successful login to Delivery Solutions page
- Click on the “Deliveries” Tab from the left side panel
- Select“Attributes” under the Deliveries Section
- Click on the toggle button against the order attribute to make it active for use.
- An Active Attribute icon will look like this
- Click on the toggle button against the order attribute to make it inactive for use.
- An Active Attribute icon will look like this
Delete Attribute
You can permanently remove an order attribute.
- After Successful login to Delivery Solutions page
- Click on the Business Tab from the left side panel
- SelectAttribute under the Business Section
- Click on the bin button against Attribute Name to remove the attribute permanently
- A popup window will open as below to confirm the deletion
- Click on Ok button to delete the attribute permanently.
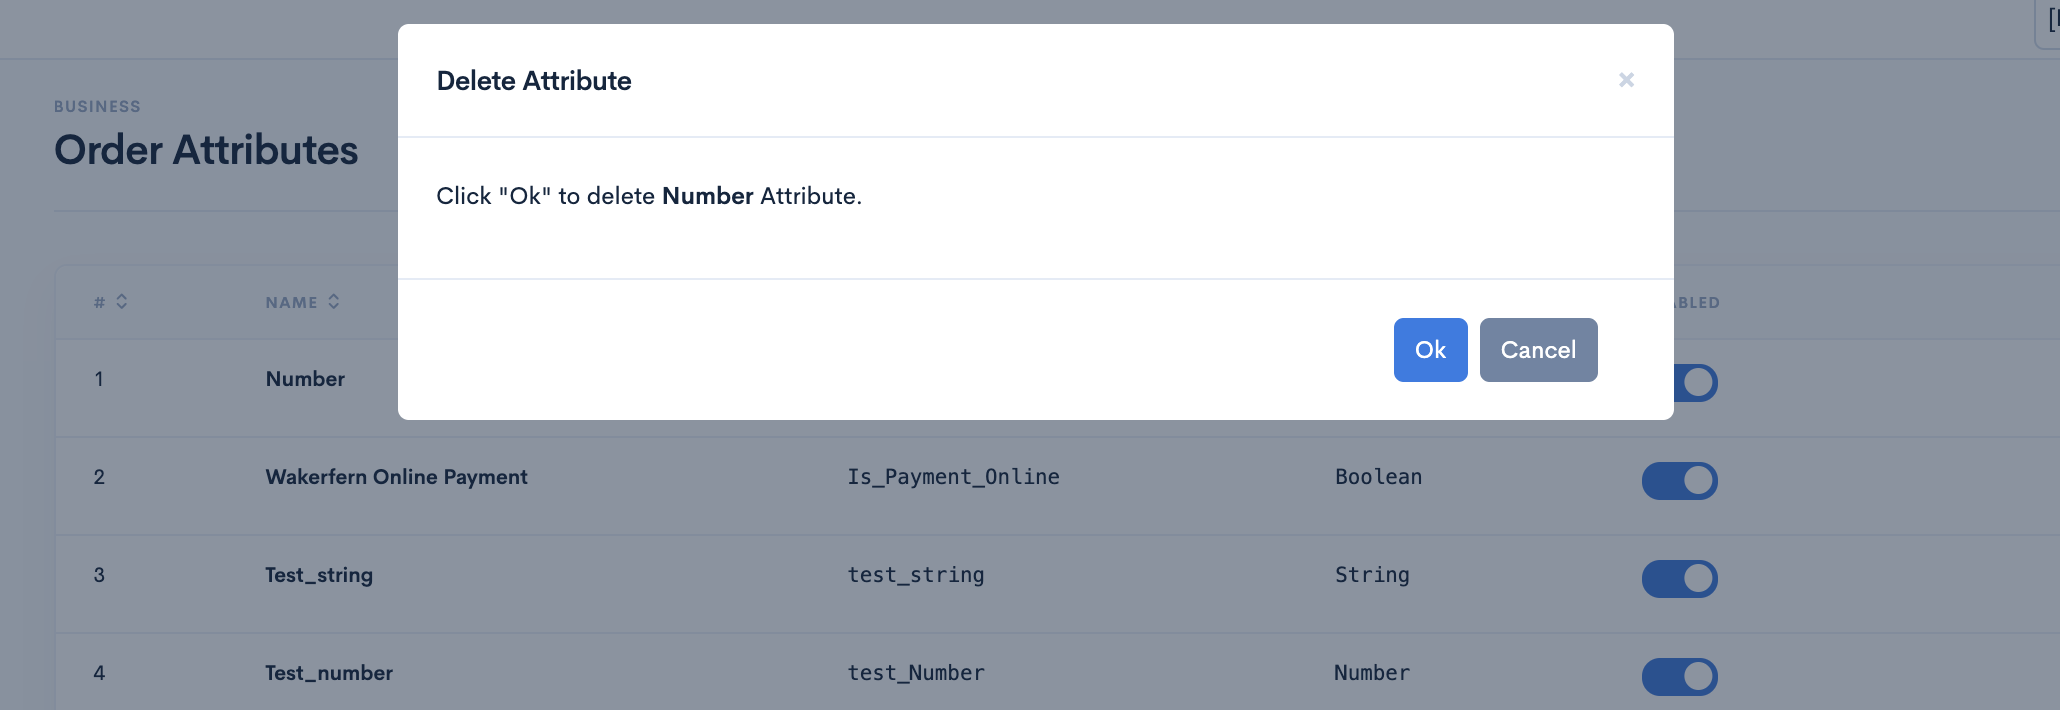
Table Of Content
Business
Alerts
Alerts sections can be helpful in setting up the alerts. It can be set for Business to receive Webhooks, SMS and Email for the set of order statuses.
This is how Alerts Page looks like
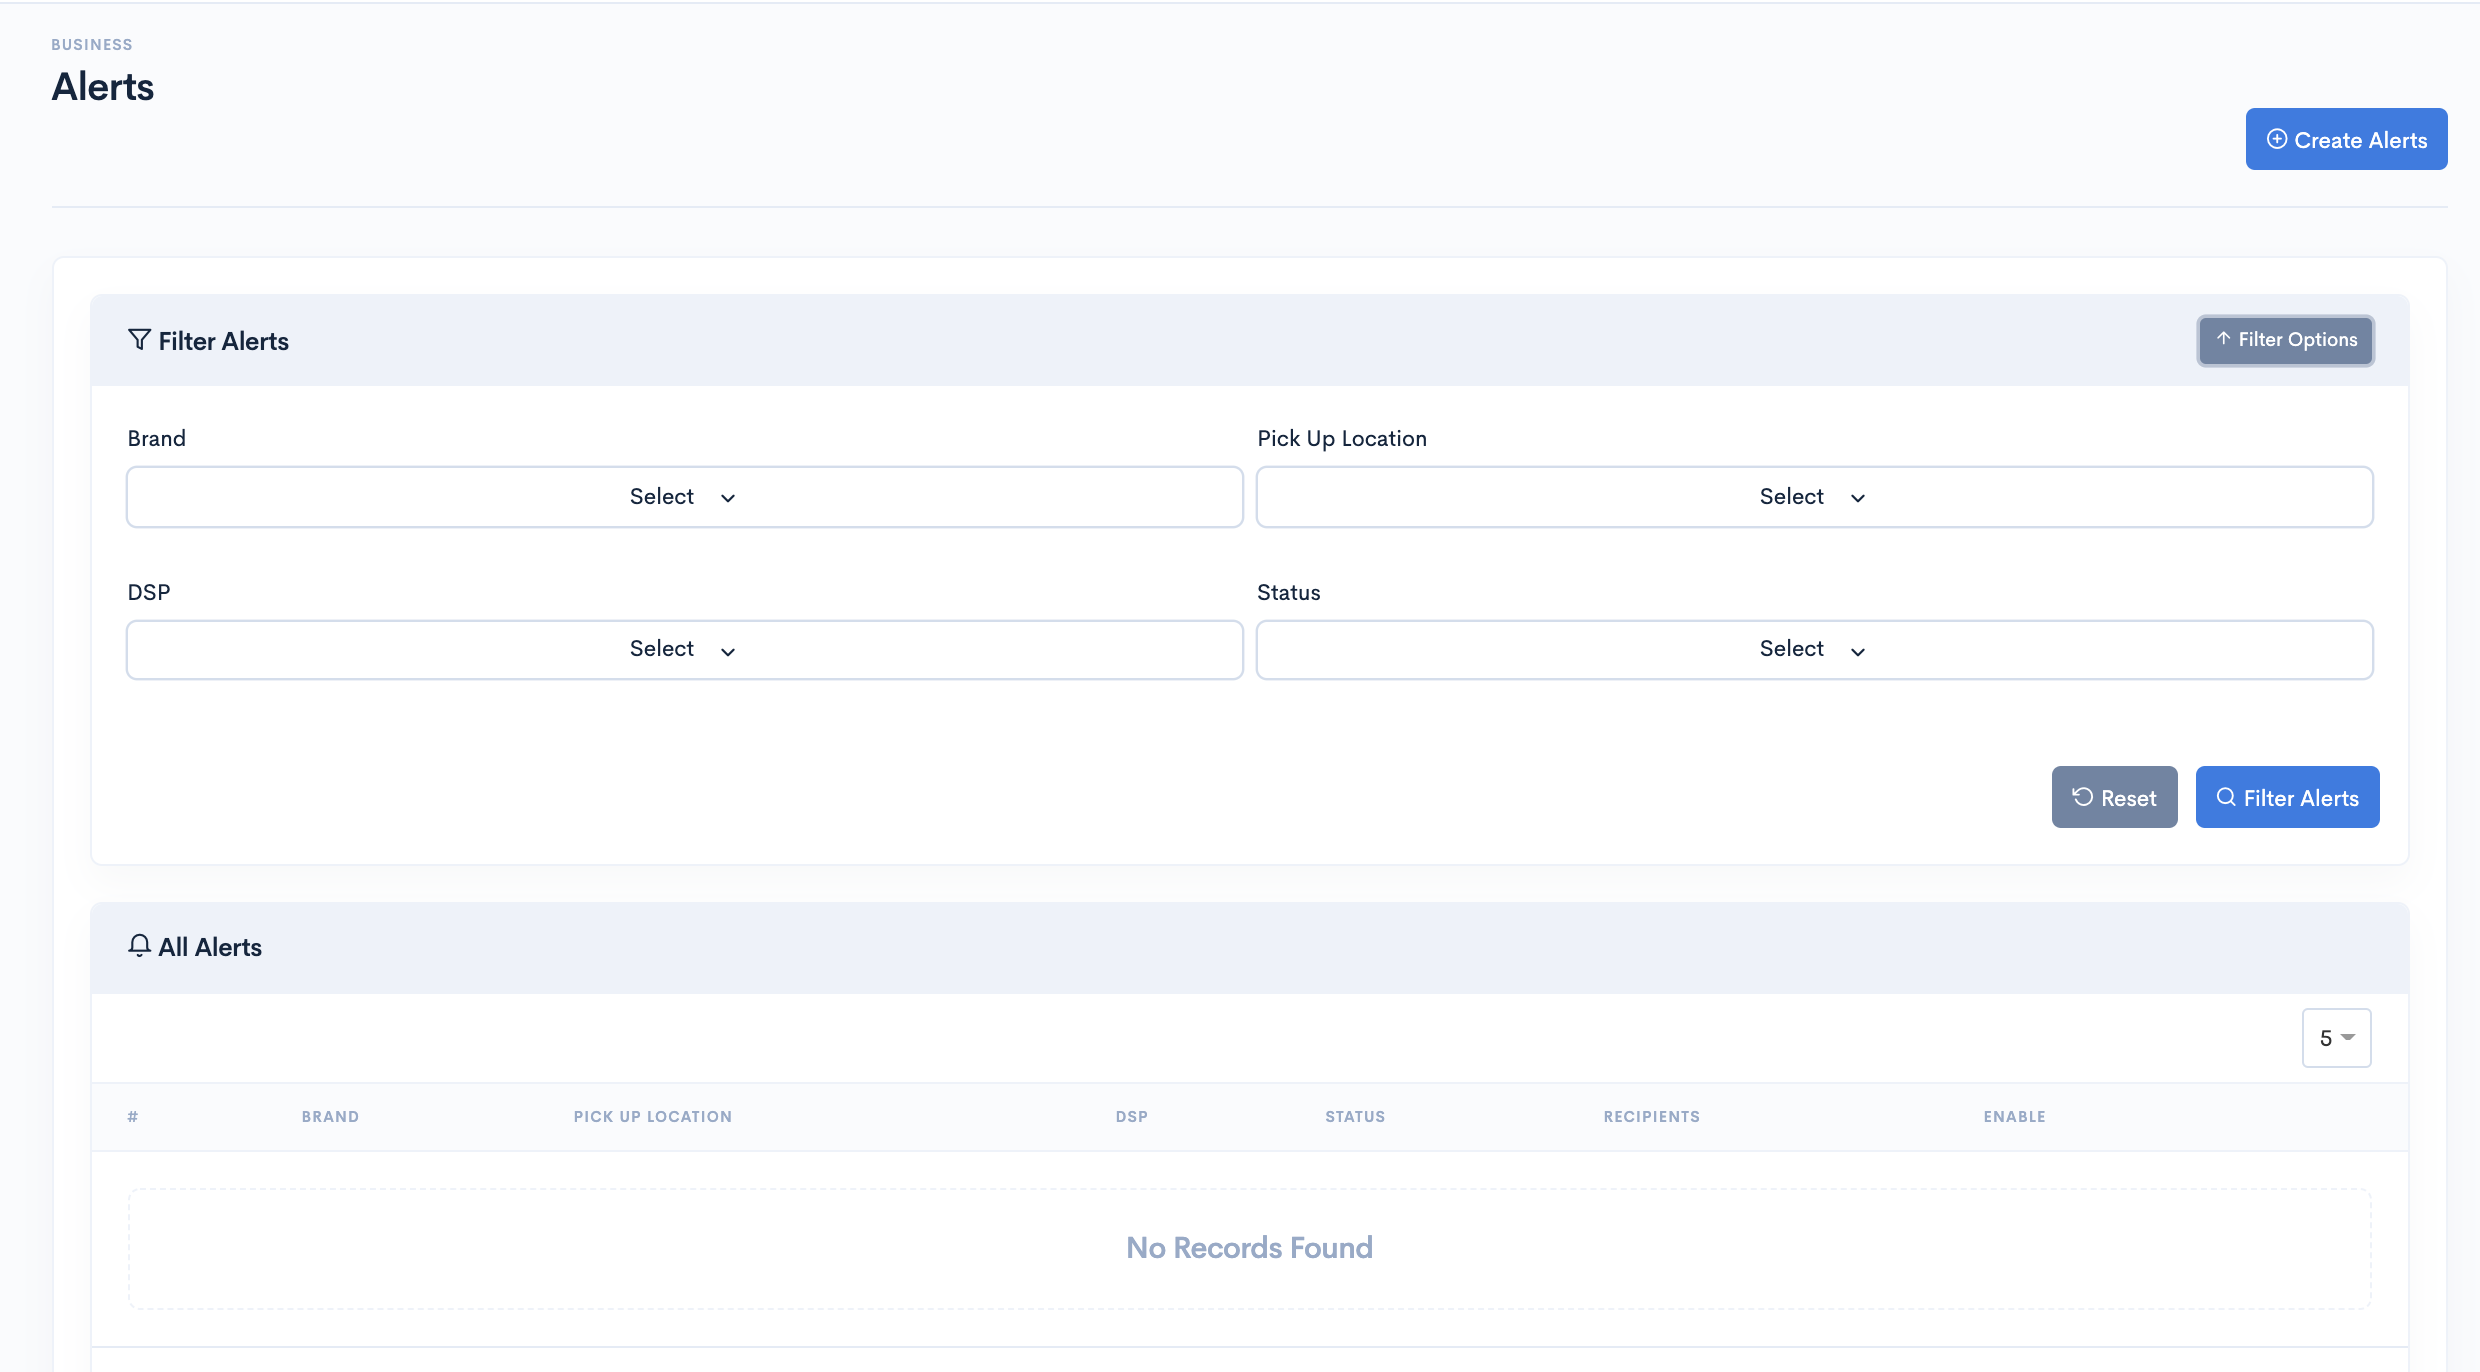
There are two sections under this page.
Filters section can be used to filter existing alerts based on some criteria such as Brand, Pick Up Locations, DSP and Order Status.
List section lets you create alerts.
Follow below instructions to create a Notification:- After Successful login to Delivery Solutions page
- ExpandBusiness section from the left side panel
- Select Alerts under the Business.
- Click on the button Create Alerts.
- This is how the Create Alert page looks like.
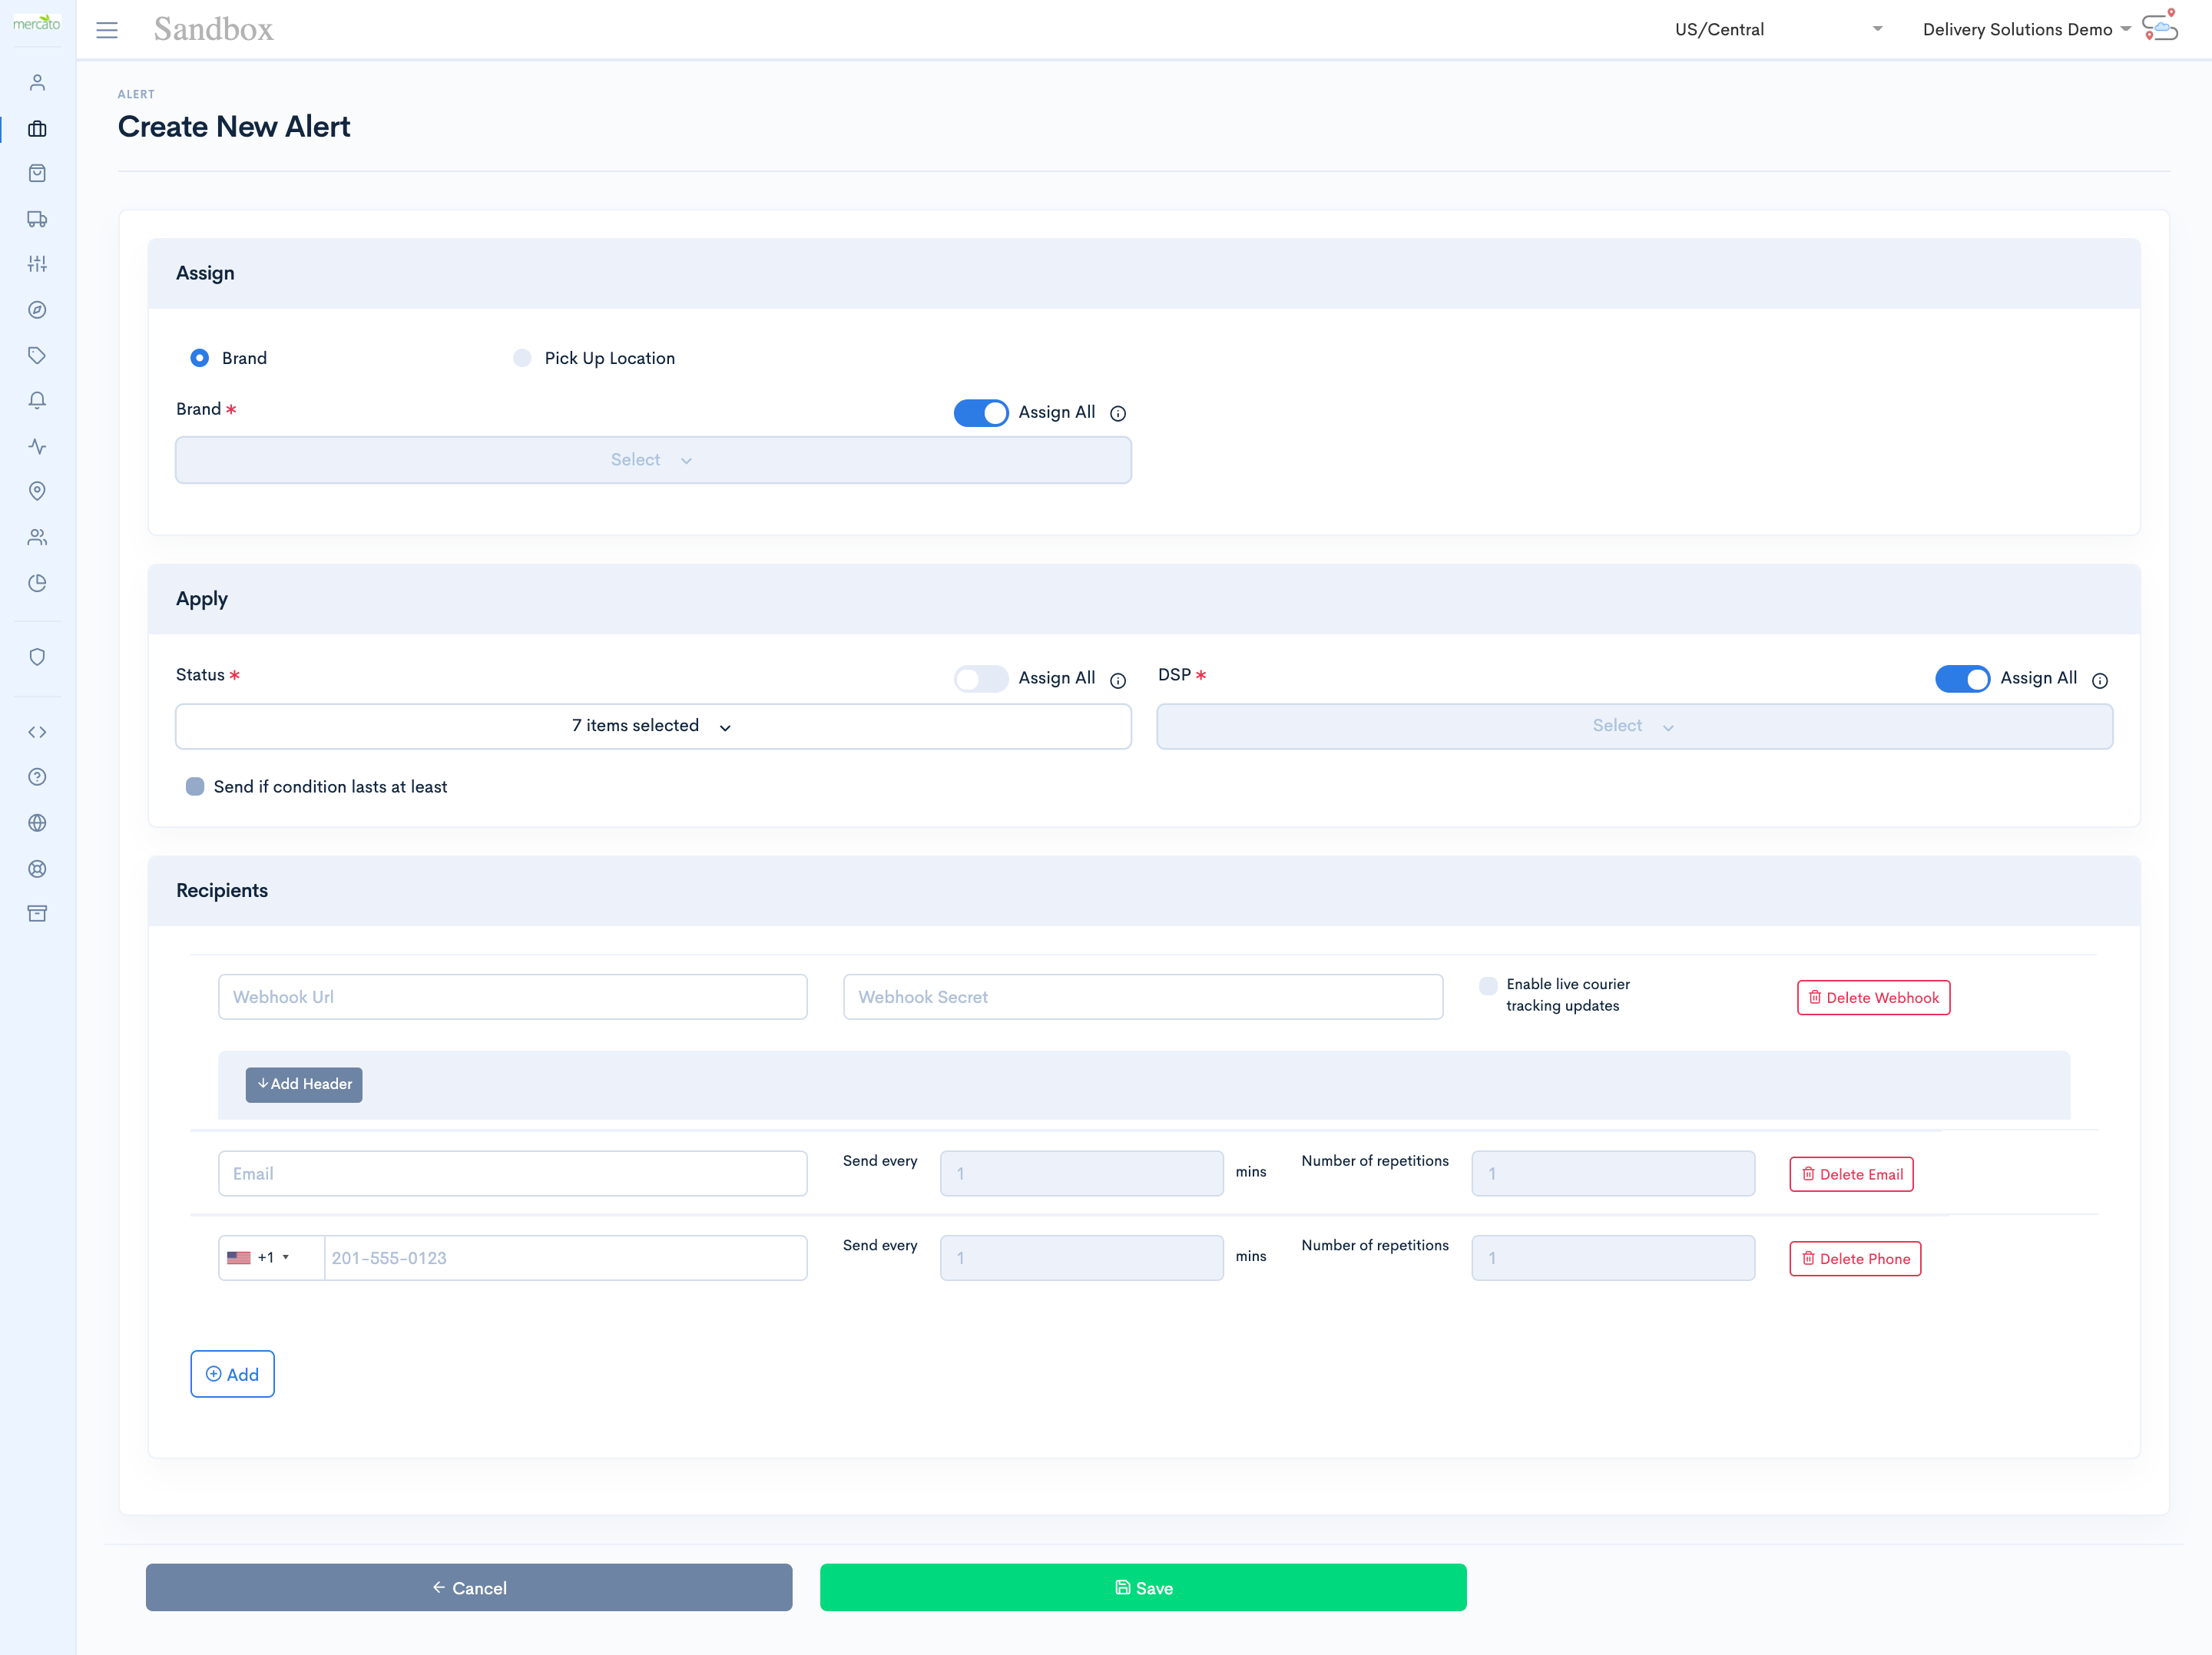
- Click on Save button to save the changes.
Basic
Alert Form seeks information for below fields:
| Field Name | Description |
|---|---|
| Assign | Alerts can be set at 2 level and will get inheritted to subsequent layer.
Brand: Select this radio button to enable Alerts to all stores under the brand. Pick Up Location: Select this radio to enable notification to all orders under the pickup location. Assigned All: This toggle remains enabled by default and notifications applies to all store/orders. |
| Apply | Status: Order status for which notification is to be sent. DSP: DSP for which notification is to be sent. Assigned All: Enable respective toggle to set notifications for all status/dsp. Send if condition lasts at least: Set Number of minutes after which alerts needs to be triggered. |
| Recipients: | Webhook: Set webhook alerts for order statuses. SMS: Set SMS alerts for order statuses. Email: Set Email alerts for order statuses. |
Table Of Content
Business
API Keys
API Keys section under Business lets you create Business API Keys. These keys helps Business Admin to access the orders under their Business. These API Keys are local to the business and cannot be used with other business under same account.
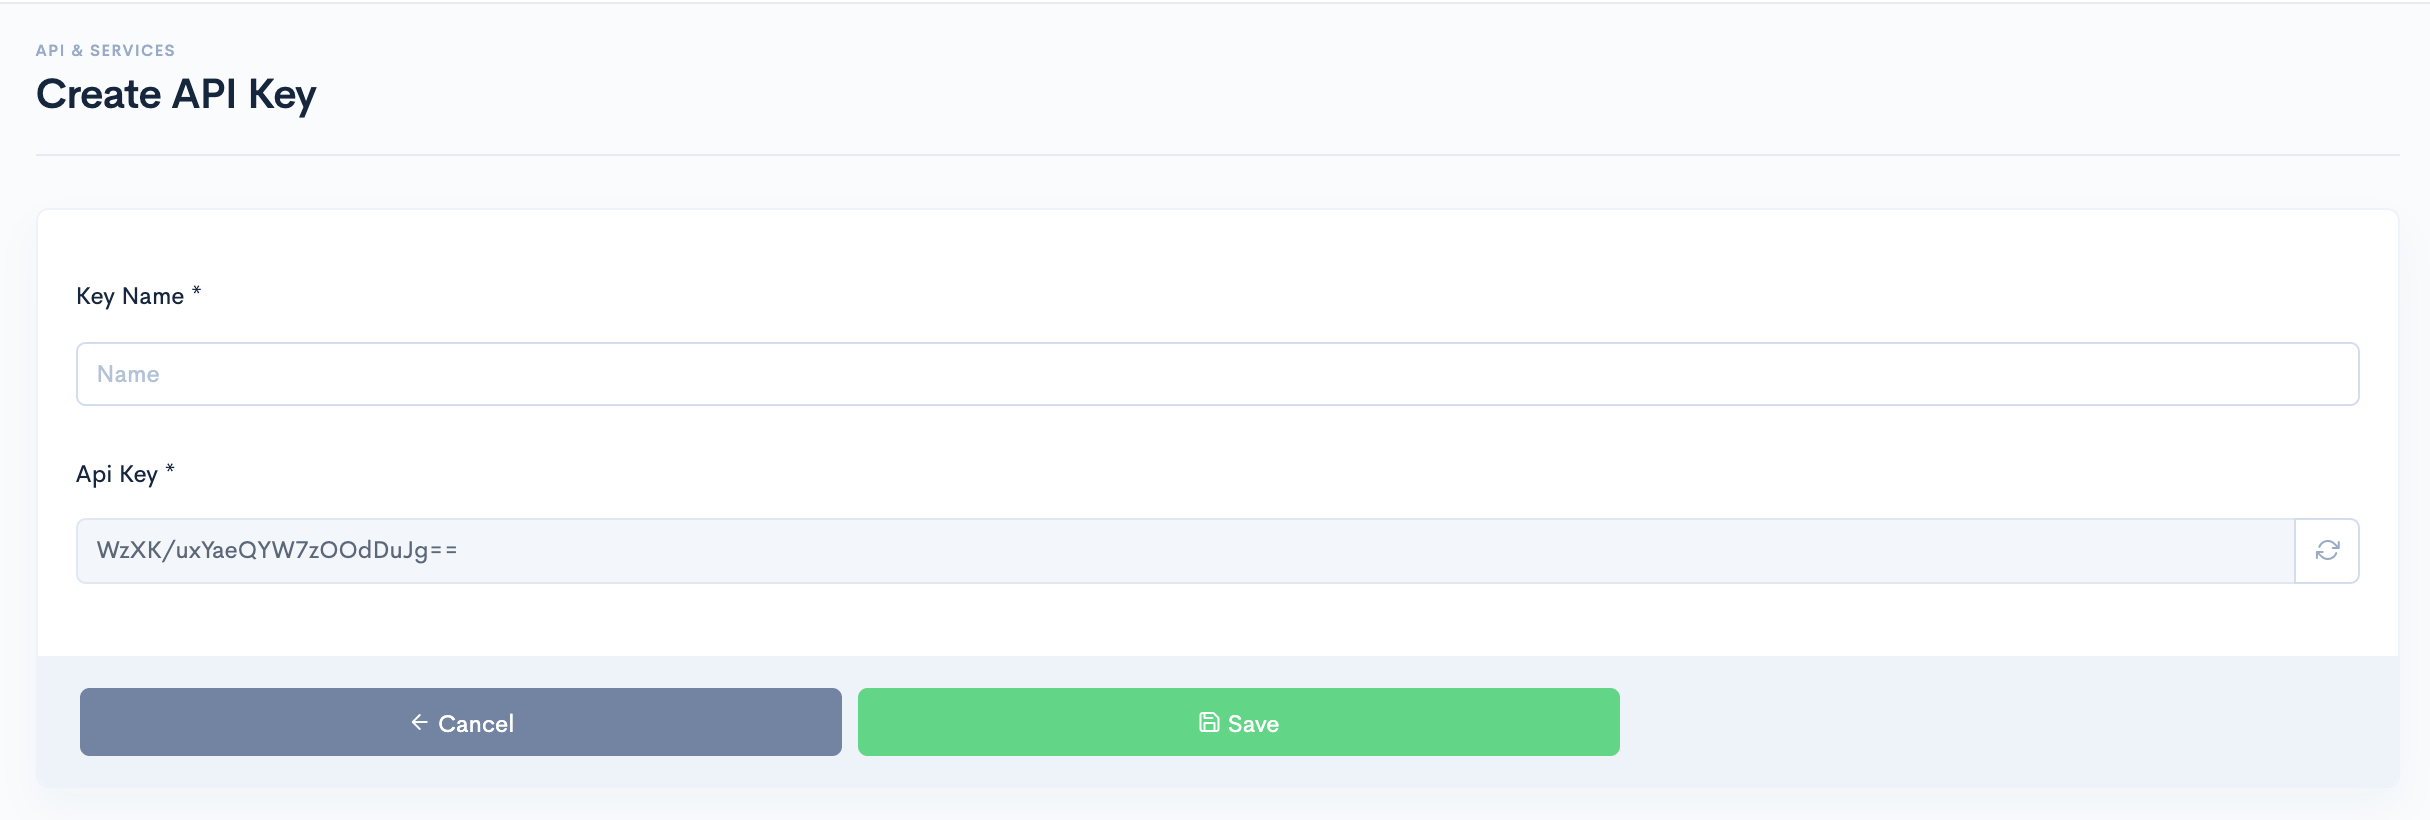
Create API Keys
Businesss can create API Keys under API Key section.
- After Successful login to Delivery Solutions page
- Click on the Business Tab from the left side panel
- Select API Keys under the Business Section
- Click on Create API Keys button
- You will be redirected to Create API Key Form as below
- Click onSave button to create new attribute.
The Attribute Form seeks information for below fields:
| Field Name | Description |
|---|---|
| Key Name | Name of the API Key |
| API Key | A unique identification of the API Key It can be alphanumeric. It must start with Character. No Special Characters allowed.(except '_') |
Edit API Key
An existing API Key can be edited.
- After Successful login to Delivery Solutions page
- Click on theBusiness Tab from the left side panel
- Select API Keys under the Business Section
- Click on button against the API Key
- You will be redirected to Edit API Key Form shown as below
- Click on “Update” once the changes have been done
Enable or Disable API Keys
Instead of removing, Businesss can opt to make an API Key Enable or Disable.
- After Successful login to Delivery Solutions page
- Click on the Business Tab from the left side panel
- Select API Keys under the Business Section
- Click on the toggle button against the order API Keys to make it enabled for use.
- A dialog box will open shown as below to seek confirmation
- An Enabled API Keys Toggle Icon will look like this
- Click on the toggle button against the order attribute to make it disable from use.
- A dialog box will open shown as below to seek confirmation
- A Disabled API Key Toggle Icon will look like this
Delete API Key
You can permanently remove an API Key.
- After Successful login to Delivery Solutions page
- Click on the Business Tab from the left side panel
- Select API Keys under the Business Section
- Click on the bin button against API Key Name to remove the API Key permanently
- A popup window will open as below to confirm the deletion
- Click on Ok button to delete the API Key permanently.
Table Of Content
Business
Compliance Check
Compliance Check page lets you check the Alcohol Compliance in a particular Zip area.
Businesss/Account Admins can check the alcohol compliance between source to destination address with the help of Zip.
- After Successful login to Delivery Solutions page
- Click on the Business Tab from the left side panel
- Select Compliance Check under the Business Section
- You will be redirected to Compliance Check Form as below
- Fill up the details in the form
- Click onCheck button to Check the compliance.
- You will be able to see the compliance results shown in a panel below the form.
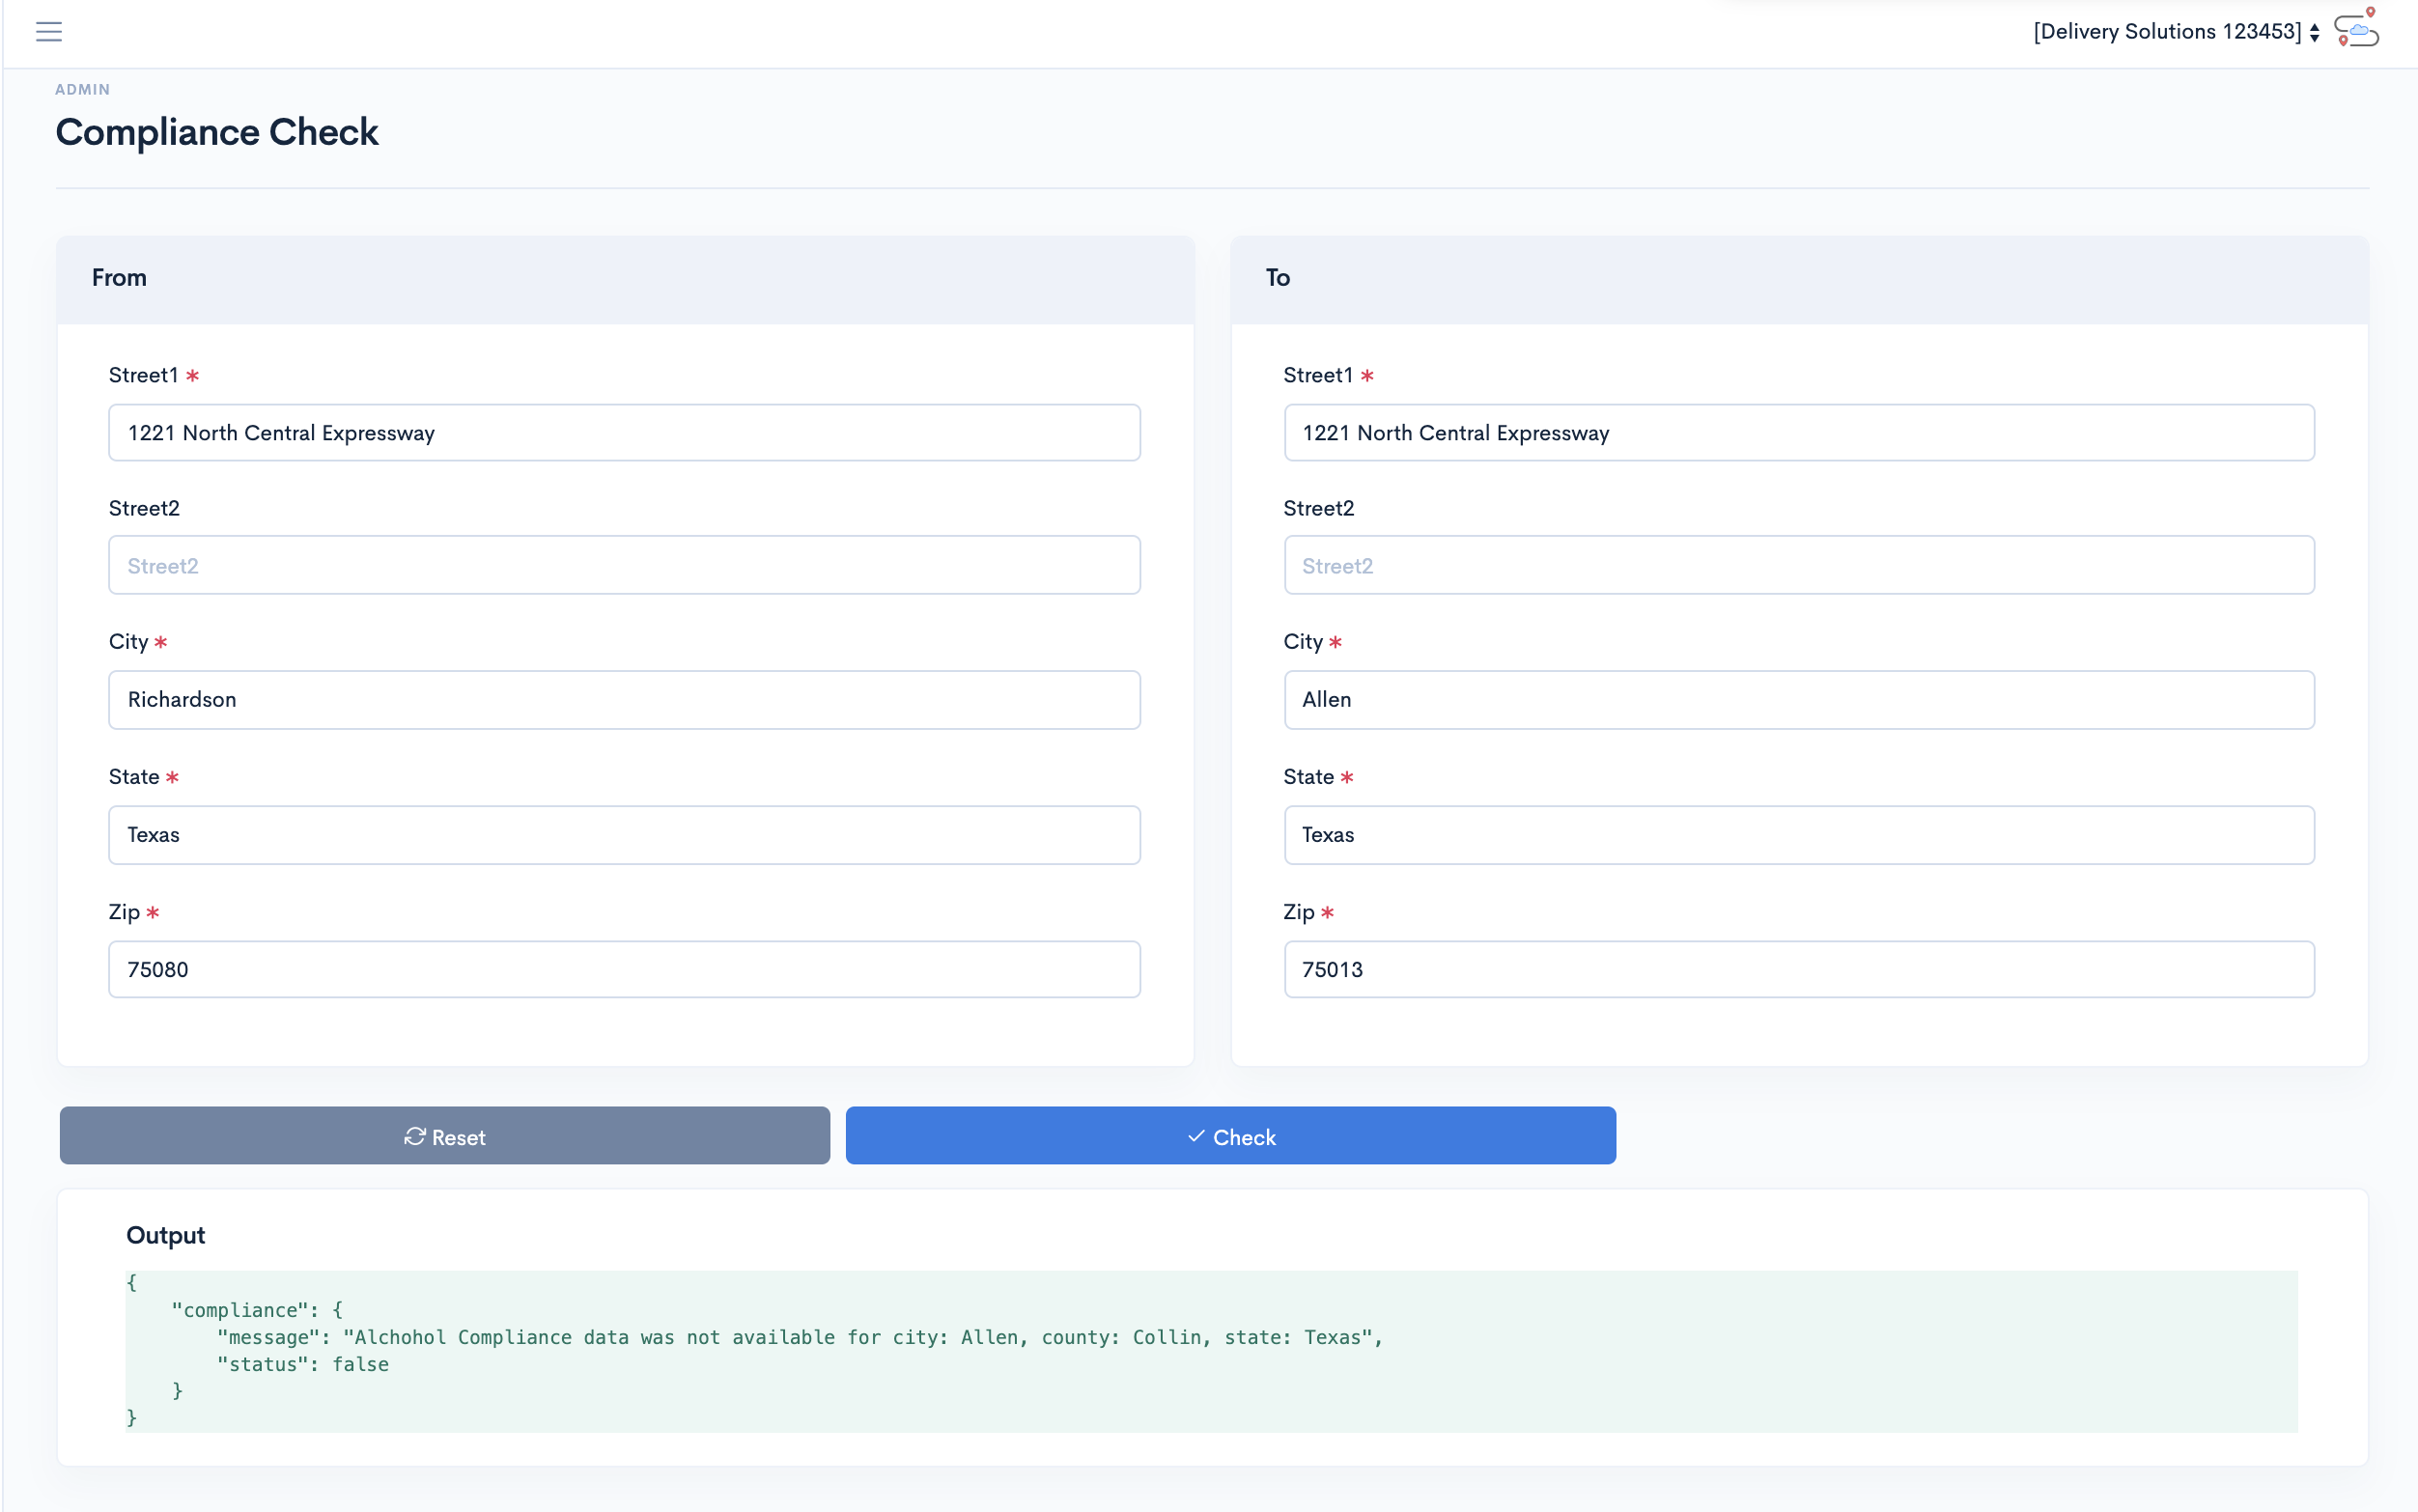
The Compliance Check Form seeks information for below fields:
| Field Name | Description |
|---|---|
| Street | Name of the street along with Apartment number |
| Street2 | Street2 field can take additional address details. This field is optional. |
| City | Name of the City |
| State | Name of the State/Province |
| Zip | Postal Code of the area |
Table Of Content
Settings
Auto Retry
Auto Retry specifies whether an attempt to be made to access a Page/URL/API Request/Response after its initial failure response. Auto Retry Configuration lets you set the number of attempts to be made during a particular timeframe from the initial failure.
Auto Retry Configurations
All the Auto Retry attempts of an order are captured in Fetch Logs and considered as a part of Order Lifecycle.
- After Successful login to Delivery Solutions page
- Click on the Business Tab from the left side panel
- Select Auto Retry Configuration under the Business Section
- You will be redirected to Auto Retry Configuration Form shown as below
- Click on Update once the changes have been done
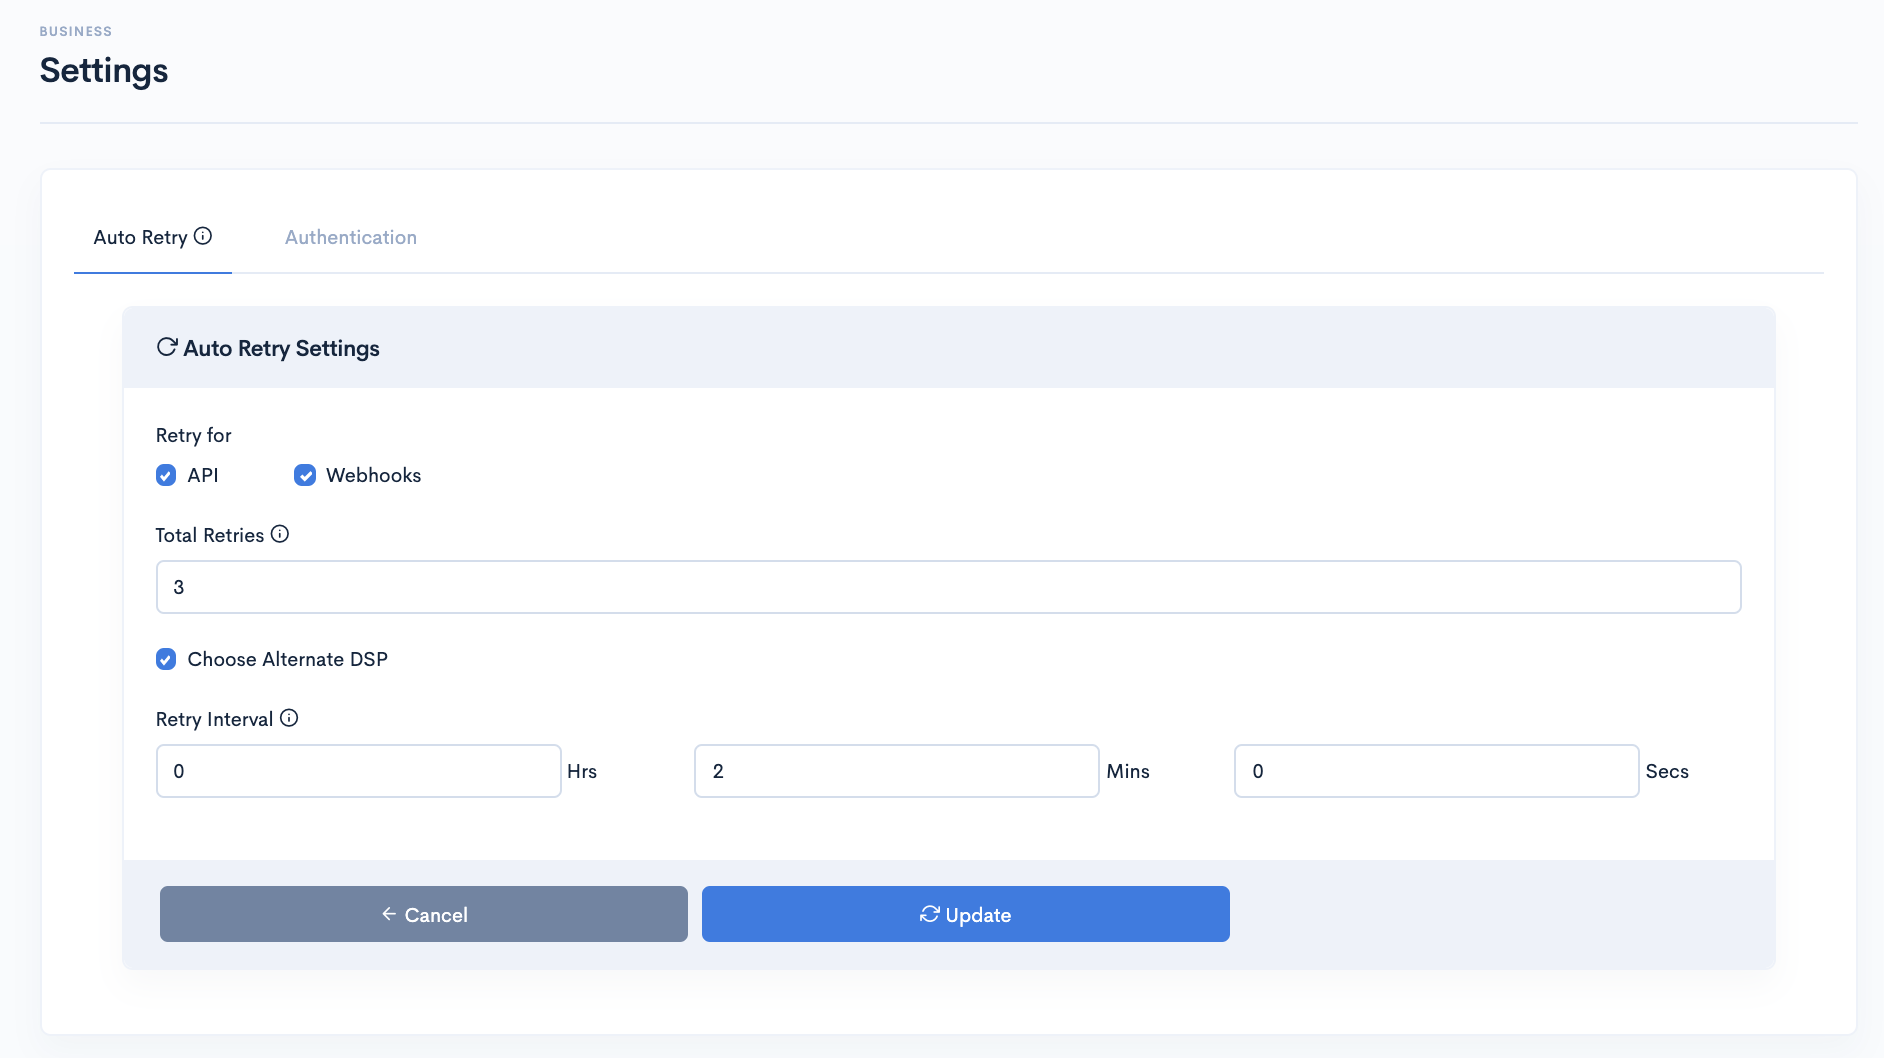
The Auto Retry Configuration Page seeks information for below fields:
| Field Name | Description |
|---|---|
| Retry for | Auto Retry can take place at API or Webhook level. if any error is encountered, Auto retry will automatically hit the URL by followig configuration made on this page |
| Events | Event are nothing but possible errors/exceptions faced during a communication between pages/integrations..
|
| Total Retries | Number of attempts or try can be set upon receiving any of the above error code |
| Choose Alternate DSP | This option lets you switch to second prefferred DSP in absence of first preffered DSP. |
| Retry Interval | After every XX(Hrs/Mins/Secs) you want "Auto Retry" to re-connect to the errored URL. |
Settings
Authentication
Delivery Solutions facilitates Single Sign on Authentication. SAML authentication is the process of verifying the user's identity and credentials (password, two-factor authentication, etc.). SAML authorization tells the service provider what access to grant the authenticated user
SSO Configuration Page
- After Successful login to Delivery Solutions page
- Click on the Business Tab from the left side panel
- Select Settings under the Business Section
- Click on Authentication Tab
- Click on Configure button
- You will be redirected to Authentication Form as below
- Select the SSO Type as SAML or OpenID. Make required configuration
- Click on Update button to create new attribute.
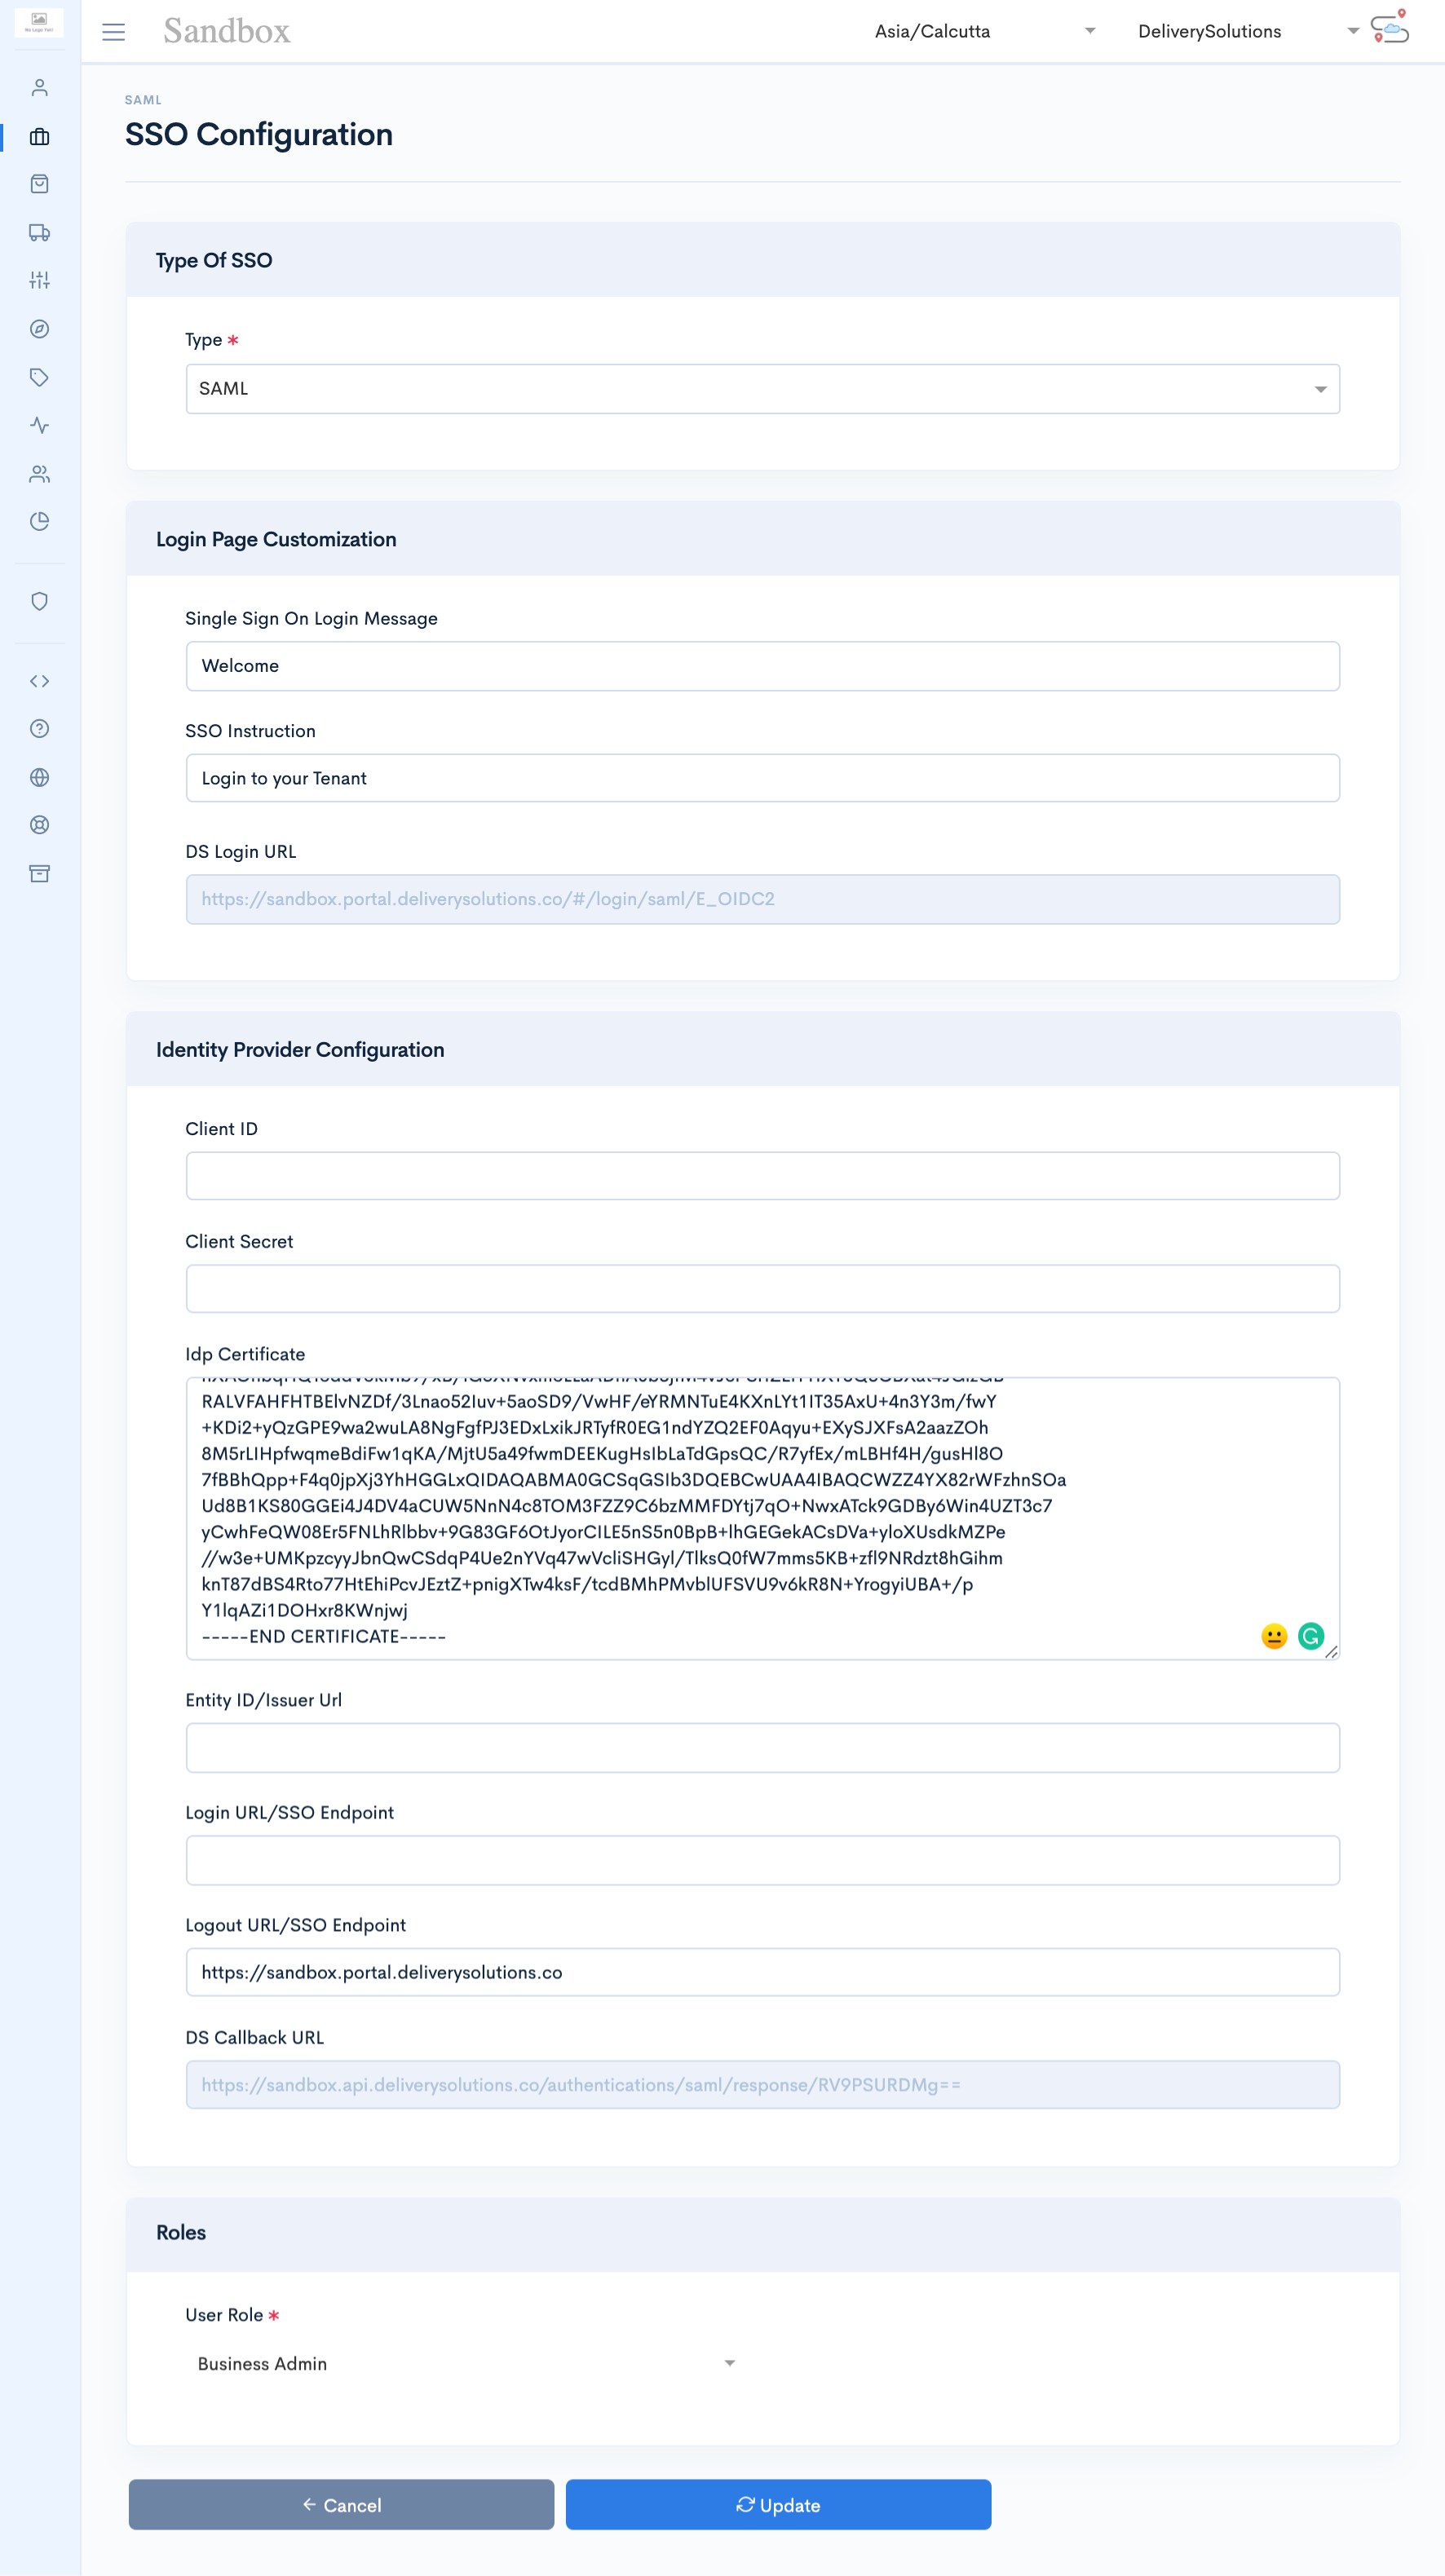
The Authentication Page seeks information for below fields:
| Field Name | Description |
|---|---|
| Single Sign On Login Message | Message to be displayed once User has been successfully logged in |
| SSO Instruction | Specific Instruction before the Login |
| Entity ID/Issuer URL | Issuer - The Entity ID—a URL that uniquely identifies your SAML identity provider. SAML assertions sent to Delivery Solutions must match this value exactly in the attribute of SAML assertions. Entity ID - The issuer in SAML requests generated by Delivery Solutions, and is also the expected audience of any inbound SAML Responses. |
| Login URL/SSO Endpoint | SAML endpoints and URLs. Communications within a federation take place through endpoints on the servers of the identity provider and service provider partners |
| Logout URL/SSO Endpoint | SAML endpoints and URLs. Communications within a federation take place through endpoints on the servers of the identity provider and service provider partners |
| Client ID | Client ID is similar as Entity ID. |
| Client Secret | Client Secret (OAuth 2.0) is a secret used by the OAuth Client to Authenticate to the Authorization Server. The Client Secret is a secret known only to the OAuth Client and the Authorization Server. Client Secret must be sufficiently random to not be guessable |
| Idp Certificate | An identity provider (abbreviated IdP or IDP) is a system entity that creates, maintains, and manages identity information for principals while providing authentication services to relying applications within a federation or distributed network. |
| DS Callback URL | A callback URL will be invoked by the API method you're calling after it's done. So if you call. |
| DS Login URL | The Delivery Solutions login page URL |
SAML Authentication
SAML is an XML-based framework for authentication and authorization between two entities: a Service Provider and an Identity Provider. The Service Provider agrees to trust the Identity Provider to authenticate users. In return, the Identity provider generates an authentication assertion, which indicates that a user has been authenticated.
SAML is a standard single sign-on (SSO) format. Authentication information is exchanged through digitally signed XML documents. It's a complex single sign-on (SSO) implementation that enables seamless authentication, mostly between businesses and enterprises.
With SAML, you don't have to worry about typing in authentication credentials or remembering and resetting passwords.
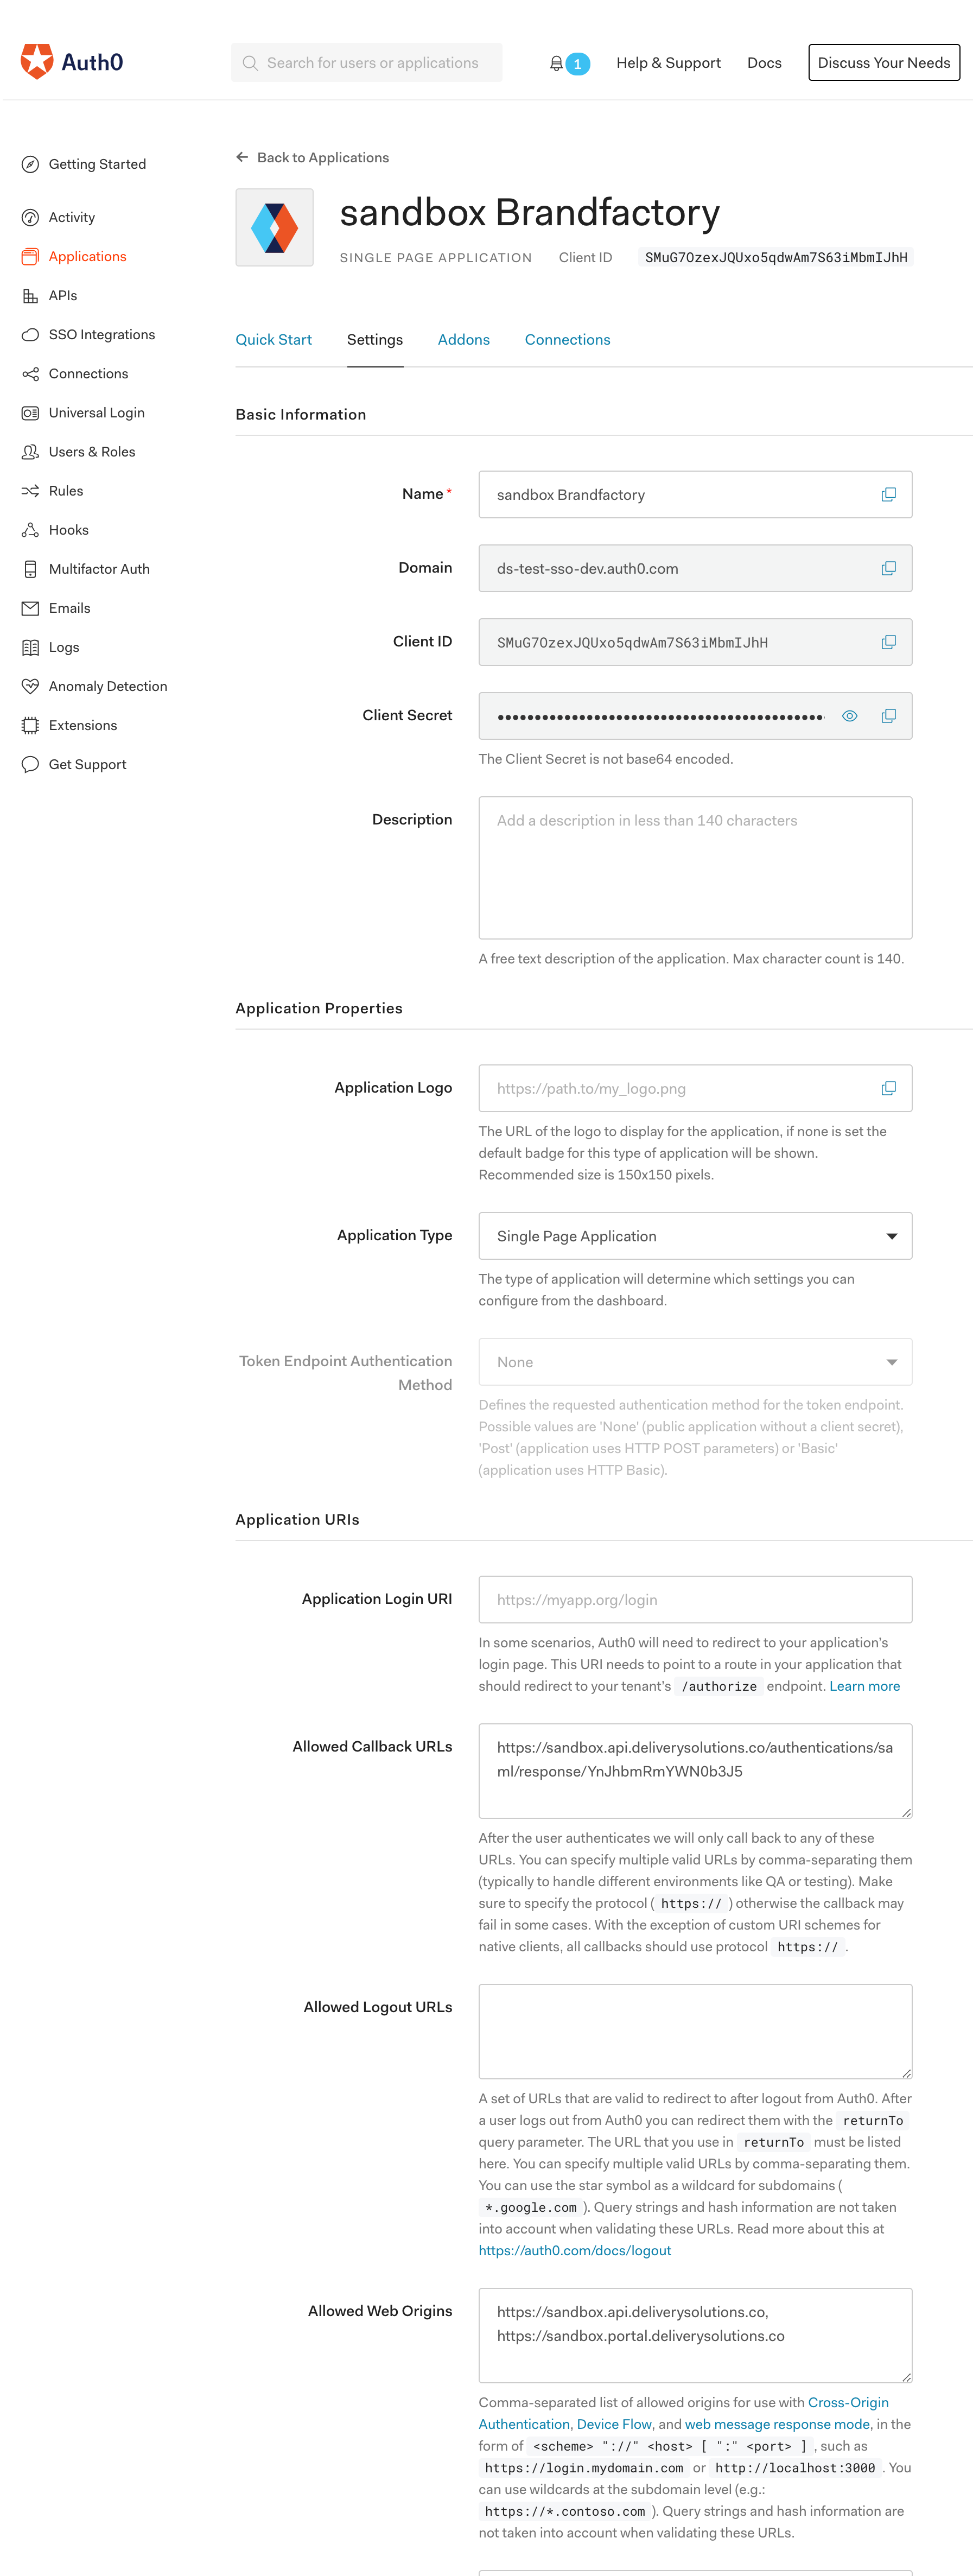
Auth0
Auth0 is a flexible, drop-in solution to add authentication and authorization services to your applications.Your team and organization can avoid the cost, time, and risk that comes with building your own solution to authenticate and authorize users.
Each time a user tries to authenticate, Auth0 will verify their identity and send the required information back to your app.
- Create an application in any of the SAML Platforms E.g., Auth0
- Open Delivery Solutions SSO Configuration Page.
- Select the SSO Type as SAML.
- Copy the DS Callback URL from SSO Configuration Page and paste in the Allowed Callback URLs at Auth0 side.
- Add the portal and API links in the Allowed Web Origins and Allowed Origins (CORS) Section.
Name Link Sandbox Portal Link https://sandbox.portal.deliverysolutions.co Sandbox API Link https://sandbox.api.deliverysolutions.co Production Portal Link https://production.portal.deliverysolutions.co Production API Link https://production.api.deliverysolutions.co
- Enter the Client Id, Client Secret and IdP Certificate of the Auth0 application in the respective fields on SSO Configuration page.
- Enter the Identity Provider Login Url from Auth0 application in the Login Url/SSO Endpoint on the SSO Configuration Page.
- Refer below screenshot for reference.
Microsoft Azure
Basic StepsA. SAML based Single-sign-on B. Manifest C. User Attributes & Claims D. Users & Groups
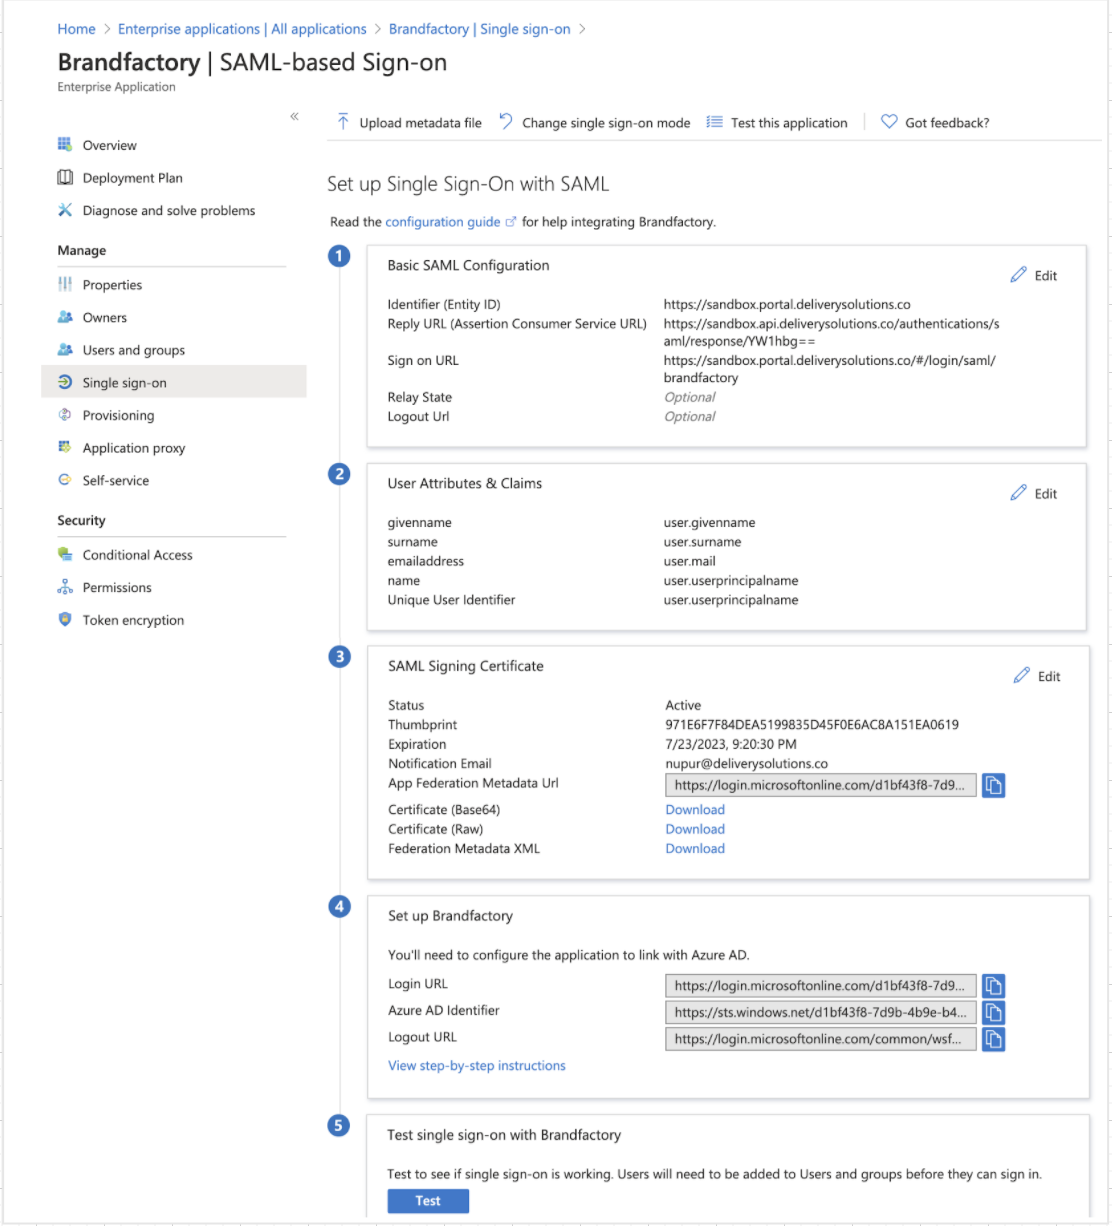
A. SAML based Single-sign-on- Login to Microsoft Azure
- Go to Single-sign-on under Manage section in your Azure Application.
- Edit Basic SAML Configuration. Copy the DS Callback URL from SSO Configuration Page into the Reply URL. at Azure side.
- This will ensure that once the user is authenticated via Azure. User will be redirected to Delivery Solutions.
- Refer below sample configuration in Azure.
- It is required to create a role in Azure to map with Delivery Solutions Role. These Roles will help in restricting the view in Delivery Solutions for the authenticated user.
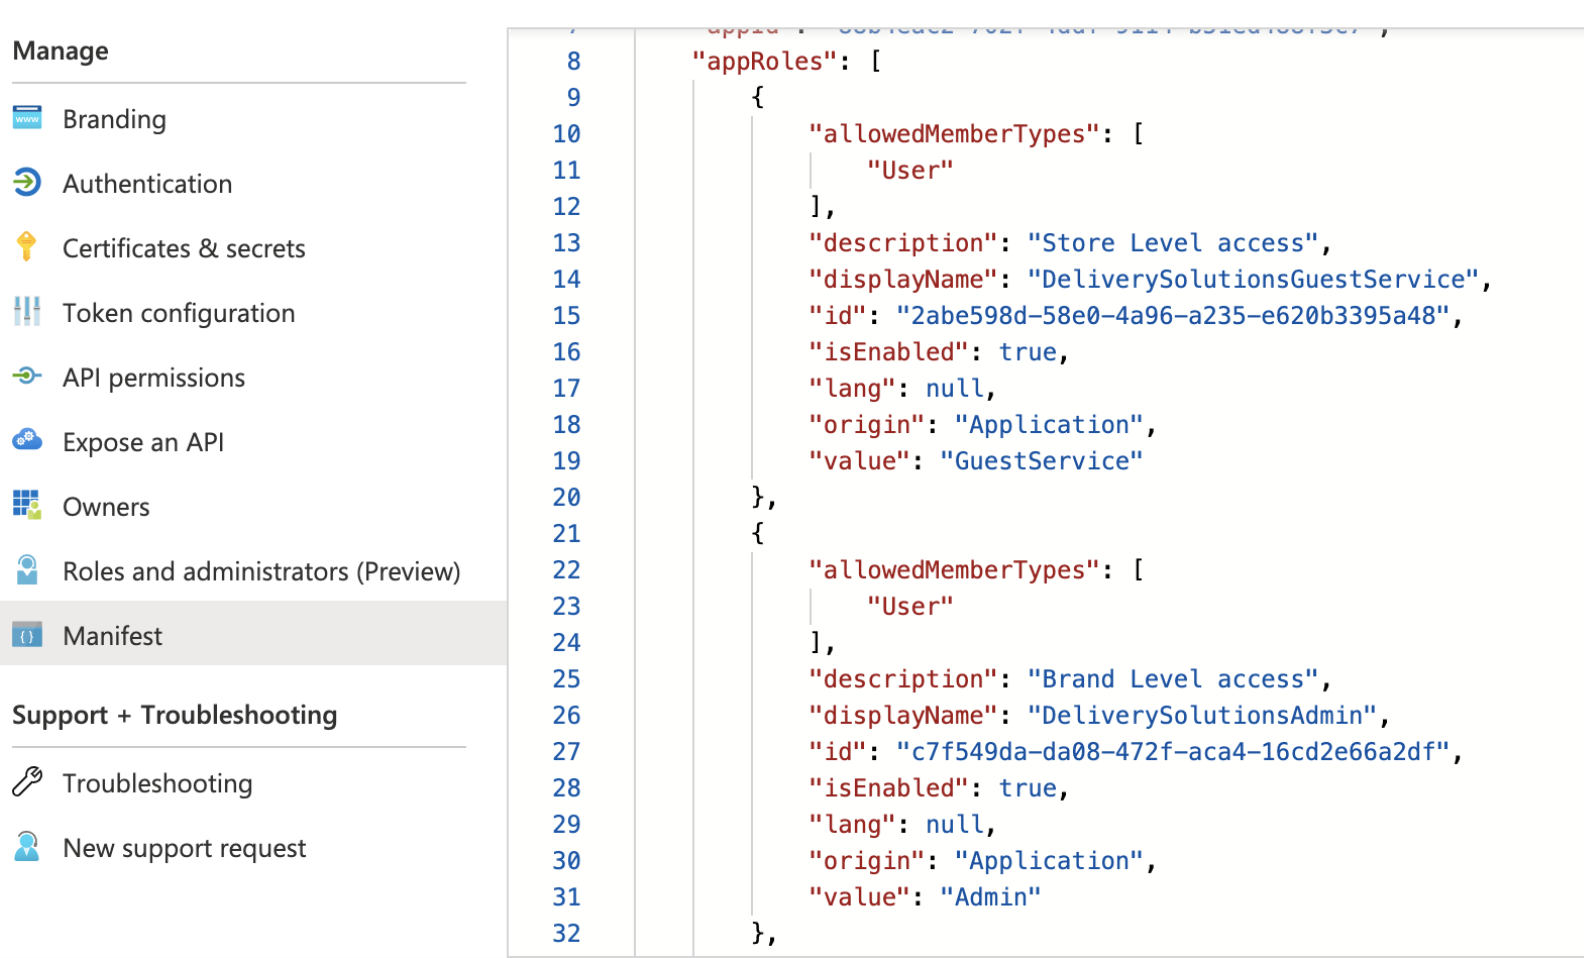
- Go to Manifest under App Registrations to map the Azure Roles with Delivery Solutions Roles.
- Create a Role mapping in appRoles in the Manifest as shown below.
- displayName: Role name in Microsoft Azure.
- value: Role name in Delivery Solutions. Make sure it does not have spaces.
- isEnabled: Set true to list the role in the Users & Groups.
- This is how the manifest should look like.
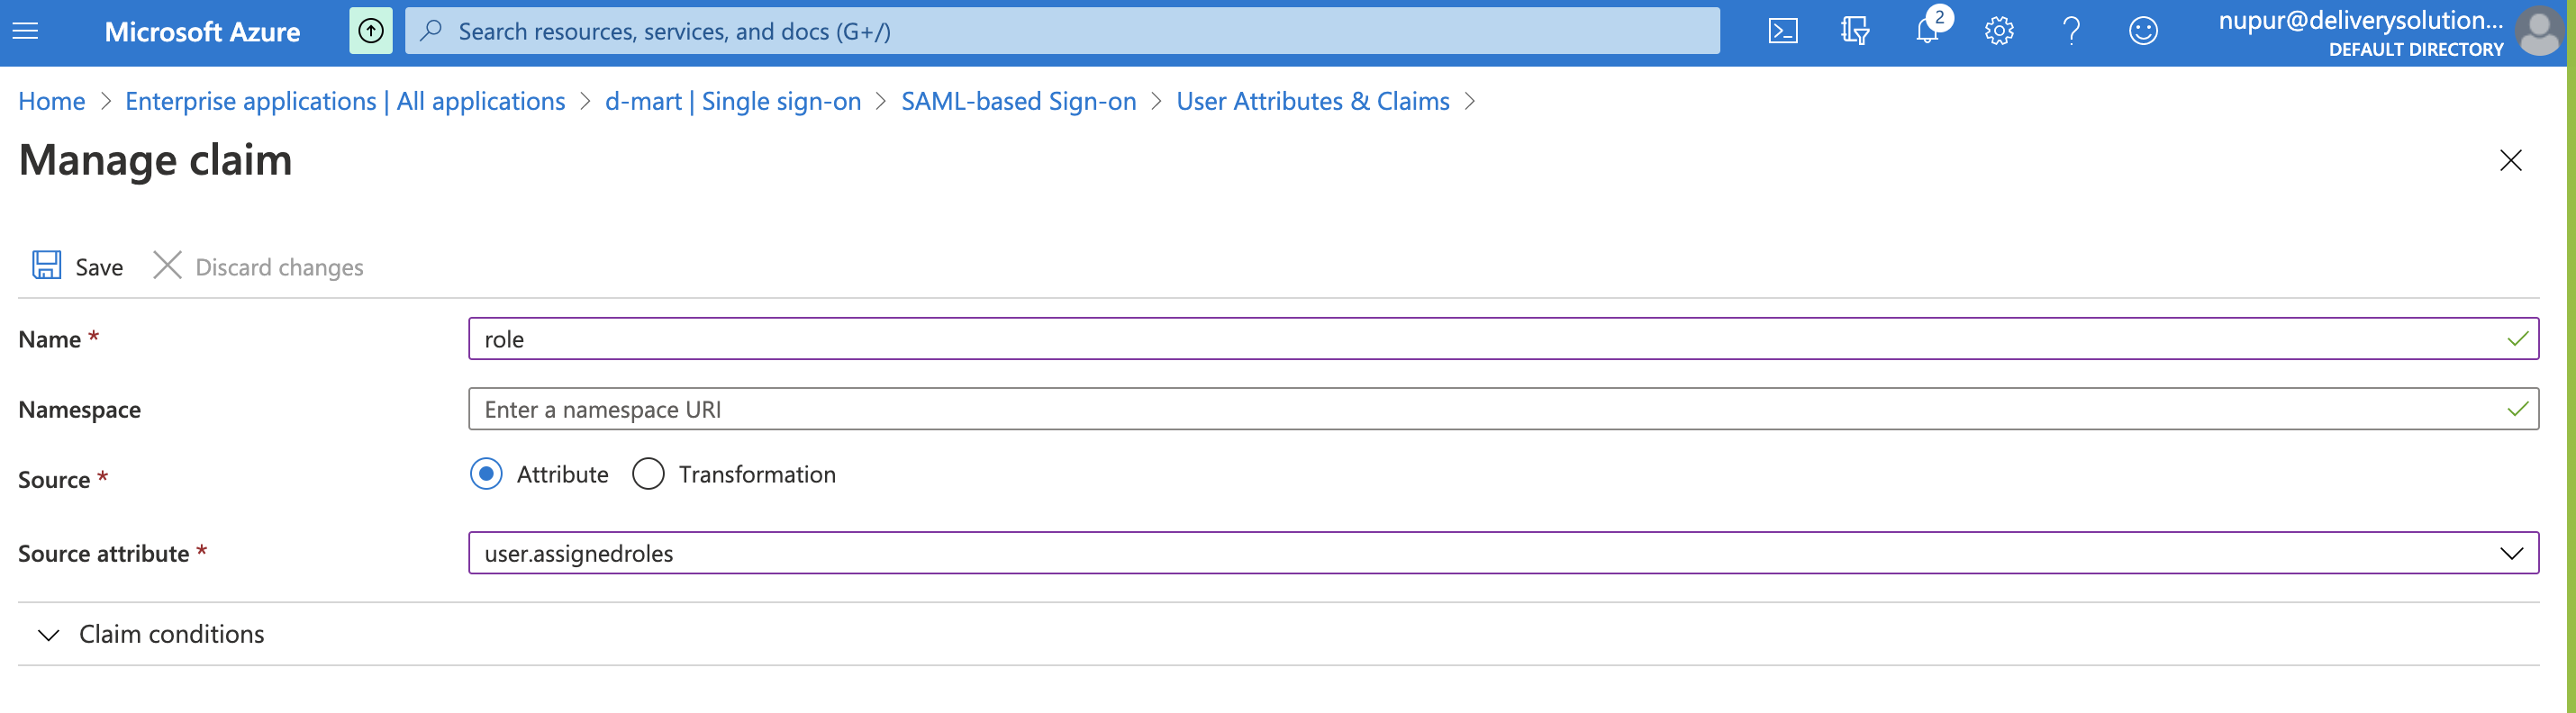
- Once the above configuration is completed. It is required to create claim in order to map Azure Roles with Delivery Solutions Role.
- Go to Attributes & Claims under your application in Azure.
- Click on Add New Claim.
- Name as role.
- Source Attribute as user.assignedroles.
- Click on Save to save the claim.
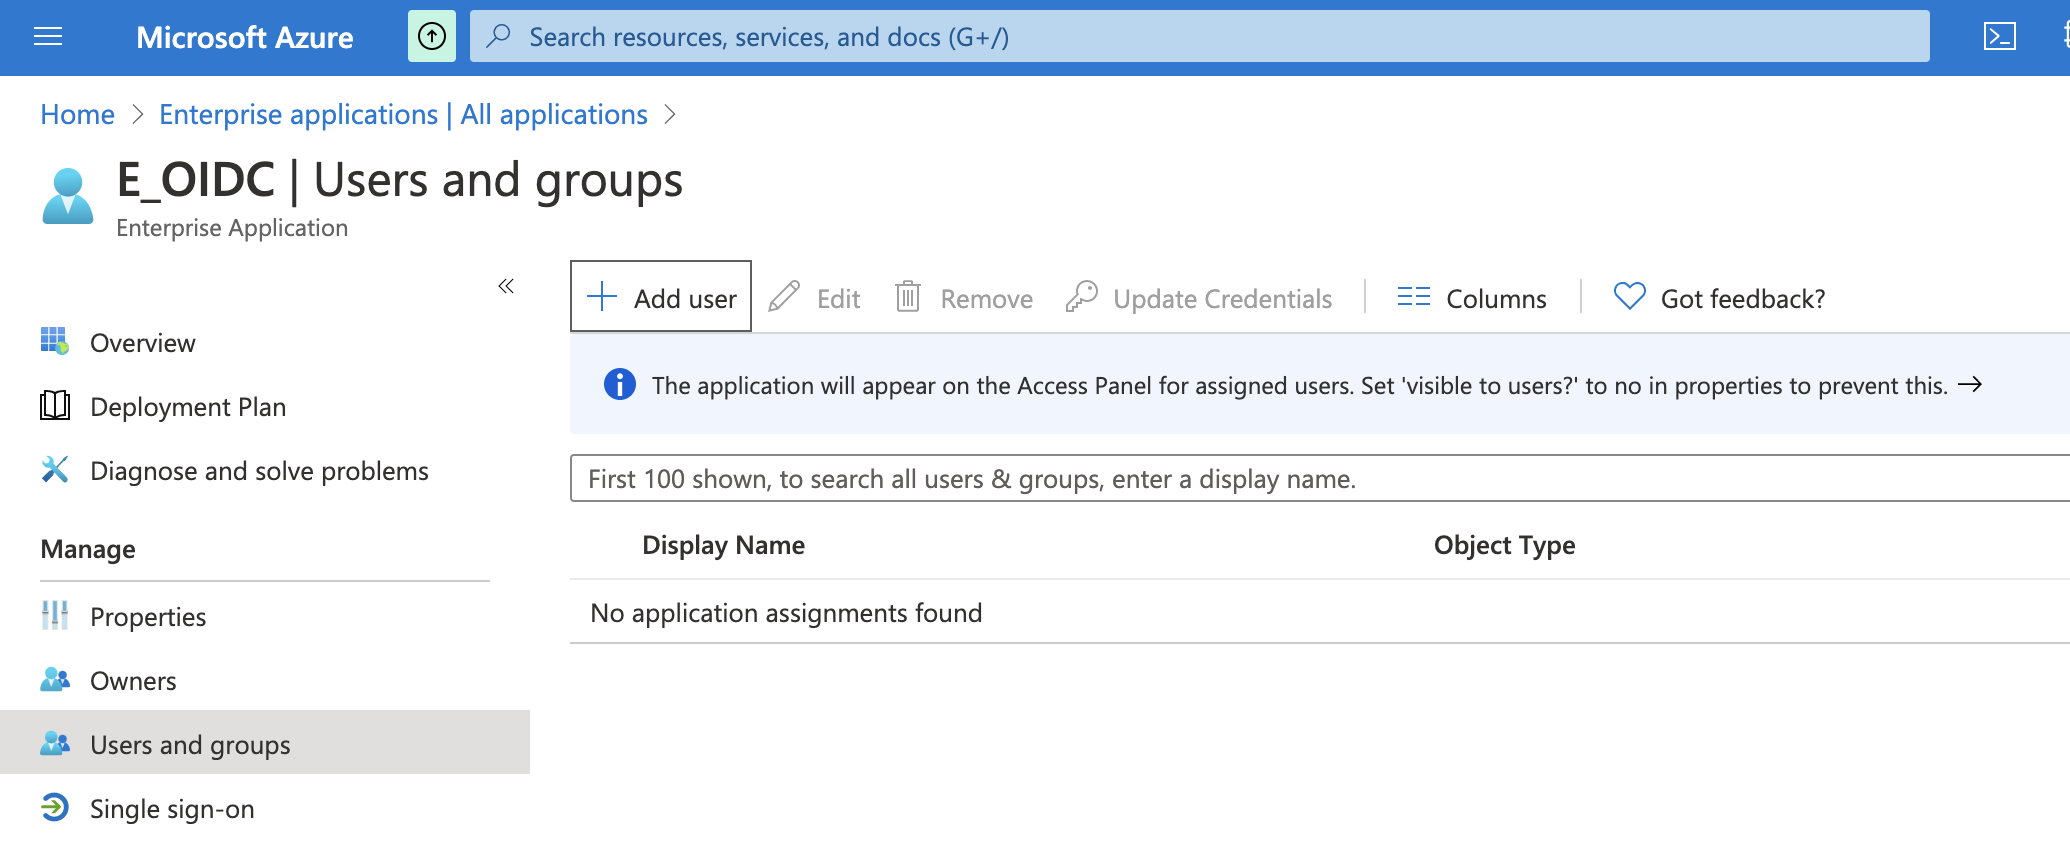
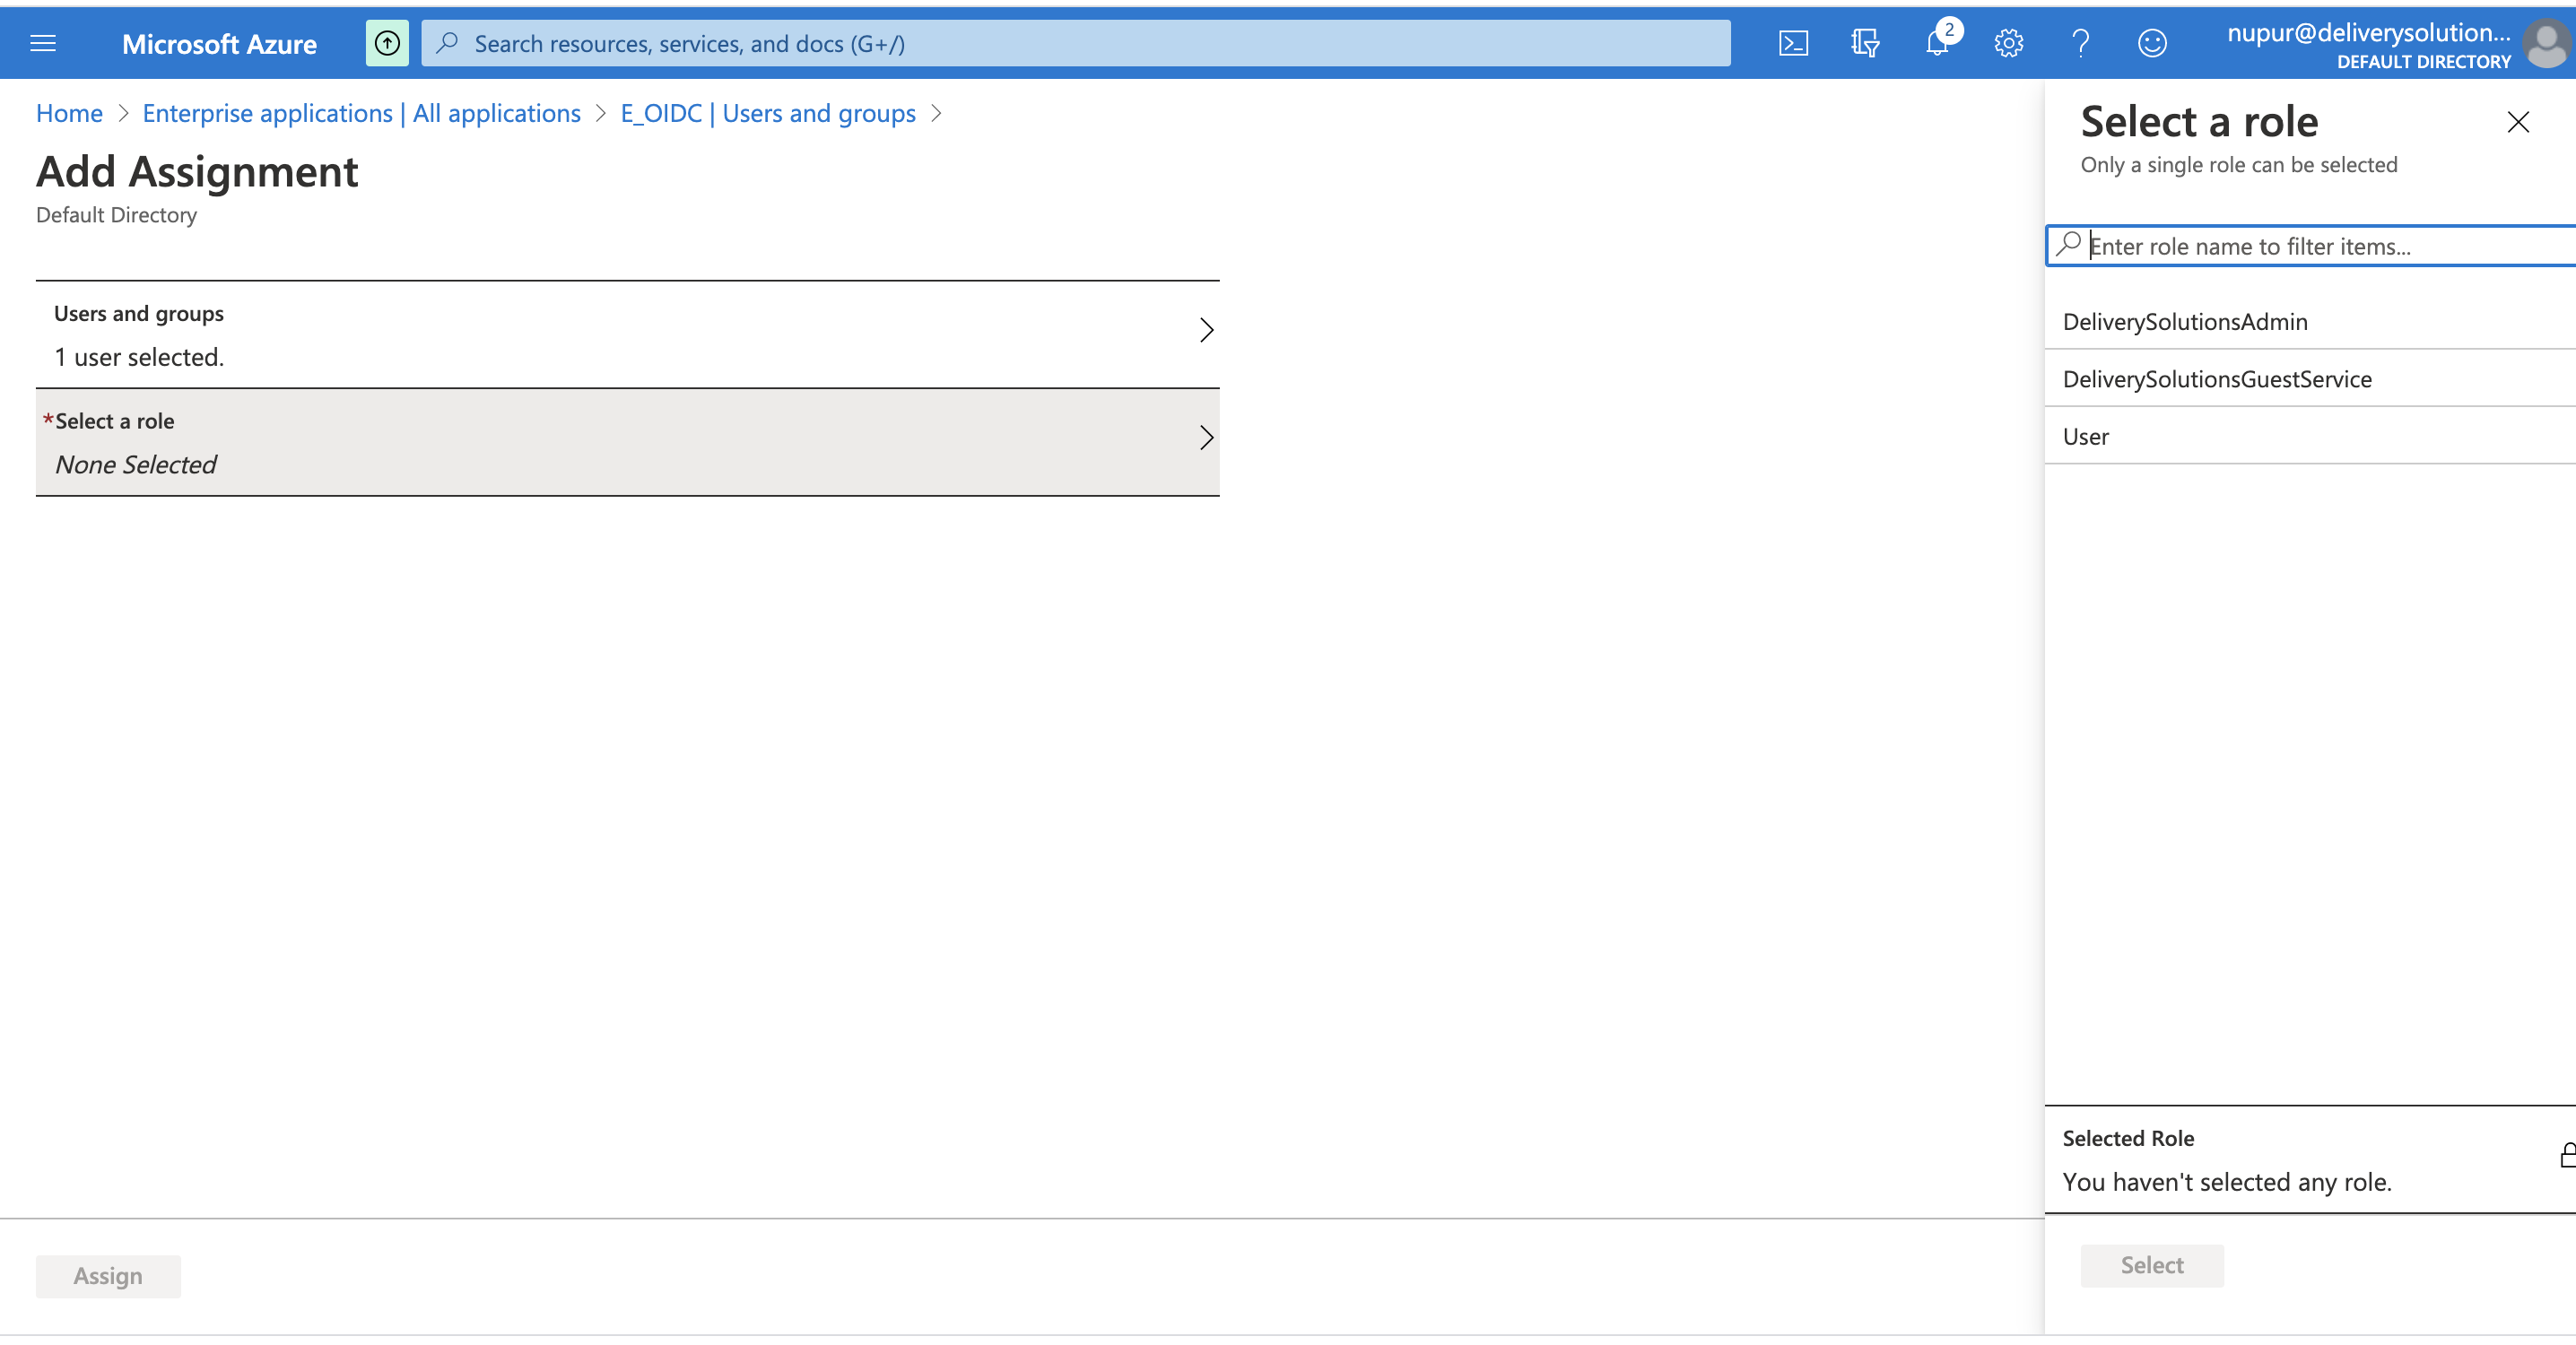
C. Users & Groups
- Once the Roles are mapped through Claims. Users can be assigned these roles.
- Go to Users and Groups under your application in Azure.
- Go to user Profile.
- Click on Add User to provide access to the application.
- Select a Role and click on Assign.
- Once the user is assigned a role. Azure will pass the role via Encrypted URL to Delivery Solutions.
Okta
Okta enables you to provide Single Sign-On (SSO) access to cloud, on-premise, and mobile applications. You sign into Okta and you can then launch any of your web apps without having to reenter your credentials.
Okta establishes a secure connection with a user's browser and then authenticates the user to Okta-managed apps using one of two SSO integration methods:
1. Okta's Secure Web Authentication (SWA) 2. Federated (supporting SAML or another proprietary federated authentication protocol)
Basic StepsA. Add Attributes for Role B. SAML Integration C. User Assignment D. Configure Idp Certificate in Delivery Solutions
A. Add Attributes for Role- Login to Okta Application
- You can also follow Okta Add Attribute Instructions to add a role using their custom attribute feature.
- In the Admin Console, go to Directory > Profile Editor.
- Click Okta in the FILTERS list.
- For Okta User (default), click Profile in the Actions column.
- Click Add Attribute.
- Please enter details for the role as shown in below picture.
- Click on Save to save the newly added attribute.
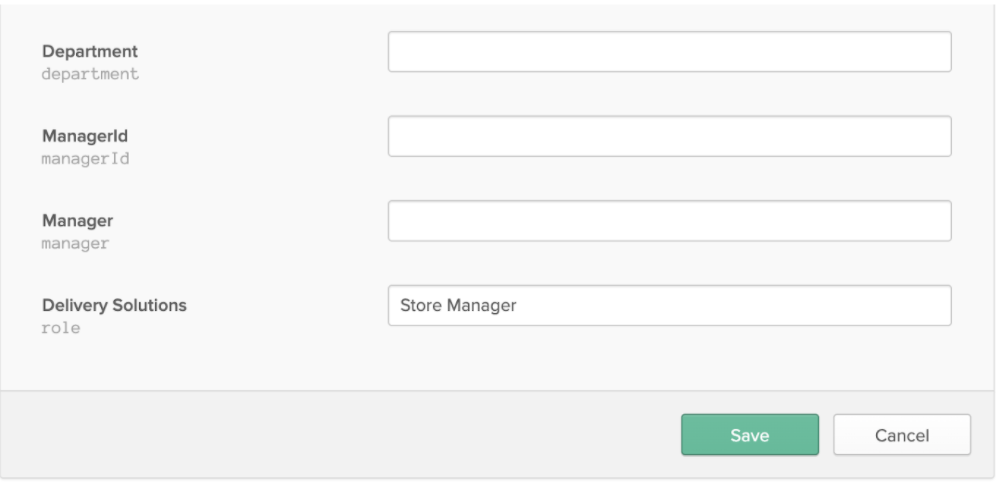
- Now go to Directory > People.
- Filter Users based on your criteria.
- Click on the User Name to go into that User's Profile.
- Click on Edit to assign the role to the user.
- Provide the role details to the field Role as shown below.
- Click on Save to save the changes. The value provided here will be sent to Delivery Solutions once the user is authenticated through Okta.

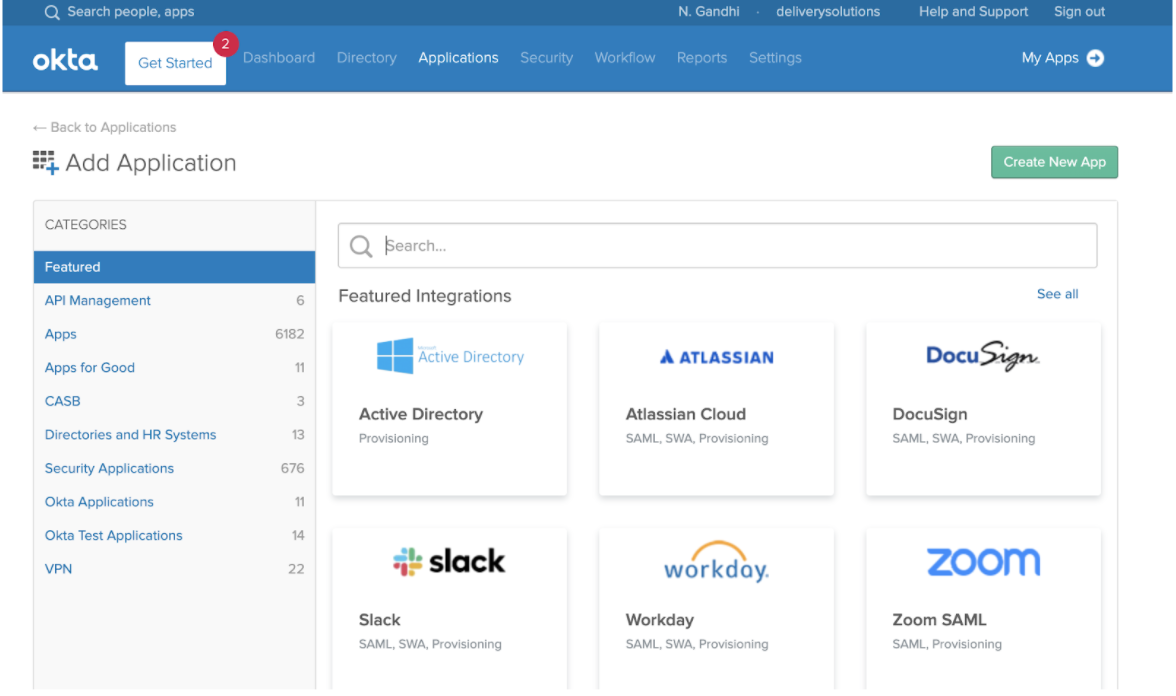
- You can also follow Okta Add New App to add SAML Integration App.
- In the Admin Console, go to Applications > Applications.
- Click on Add Application
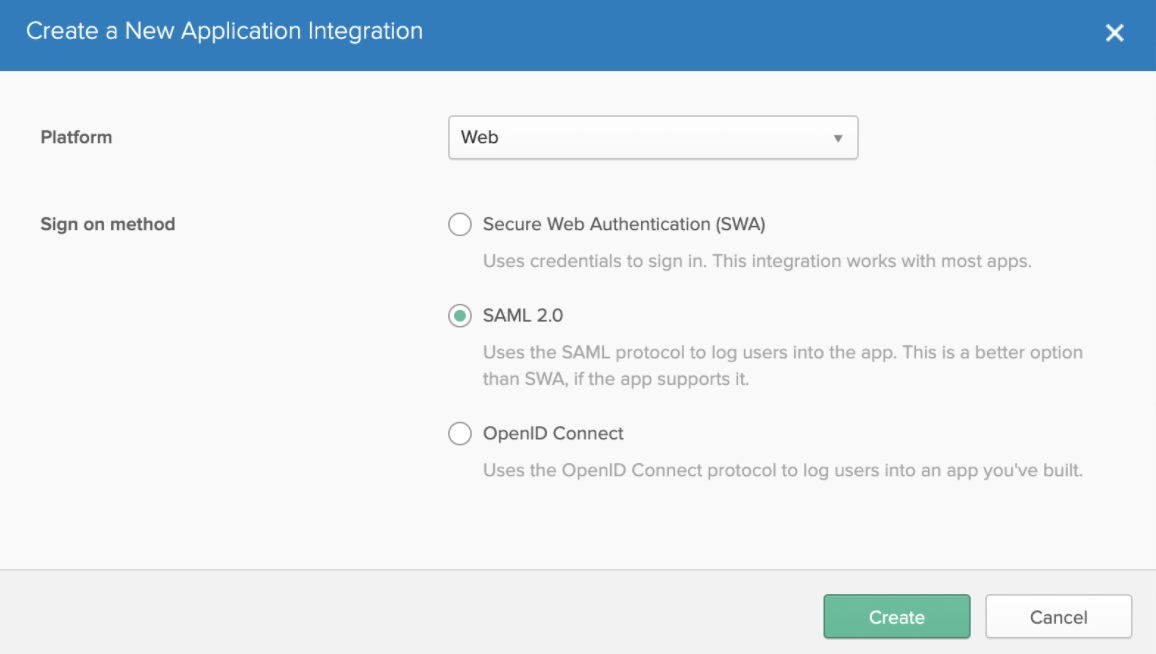
- Click on Create New App as shown below.
- To create a SAML integration, select Web as the Platform and SAML 2.0 as shown in below screenshot. for the Sign on method.
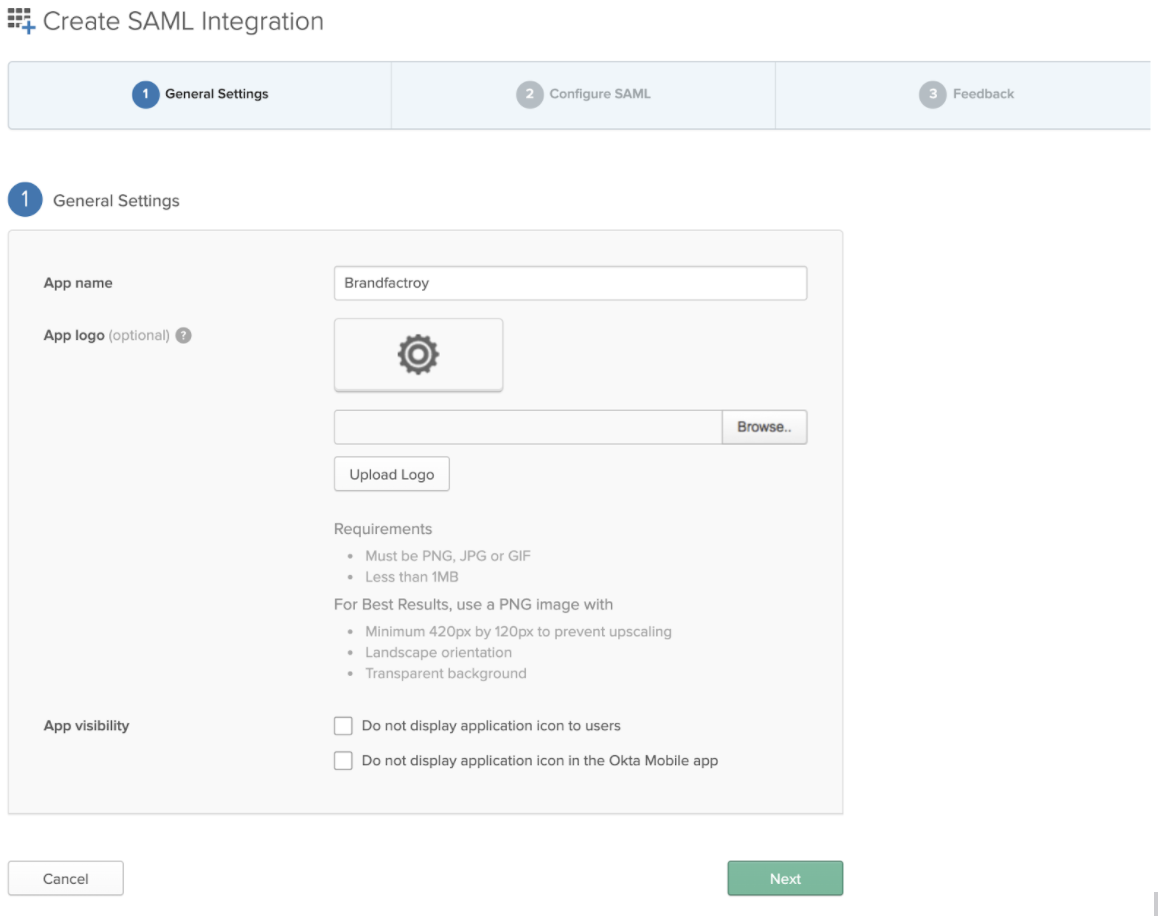
- Configure General Settings as shown below and click on Next.
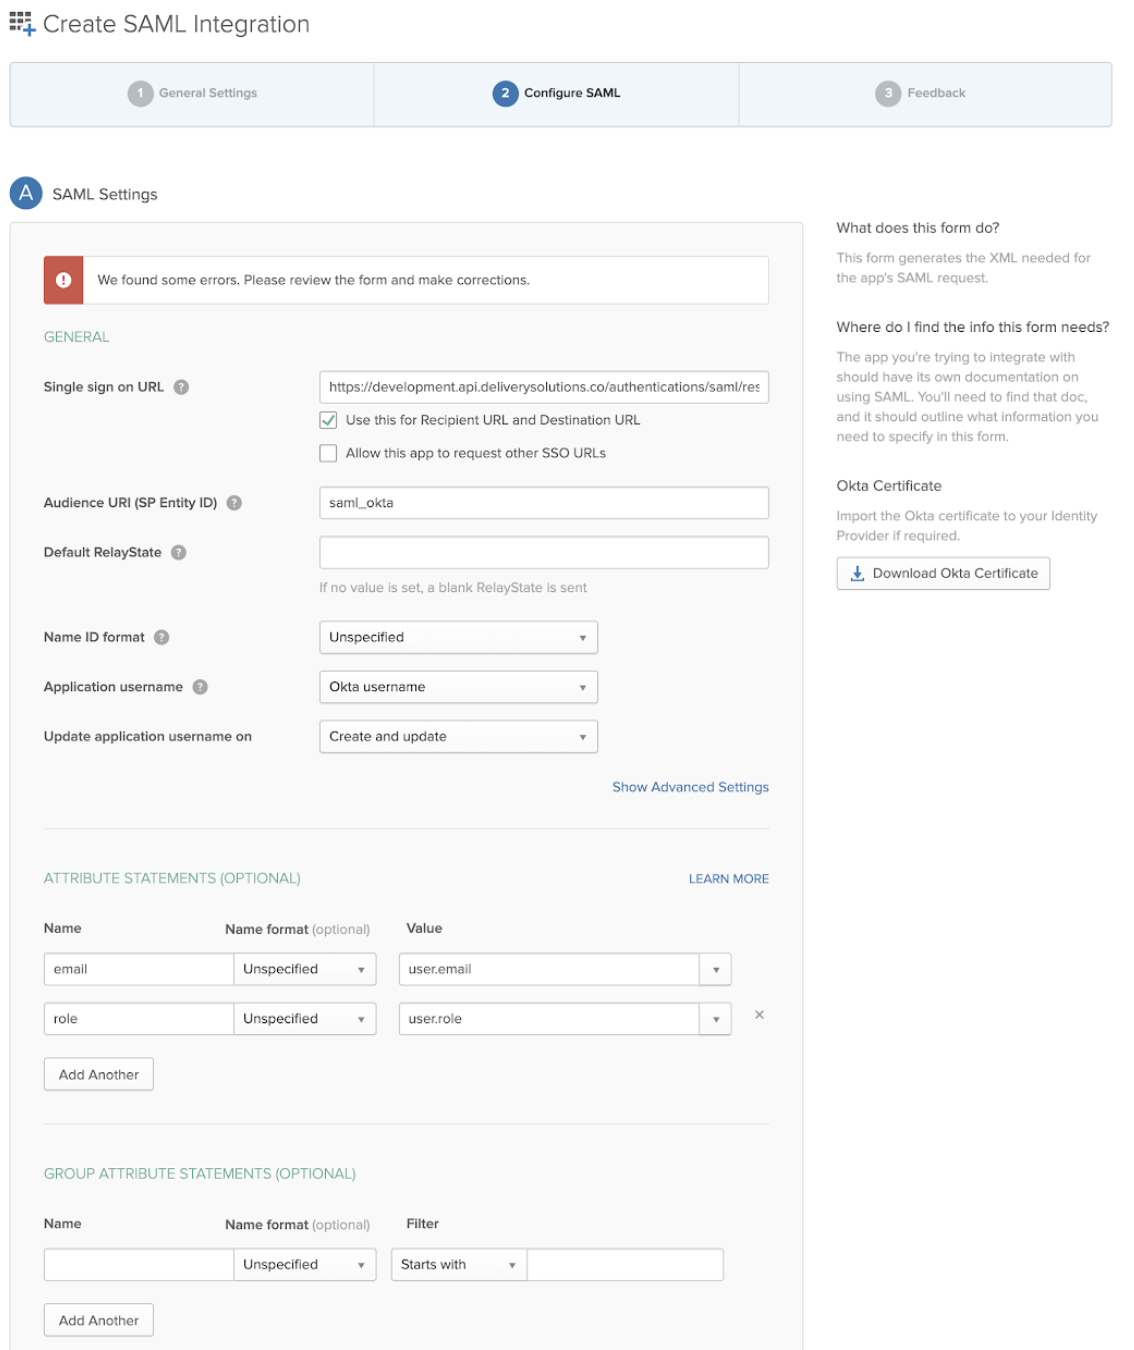
- Configure SAML Settings as mentioned below.
- Single sign-on URL: Mention Callback URL configured in Authentication Page in Delivery Solutions (Business - Settings) over here.
- Use this for Recipient URL and Destination URL: Select this check box if you want the recipient and destination URL to be the same.
- Audience URL: Provide an appropriate value. This is usually the Entity ID of your application.
- Add Attributes Statements to map standard and custom attribute over here.
- email: user.email
- role: user.role (The custom attribute created in A. Add Attributes for Role)
- Please see below example of the SAML Settings.
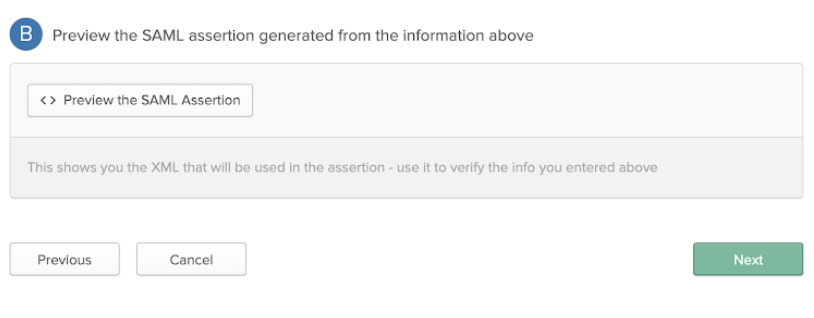
- Click on Preview SAML Assertion as shown below.
- Click on Next to add feedback.
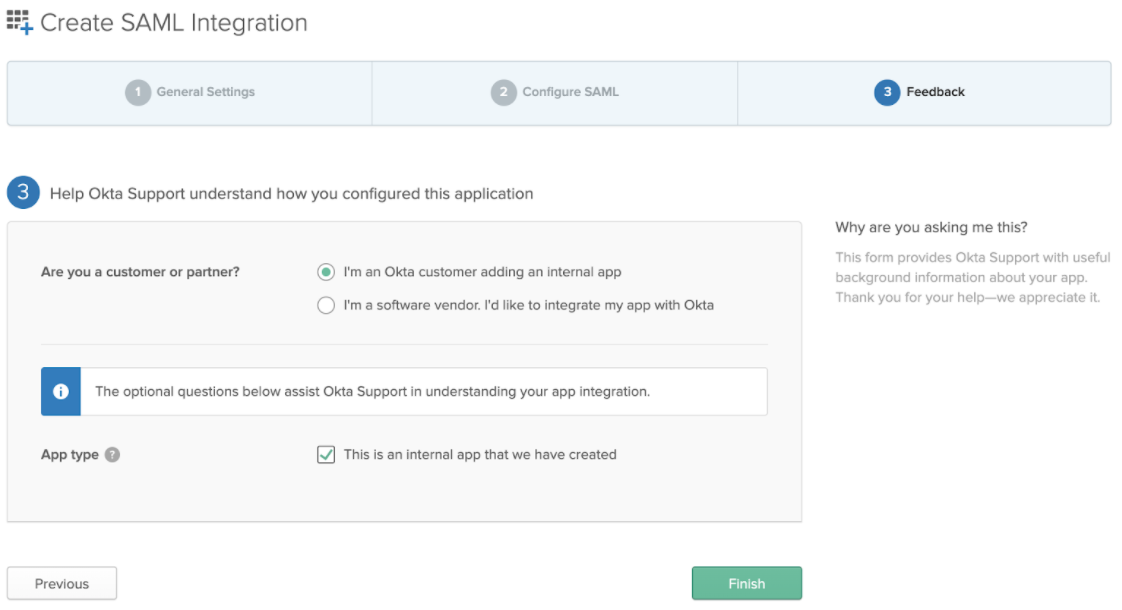
- Configure Feedback and Click on Finish as shown below.
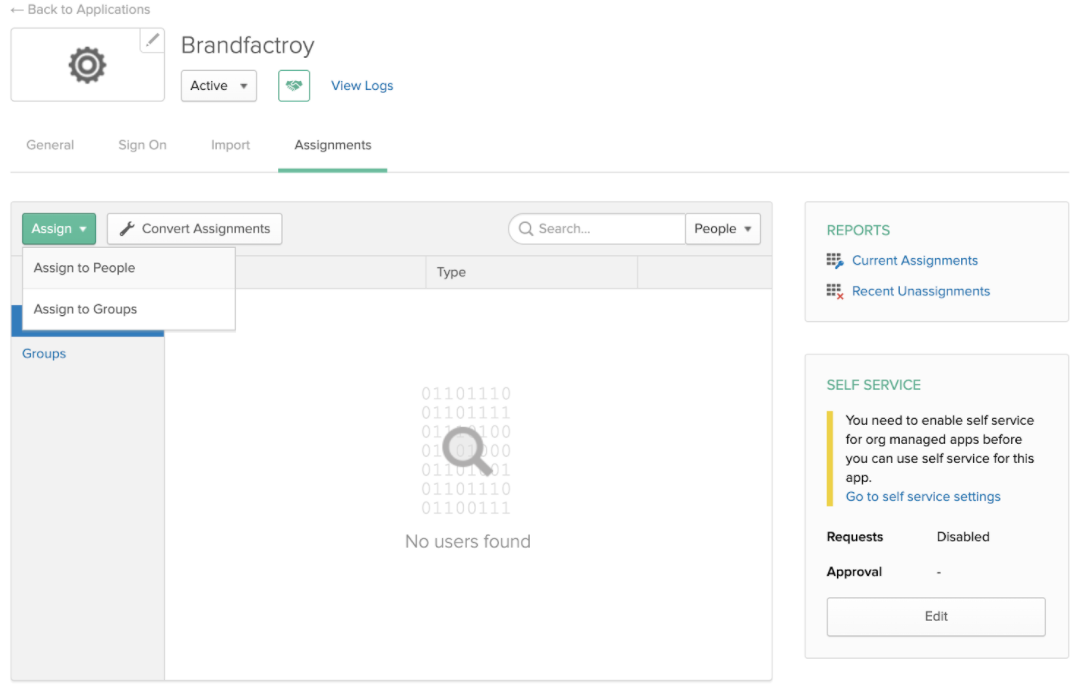
- Once the SAML Integration app is created. Follow below steps to assign Users to the app.
- From the Applications page, search or scroll down to the app you want to assign to one or more people/groups.
- Click the individual app to view its page.
- On the app specific page, click the Assignment tab.
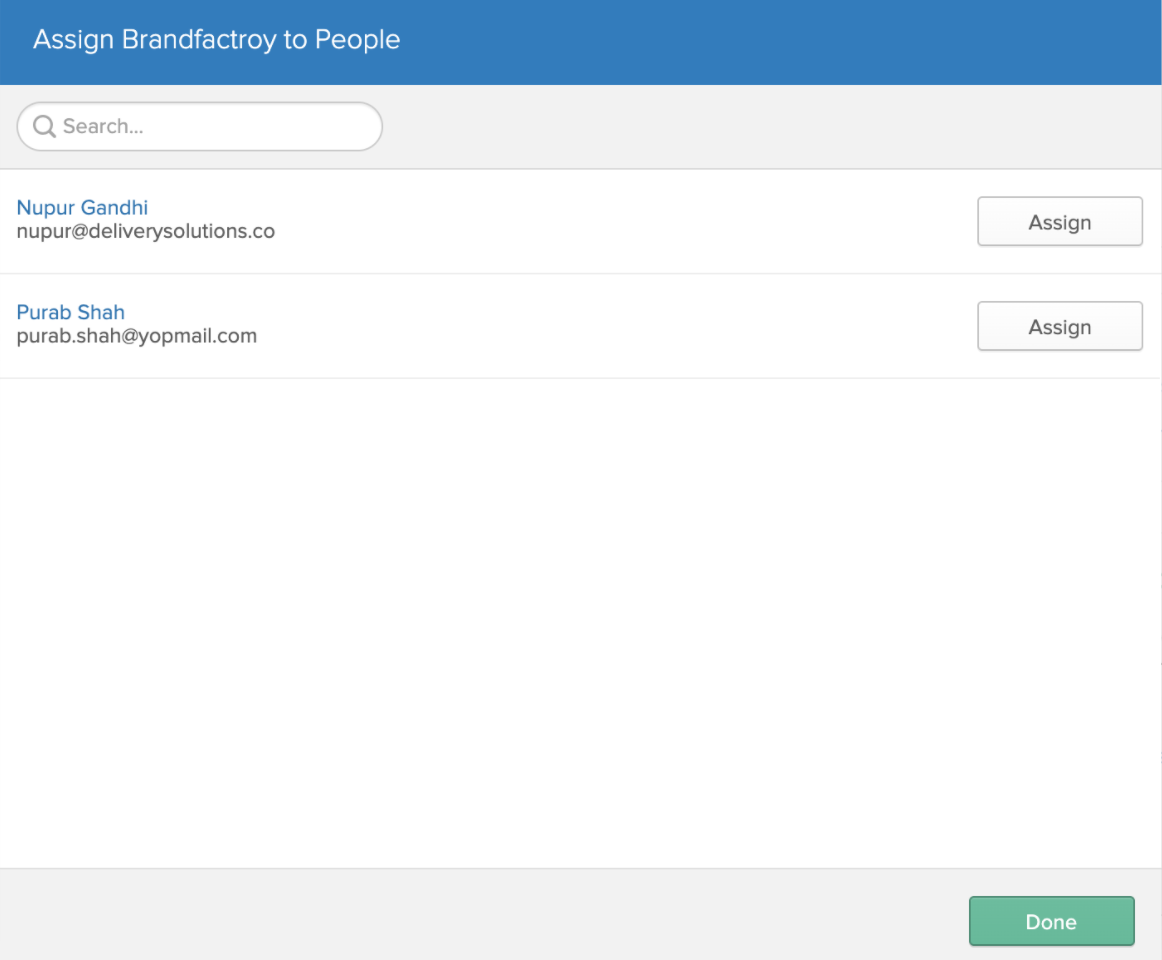
- Choose either Assign to People or Assign to Groups. An Assign
to People /Assign to Groups dialog appears listing available end users or groups who are not already assigned to the selected app.
- Click the Assign button next to each user or group for which you want this app assigned. For users, complete the Attributes page.
- Assign more users/groups as shown below, or click Done.
D. Configure Idp Certificate in Delivery Solutions
- Once the SAML Integration app is created. Follow below steps to configure Idp Certificate.
- From the Applications page, click the Sign On tab.
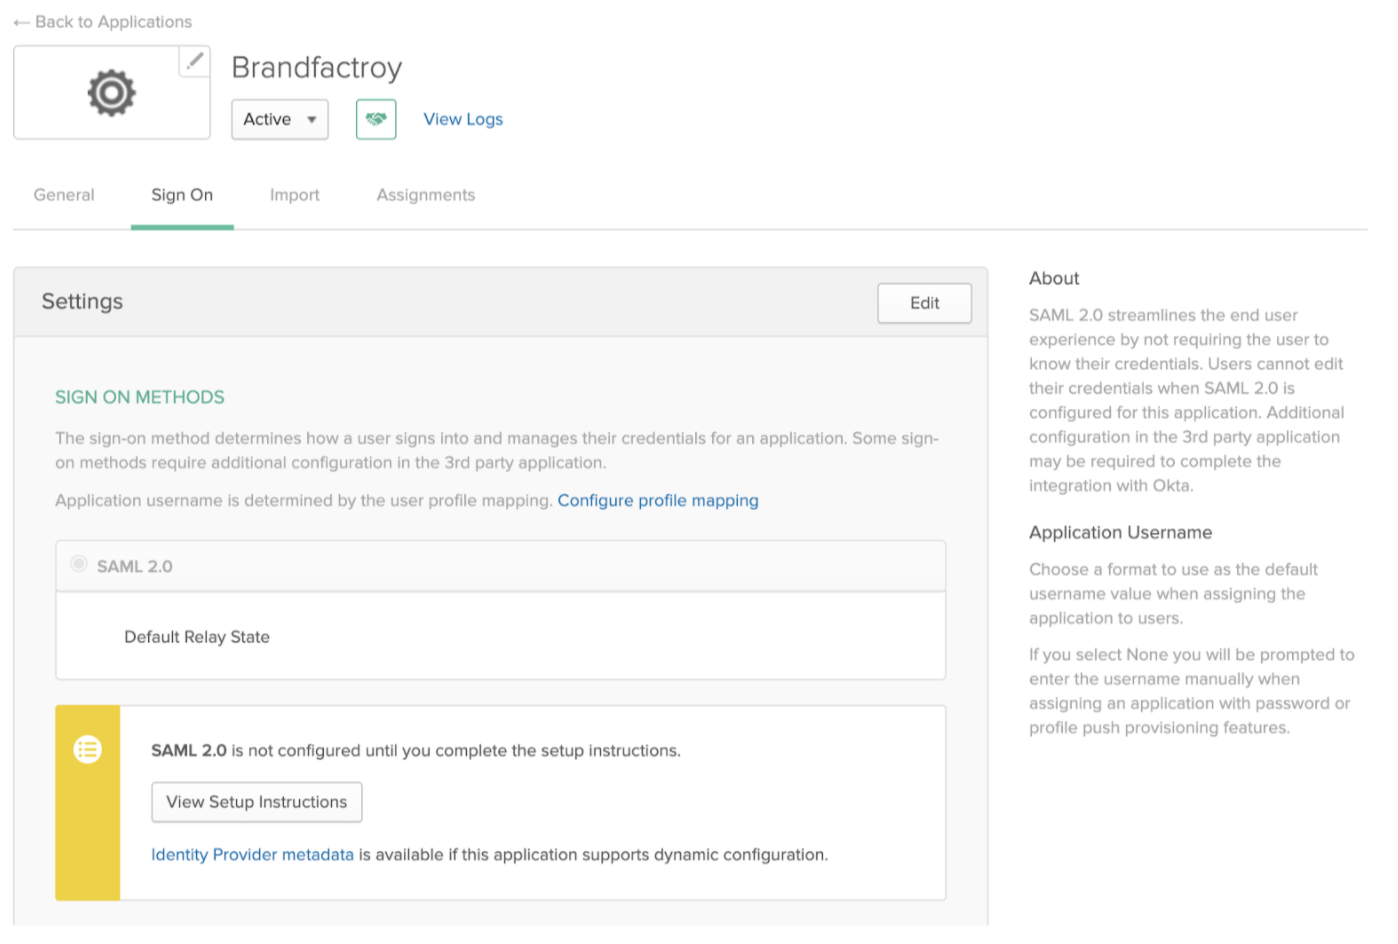
- Copy below parameters as a part of two way configuration.
- From Okta to Delivery Solutions
- From Delivery Solutions to Okta
| From Okta | To Delivery Solutions |
|---|---|
| Identity Provider Single Sign On Url | Login Url/ SSO Endpoint |
| X.509 Certificate | Idp Certificate |
| Audience Uri | Entity Id |
| From Delivery Solutions | To Okta |
|---|---|
| DS Callback Url | Single Sign On Url |
| Entity Id | Audience Uri |
Open ID Authentication
OpenID Connect is a simple identity layer built on top of the OAuth 2.0 protocol, which allows clients to verify the identity of an end user based on the authentication performed by an authorization server or identity provider (IdP), as well as to obtain basic profile information about the end user in an interoperable and REST-like manner. OpenID Connect specifies a RESTful HTTP API, using JSON as a data format.
OpenID Connect is an increasingly common authentication protocol: when an app prompts you to authenticate using your Facebook or Google+ credentials, the app is probably using OpenID Connect.
OpenID Connect allows a range of clients, including web-based, mobile, and JavaScript clients, to request and receive information about authenticated sessions and end-users.
OneLogin provides a custom connector option that makes it easy to configure your OpenID Connect-enabled app to use OneLogin as the Identity Provider (IdP) in an OpenID Connect flow.
Google OpenID
Delivery Solutions supports OpenID authentication with Google's OAuth 2.0 APIs.
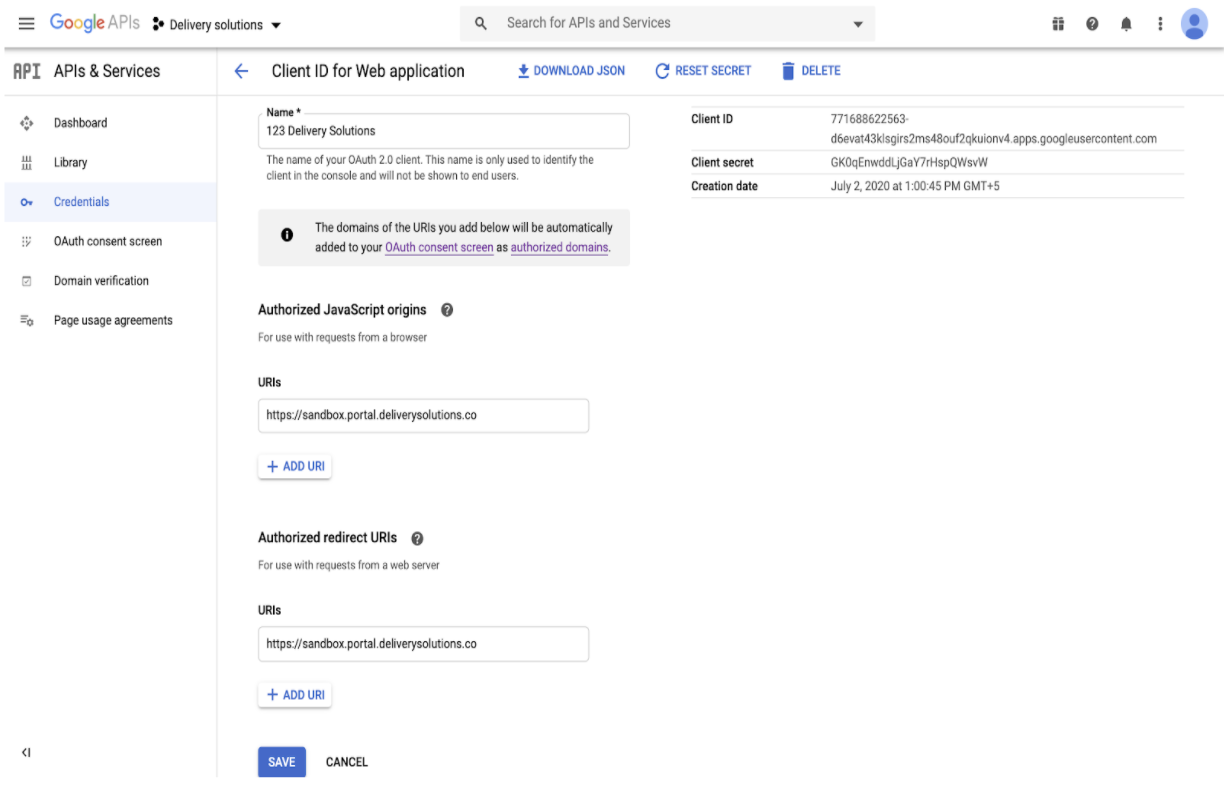
- Create an application in the Google OpenID.
- Open Delivery Solutions SSO Configuration Page.
- Select the SSO Type as SAML.
- Copy the DS Callback URL from SSO Configuration Page and paste in the Authorized Javascript origins and Authorized redirect URis under Credentials section in Google OpenId App.
- Copy the Client ID and Secret from Google OpenID app and paste it in SSO Configuration Page in Delivery Solutions.
- Refer below screenshot for reference.
- Click on Save.
Settings
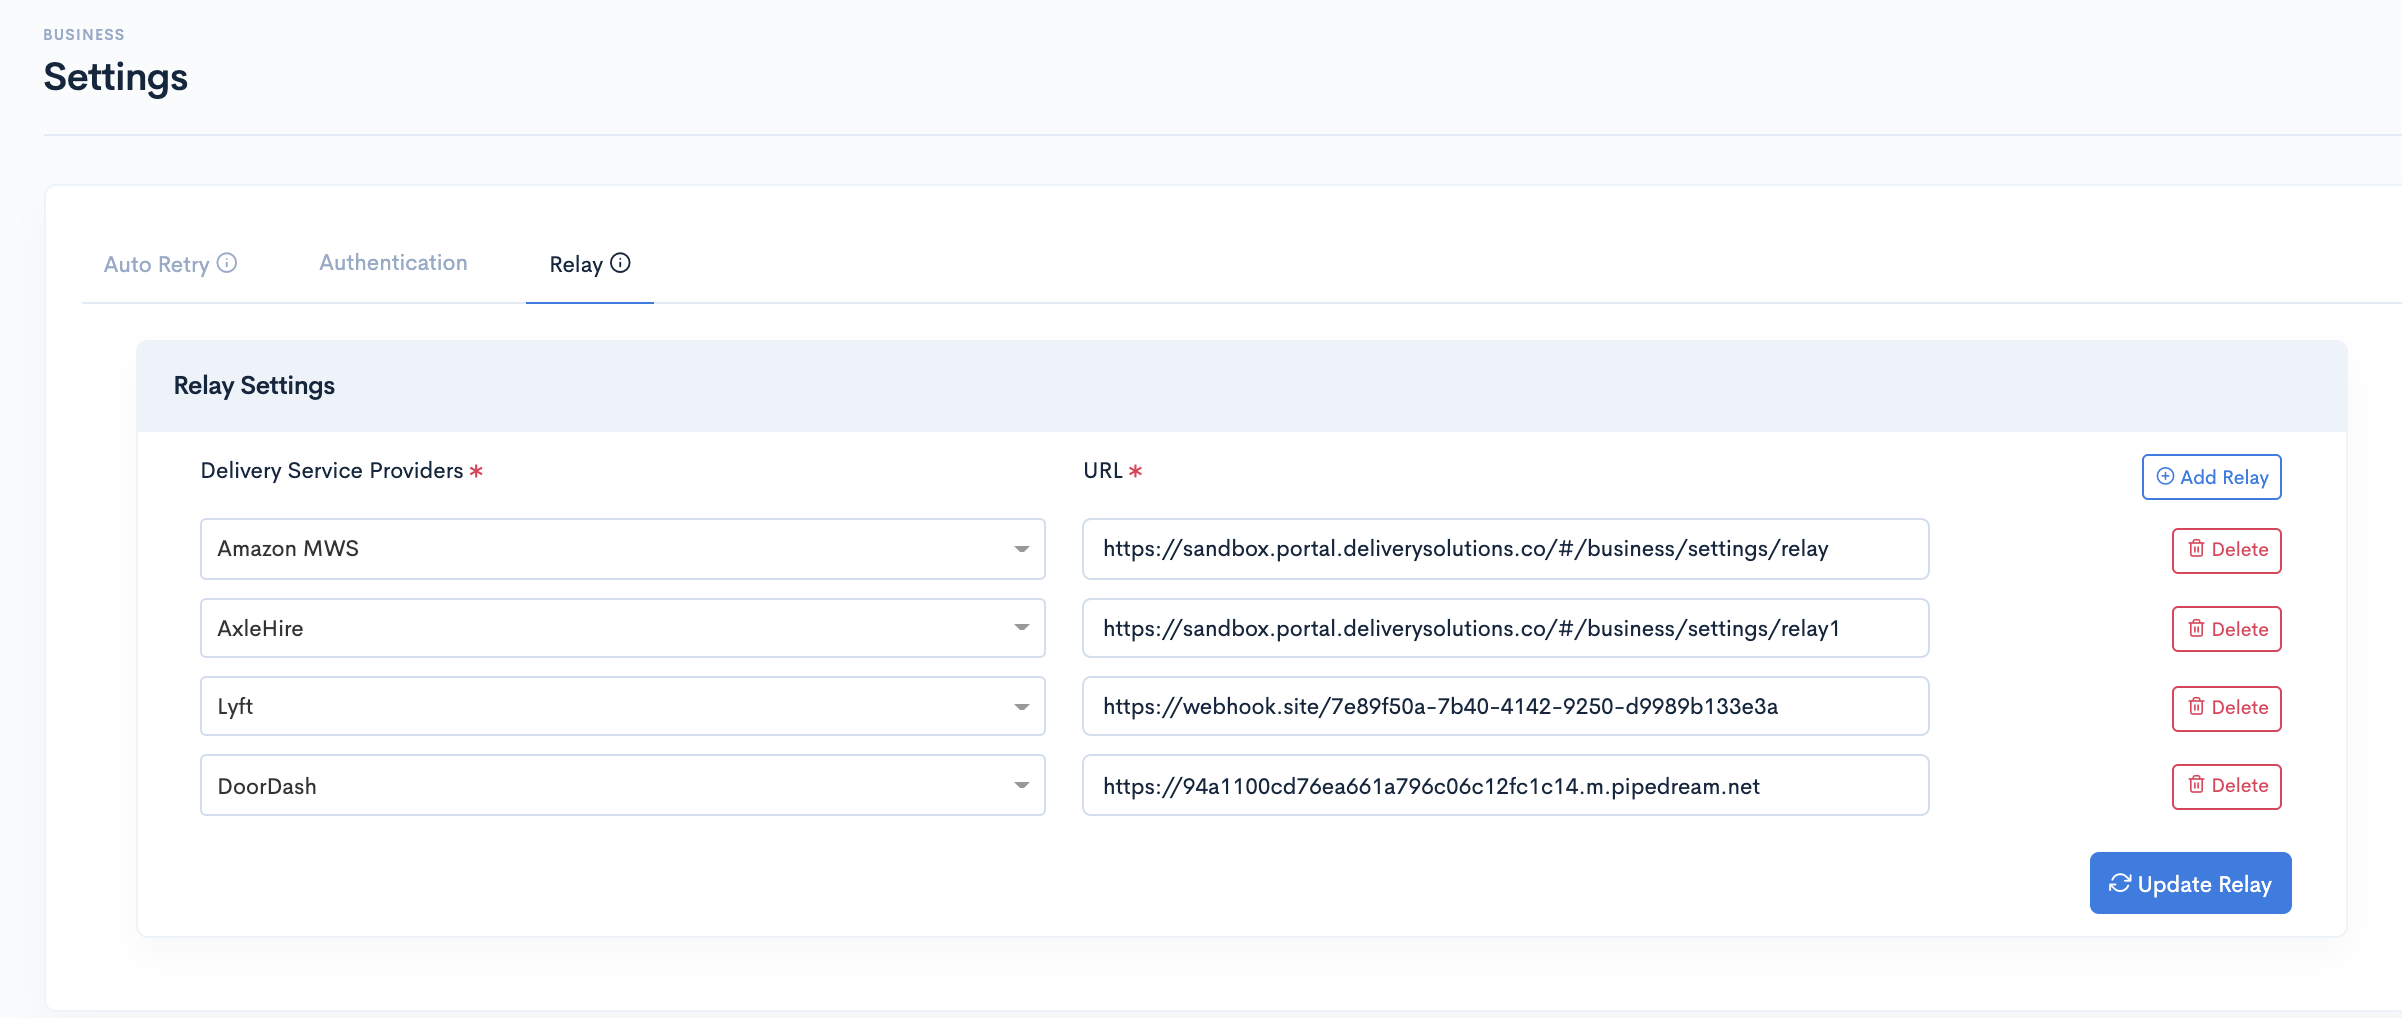
Relay
Relay settings can be set over here to receive the webhooks.
This is how our Relay page looks like..
Deliveries
Understanding how orders work in DeliverySolutions is an important part of any Business.. After a customer places an order, It appears on the Status page under Deliveries section of Delivery Solutions.
- Create Delivery
- Order Statuses
- Packages
- Attributes
Deliveries
Order LifeCycle
Order LifeCycle
Order Statuses
| Status Name | Description |
|---|---|
| REQUEST RECEIVED | Tenant request for placing the Order has been received at DS |
| ESTIMATES RECEIVED | DS has received estimates from one or more DSP on order |
| ESTIMATES FAILED | DS has not received estimates from any of the DSP on order |
| ORDER DISPATCHED | Order has been dispatched to DSP from DS |
| ORDER CONFIRMED | DSP has received the order at their end |
| ORDER ASSIGNED | DSP has assigned the order to a driver |
| PICKUP STARTED | Driver has started moving towards pickup location |
| PICKUP EXCEPTION | Driver has reported some exception in pickup |
| PICKUP COMPLETED | Driver has picked up the package from Pickup Location |
| OUT FOR DELIVERY | Driver has started moving towards delivery location with package |
| ORDER DELIVERED | Driver has delivered the package to customer |
| ORDER RETURNED | Driver has returned the package to pickup location |
| ORDER CANCELLED | Order has been cancelled either by tenant or DSP |
| ORDER FAILED | Order has been Failed, and is not with DSP for delivery |
| ORDER DELAYED | Driver has reported that he is running late for delivering the order |
| ORDER UNASSIGNED | Order has been unassigned from Driver |
| ORDER UNDELIVERABLE | Order cannot be delivered,Driver has reported some exception in delivering the order. |
| ORDER REDELIVERY | Order is out for re-delivery by Driver |
Table Of Content
Deliveries
Create Delivery
Place your orders with Delivery Solutions.
There are two ways through which an order can be placed with Delivery Solutions
- Delivery Solution API
- Delivery Solution Interface
This is how our Deliveries page looks like..

Deliveries
Create Order/Delivery
Locate Create Delivery Page with below steps:
- After Successful login to Delivery Solutions page
- Click on the Deliveries Tab from the left side panel
- Select Create Delivery under the Deliveries Section
- You will be redirected to a Create Delivery Form
- Click on the appropriate option once the details are in place.
This is how our Create Delivery page looks like..
Pickup Details
Store details section takes basic details of the store such as store name, store Timezone, Pickup/Drop off Window details and so on.
This is how your Pickup Details Section looks like
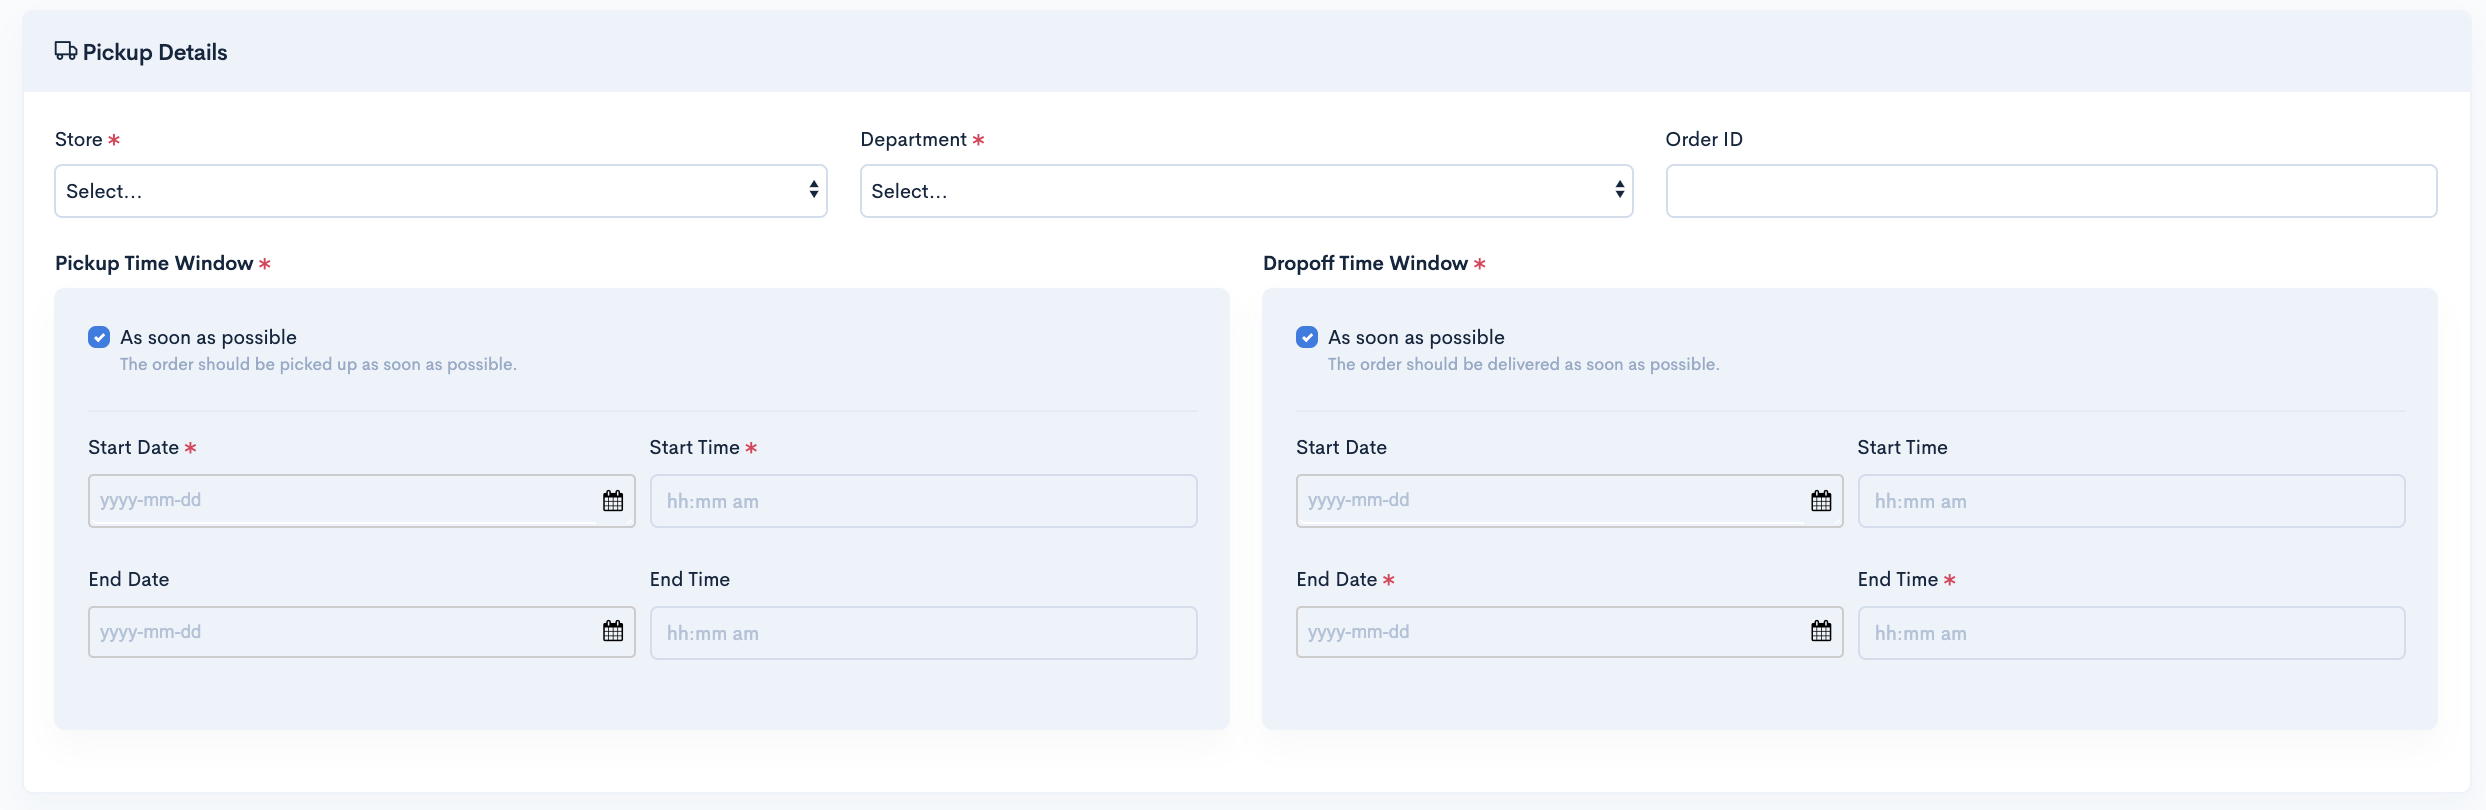
Basic
The Pickup Details section seeks information for below fields:
| Field Name | Description |
|---|---|
| Store | List of stores under the selected business |
| Store Timezone | Store’s local timezone |
| Order ID | Unique Identification Number of Order |
| Department | Store’s Department such as Food, Apparel |
| ASAP Pickup | Pickup As soon as the order is ready to deliver |
| ASAP Drop Off | Deliver the order as soon as it is picked up |
| Pickup Time Window Start and End | Timeframe between which an order can be picked up |
| Drop-off Time Window Start and End | Timeframe between which an order can be picked up |
Important
Pickup Start and End Time and Drop Off Start and End Time windows will not be applicable if ASAP Pickup and Drop Off is selected respectively
Dispatch Setting
Dispatch Settings section allows you to configure Order Dispatch Settings while placing an order. A dispatch type determines whether an order should be dispatched to DSP or requires to be with Delivery Solutions until manually released or scheduled to release to DSP. The Dispatch Settings are also available at the Store and Order level for overrides. The settings configured at the Business level will be inherited by the Stores and each of its Orders unless overridden.
This is how your Dispatch Settings Section looks like

Basic
The Dispatch Settings section seeks information for below fields:
| Field Name | Description |
|---|---|
| Type |
Immediate: Dispatch Order to DSP Immediately Manual: DS stores the order and wait for the manual intervention to release it to DSP Schedule: DS stores the order and releases to DSP as per scheduling |
| Time | In case of Scheduled type, DS stores minutes before pickup starts |
Drop-Off Details
Drop Off section takes the details of the delivery address where order needs to be delivered.
This is how your Drop-Off Section looks like
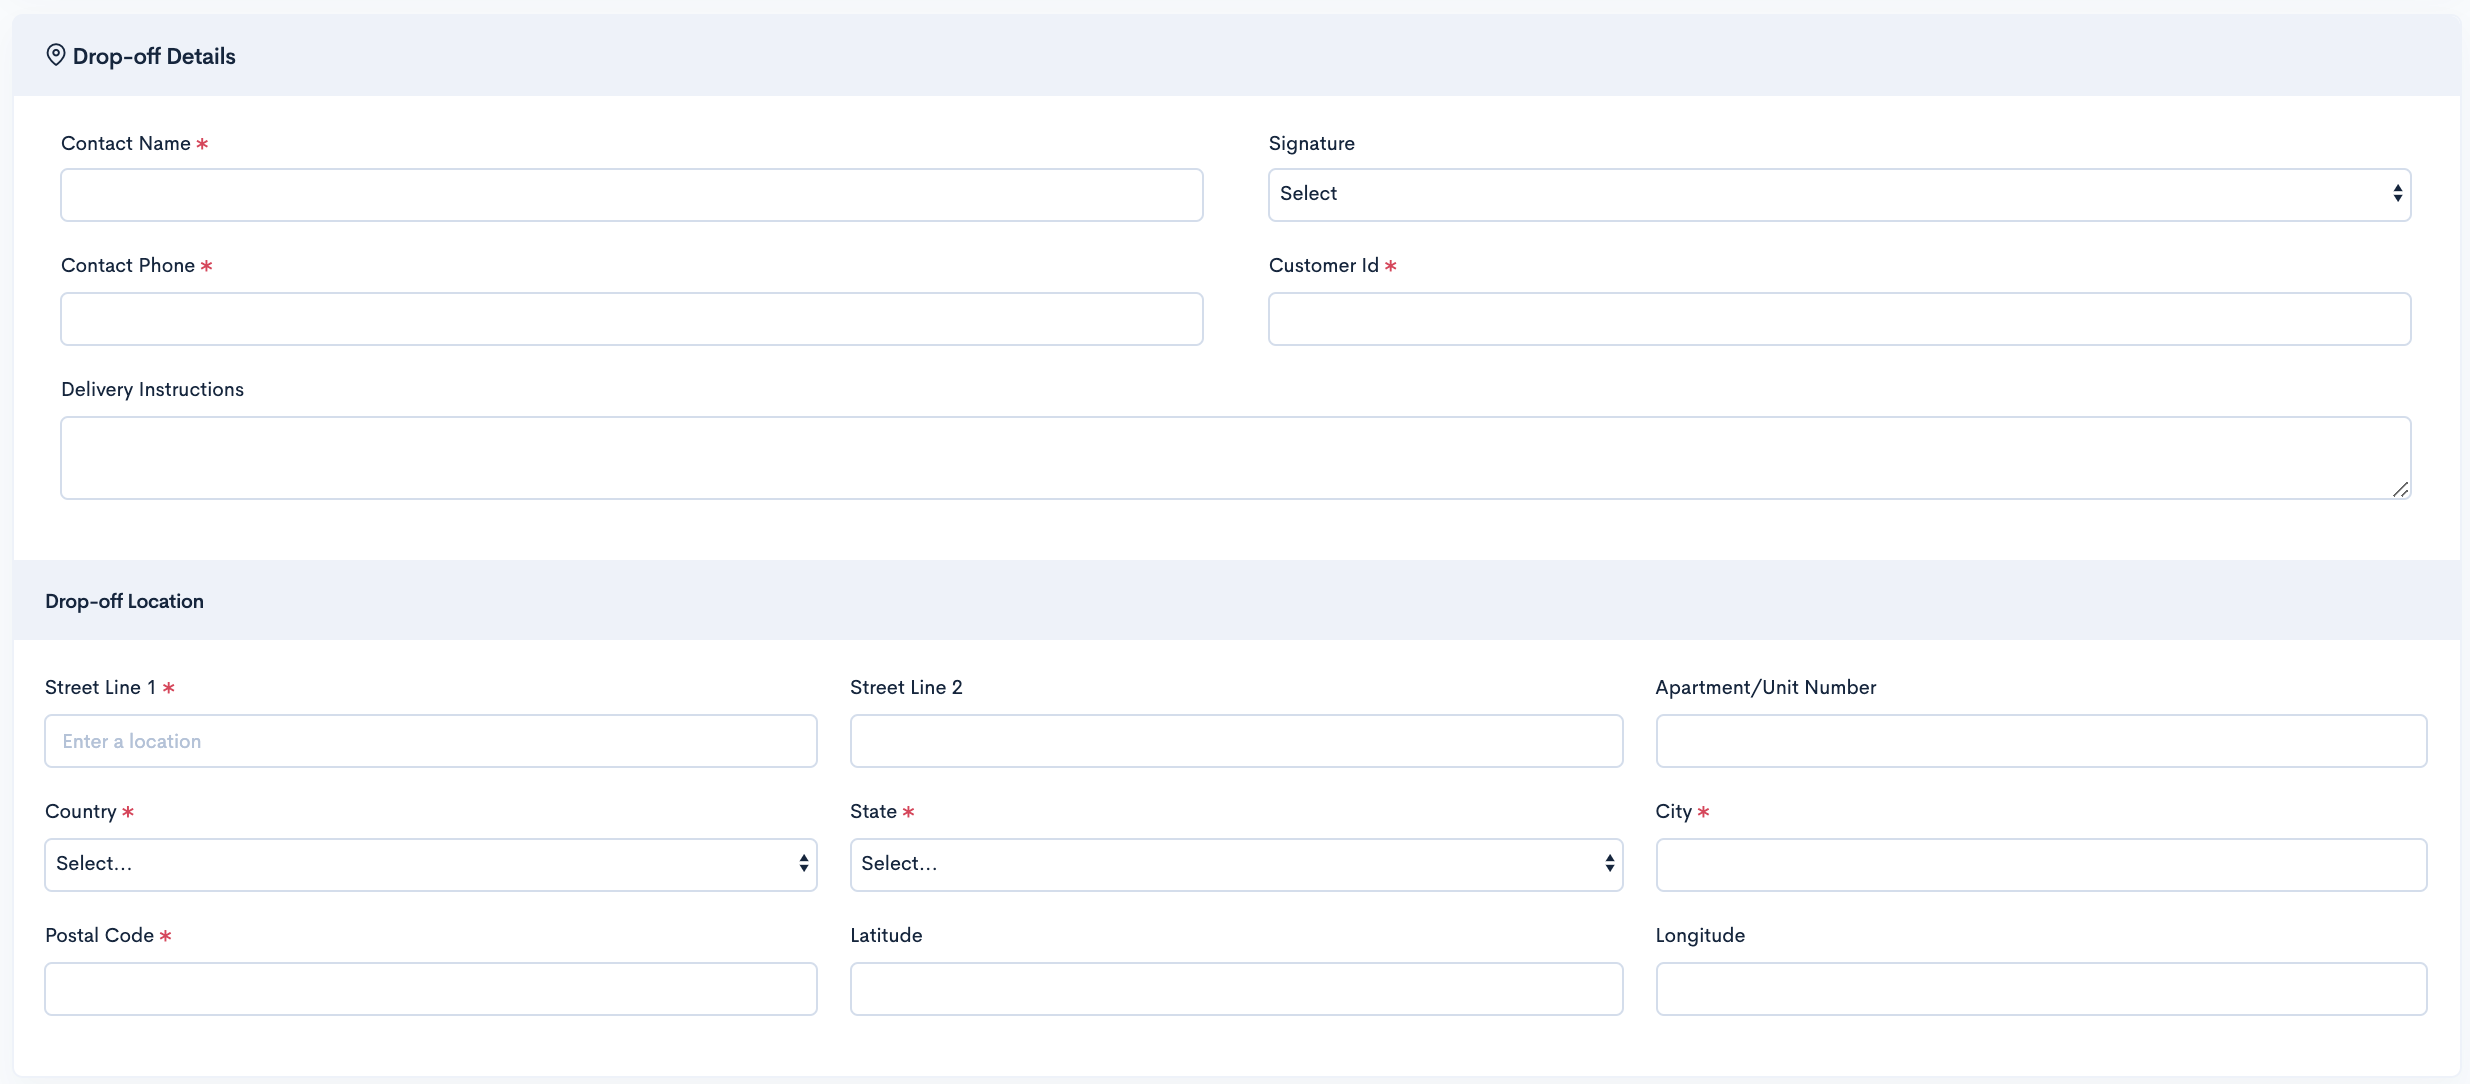
Basic
The Drop Off section seeks information for below fields:
| Field Name | Description |
|---|---|
| Contact Name | Name of the customer whose order needs to be delivered |
| Phone | Contact Number of the customer |
| Street | Street Address having Apartment Number and Street Name |
| Street1 | Street Name |
| Apartment Number | Apartment Number |
| City | City Name |
| Postal Code | Zip Code of the Area |
| State | Name of the State |
| Country | Name of the Country |
| Latitude | The Latitude will be automatically generated based on the address |
| Longitude | The Longitude will be automatically generated based on the address |
Package Details
Package Details section contains details about the package such as Package value, Package Size, Quantity and so on. You can add as many packages as you want by clicking Add button in Package Details section
This is how your Package Details Section looks like
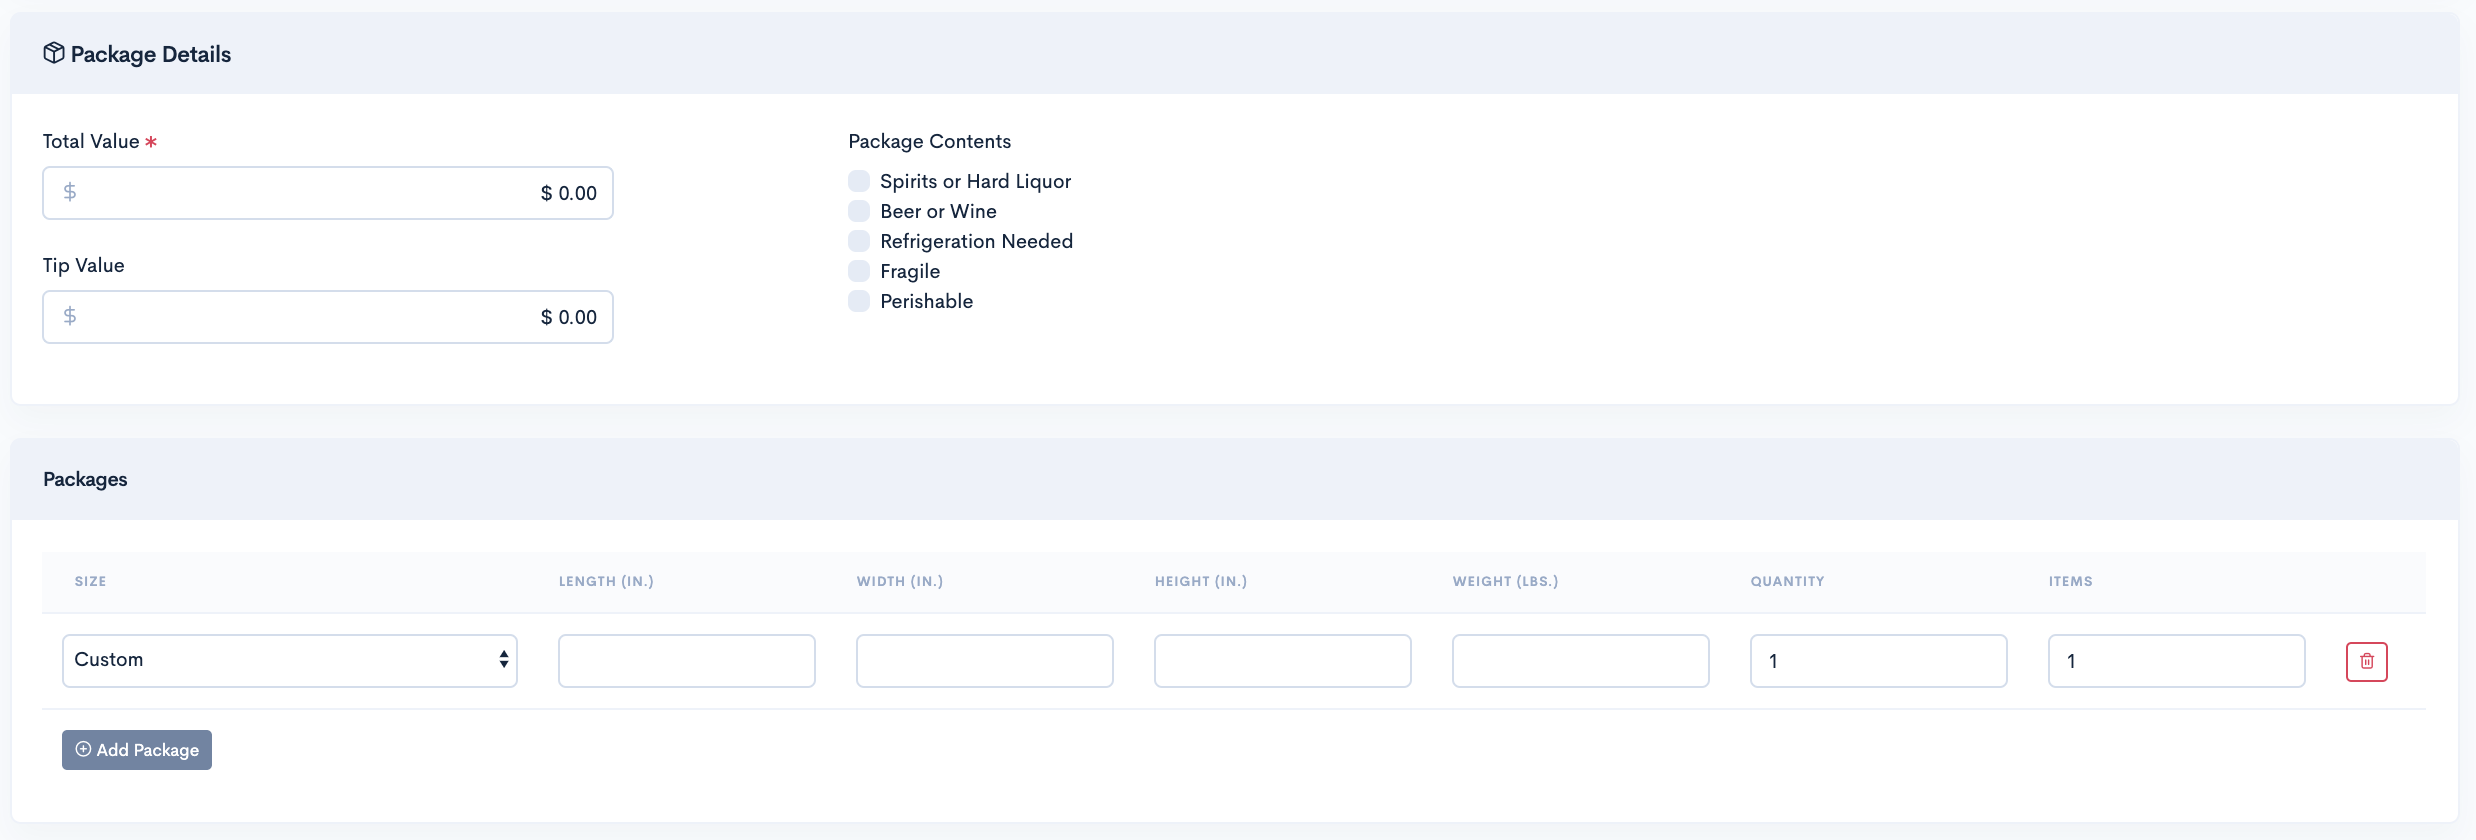
Basic
The Package Details section seeks information for below fields:
| Field Name | Description |
|---|---|
| Total Package Value | Total Package Value contains the cost of it |
| Tip | |
| Package Content | The type of content in the package |
| Size | The size of the package Small Medium Large |
| Quantity | Number of Packages |
| Weight (in lbs) | Package Weight in pounds |
| Length (in Inches) | Package Length in Inches |
| Width (in Inches) | Package Width in Inches |
| Height (in Inches) | Package Height in Inches |
| Items | Number of items in a Package |
Notification Details:
In this section you can mention the Email and Phone number details where order notifications will be sent.
This is how your Notification details Section looks like

Basic
The Notification Details section seeks information for below fields:
| Field Name | Description |
|---|---|
| URL | Webhook URL for notifications |
| Email Address for notifications | |
| SMS | Phone Number for SMS notifications |
Custom Attributes
Business Admins can also provide details for order attributes while placing an order. These attributes further helps in selecting most suitable DSPs by filtering them using Business Rules.
This is how your Custom Attributes Section looks like
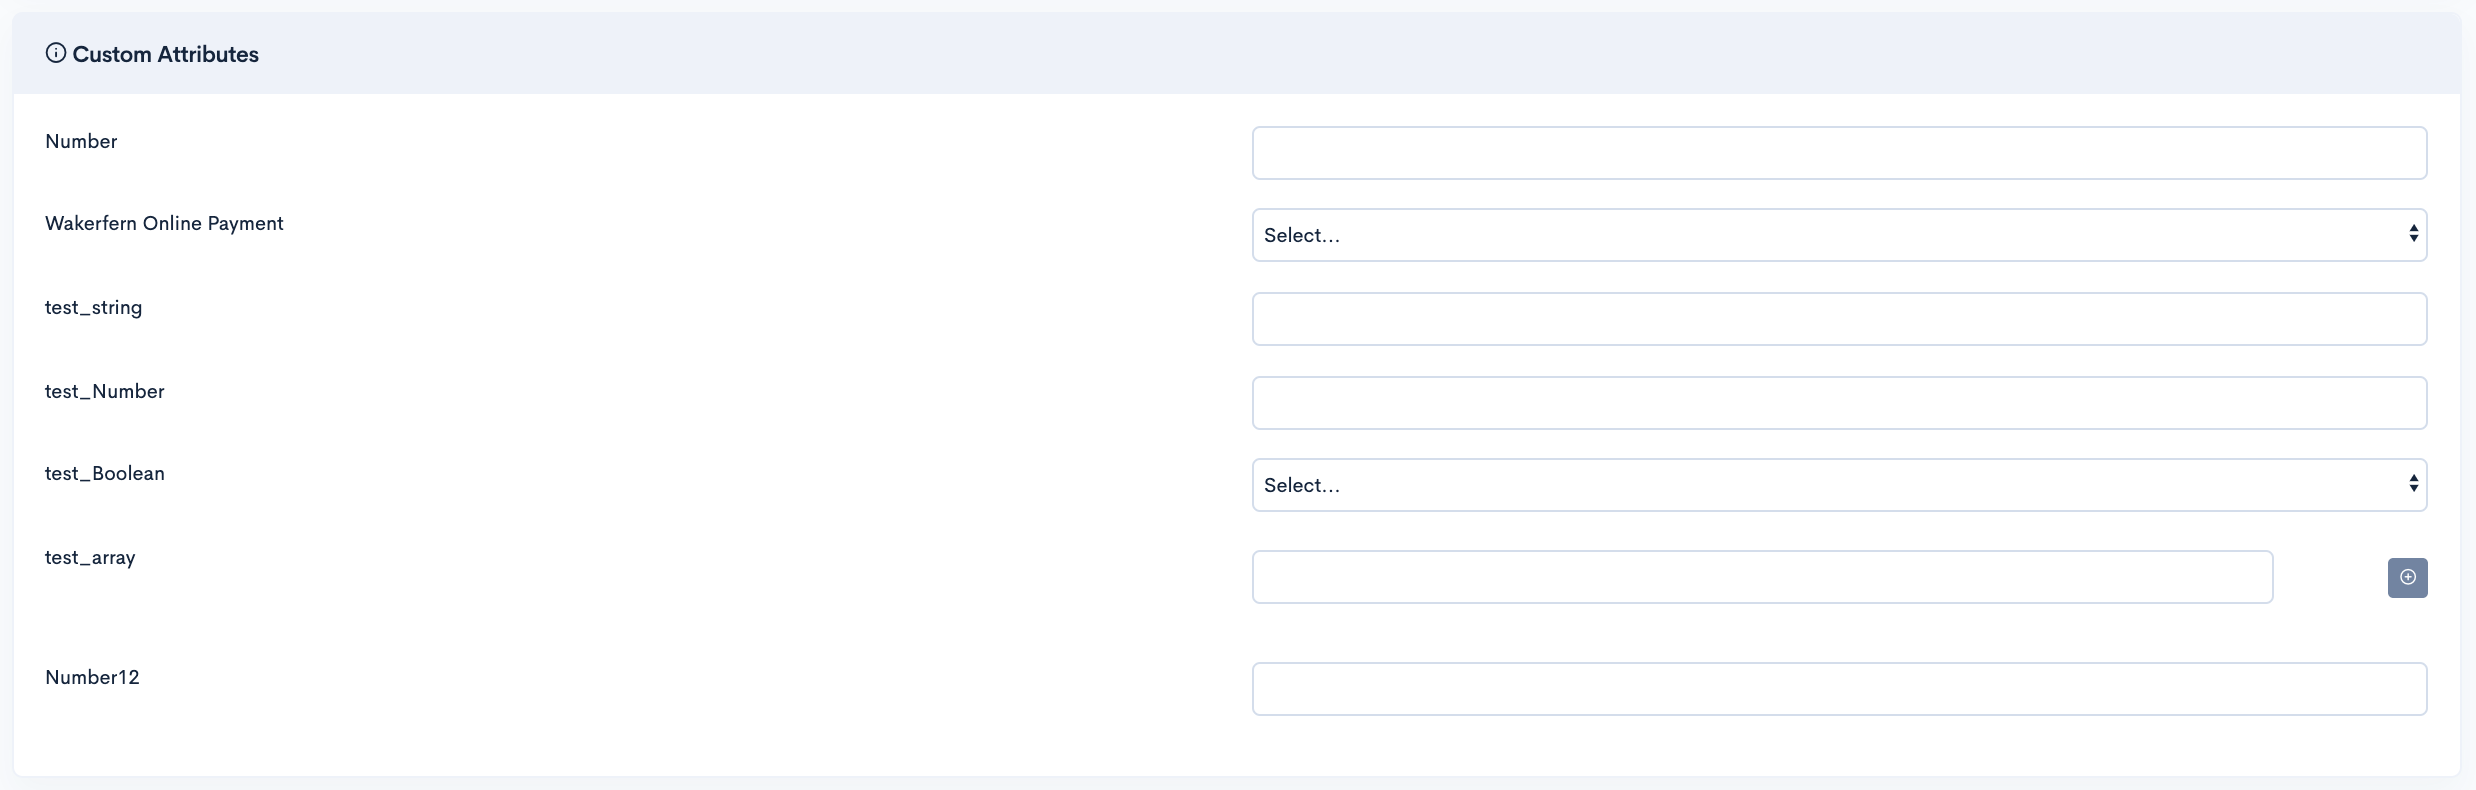
Orders with Estimates
In Order with Estimates, before placing an order with DSPs, You request for the estimates given by all the DSPs. Additionally, based on the cost and time in the estimate you can make a decision which DSP you wish to give order for delivery.

Follow below instructions
- After Successful login to Delivery Solutions page
- Click on the Deliveries Tab from the left side panel
- Select Create Delivery under the Deliveries Section
- You will be redirected to a Form called Address & Packages
- Fill in the details in each section of the form
- Click on Get Estimates to get the order estimates
- You will be redirected to Estimation page having estimates from available DSPs
- Select the radio button against the DSP through which you wish to make order delivery
- Click on Place Order to place the order
- You will be redirected to Summary page where you can see the order summary
Direct Place Orders
Direct place order internally works the same way as that of get estimate and place order, i.e. when order request is received, first DS requests for estimates from all DSPs, on receiving estimates based on rule configured best DSP in terms of estimation gets selected, and instead of giving estimate and DSP details back to tenants, Delivery Solutions places the order directly to that DSP of which estimate was selected as best out of all DSPs..

Follow below instructions
- After Successful login to Delivery Solutions page
- Click on the Deliveries Tab from the left side panel
- Select Create Delivery under the Deliveries Section
- You will be redirected to a Form called Address & Packages
- Fill in the details in each section of the form
- Click on Place Order
- Your order will be automatically placed with the DSP having the best estimate and delivery time.
- You will be redirected to Summary page where you can see the order summary.
Schedule Order
Orders can be scheduled as well. In dispatch settings under Create Delivery page, Businesss can select the schedule option. Whenever an order is placed as schedule, It is mandatory to set the Pickup Start Time and Drop Off End time prior to placing the order.

Follow below instructions
- After Successful login to Delivery Solutions page
- Click on the Deliveries Tab from the left side panel
- Select Create Delivery under the Deliveries Section
- You will be redirected to a Form called Address & Packages
- Fill in the details in each section of the form
- In Dispatch Settings section, select option schedule
- Provide Time(in minutes) before which order will be picked up from DSP
- You will be redirected to Summary page where you can see the order summary
Manual Order
Delivery Solutions allows you to place an order manually where you can save an order with Delivery Solutions and release it to DSPs later on.
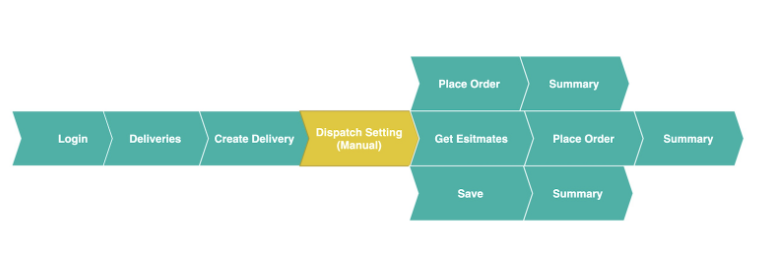
Follow below instructions
- After Successful login to Delivery Solutions page
- Click on the Deliveries Tab from the left side panel
- Select Create Delivery under the Deliveries Section
- You will be redirected to a Form called Address & Packages
- Fill in the details in each section of the form
- In Dispatch Settings section, select option Manual
- Click on Save button to keep the Order with Delivery Solution. You can release the order later on.
- Click on Get Estimates to get the estimates of the order
- Click on Place Order to allow Delivery Solution to directly place with the DSP having most suitable estimates and time for your order.
- You will be redirected to Summary page where you can see the order summary
Orders with ASAP Time Window
Customers can place an ASAP order through API as well as Delivery Solution Interface. An ASAP order means Pick up the order right away and Deliver the order as soon as the pickup is done. However, DSP preference and Scenarios will be still considered. The earliest delivery will be selected as per the scenarios set under the orchestrations section.
Please note in this case “Always Honor Delivery Window” check becomes invalid as there is no fix time given by tenants to pickup and delivery.
However, in this case DSP preference and Scenarios still comes into play, and as per the result of those scenarios estimate which will delivery at earliest gets selected.
ASAP Pickup
When an order is set for ASAP Pickup option, It enforces the DSPs that the order should be picked up from the store as soon as it is ready for pick up.
This is how ASAP Pickup option looks like.

Follow below instructions
- After Successful login to Delivery Solutions page
- Click on the Deliveries Tab from the left side panel
- Select Create Delivery under the Deliveries Section
- You will be redirected to a Form called Address & Packages
- Go to Pickup Details section
- Click on the checkbox ASAP Pickup, It will automatically disable the Pickup Start and End window
- You are all set to place ASAP Pickup order.
- After Successful login to Delivery Solutions page
- Click on the Deliveries Tab from the left side panel
- Select Create Delivery under the Deliveries Section
- You will be redirected to a Form called Address & Packages
- Go to Pickup Details section
- Click on the checkbox ASAP Drop Off, It will automatically disable the Drop Off Start and End window
- You are all set to place ASAP Drop Off order
ASAP Drop Off
When an order is set for ASAP Drop Off option, It enforces the DSPs that the order should be delivered to the customer as soon as it is available to them for delivery.
This is how ASAP DropOff option looks like.

Follow below instructions to create an ASAP Pickup Order:
Important
Exact Delivery Window Rule under Orchestration section will become inapplicable for ASAP orders
Deliveries
Deliveries
Orders which are with Delivery Solutions and yet to be dispatched to DSPs can be managed through Delivery Solutions Interface.
View Orders
You can view all the orders on Status page under Deliveries section.
- After Successful login to Delivery Solutions page
- Click on the Deliveries Tab from the left side panel
- Select appropriate options to filter your orders
- You will be able to see the list of stores at the bottom of the page.
- Click on three vertical dots icon for more options
- Select
 button to view the detailed order.
- Click on
 button to go back to Deliveries Page
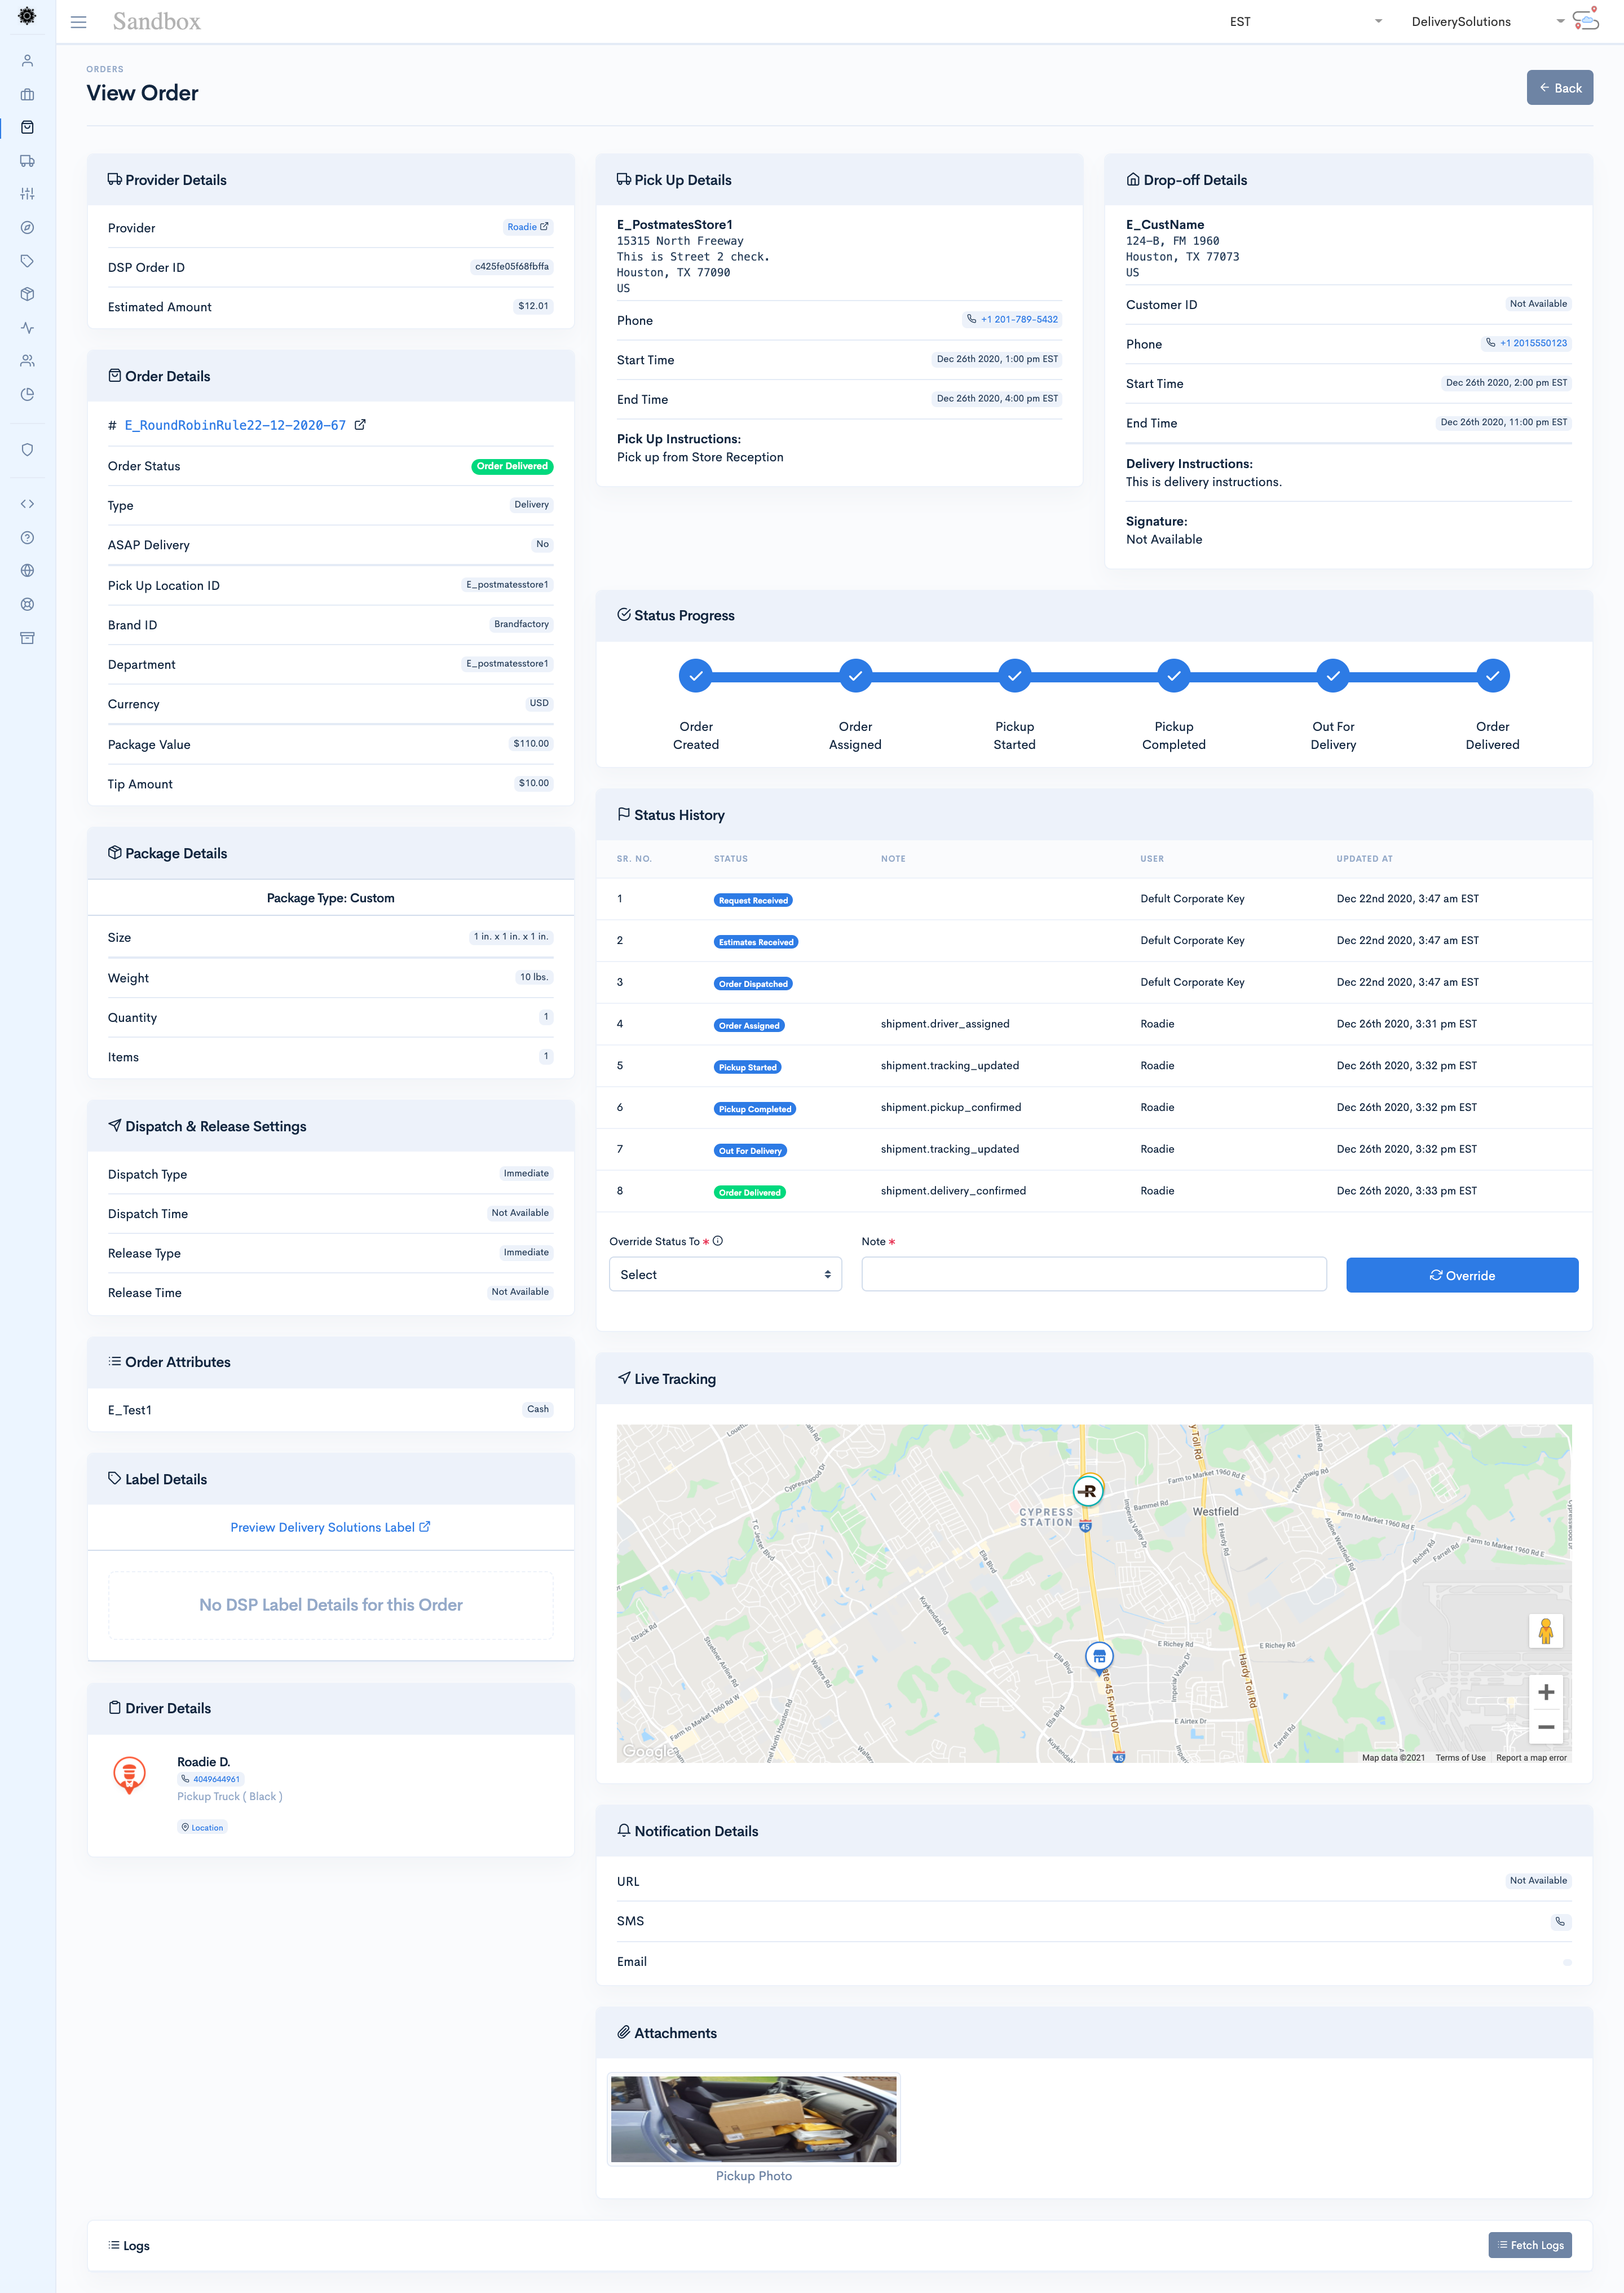
Filter Orders
You can search your orders based on the filters available on the Status Page.
This is how the list of filters looks like.
Basic
The Status page contains below filters.
| Field Name | Description |
|---|---|
| Date |
Filters Stores as per the duration mentioned below
Last 24 Hours Upcoming Tomorrow Today Yesterday Last 7 Months Current Month |
| Date Applies to | Above Date Filter will be applied to below date types.
Pickup Date Drop Off Date Created Date Updated Date |
| Time Zone | The Timezone the store located in. Local Time (Default - local timezone of the store) Eastern Central Mountain Mountain Standard Pacific |
| Address Applies To | Pick Up Location Drop Off Location Pick Up Or Drop Off Location |
| City | List of Cities |
| State | List of States |
| DSP | List of DSPs |
| Order ID | Order ID |
| Brand | Brand ID |
| Store | Store ID - Store Name (list of stores) |
| Exclude Order Status | Dropdown to select orders to be exluded by filter |
| Customer Name | Name of the customer order belongs to. |
Edit Order
You can edit an existing order from the Deliveries Status page.
- After Successful login to Delivery Solutions page
- Click on the Deliveries Tab from the left side panel
- Select appropriate options to filter your orders
- You will be able to see the list of stores at the bottom of the page.
- Click on three vertical dots icon for more options
- Click on
 button.
 - You will be redirected to Address & Package Page
- Follow the same instructions mentioned in Create Delivery section.
Fetch Logs
Fetch Logs are nothing but the logs being sent to DSPs and Tenants based on the change in the order status.
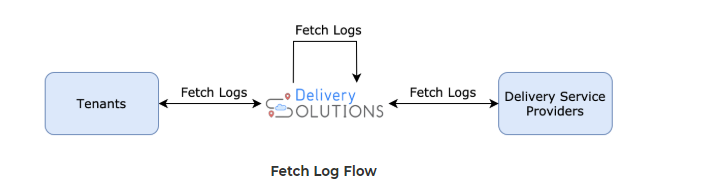
You can view the Fetch Logs under Status and Create Delivery Page.
- After Successful login to Delivery Solutions page
- Click on the Deliveries Tab from the left side panel
- Select“Status” under the Deliveries Section
- Select appropriate options to filter your orders
- You will be able to see the list of stores at the bottom of the page.
- Click on three vertical dots icon for more options
- Click on button or
button on the right most side of the order row.
- You will be redirected to Address & Package or “Order Detail” page
- Click on the Fetch Logs Button to retrieve the order logs.
This is how fetch logs looks like
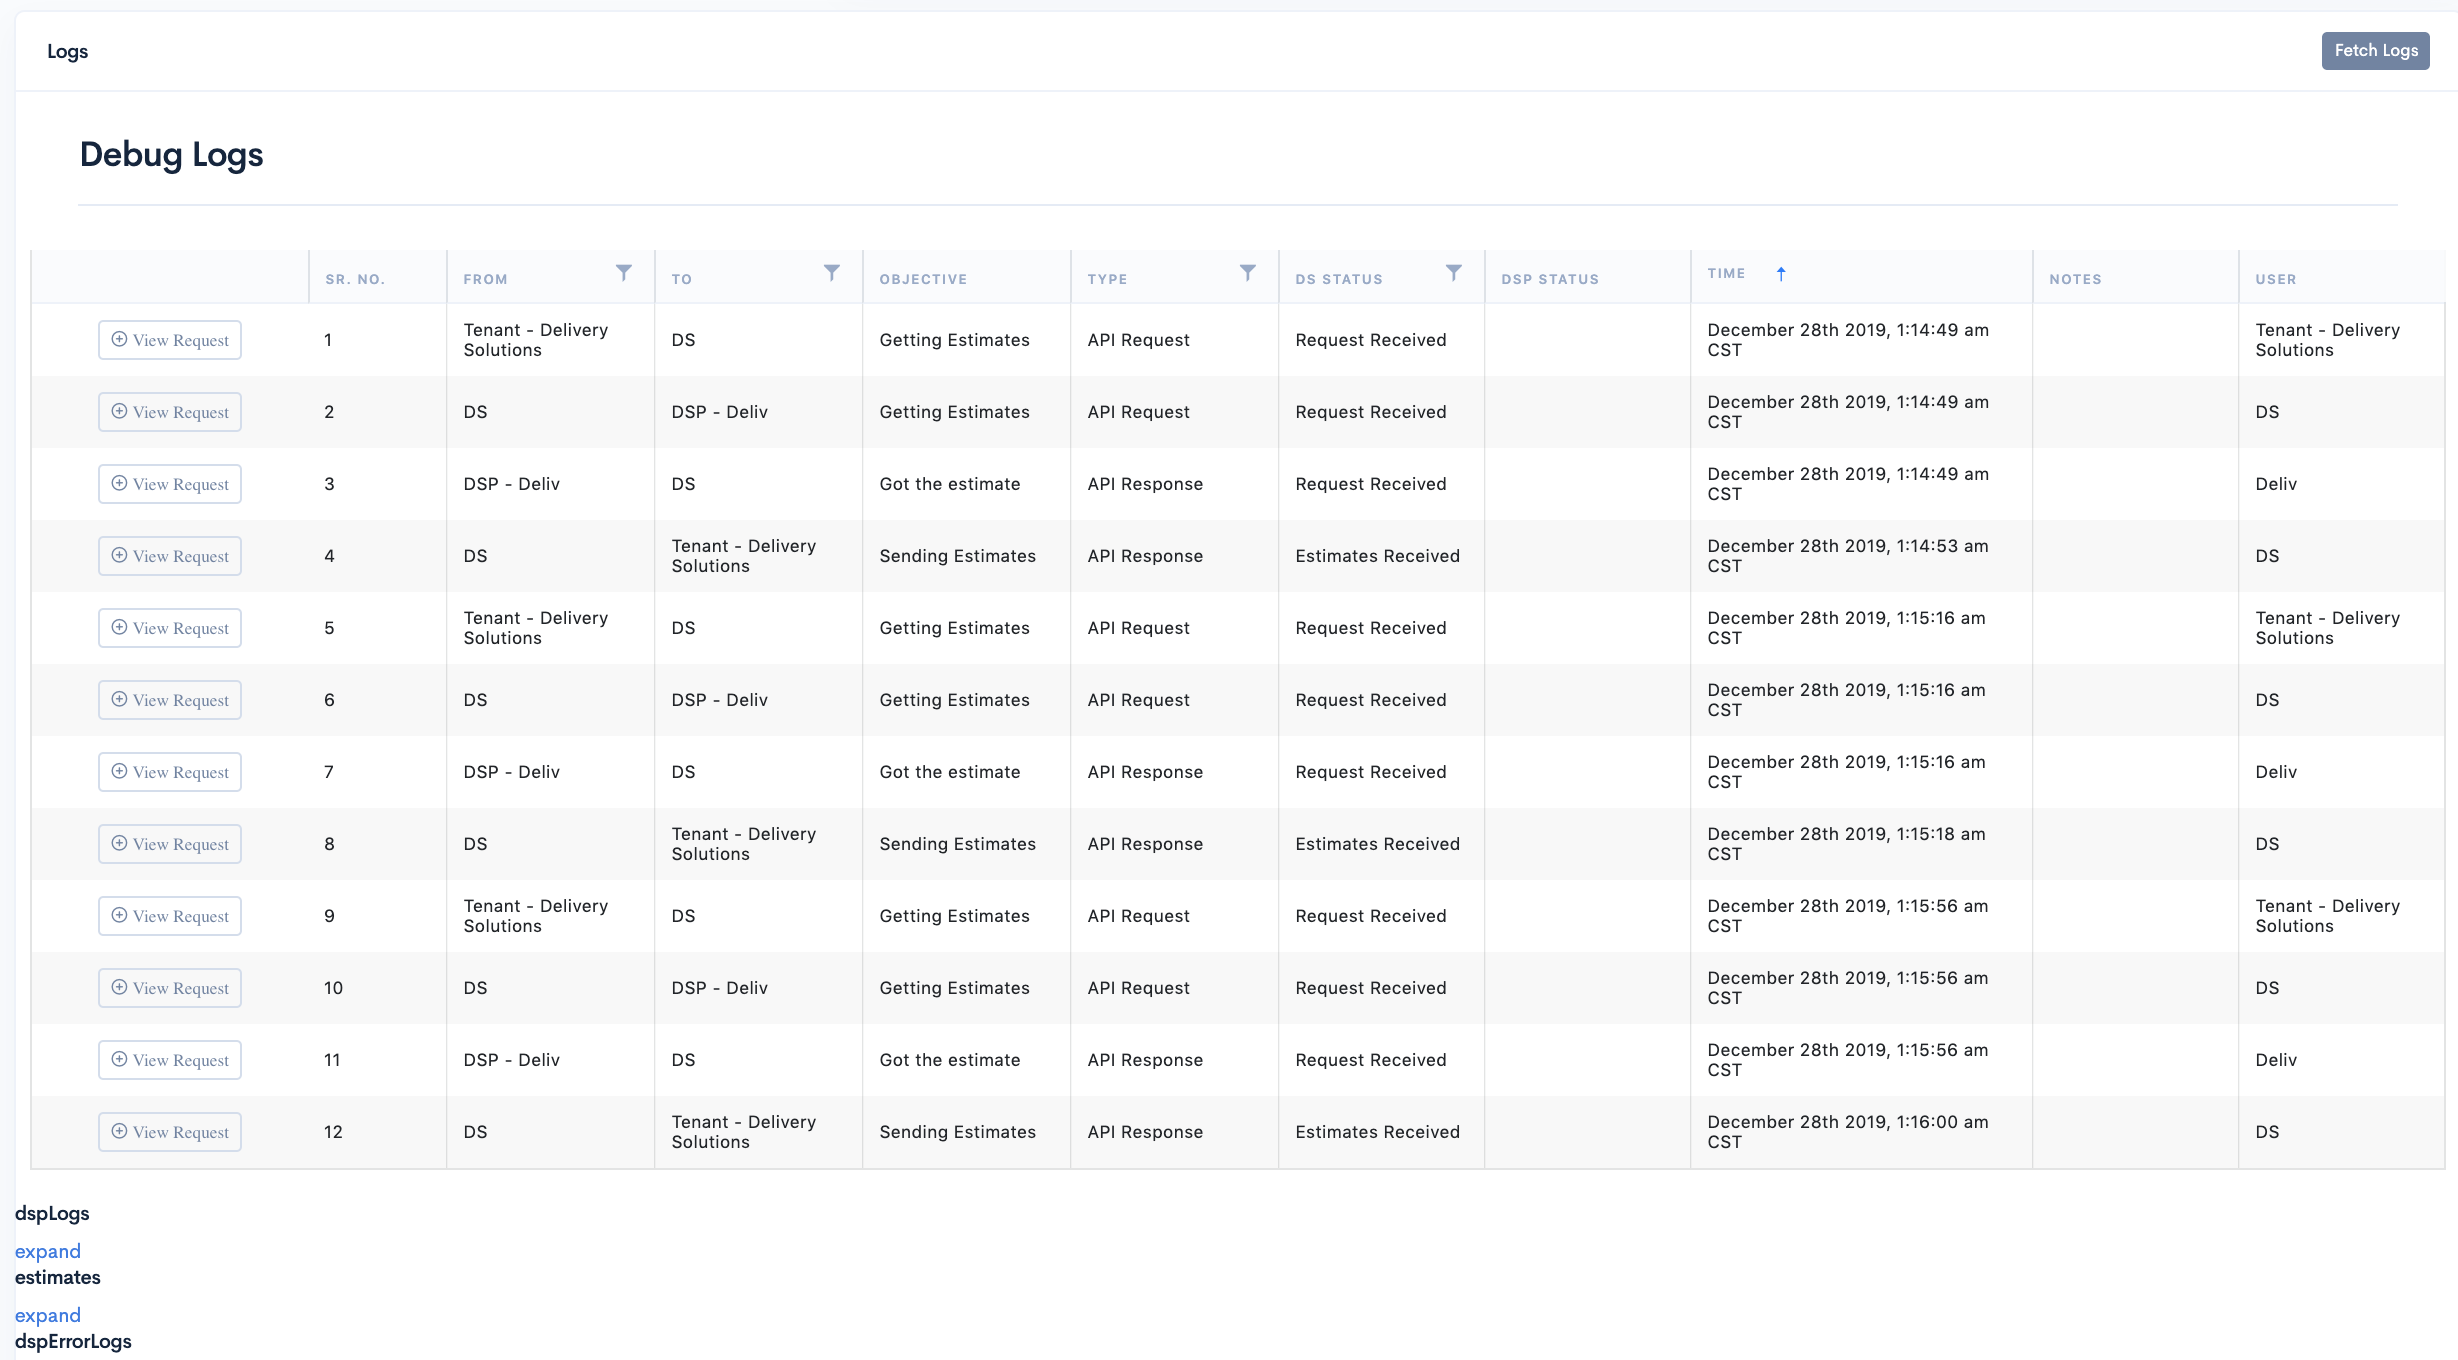
Basic
The Fetch Logs Tablesection seeks information for below fields:
| Field Name | Description |
|---|---|
| Sr | Serial Number of the logs since |
| From | Tenants/DSP/DS name from where the log is sent |
| To | Tenants/DSP/DS name to where the log is received |
| Type |
The field contains the type of the Logs such as
below API Request API Response Webhook Request Webhook Response |
| DS Status | Respective Order Status in Delivery Solution |
| DSP Status | Respective Order Status in DSP |
| Time | Time when the logs were generated |
| Notes | Additional details |
| User | User name from where the logs are being sent |
Cancel Order
Order Cancellation can take place at any point of time in the order life cycle.
- After Successful login to Delivery Solutions page
- Click on the Deliveries Tab from the left side panel
- Select appropriate options to filter your orders
- You will be able to see the list of stores at the bottom of the page.
- Click on three vertical dots icon for more options
- Select
 button to cancel the order against the order
- You will be asked to confirm the cancellation of the order
- Click Ok to Cancel the order
Export Orders
Businesss can export the order placed by them in CSV/XLXS Format.
- After Successful login to Delivery Solutions page
- Click on the Deliveries Tab from the left side panel
- Select Status under the Deliveries Section
- Select appropriate options to filter your orders
- You will be able to see the list of stores at the bottom of filter as shown below

- Select the File Format option from the upper right corner of the store lists as shown below
- Click onExport button to export the orders
-
At a time you can download orders for only 3 months. You will be prompted a dialog if exceeded the date range as shown below.
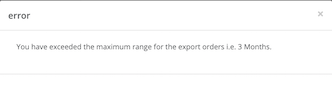
- Selected format file with orders will automatically downloaded.
Important
Select Include Lifecycle Timestamp to include excluded order status
Table Of Content
Provider Config
Delivery Service Providers
Provider Config page lets you manage and configure the available Delivery Service Providers based on your Business requirement.
DSP configuration mainly seeks API Key. Once DSP is configured, then only It can be assigned to the Store.
- After Successful login to Delivery Solutions page
- Click on the Provider Config Tab from the left side panel
- You will be redirected to Delivery Service Providers under the Provider Config Section
This is how Delivery Service Providers Page looks like..
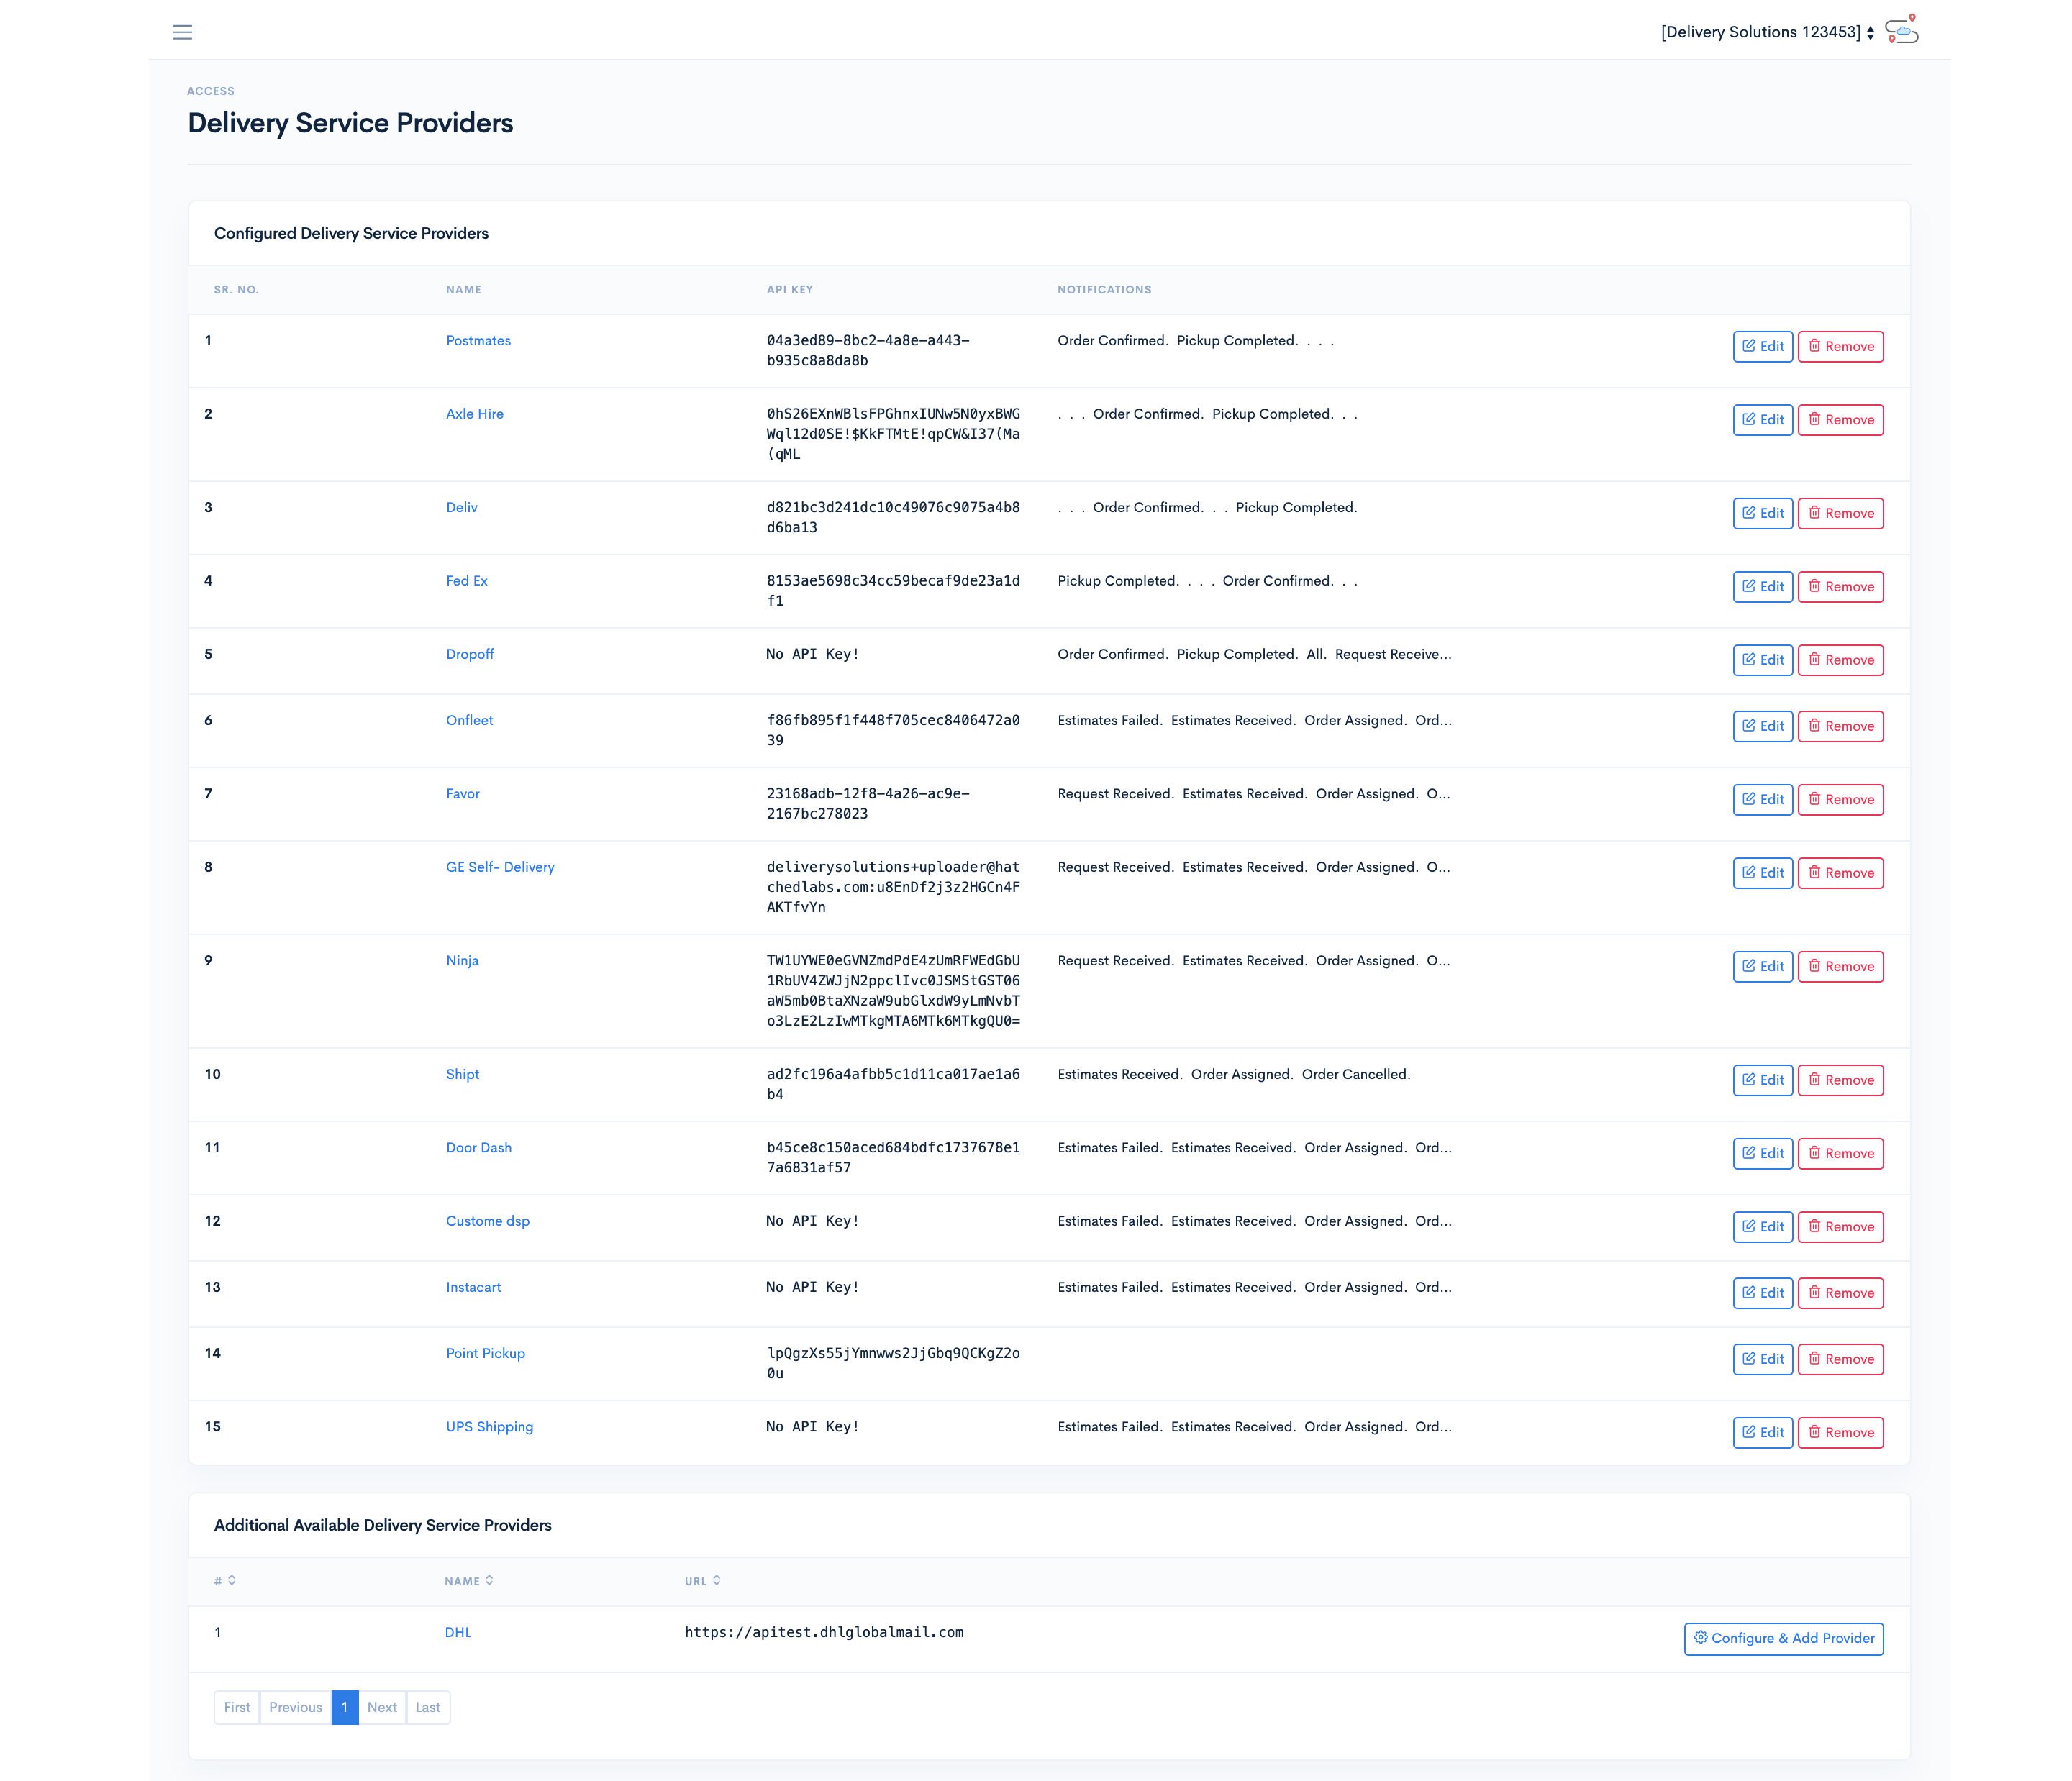
Configure & Add Providers
The configuration of DSPs will require details such DSP API key, SMS/Email, webhooks and so on. These details vary depending upon the DSPs.
Once DSP configuration takes place, DSP needs to be added to the store, then and then only the store can send orders to the DSP
- After Successful login to Delivery Solutions page
- Click on the Provider Config Tab from the left side panel
- You will be redirected to Delivery Service Providers under the Provider Config Section
- Click on the Configure & Add Provider against the DSP name under Additional Available Delivery Service Providers
- You will be redirected to respective DSP Configuration page
- Fill up the details in the Configuration form
- Click on Save Changes & Update Provider to add DSP.
Basic
The Configuration Form seeks information for below fields:
| Field Name | Description |
|---|---|
| API Key | DSP API Key is mandatory as it authenticates the API requests going to respective DSP from DS. This field is mandatory to map the DSP to store |
| Webhooks | notification URL for sending status updates to DSPs. This field is mandatory to map the DSP to store |
| SMS/Email | Email/SMS alerts to be sent to the DSPs. This field is mandatory to map the DSP to store |
Important
There are other DSP specific mandatory fields which needs to be configured prior to adding it to the Store.
Edit Configured DSPs
You can modify the details of existing added DSPs under Configure Delivery Service Provider section.
- After Successful login to Delivery Solutions page
- Click on the Provider Config Tab from the left side panel
- You will be redirected to Delivery Service Providers under the Provider Config Section
- Click on the button against DSP
- You will be redirected to respective DSP Configuration page
- Fill up the details in the form
- Click on Save Changes & Update Provider to save the changes
Remove Configured DSPs
You can disable the existing added DSPs under Configure Delivery Service Provider section.
- After Successful login to Delivery Solutions page
- Click on the Provider Config Tab from the left side panel
- You will be redirected to Delivery Service Providers under the Provider Config Section
- Click on the
 button against the DSP name
- A popup window will be opened as shown below.
- Click on OK to remove the configured DSP .
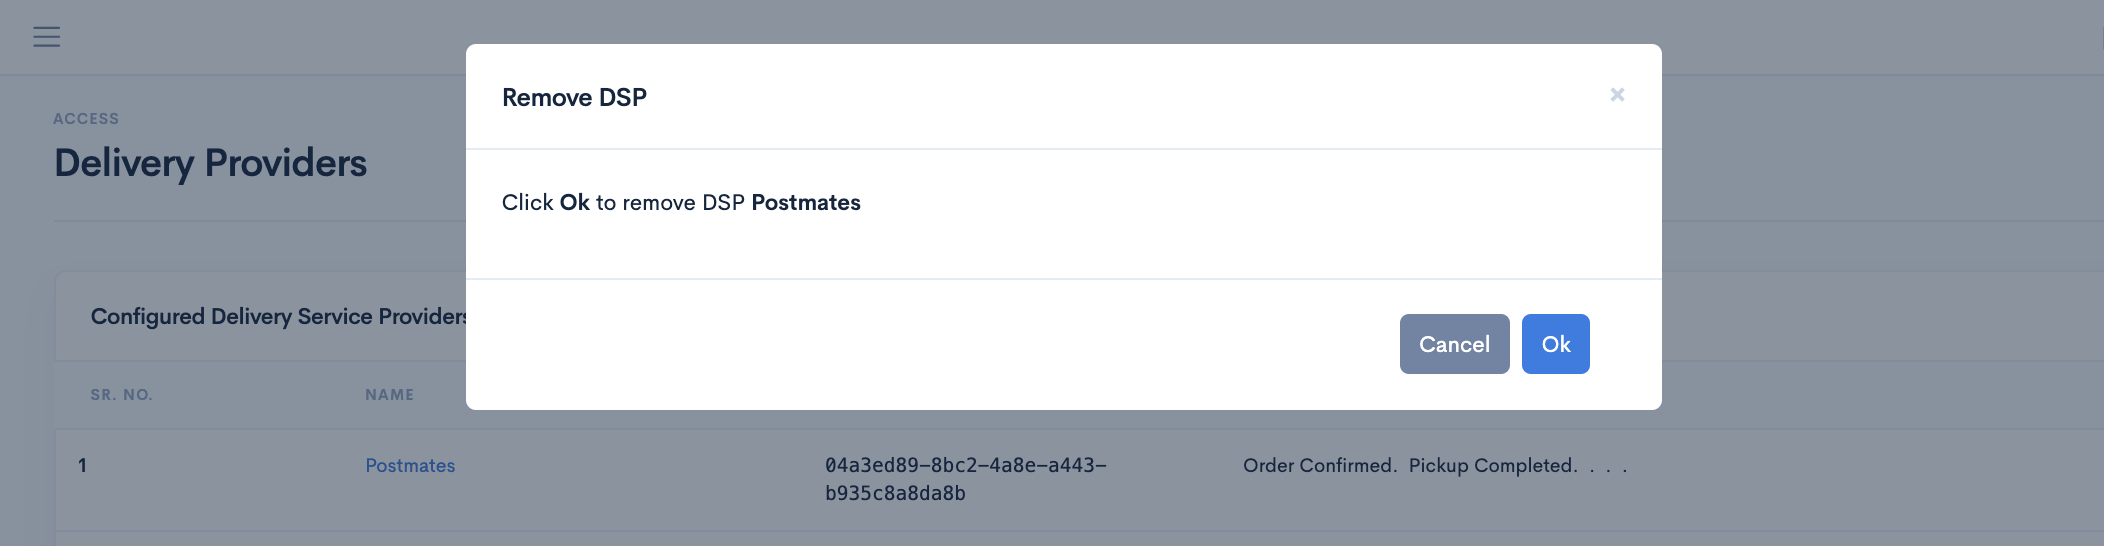
DSP Attributes
You can Configure Delivery Service Provider attributes in this section.
- After Successful login to Delivery Solutions page
- Click on the Provider Config Tab from the left side panel
- You will be redirected to Delivery Service Providers under the Provider Config Section
- Click on the DSP name
- You will be redirected to DSP Configurations page as shown below.
- Click on button to Edit the configuration.
- Edit the details on the form
- Click on Save to save the changes
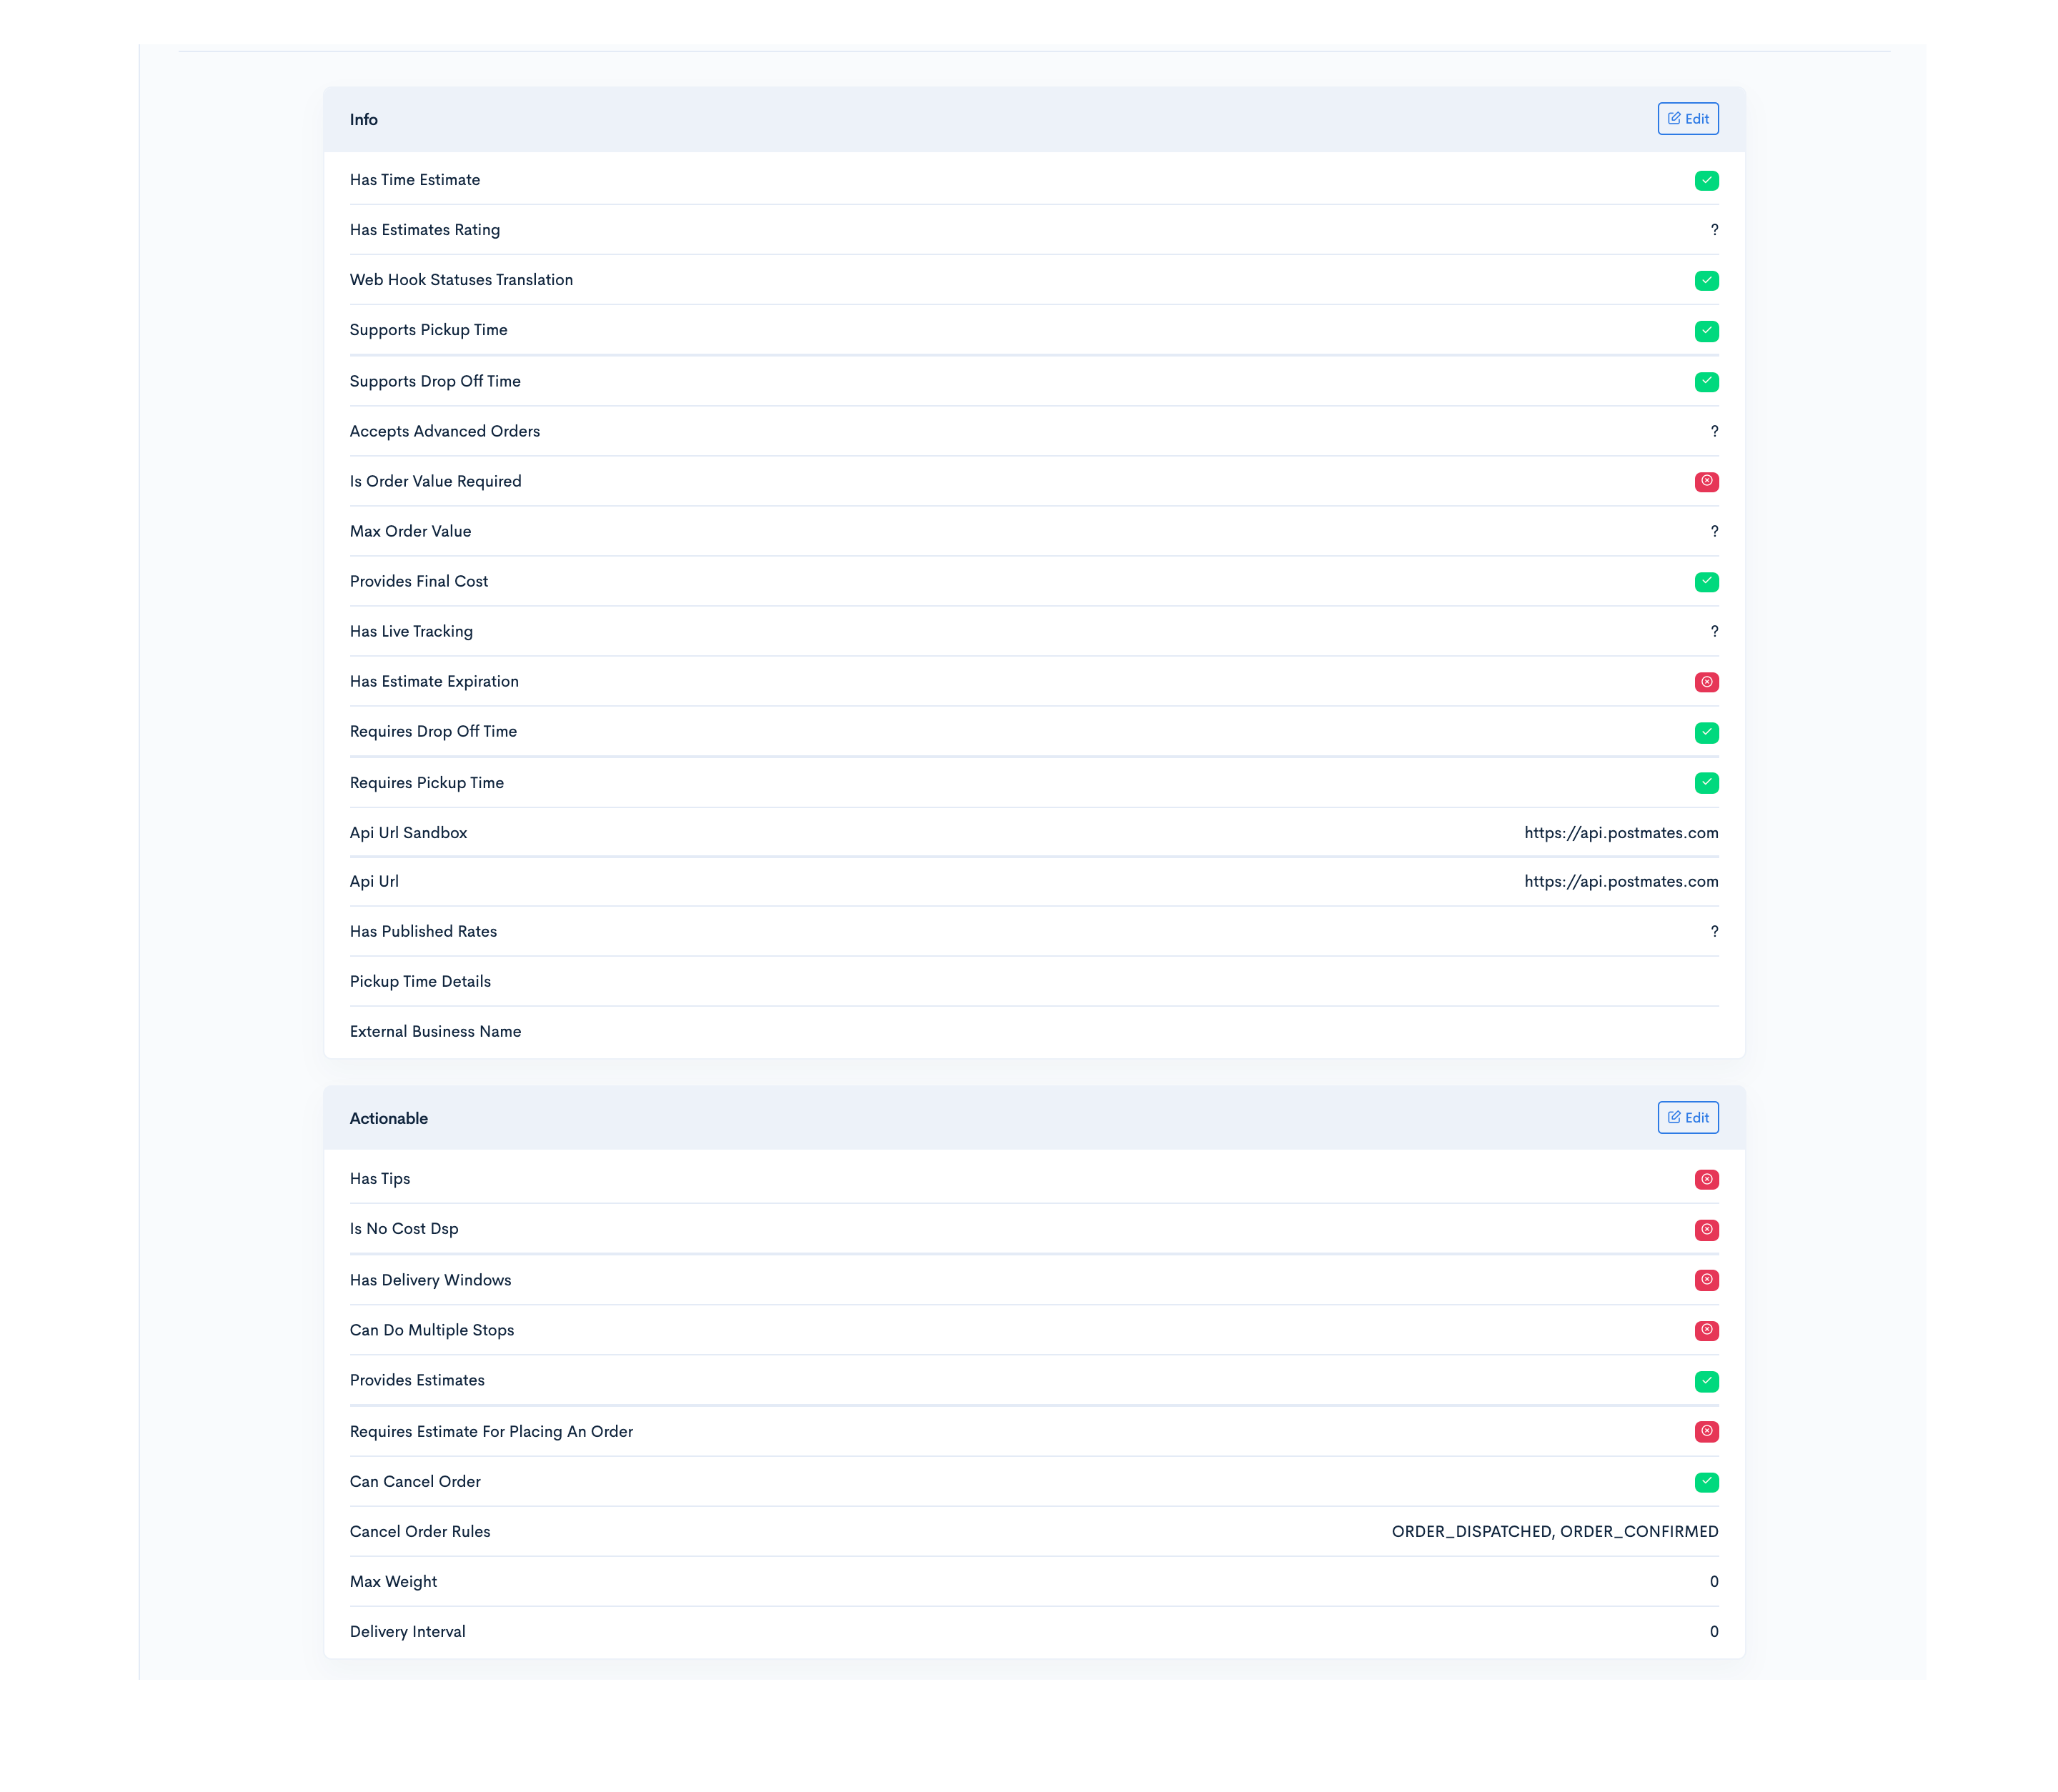
In House
Private Fleet Configuration
Private Fleet Configuration refers to a concept where Businesss have their own fleet of drivers for deliveries. Delivery Solutions as a platform allows Businesss to create and manage drivers, their delivery zones and shifts to be taken up by drivers. It also helps Businesss to manage, positioned, allocate and track deliveries of these drivers.
It Additionally, Delivery Solutions has a tie-up with Private Fleet which provides a mobile application for drivers to receive delivery details, and allows them to update the progress of the order.
Private Fleet Configuration
Organisational Units
An organizational unit (OU) is a subdivision into which you can place Drivers, Delivery Zones, Drivers Scheduling, and other units. You can create organizational units to mirror your organization's functional or business structure. Each domain can implement its own organizational unit hierarchy..
Similarly, Delivery Solutions allow to create multiple Org Units and Zones where you can create and schedule Drivers' shifts.
Create Organisational Unit
Create Organisational Unit as a part of Private Fleet Configuration
This is how Create Organisational Unit Form looks like
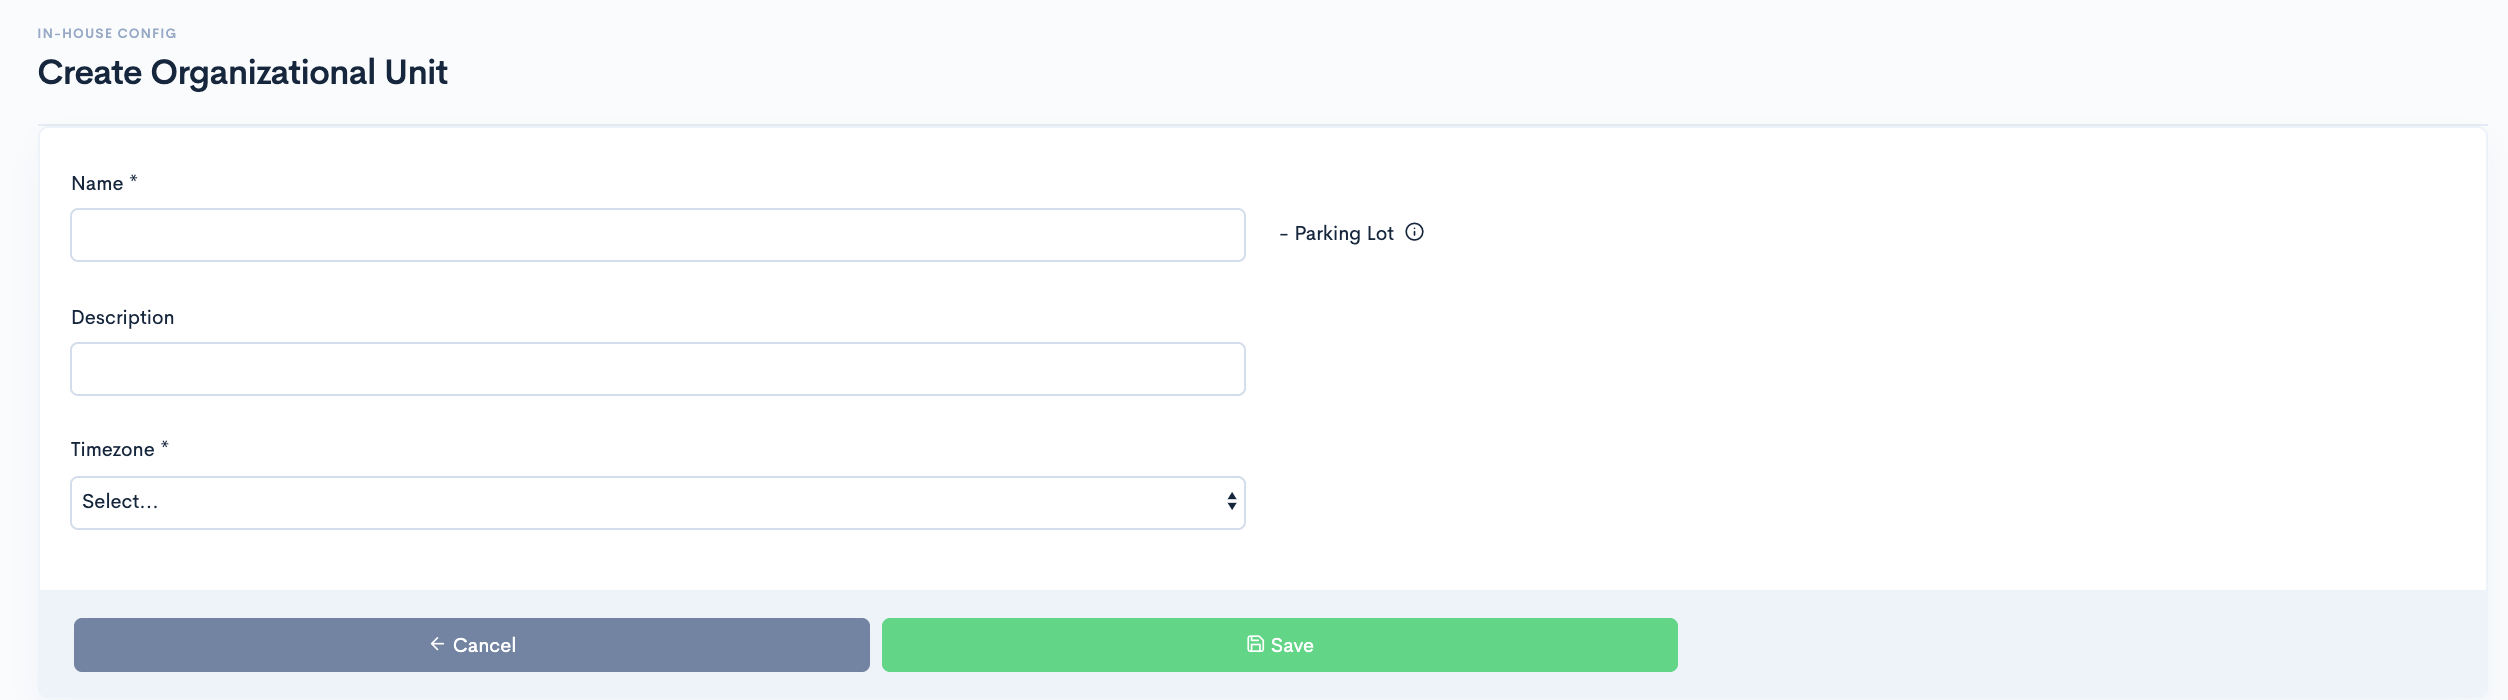
- After Successful login to Delivery Solutions page
- Click on the Private FleetConfig Tab from the left side panel
- Select Org Units under the Private Fleet Configuration Section
- Click on the Create OU button.
- You will be redirected to the Create Organisational Units form
- Fill in the details in the form
- Click on Save button to create a new org unit.
Basic
The Organisational Unit Form seeks information for below fields:
| Field Name | Description |
|---|---|
| Name | Name of the Organisational Unit |
| Description | A brief description about the Organisational Unit location |
| Timezone | Timezone in which the OU present |
Edit Organisational Unit
Update an existing Organisational Units as a part of Private Fleet Configuration
- After Successful login to Delivery Solutions page
- Click on the Private Fleet Configuration Tab from the left side panel
- Select Org Units under the Private Fleet Config Section
- Click on button.
- Edit the Name in Input Box
- Edit the Description in the Input Box
- Click on Save Button to save the changes
Enable or Disable Organisational Unit
Enable/Disable an existing Organisational Units as a part of Private Fleet Configuration
- After Successful login to Delivery Solutions page
- Click on the Private Fleet Config Tab from the left side panel.
- Select Org Units under the Private Fleet Config Section
- Swipe Right the toggle button against Org Units to Enable it.
- An Enabled Org Unit will be marked as
- After Successful login to Delivery Solutions page
- Click on the Private Fleet Config Tab from the left side panel.
- Select Org Units under the Private Fleet Config Section
- Swipe Left the toggle button against Org Units to Enable it.
- A Disabled Org Unit will be marked as
Private Fleet Configuration
Delivery Zone
Create Zones under Organisational Units
Create Delivery Zone
This is how Create Delivery Zone Form looks like
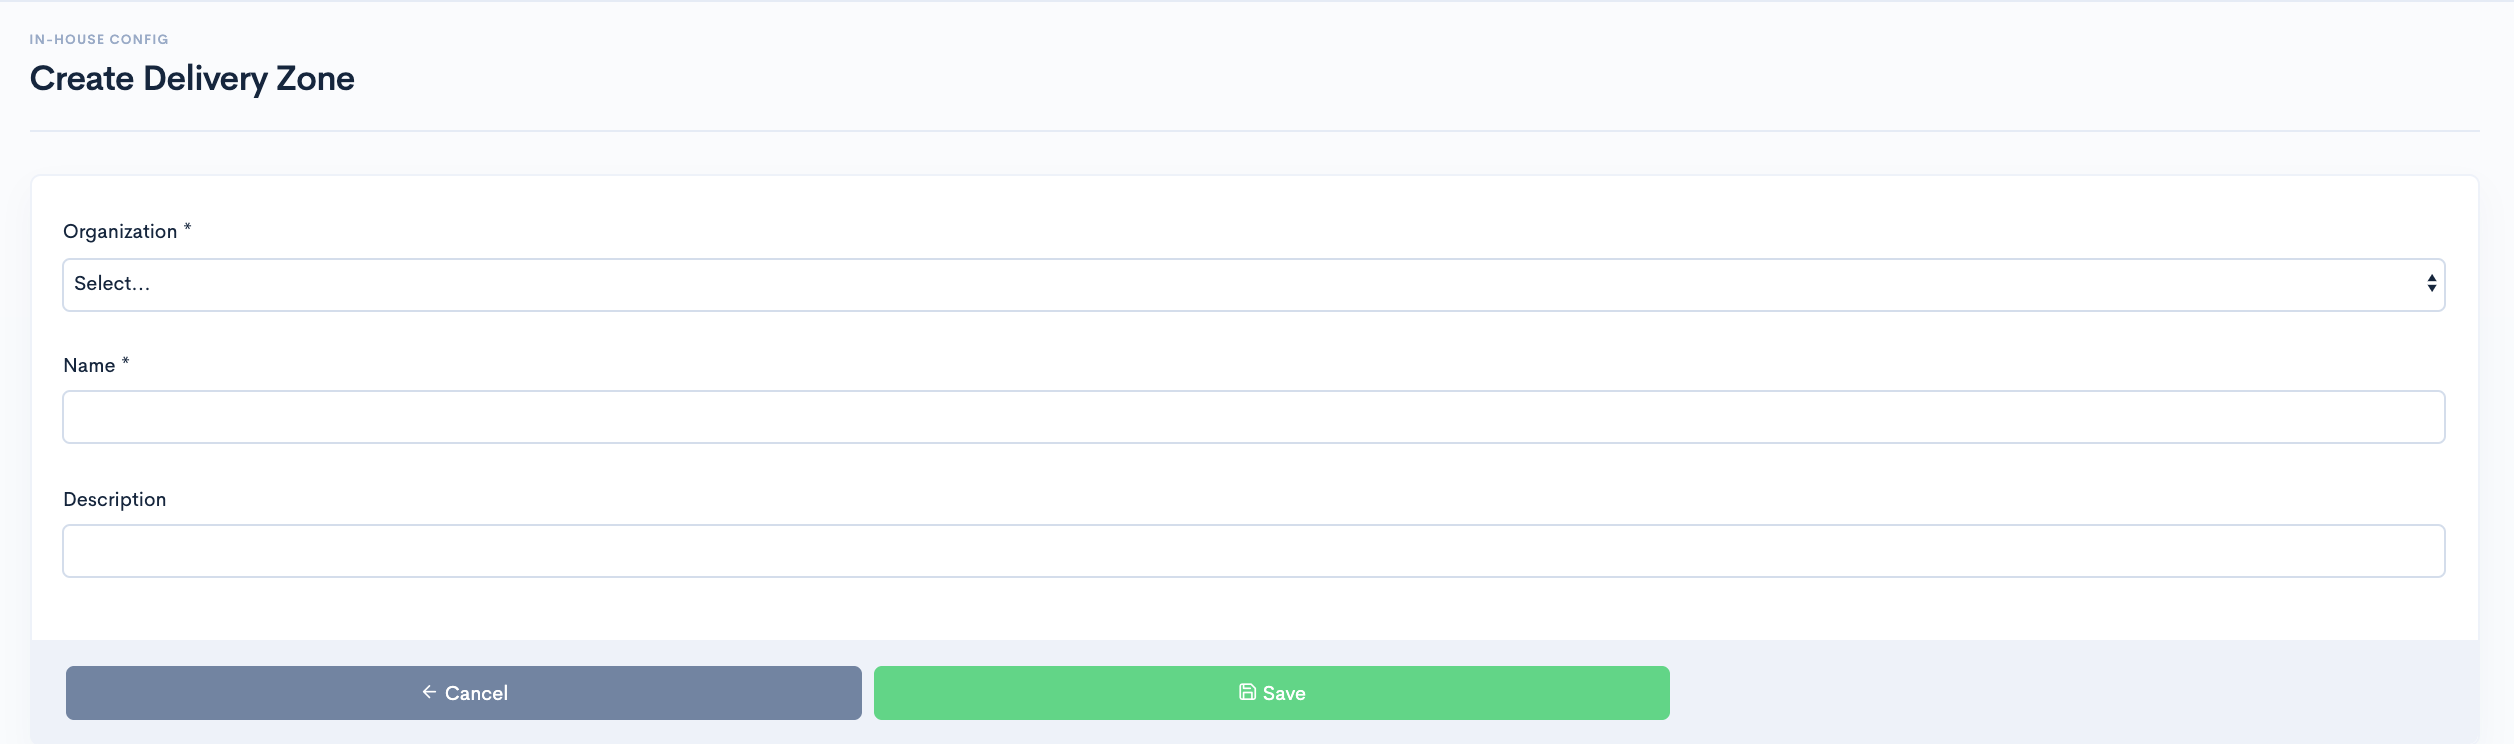
- After Successful login to Delivery Solutions page
- Click on the Private Fleet Config Tab from the left side panel
- Select Delivery Zone under the Private Fleet Config Section
- Go to Create Delivery Zone section
- Click on the Create Delivery Zone button
- You will be redirected to the Create Delivery Zone form
- Fill in the details in the form
- Click on Save button to create a new org unit.
Basic
The Organisational Unit Form seeks information for below fields:
| Field Name | Description |
|---|---|
| Organisation | Organisational Unit |
| Name | Name of the Delsivery Zone |
| Description | A brief description about the Delivery Zone |
Edit Delivery Zone
Update an existing Delivery Zone as a part of Private Fleet Configuration
- After Successful login to Delivery Solutions page
- Click on the Private Fleet Config Tab from the left side panel
- Select Delivery Zone under the Private Fleet Config Section
- Click on button.
- Edit the details in the input boxes
- Click on“Update” Button to save the changes
Enable or Disable Delivery Zone
Enable/Disable an existing Delivery Zone as a part of Private Fleet Configuration
- After Successful login to Delivery Solutions page
- Click on the Private Fleet Config Tab from the left side panel
- Select Delivery Zone under the Private Fleet Config Section
- Swipe Right the Toggle button against Delivery Zone to Enable it.
- An Enabled Delivery Zone toggle will look like this
- After Successful login to Delivery Solutions page
- Click on the Private Fleet Config Tab from the left side panel
- Select Delivery Zone under the Private Fleet Config Section
- Swipe Left the Toggle button against Delivery Zone to Enable it.
- A Disabled Delivery Zone toggle will look like this
Search Delivery Zone
Search an existing Delivery Zone under an Organisational Unit
- After Successful login to Delivery Solutions page
- Click on the Private Fleet Config Tab from the left side panel
- Select Delivery Zone under the Private Fleet Config Section
- Select the Organisation in Drop Down list
- Click on Search Button to search Zones
- Delivery Zones will be listed down as per the selected Organisation
Private Fleet Configuration
Scheduling
Manage Delivery Slots schedules under Delivery Zones
Create Delivery Slots
Create and modify delivery slots
This is how Scheduling Page looks like
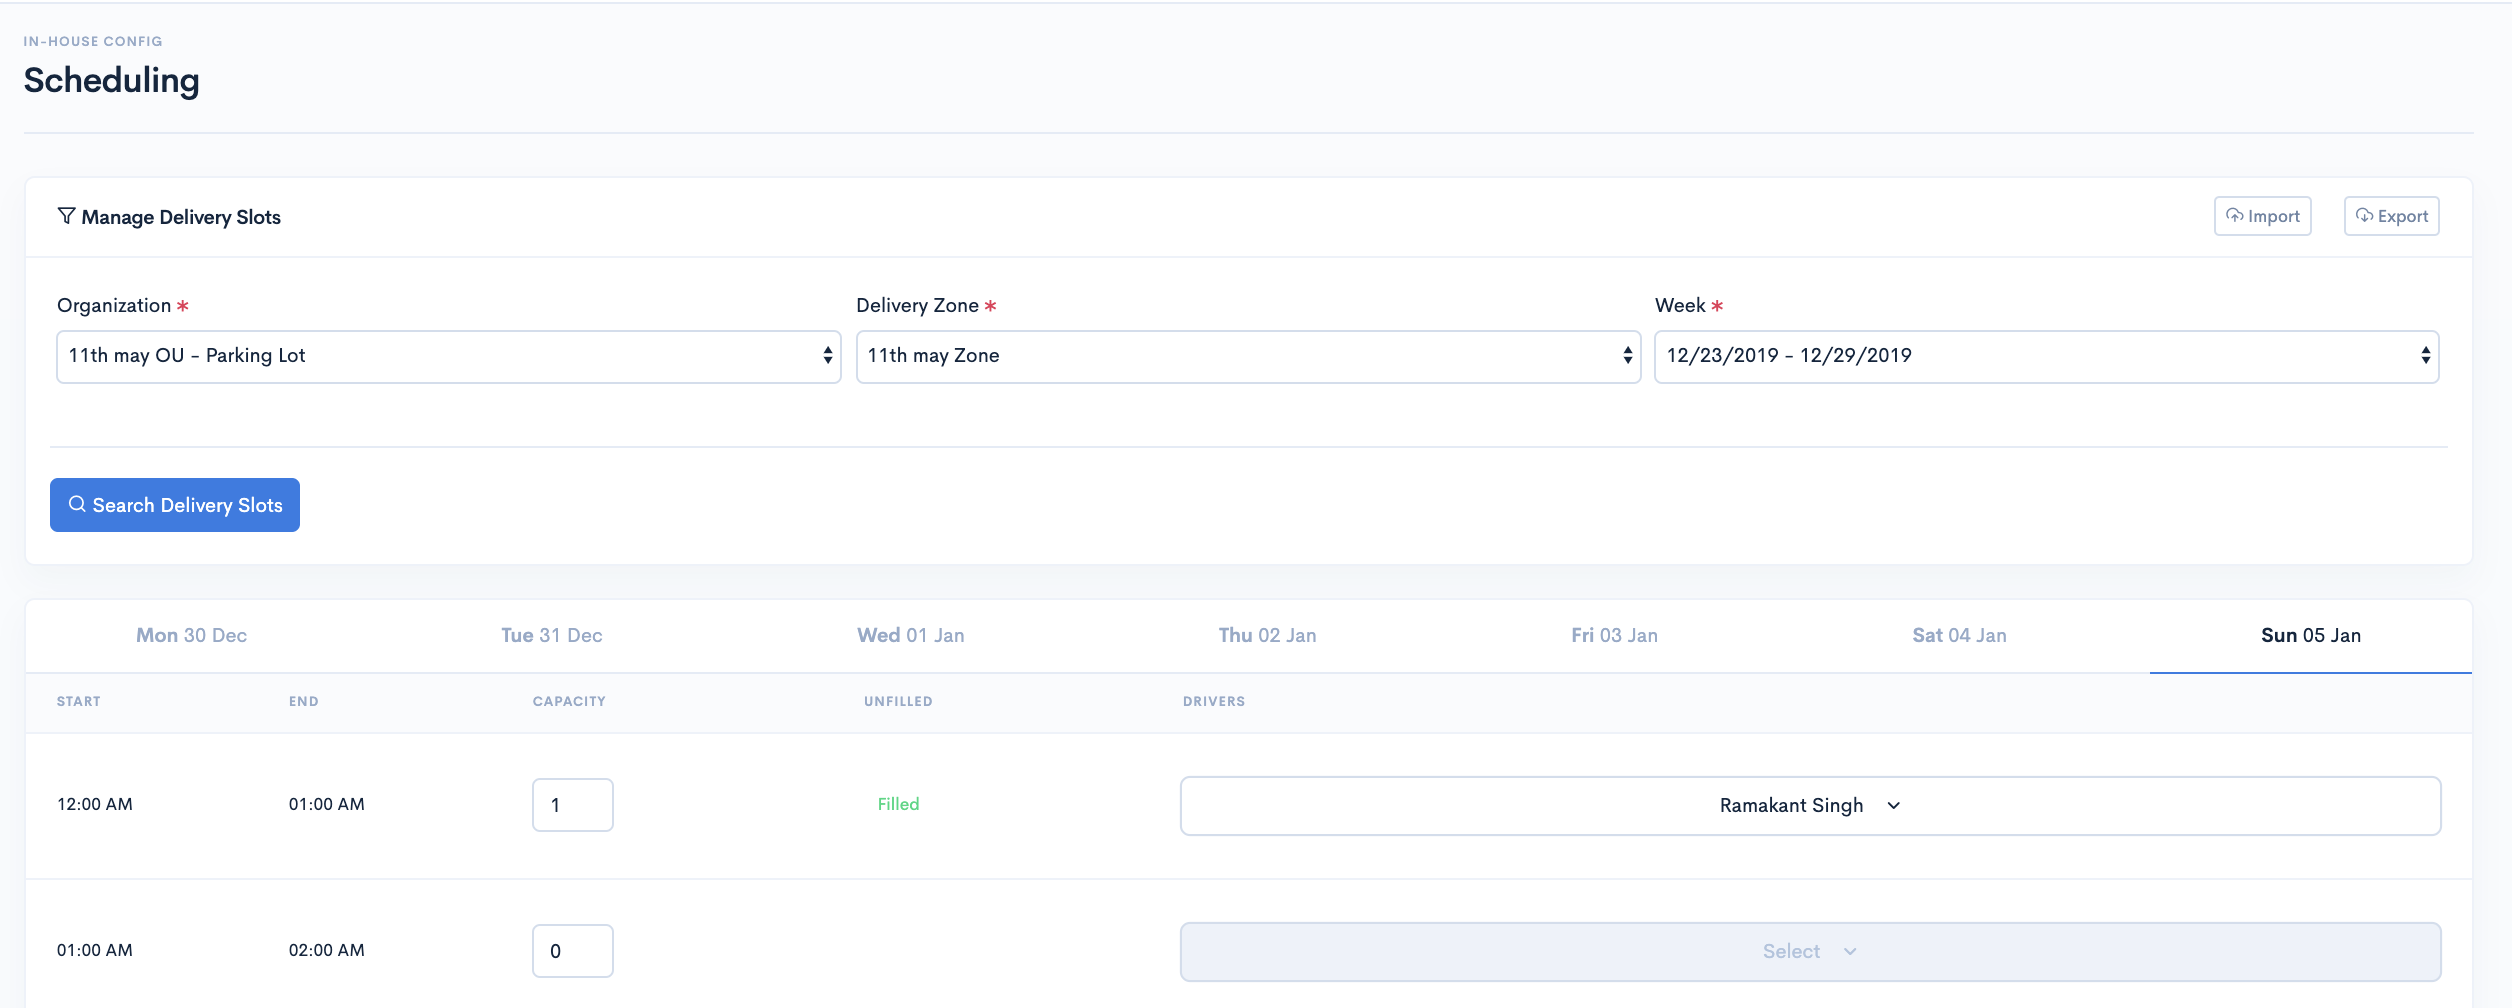
- After Successful login to Delivery Solutions page
- Click on the Private Fleet Config Tab from the left side panel
- Select Scheduling under the Private Fleet Config Section
- Go to Deliveries Slots section
- Select appropriate options in the fields
- Click on Search to find the available Delivery Slots
- Select a Day under a week for which you wish to set delivery slot time
- SelectStart time, End time from the drop down list
- Insert Capacity in the input box
- Click on the Driver button to select a driver for the delivery slot
- Click on Create to create the delivery slot
- A new delivery slot will be added
- Click on“Save” to save the changes
Basic
The Organisational Unit Form seeks information for below fields:
| Field Name | Description |
|---|---|
| Organisation | Organisational Unit |
| Delivery Zone | Delivery Zone |
| Week | Scheduling Week |
| Start | Start Time of Delivery Slot |
| End | End Time of Delivery Slot |
| Capacity | Number of Items |
Import Delivery Slot
Import multiple Delivery Slots schedules through csv/Xlxs File
- After Successful login to Delivery Solutions page
- Click on thePrivate Fleet Config Tab from the left side panel
- Select Scheduling under the Private Fleet Config Section
- Go to Delivery Slots section
- Click on the Import button to import a file
- A Popup Window will open to browse the file from your local drive
- Select the Delivery Slot file you wish to Import
- Click Ok to Import the file
- Delivery Slots will be added accordingly
Export Delivery Slot
Export multiple Delivery Slots schedules in csv/Xlxs File
- After Successful login to Delivery Solutions page
- Click on thePrivate Fleet Config Tab from the left side panel
- Select Scheduling under the Private Fleet Config Section
- Go toManage Delivery Slots section
- Click on the "Export" button to export all Delivery Slots to a file
- Delivery Slots will be exported to a file accordingly
Table Of Content
Private Fleet Configuration
Drivers
Delivery Solutions allows you to manage drivers under Private Fleet configurations
Create Driver
Create a new driver under an organisational unit.
This is how Drivers looks like
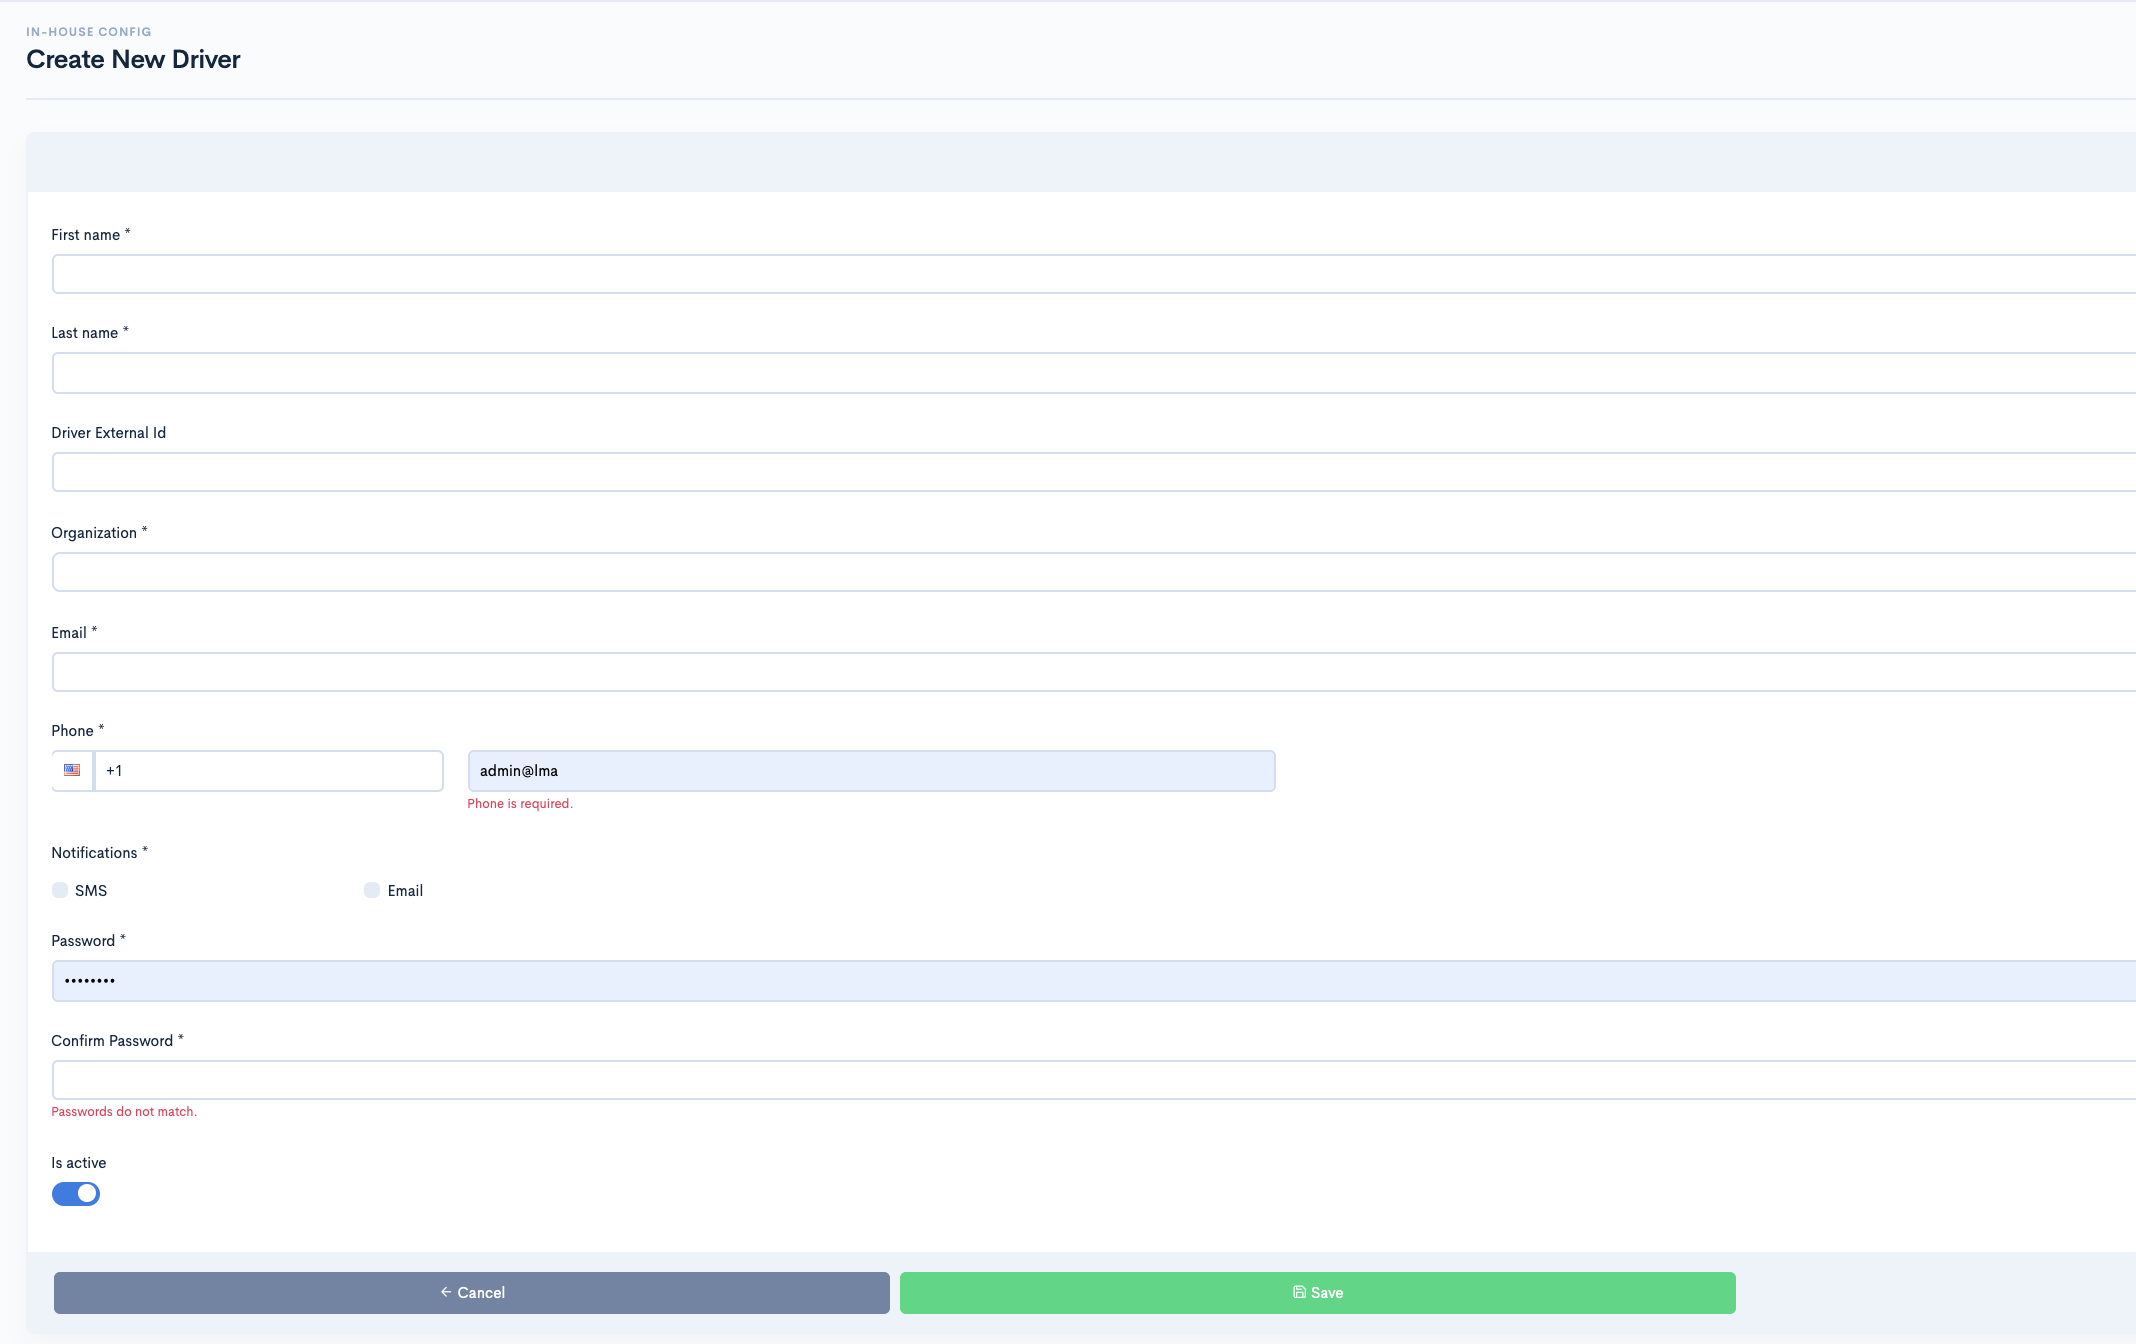
- After Successful login to Delivery Solutions page
- Click on the Private Fleet Config Tab from the left side panel
- Select Drivers under the Private Fleet Config Section
- Click on the Create Driver button
- You will be redirected to the Create New Driver form
- Fill in the details in the form
- Click on Save button to create a new org unit.
Basic
The Create Driver Form seeks information for below fields:
| Field Name | Description |
|---|---|
| First Name | First Name of the Driver |
| Last Name | Last Name of the Driver |
| Driver External ID | Driver’s Unique Identification Card |
| Organisation | Driver’s Organisation |
| Driver’s Email Address | |
| Phone | Driver’s Phone Number |
| Notification | SMS/Email Notification based on the checkbox checked in the form |
| Password | Driver’s Password |
| Status | Driver’s Status as Active if Checkbox is checked in the form |
Edit Driver
Edit an existing driver under an organisational unit
- After Successful login to Delivery Solutions page
- Click on the Private Fleet Config Tab from the left side panel
- Select Drivers under the Private Fleet Config Section
- Click on Edit button
- You will be redirected to theEdit Driver Page
- Fill in the details in the form
- Click on Update button to save the changes
Search Driver
Search an existing driver under an organisational unit
- After Successful login to Delivery Solutions page
- Click on the “Private Fleet Config Tab from the left side panel
- Select Drivers under the Private Fleet Config Section
- Insert First Name or Last Name in the input box
- Select Organisation in DropDown List
- Click on Search button
- You will be able to see the driver details below the search section
View Driver Shifts
Search an existing driver under an organisational unit
- After Successful login to Delivery Solutions page
- Click on the Private Fleet Config Tab from the left side panel
- Select Drivers under the Private Fleet Config Section
- Click on View Shift button against driver in the list
- You will be able to see the driver shift as below

Table Of Content
Orchestration
Orchestration enables stores to have multiple options of delivery providers. Basically, store admin can compare cost and time estimates of multiple DSPs and can manually choose any one of them for delivery or they could configure set of rules to automatically select the best option for them from available DSPs.
Orchestration
Selection Settings
Rules might require additional conditions to be set in order to create criteria/scenarios for DSP/DispatchType/ReleaseType selection. These rules/conditionas can be created using various attributes of orders such as standard, custom, premium, coverage area and combiniation of attributes.
This section focuses on the use of these attribites under orchesrtation
As per the Orchestration, all the orders be it New or Edited has to go through the Orchestration Rule.
Once the suitable DSP is selected for an Order, Rule is supposed to check the Release Order Settings before it dispatches the order to DSP. This section lets you manage those orders whose DSP has been selected but requires further conditions before it is disptached.
One can schedule a dispatch of an order through this section. The scheduled order will stay with Delivery Solutions in "Pending Release" status untill It fulfills certain conditions set in the scenarios.
Please note, Immediate option will immediately dispatch the order to DSP. Once an order is dispatched, It cannot be edited. While "Pending Release" order gives you an advantage to edit an order before it dispatched to DSP
If there are no Release Order Settings scenarios created under this section, Orchestration Rule will automatically follow the Default Release Settings.
Premium Attributes
Unlike standard attributes there are premium attributes such as Delivery Distance which allows you to orchestrate and select DSP, Dispatch Type and Release Type.
Since this attribute requires additional calculations in order to fetch distance (in Miles) between pikcup and develiery address, opting this feature will incur additional charges.
Below is an example of how this attribute can be used to set conditions under rules.

Order Attributes
There are standard orderd attributes of every order which can be used to set business rules.
Order attributes can be defined in Package area while placing an order under Create Delivery section under Deliveries as shown below.
These attributes can be used further in Orchestration to compare them with DSP attributes.

| Attribute | Description |
|---|---|
| For Order Value |
Order value is compared with package value if this attributes is selected as a rule. Locate Package Value in Order:
|
| When Order Has Alcohol |
The order contains Alcohol or not is checked with Order Details if this attribute is selected as a rule. Locate Package Content in Order:
|
| When Order Has Beer Or Wine |
The order contains Beer/Wine or not is checked with Order Details if this attribute is selected as a rule. Locate Package Content in Order:
|
| Number Of Packages |
Based on the number of packages in an order a rule can be set to select a particular DSP. Locate Package Content in Order:
|
| Weight Of Packages |
Based on the weight of packages in an order a rule can be set to select a particular DSP. Locate Weight of Packages in Order:
|
| Has Tips |
Few DSPs accepts the Tip for delivering an order to a customer. Businesss can set the rule to check whether order contains tip or not. Locate Package Value in Order:
|
| Is Apartment |
Few DSPs Locate Package Value in Order:
|
Elastic Delivery
Use Elastic Delivery options to write complex conditions based on number of orders. The Elastic Delivery filters DSPs by applying rules on Number Of Orders, Number of Orders per Zones, Number of Orders per Stores, Number of Units per hour and so on.
Function: Number of Orders
Sample: First five orders in last one hour should go to Private Fleet delivery, and 6th order onwards should go to third party DSP.

- In scenarios where we select "number of orders", this considers number of orders which are already with DSP from that store.
- If we are selecting 1 hour that means, if the current time is 1.30pm than we look at all the orders sent to DSP from 1 to 1.30 pm for that store.
- Next to the hour where we select "DSP" in dropdown, for example onfleet, we consider all orders for that store which are sent to "Onfleet" from 1 to 1.30 pm.
- Then we check if this count is >, >=, <,<=o r=to number mentioned in input field (5 in below screenshot), then the condition becomes true or false.
- And then it goes to DSP which we have mentioned as per true or false result
Service Coverage Attributes
Service Coverage Attributes are nothing but the Boundary Attributes of Pick Up Locations such as BoundaryTags. These attributes can be used to orchestrate and select DSP, Dispatch Types and Release Types.
Store Boundary define the coverage of a Pick Up Location. Such Boundaries can be given a tag name.
This is how Store Boundary tags can be used in conditions under Rules.
Custom Attributes
Custom Order Attributes created in Attributes section under Business section can also be used to orchestrate Dispatch Settings, DSP Selections and Release Settings.
They are available in the same dropdown list where other order attributes are present.
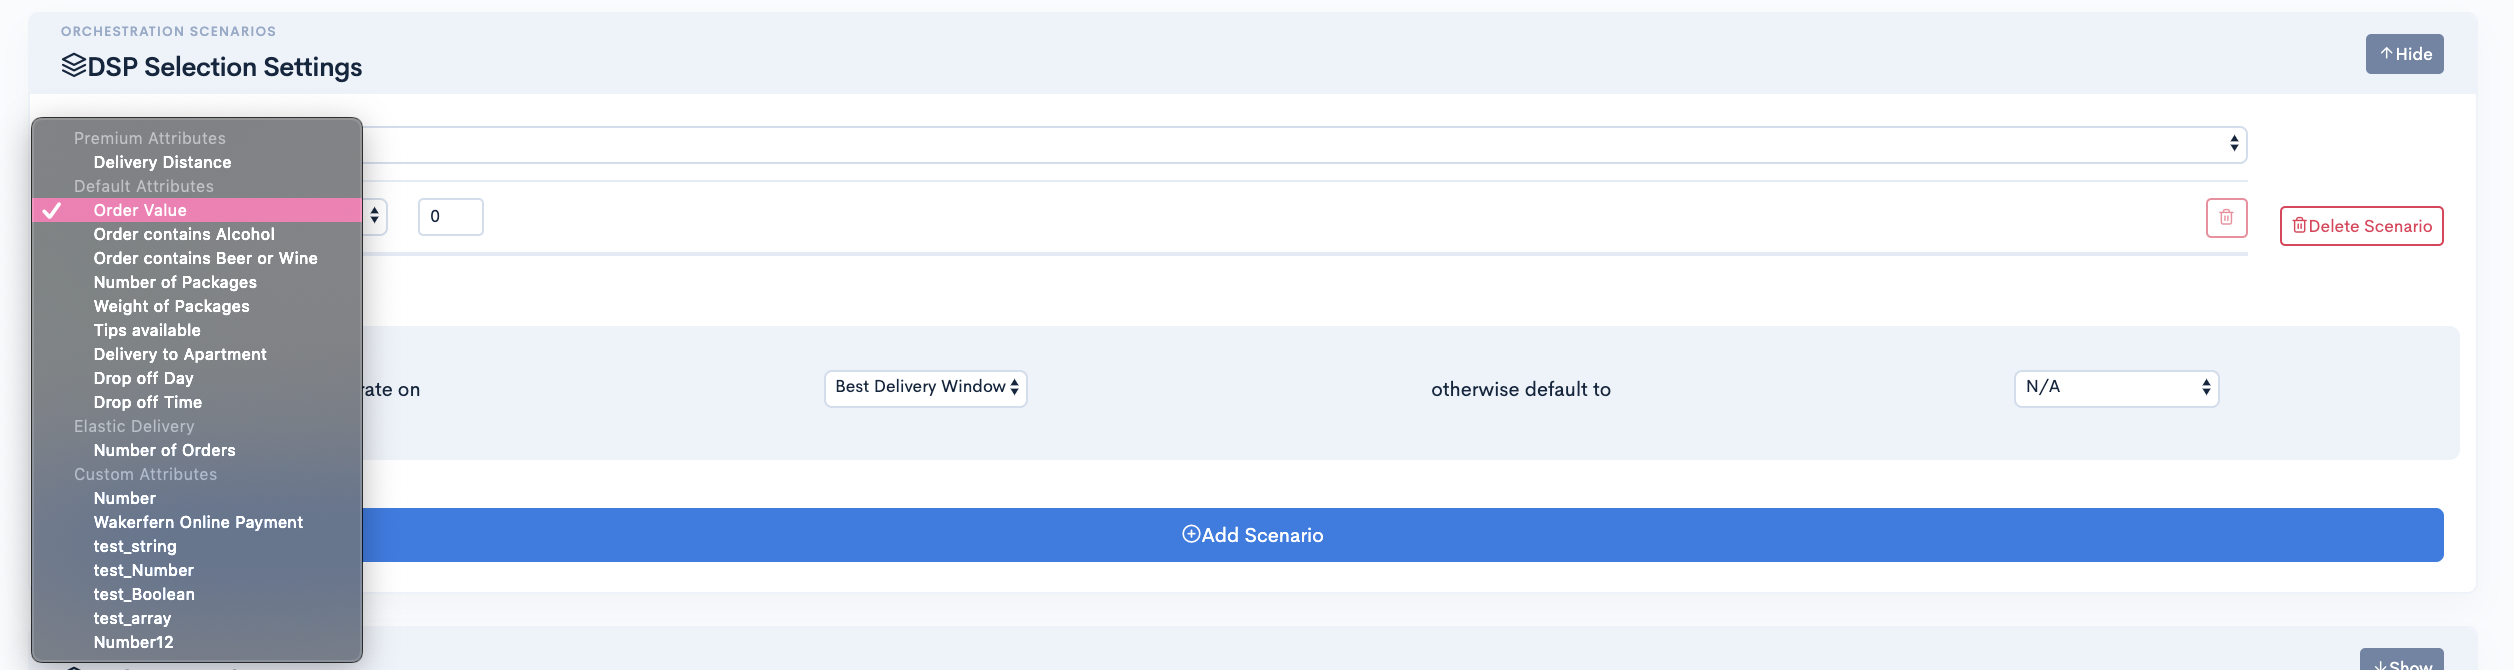
Important
Visit Attribute Page under Deliveries section for more details about Order Attributes.
Attribute Data Types and Operators
Data Types & Operators
Attributes and functions have their own data types corresponding operators and values
There are 4 data types of attributes
- String
- Number
- Boolean
- Array
| Data Type | Description | Operator |
|---|---|---|
| String | Holds values in alphabets | Equal to Not equal to |
| Number | Holds Positive Numeric Value |
<: Less Than > : Greater Than = : Equals To |
| Boolean | Holds True or False value | is |
| Array | Holds Array of values in String or Numeric | Equal to |
Orchestration
Dispatch Rules
Dipsatch Rules are mainly created to orchestrate the orders prior to getting dispatched to DSP for Estimates. Rules can be set to decide whether orders are required to be released for estimates immediately/manually/schedules basis.
A default DSP Rule Package gets created as soon as a new Business gets created, at the same time default dispatch settings is tagged to the rule. If there are no custom rule package created, all Pick Up Locations automatically falls under Default Package Rule. All the orders placed to the Pick Up Locations will use Default Rule Package for Dispatch.
- Default Dispatch Settings to use this setting in abscense of scenarios.
- Scenarios to setup customised dispatch rules based on order and store attributes.
This is how Dispatch Rule page looks like...

There are 3 variants of Dispatch Types as mentioned below.
| Dispatch Type | Description |
|---|---|
| Immediate | Immediate Dispatch type orders will be immediately dispatched to check for estimates/place order with DSPs. |
| Manual | Manual Dispatch type orders can be saved in Delivery Solutions. Such type of orders further can be manually placed with DSP, untill then they will stay in Pending Dispatch status. |
| Schedule | Scheduled Dispatch Type orders can be scheduled to be release to DSP to seek their estimates. Such orders can be scheduled with certain minutes before/after Pickup Start Time and Dropoff End Time. Time. |
Create Dispatch Rule Package
Delivery solutions allow you to create packages and set dispatch rules and dispatch type preferences based on your requirement
- After Successful login to Delivery Solutions page
- Click on the Orchestration Tab from the left side panel.
- Select Rules under the Orchestration.
- Select Dispatch tab under the Rules page.
- Click on Create Dispatch Rule button on the upper right corner
- A popup window will get open to seek Package Details as below
- Click on Create button to create a new package.
- You can see newly created package in the dropdown list on the same page.
- Click on Update Dispatch Rule button to save new changes.
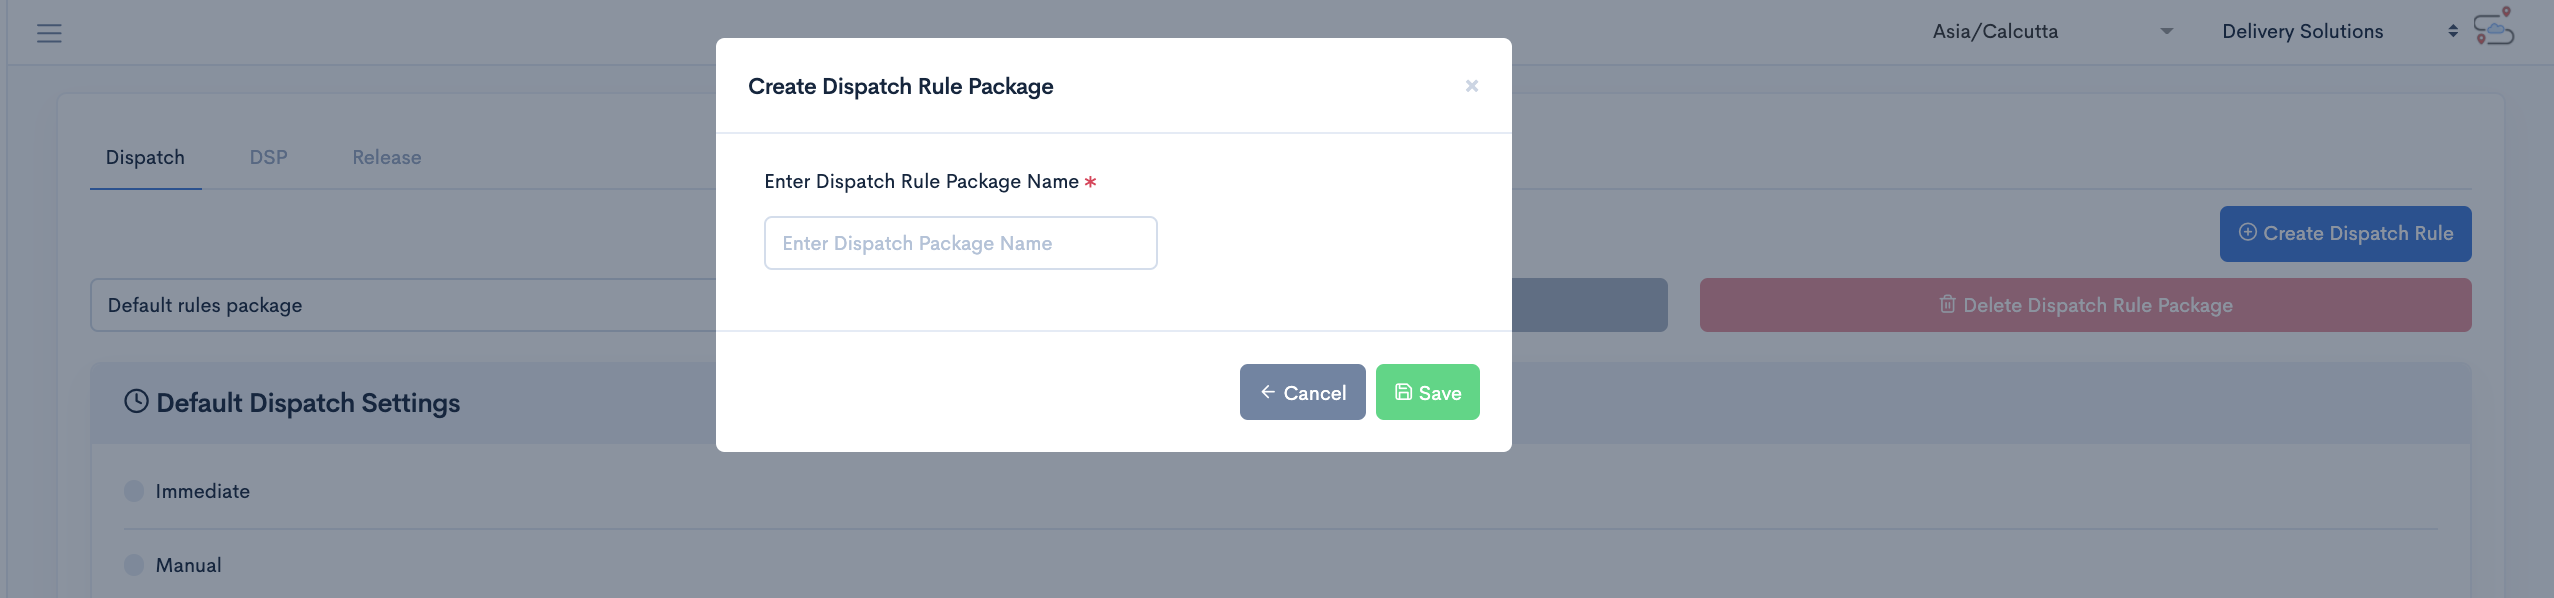
Add Dispatch Rule Scenario
- After Successful login to Delivery Solutions page
- Click on the Orchestration Tab from the left side panel
- Select Rules under the Orchestration
- Select Dispatch tab under Rules page
- Go to Selection Settings section
- Click on Add Scenario button.
- A window will be expanded to set the conditions.
- Select theOrder Attributes or Functions from the drop down list on which you want to set the rules
- Select the appropriate Operator from the drop down to create a criteria
- Set Value in the Drop Down or Input Box to compare it with DSP values
- For any condition mentioned above If satisfied,
- Set the actions on the right side of the panel.
- Select appropriate options in dropdown against DSP Preference
- Set the Else condition using otherwise default to, if the above condition is not matched.
- Click on Add Scenario and follow the same process to add more scenarios
- Click on Update Dispatch Rule button to save new changes.
Update Dispatch Rule Scenario
Update the existing scenarios by following instructions as below
- After Successful login to Delivery Solutions page
- Click on the Orchestration Tab from the left side panel
- Select Rules under the Orchestration
- Select Dispatch tab under the Rules
- Go to Selection Settings section
- Click on Show button to expand the collapsible window
- Edit the details in the condition as per the requirement
- Click on Update Dispatch Rule button to save new changes.
Delete Dispatch Rule Scenario
Delete the existing scenarios by following instructions as below
- After Successful login to Delivery Solutions page
- Click on the Orchestration Tab from the left side panel
- Select Rules under the Orchestration
- Select Dispatch tab under the Rules
- Go to Selection Settings section
- Click on
 button against the scenario you wish to delete it permanantly.
 - A popup window will get open to seek confirmation as below
- Click on Ok button to delete the scenario
- Click on Update Dispatch Rule button to save new changes.
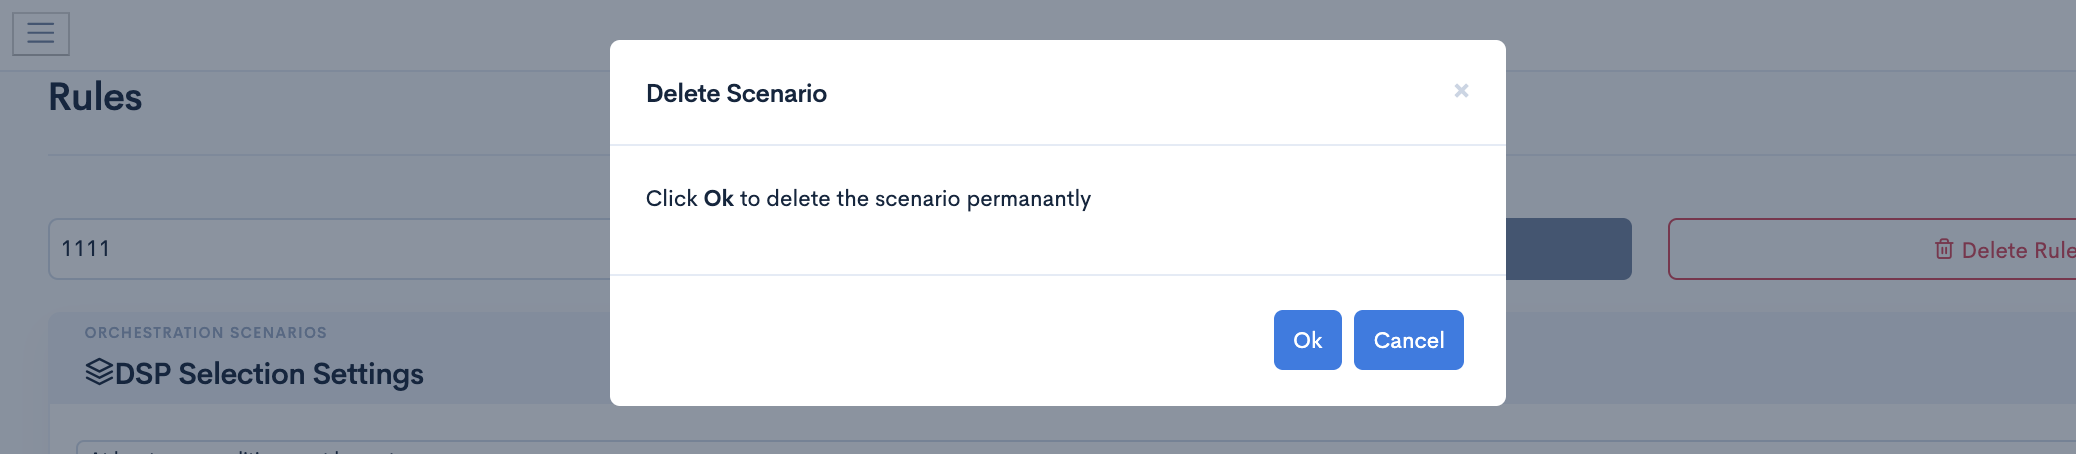
Delete Dispatch Rule Package
Delivery solutions allows you to delete existing dispatch rule packages..
Dispatch Rule cannot be deleted if it is assigned to one of the Pick Up Locations. Click on View Assigned Pick Up Locations button as shown below to check assigned locations to the dispatch rule.
It is mandatory to remove all assigned Pick Up Locations to delete the dispatch rule.
- After Successful login to Delivery Solutions page
- Click on the Orchestration Tab from the left side panel
- Select Rules under the Orchestration
- Select the Business Rule Package from the Drop Down List
- Click on
 button on the upper right corner
 - A popup window will get open to seek confirmation as below
- Eg. Package Name is “Immediate
Dispatch”
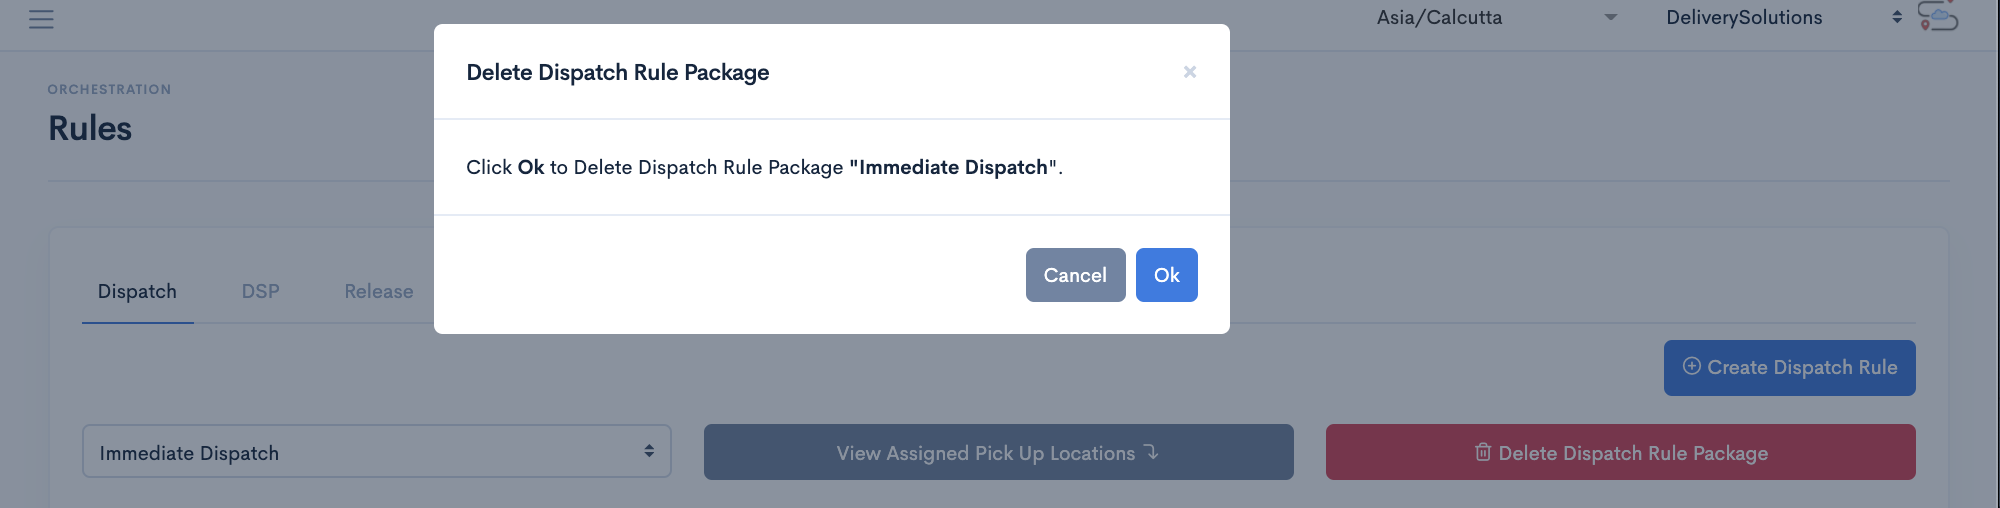
- Eg. Package Name is “Immediate
Dispatch”
- Click on Delete button to delete the package
- Click on Update Dispatch Rule button to save new changes.
Orchestration
DSP Rules
Businesss can setup dynamic and complex rules for selecting best DSP from all the estimates received from different DSPs associated with themselves. Such decision is taken care by the Rule Engine based on the predefined rules set by Businesss.
A default DSP Rule Package gets created as soon as a new Business gets created. If there are no custom DSP Rule Package created, all Pick Up Locations automatically falls under Default Package Rule. All the orders placed to the Pick Up Locations will use Default Rule Package for Dispatch.
- Compliance to filter DSPs and DSP Estimates
- DSP Preference to Sort DSPs based on preference
- Scenarios to setup customised business rules for DSP Estimates and preferences
This is how DSP Rule page looks like...
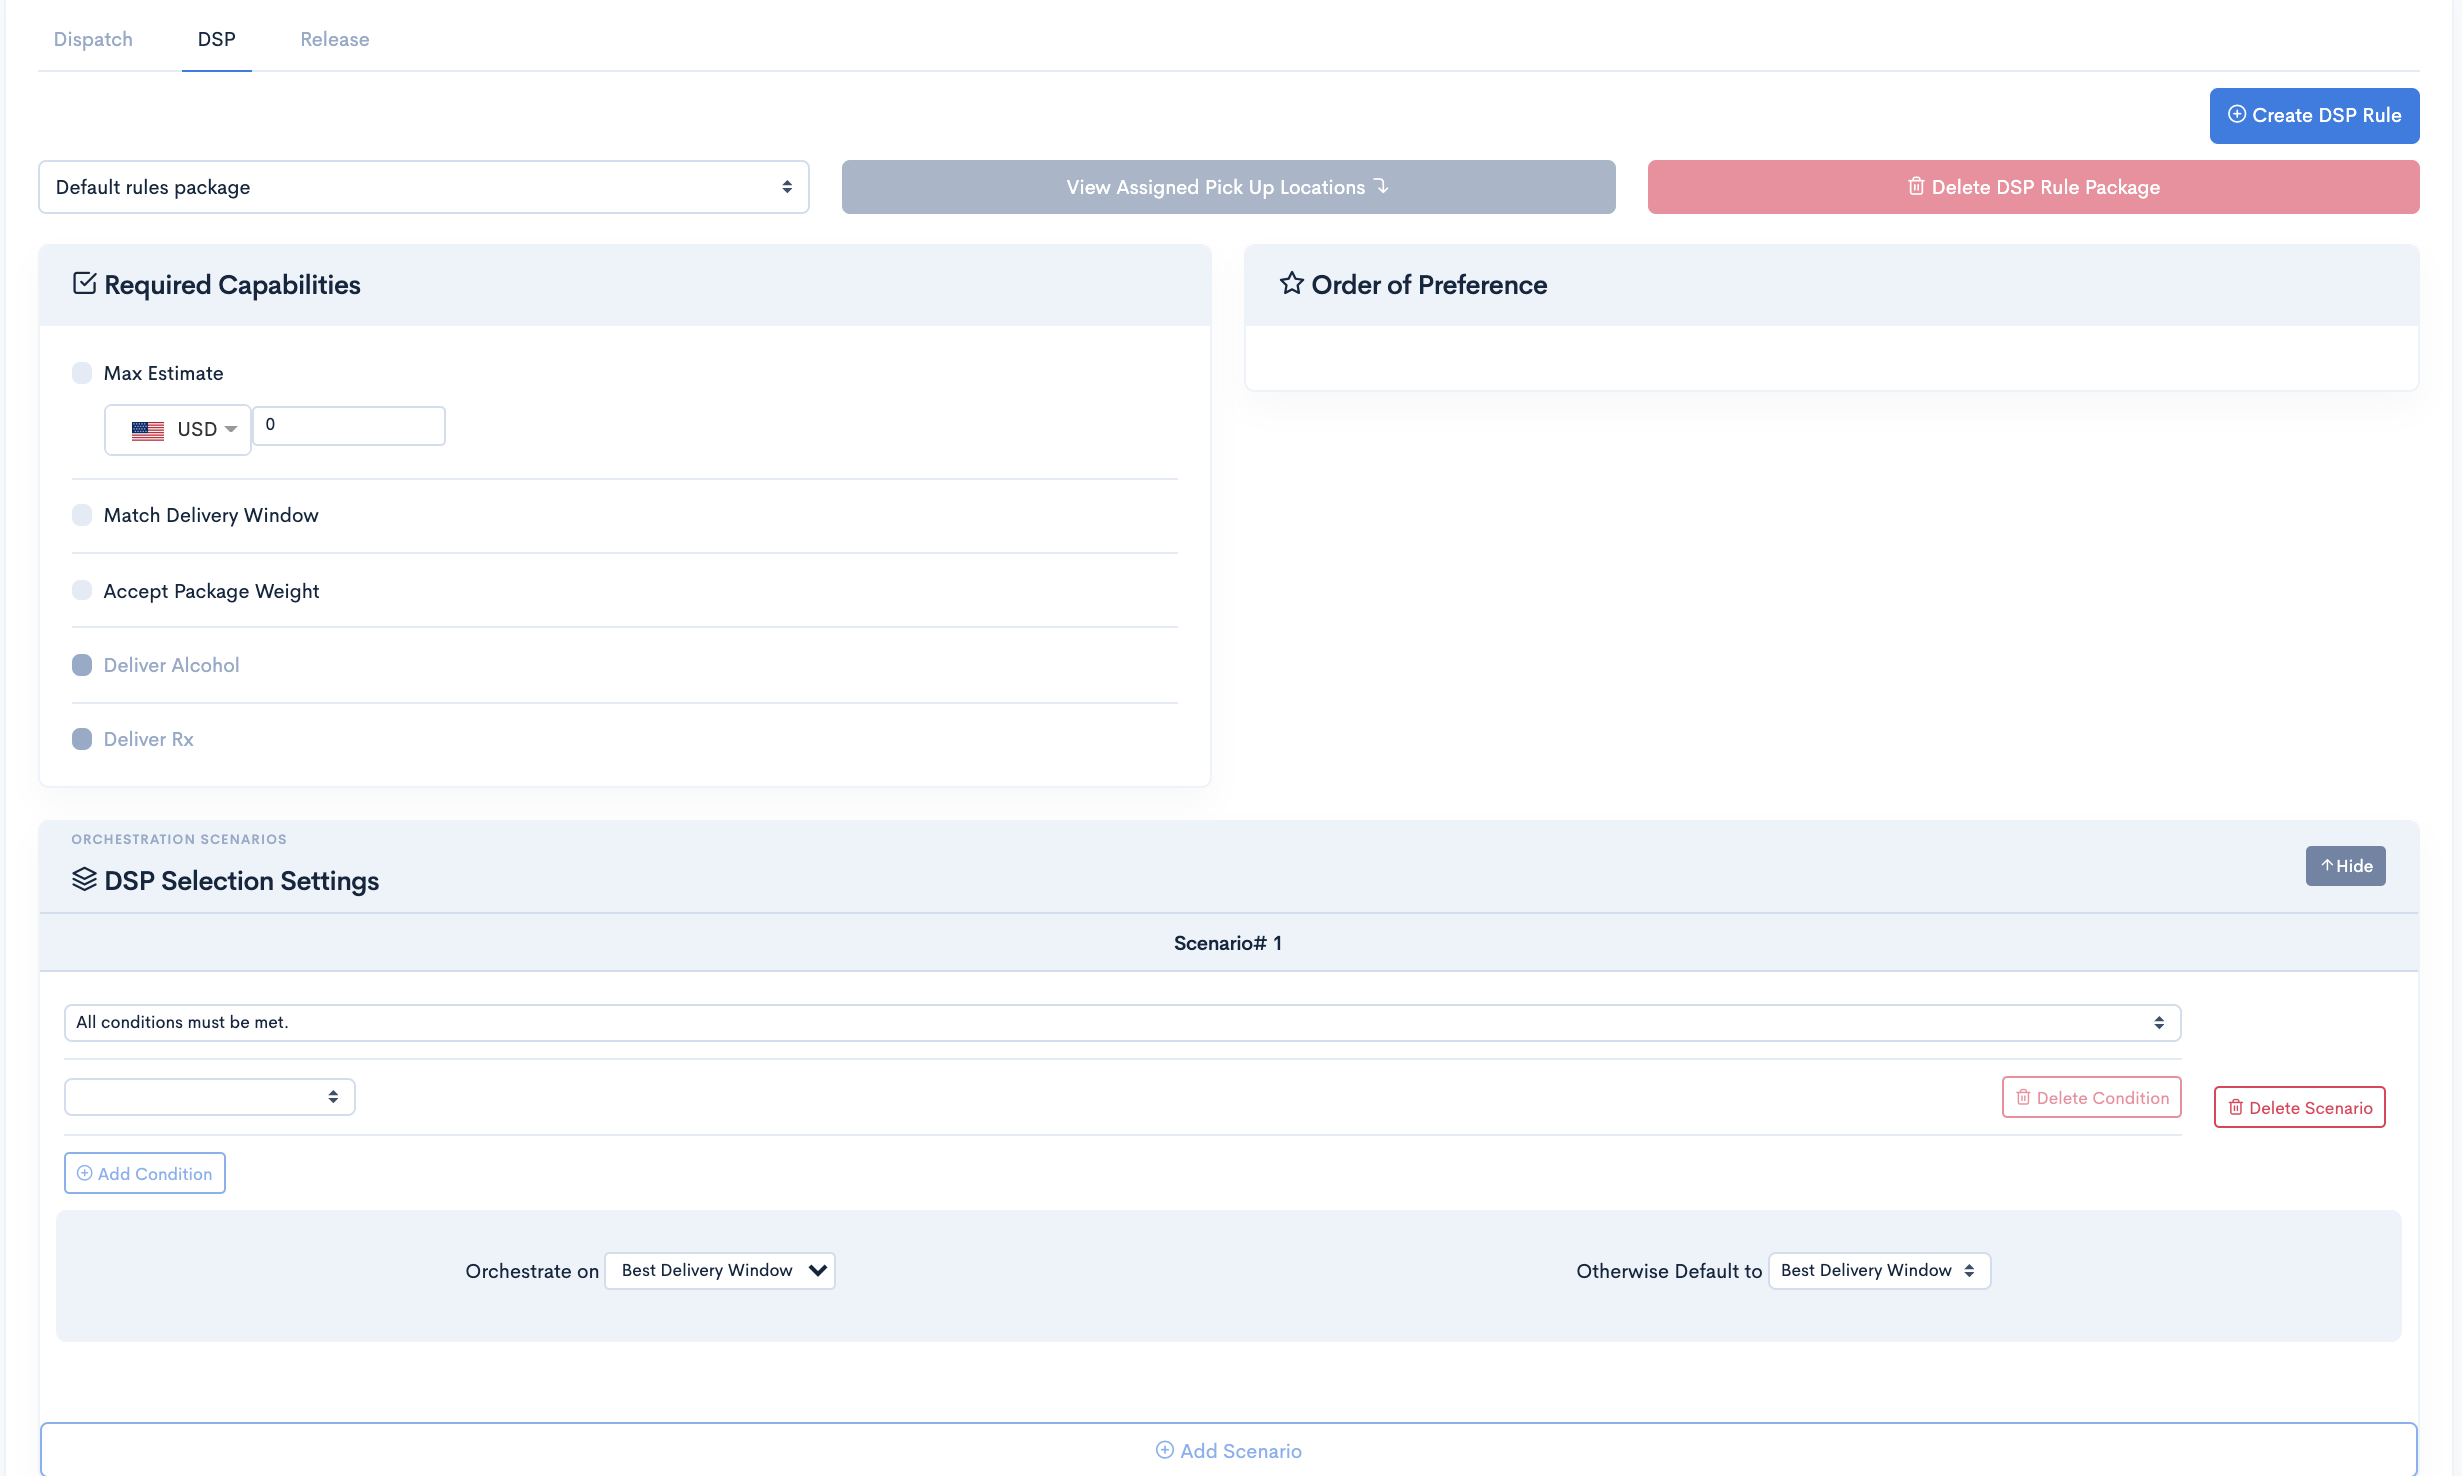
Create DSP Rule
Delivery solutions allow you to create packages and set business rules and dsp preferences based on your requirement
- After Successful login to Delivery Solutions page
- Click on the Orchestration Tab from the left side panel
- Select Rules under the Orchestration
- Click on Create Rule button on the upper right corner
- A popup window will get open to seek Package Details as below
- Click on Create button to create a new package.
- You can see newly created package in the dropdown list on the same page.
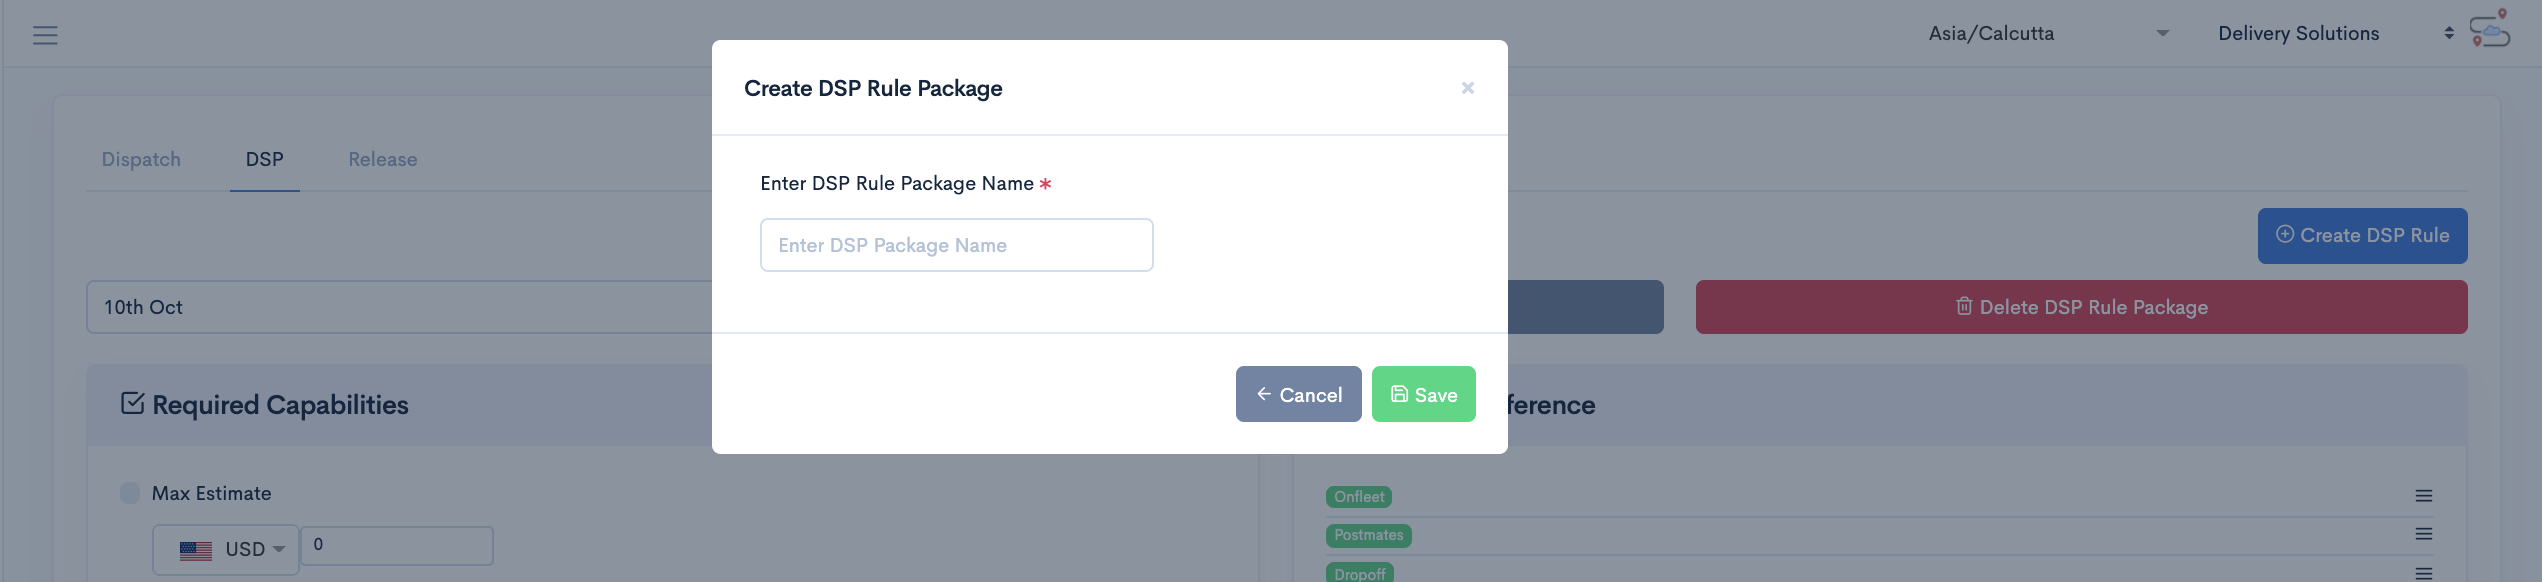
Required Capabilities
Delivery solutions allow you to filter DSPs based on their capabilities. Here it generally acts as a hard gate for filtering DSP based on the rule set under this section. All the DSPs not falling under the condition set in the Compliance section will be filtered out first.
- After Successful login to Delivery Solutions page
- Click on the Orchestration Tab from the left side panel
- Select Rule under the Orchestration
- Go to Compliance section under Rule Page
- Check the checkbox against the Compliance rule to set it as filter for DSPs.
- Compliance Rule checkbox will be marked as
 if it is in activated for DSPs filtration.
This is how Compliance section looks like
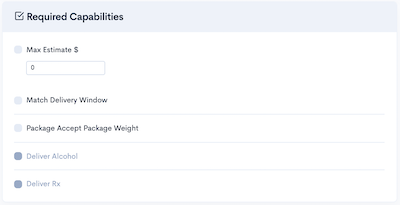
| Compliance | Description |
|---|---|
| Max Estimate $ | Businesss can filter DSPs based on their Estimate Amount. The amount in the input box beside the checkbox will set the maximum Estimates Amount from DSPs to be considered for further selection. DSPs which are exceeding the estimated amount provided in the input box will get discarded and only those DSPs will be shortlisted whose estimated amount is less than the amount mentioned in this rule |
| Match Delivery Window | Businesss can set a rules to strictly follow Pickup and Drop Off Time window for Order Delivery by checking this checkbox. This rule will check the Order Delivery Time Window with the Delivery Time Estimates given by DSPs. DSPs which are not able to deliver the order as per the Delivery Time Window mentioned in the order will get discarded and only those DSPs will be shortlisted who can deliver the order within the Delivery Time Window |
| Package Accept Package Weight | Every DSP has their own Package Weight Limit they deliver. Businesss can set the rule to cross check the Package Weight Limit with DSP’s package weight limit. DSPs which are not able to deliver the order having package weight exceeding their max package weight will be discarded and only those DSPs will be shortlisted who can deliver the order with the package weight mentioned in the order. |
| Deliver Alcohol | Few DSPs do not facilitate delivery of alcohol/alcoholic products. Businesss can set the rule to filter the DSPs who do not deliver the alcohol/alcoholic products by checking this checkbox. |
| Deliver RX | Few DSPs do not facilitate delivery of medicines and drugs. Businesss can set the rule to filter the DSPs who do not deliver the medicines by checking this checkbox. |
Order of Preference
Order of Preference lists down all the configured Delivery Service Provider under a business. In absence of custom rules, this preference will be considered for DSP selection.
DSP Preference comes into the picture if there are no scenarios defined under a default/custom DSP Rule package.
- After Successful login to Delivery Solutions page
- Click on theOrchestration Tab from the left side panel
- Select Rules under the Orchestration
- Select DSP tab under the Rules page
- Go to Order of Preference section
- This is how order of preference section looks like
- Rearrange the DSPs as per the priority by arranging them with their names.
- The top most dsp will have the higher precedence in terms of priority over bottom DSPs.
- Click on Update DSPs button in case you get Some of the DSPs are not yet added to the existing rules. Use the "Update" button to add them. warning

Override DSP Preference Under Scenarios
Order of Preference for DSPs can be overridden in custom rule scenarios.
In case scenarios have been defined, It takes first preference over DSP Preference.
This is how custom DSP preference looks like under scenarios.
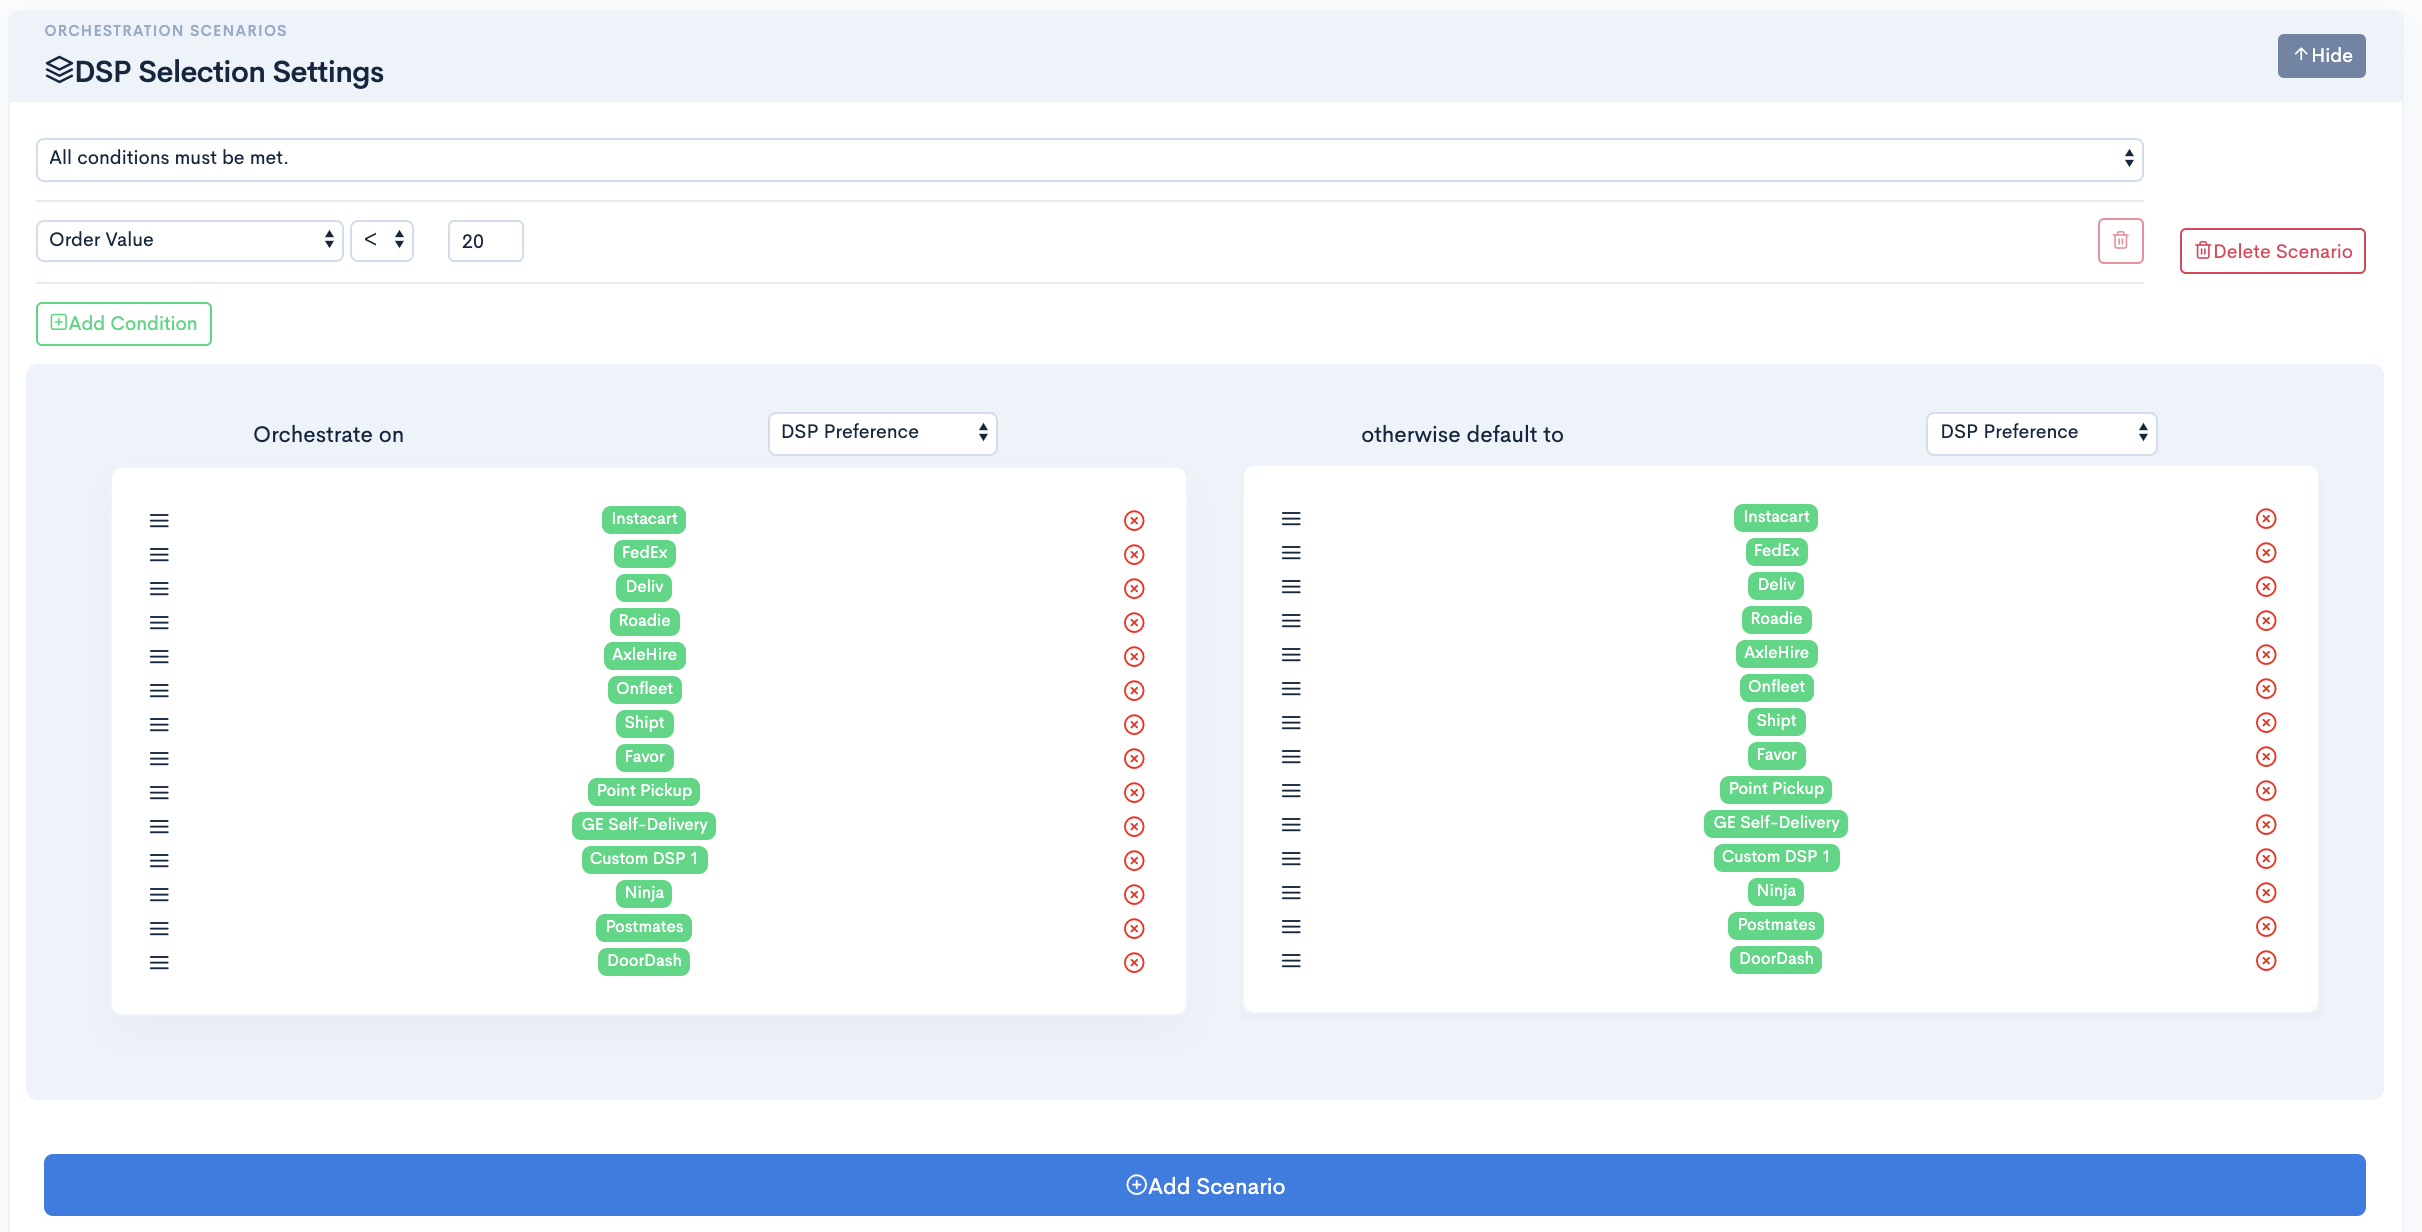
Add DSP Rule Scenario
- After Successful login to Delivery Solutions page
- Click on the Orchestration Tab from the left side panel
- Select Rules under the Orchestration
- Select DSP tab under the Rules page
- Go to DSP Selection Settings section
- Click on Add Scenario button.
- A window will be expanded to set the conditions.
- Select theOrder Attributes or Functions from the drop down list on which you want to set the rules
- Select the appropriate Operator from the drop down to create a criteria
- Set Value in the Drop Down or Input Box to compare it with DSP values
- If any DSPs get selected based on the condition mentioned above.
- Set the actions on the right side of the panel.
- Select appropriate options in dropdown against DSP Preference
- Set the Else condition using otherwise default to, if the above condition is not matched.
- Click on Add Scenario and follow the same process to add more scenarios
- Click on Update DSP Rule button to save the scenario
Update DSP Rule Scenario
Update the existing scenarios by following instructions as below
- After Successful login to Delivery Solutions page
- Click on the Orchestration Tab from the left side panel
- Select Rules under the Orchestration
- Select DSP tab under the Rules page
- Go to DSP Selection Settings section
- Click on Show button to expand the collapsible window
- Edit the details in the condition as per the requirement
- Click on Update button to update the changes made to the scenarios
Delete DSP Rule Scenario
Delete the existing scenarios by following instructions as below
- After Successful login to Delivery Solutions page
- Click on the Orchestration Tab from the left side panel
- Select Rules under the Orchestration
- Select DSP tab under the Rules page
- Go to DSP Selection Settings section
- Click on button against the scenario you wish to delete it permanantly.
- A popup window will get open to seek confirmation as below
- Click on Ok button to delete the scenario
DSP Selection Options
If the condition set in scenario is met. Businesss can define set of actions to select the DSPs.
- Best Delivery Window
- DSP Preference
- Lowest Cost
- Order of Preference (Default)
If the condition mentioned in the scenario is met then DSP will be further selected based on the ETA provided by them. The best suited DSP will have the Estimated delivery time shortest compared to all other DSPs. Otherwise, Businesss can set default action in “else default to” part.

If the condition mentioned in the scenario is met then DSP will be further selected based on the DSPs arranged hereby as per the Business’s preference. Otherwise, Businesss can set default action in “else default to” part.
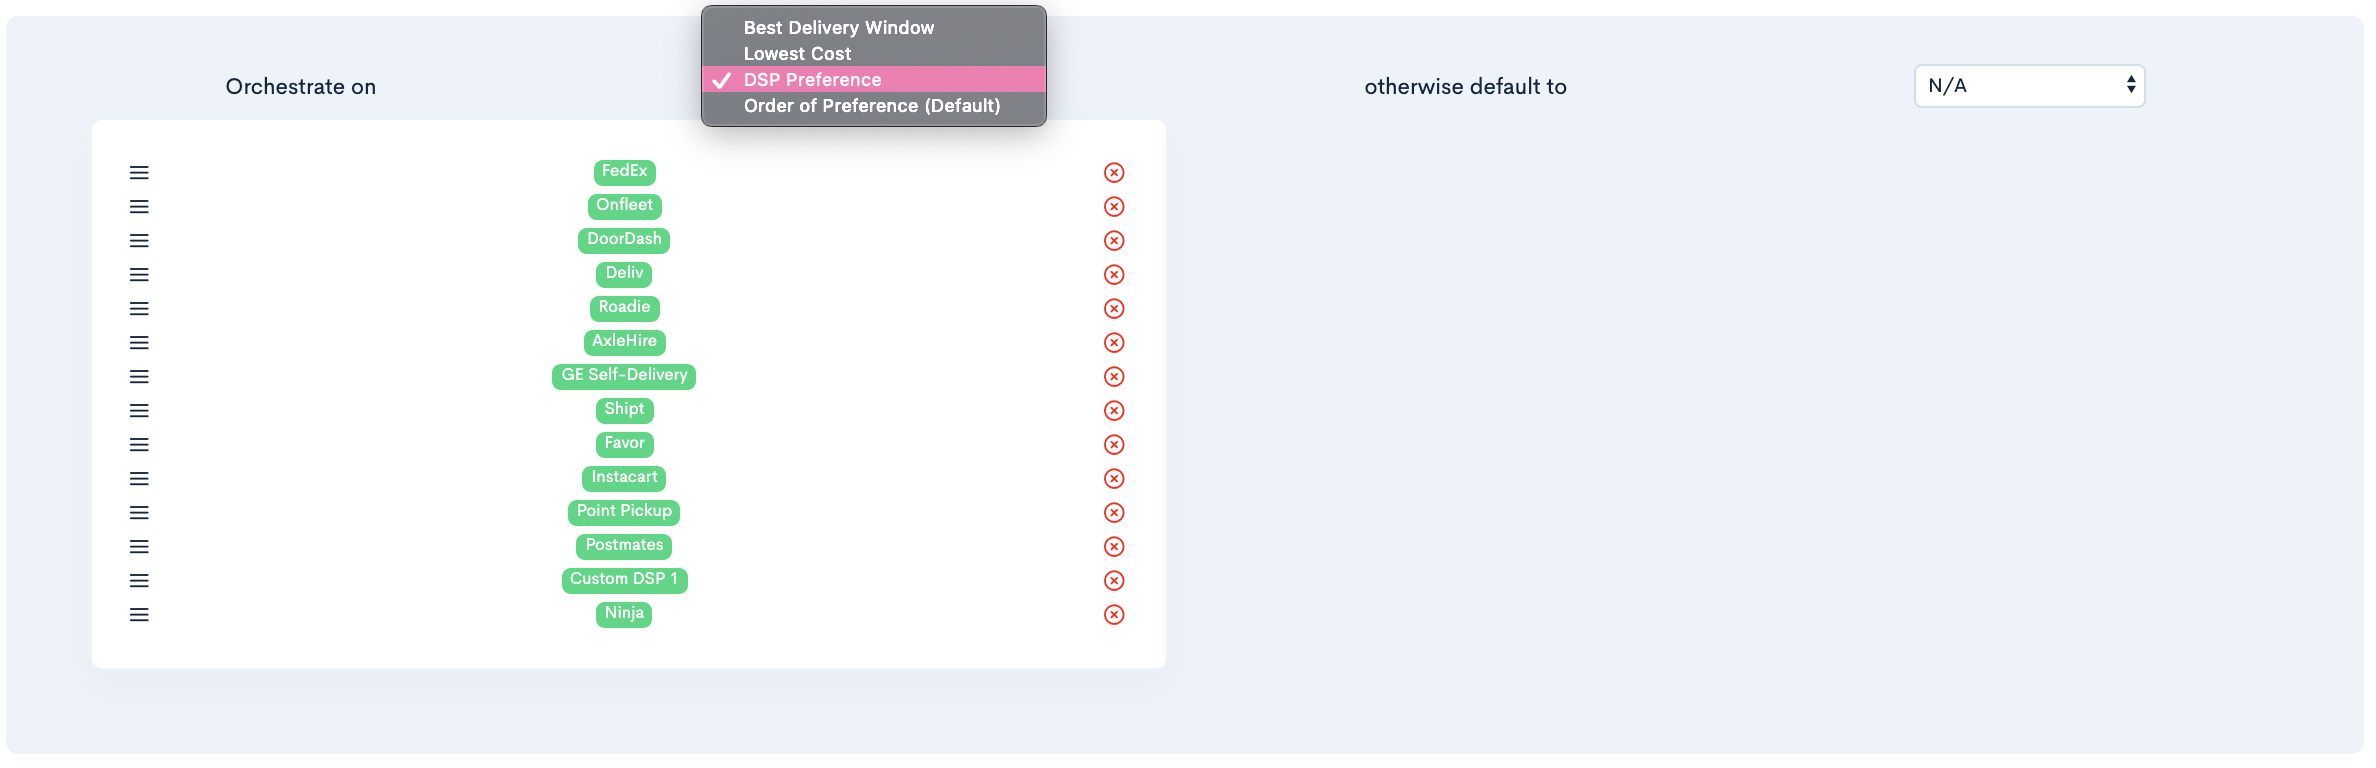
If the condition mentioned in the scenario is met then DSP will be further selected based on the estimates amount given by them. The best suited DSP will have estimated amount lowest compared to all other DSPs.. Otherwise, Businesss can set default action in“else default to” part.

If the condition mentioned in the scenario is met then DSP will be further selected based on the order of prefernces set in the rule.

Delete DSP Rule
Delivery solutions allow you to delete existing packages or remove business rules and dsp preferences based on your requirement.
DSP Rule cannot be deleted if it is assigned to one of the Pick Up Locations. Click on View Assigned Pick Up Locations button as shown below to check assigned locations to the DSP rule.
It is mandatory to remove all assigned Pick Up Locations to delete the DSP rule.
- After Successful login to Delivery Solutions page
- Click on the Orchestration Tab from the left side panel
- Select Rules under the Orchestration
- Select DSP tab under the Rules page
- Select the Business Rule Package from the Drop Down List
- Click on
 button on the upper right corner
 - A popup window will get open to seek confirmation as below
- Eg. Package Name is “DS_Guide_Pkg”
-
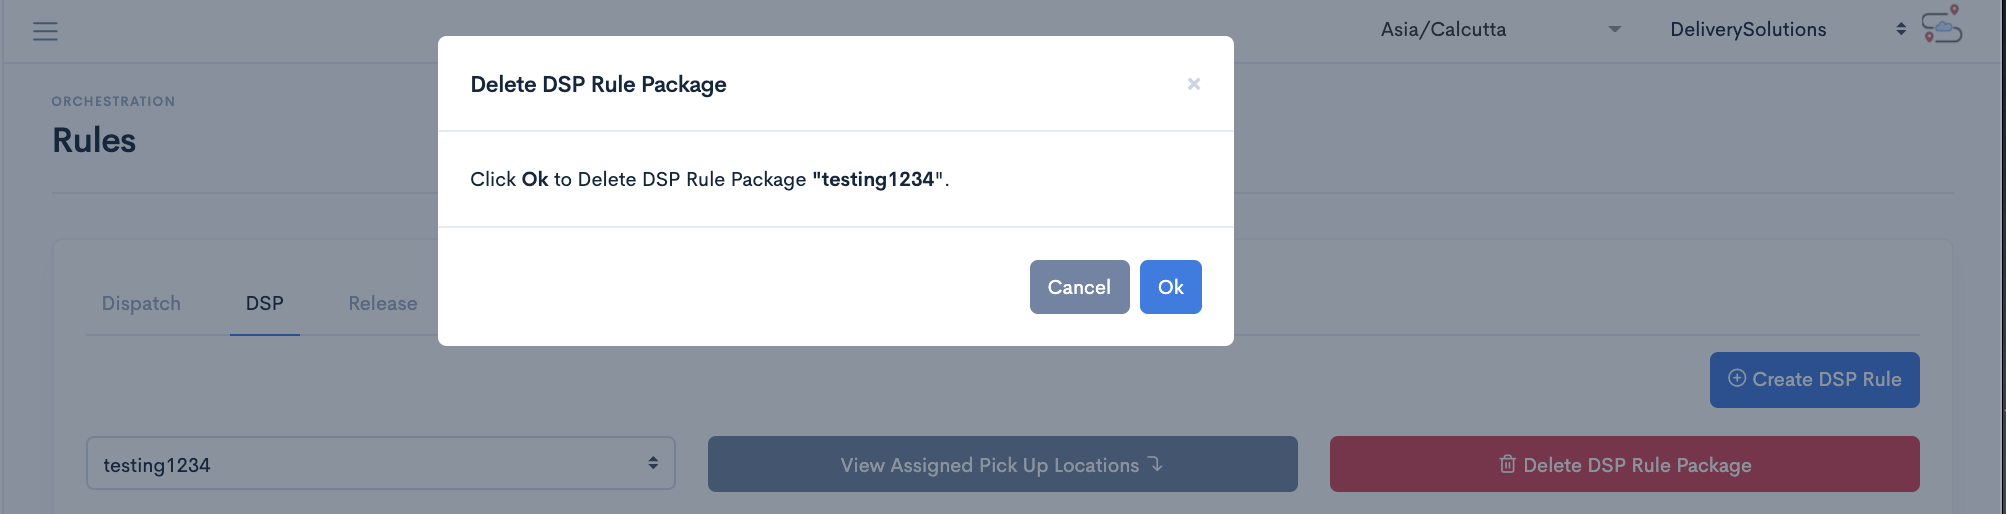
- Click on Delete button to delete the package
Orchestration
Release Rules
Release Rules are mainly created to orchestrate the orders which has passed the phase of Estimates and are ready to be dispatched to DSP. Release Rules can be set to decide whether orders are required to be placed with DSP immediately/manually/schedules for further processing.
A default DSP Rule Package gets created as soon as a new Business gets created, at the same time default release settings is tagged to the rule. If there are no custom rule package created, all Pick Up Locations automatically falls under Default Package Rule. All the orders placed to the Pick Up Locations will use Default Rule Package for Release.
- Default Release Settings to use this setting in abscense of scenarios.
- Release Order Settings to setup customised dispatch rules based on order and store attributes.
This is how Release Rule page looks like...
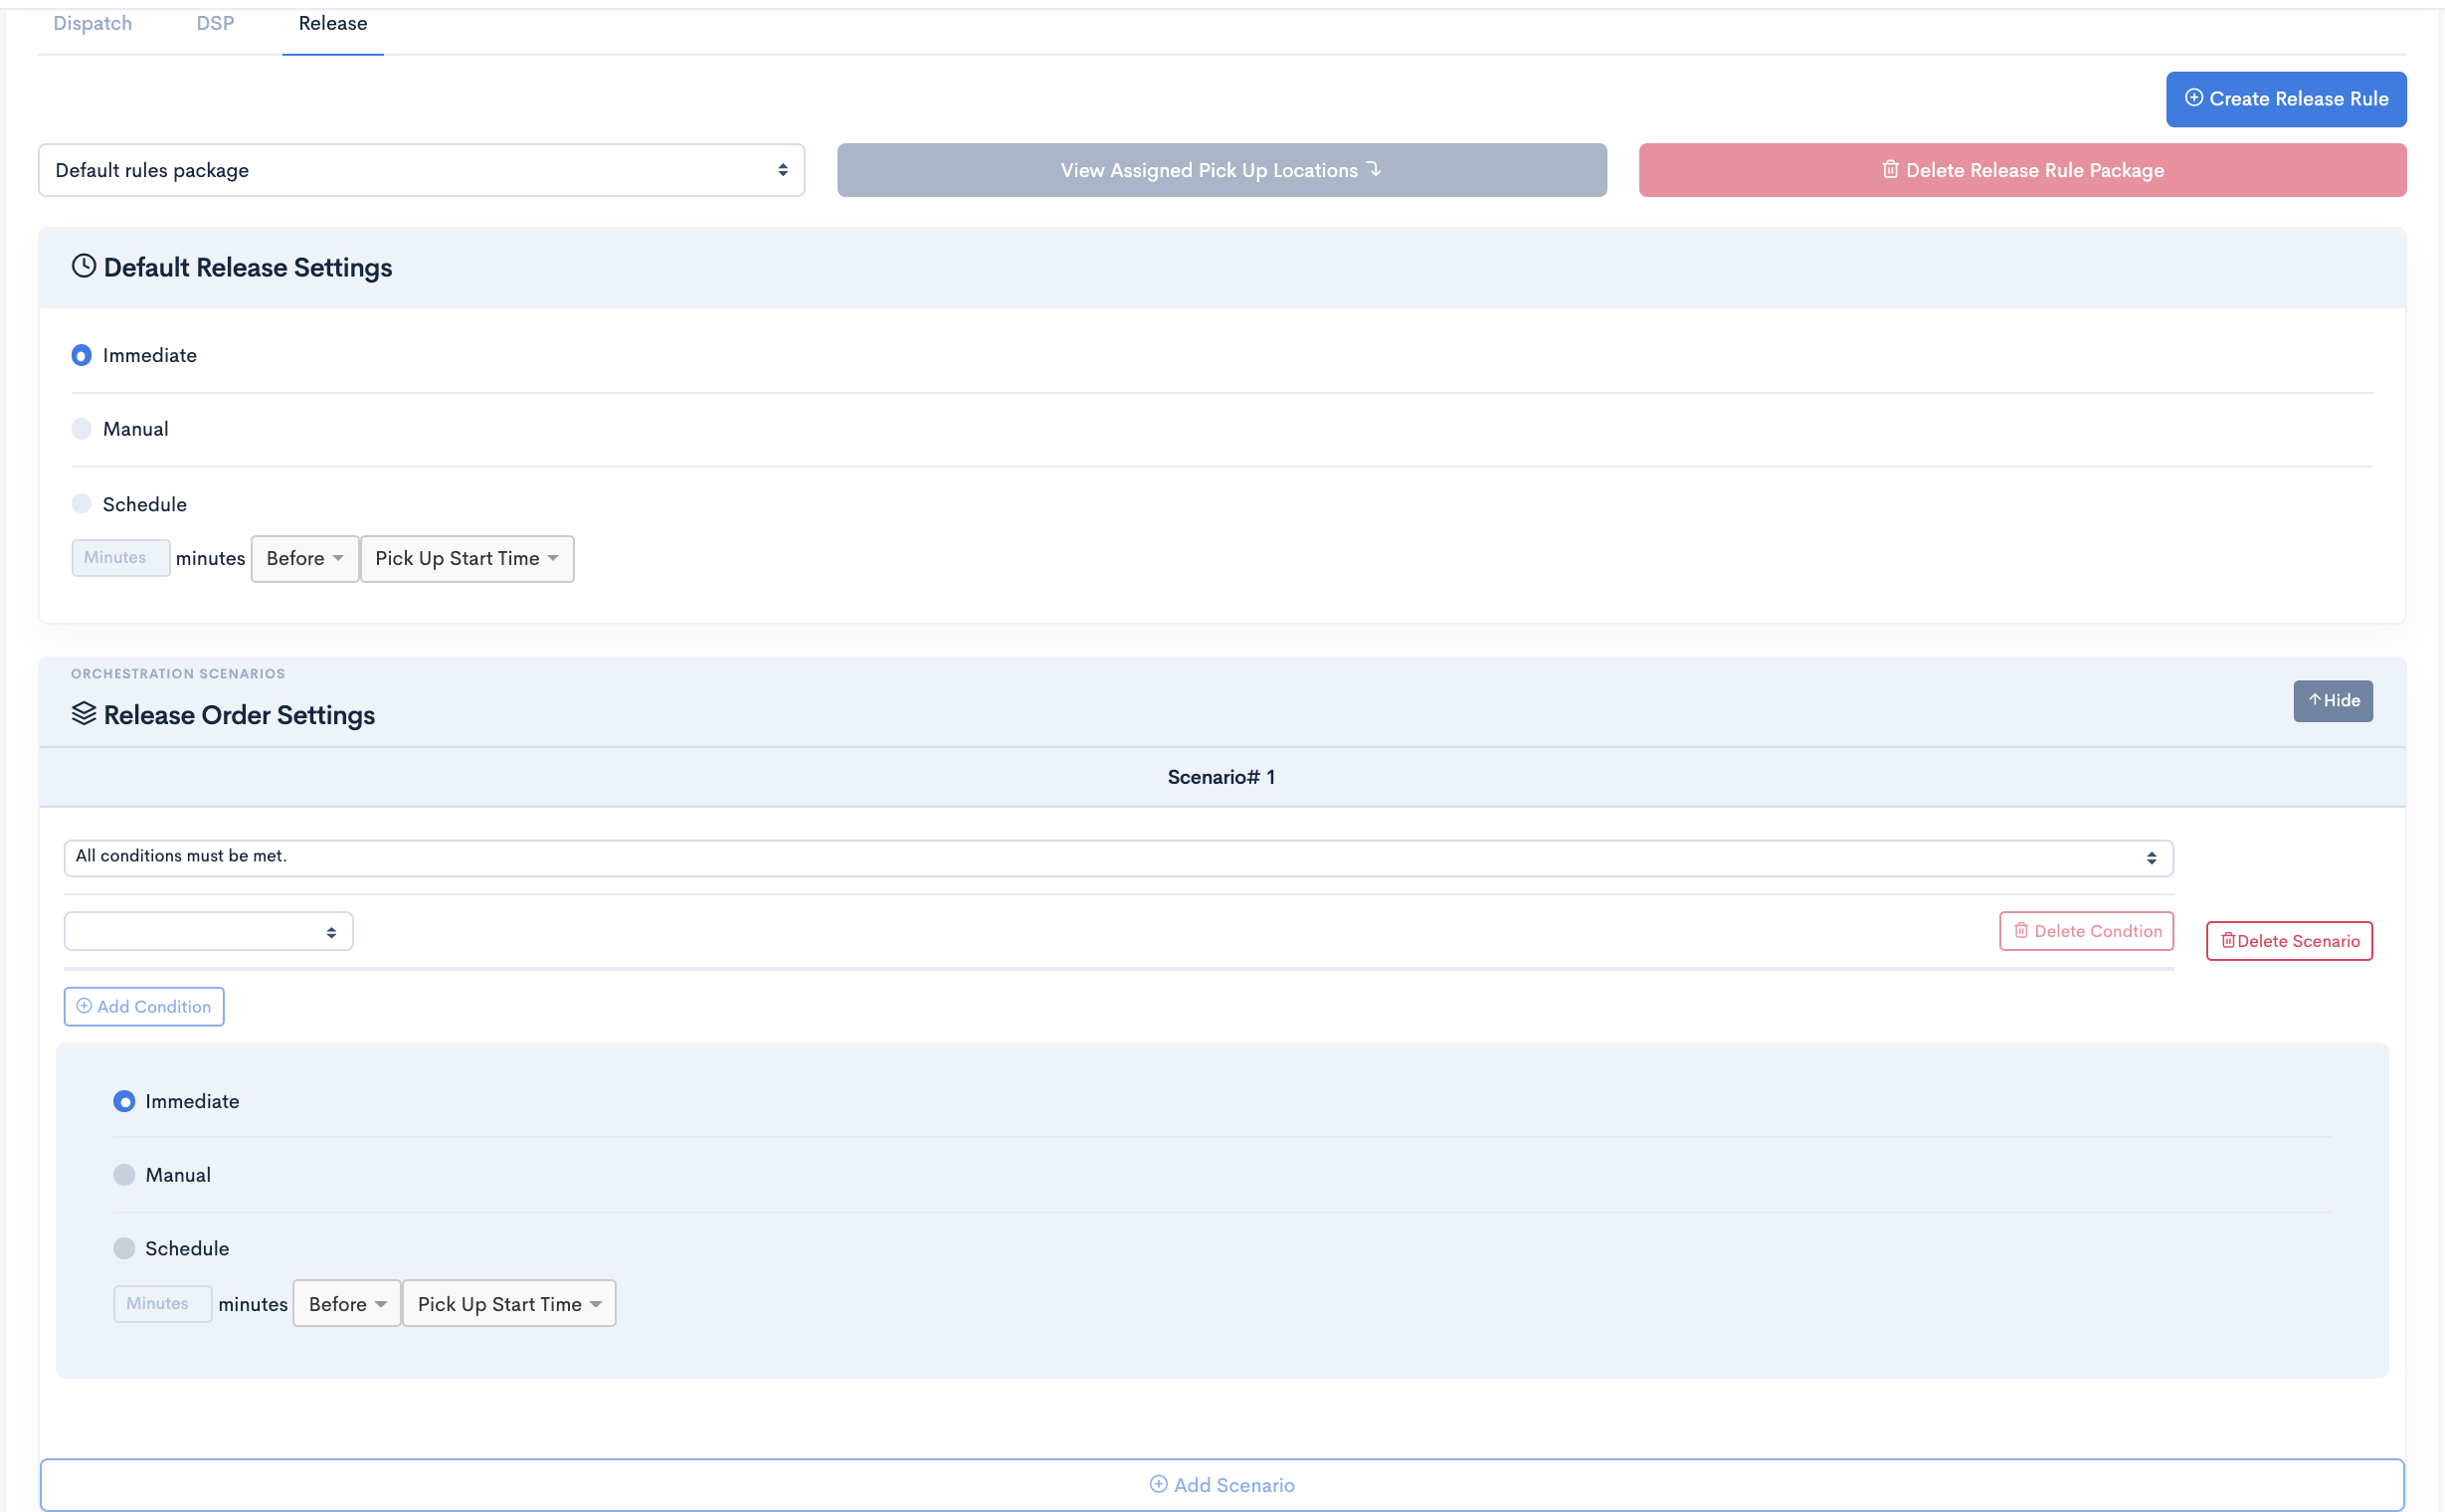
There are 3 variants of Release Types as mentioned below.
| Release Type | Description |
|---|---|
| Immediate | Immediate Release type orders will be dispatched to DSP immediately, Once the order is dispatched to DSP, you cannot modify the order. |
| Manual | Manual Release Type orders will sit with Delivery Solutions untill it is manually released to DSP. |
| Schedule | Schedule Release Type orders can be scheduled for dispatch to DSP for further processing. Such orders can be scheduled to be dispatch based on their Pickup Start Time and Dropoff End Time. |
Create Release Rule Package
Delivery solutions allow you to create packages and set release rules and release type preferences based on your requirement
- After Successful login to Delivery Solutions page
- Click on the Orchestration Tab from the left side panel.
- Select Rules under the Orchestration.
- Select Release tab under the Rules page.
- Click on Create Release Rule button on the upper right corner
- A popup window will get open to seek Package Details as below
- Click on Create button to create a new package.
- You can see newly created package in the dropdown list on the same page.
- Click on Update Release Rule button to save new changes.
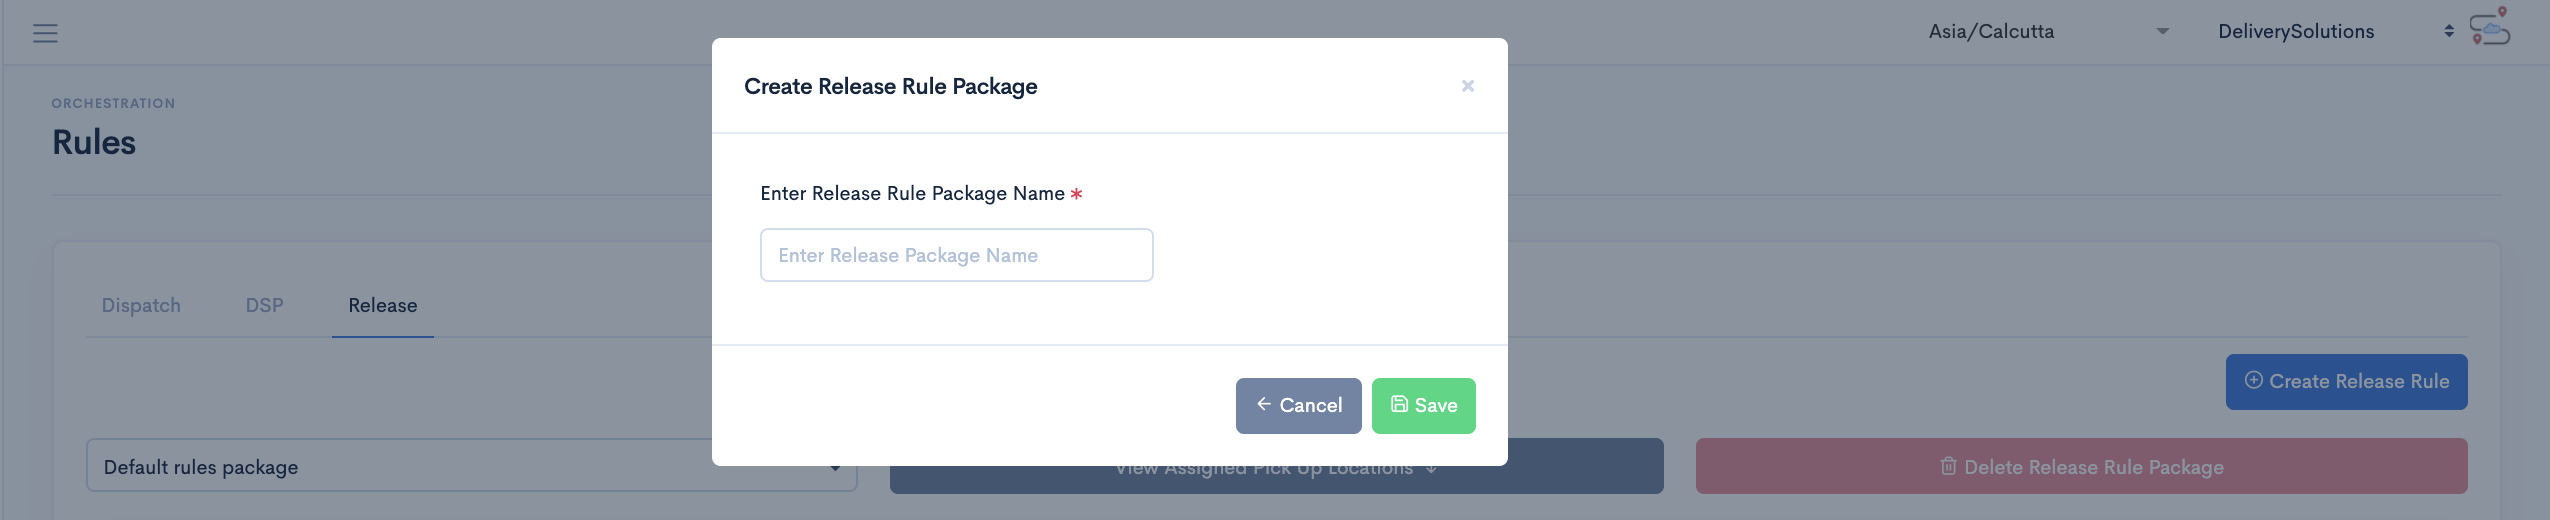
Add Release Rule Scenario
- After Successful login to Delivery Solutions page
- Click on the Orchestration Tab from the left side panel
- Select Rules under the Orchestration
- Select Release tab under Rules page
- Go to Selection Settings section
- Click on Add Scenario button.
- A window will be expanded to set the conditions.
- Select theOrder Attributes or Functions from the drop down list on which you want to set the rules
- Select the appropriate Operator from the drop down to create a criteria
- Set Value in the Drop Down or Input Box to compare it with DSP values
- For any condition mentioned above If satisfied,
- Set the actions on the right side of the panel.
- Select appropriate options in dropdown against DSP Preference
- Set the Else condition using otherwise default to, if the above condition is not matched.
- Click on Add Scenario and follow the same process to add more scenarios
- Click on Update Dispatch Rule button to save new changes.
Update Dispatch Rule Scenario
Update the existing scenarios by following instructions as below
- After Successful login to Delivery Solutions page
- Click on the Orchestration Tab from the left side panel
- Select Rules under the Orchestration
- Select Release tab under the Rules
- Go to Selection Settings section
- Click on Show button to expand the collapsible window
- Edit the details in the condition as per the requirement
- Click on Update Release Rule button to save new changes.
Delete Release Rule Scenario
Delete the existing scenarios by following instructions as below
- After Successful login to Delivery Solutions page
- Click on the Orchestration Tab from the left side panel
- Select Rules under the Orchestration
- Select Release tab under the Rules
- Go to Release Order Settings section
- Click on button against the scenario you wish to delete it permanantly.
- A popup window will get open to seek confirmation as below
- Click on Ok button to delete the scenario
- Click on Update Release Rule button to save new changes.
Delete Release Rule Package
Delivery solutions allows you to delete existing dispatch rule packages..
Release Rule cannot be deleted if it is assigned to one of the Pick Up Locations. Click on View Assigned Pick Up Locations button as shown below to check assigned locations to the dispatch rule.
It is mandatory to remove all assigned Pick Up Locations to delete the dispatch rule.
- After Successful login to Delivery Solutions page
- Click on the Orchestration Tab from the left side panel
- Select Rules under the Orchestration
- Select the Release Rule Package from the Drop Down List
- Click on
 button on the upper right corner
 - A popup window will get open to seek confirmation as below
- Eg. Package Name is “testing1234”
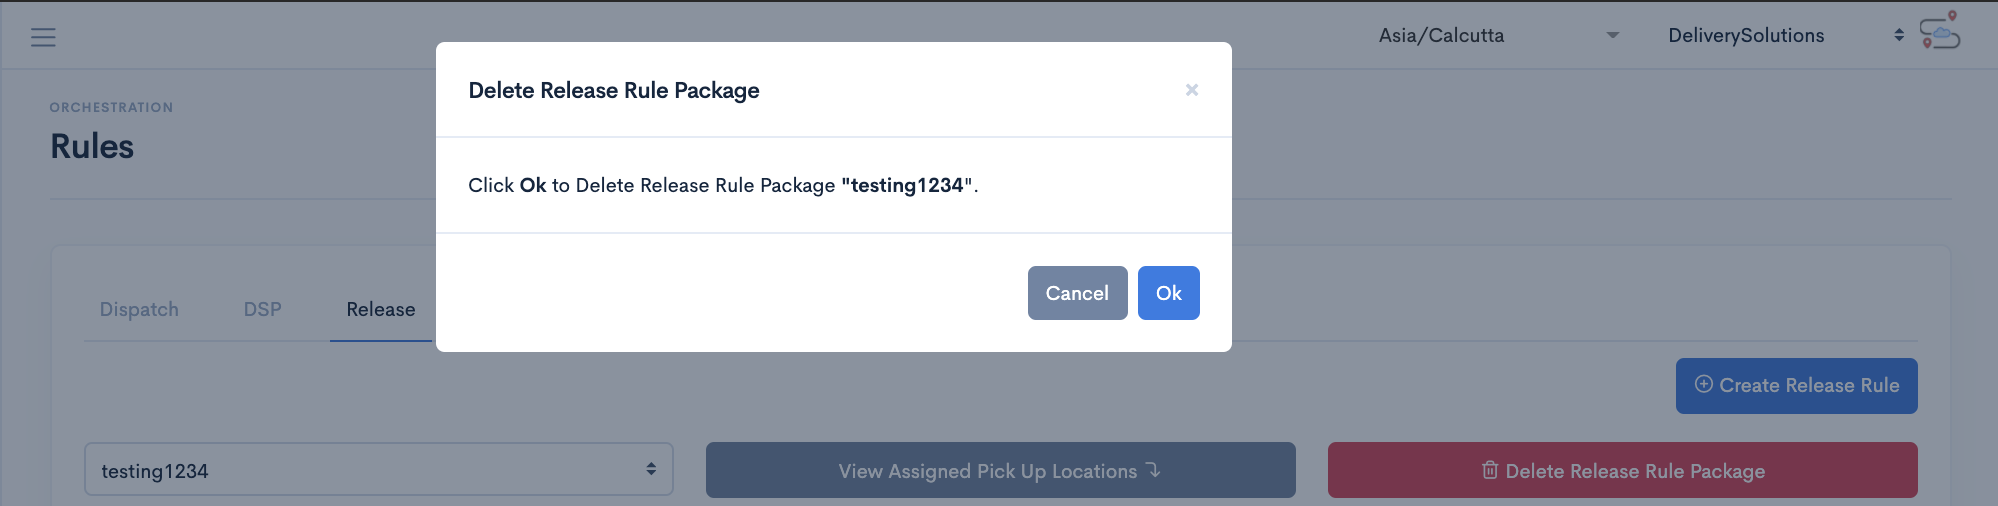
- Eg. Package Name is “testing1234”
- Click on Delete button to delete the package
- Click on Update Release Rule button to save new changes.
Orchestration
Assignment
Assign your rules to Store or Group of Stores.
Any Rule Package designed in the Rules Page under Orchestration further can be assigned to Store or Group of store to enable them to follow the same.
You can assign DSP, Dispatch and Release Rules as below.
this is how the rule assignment looks like whenever you land on the page
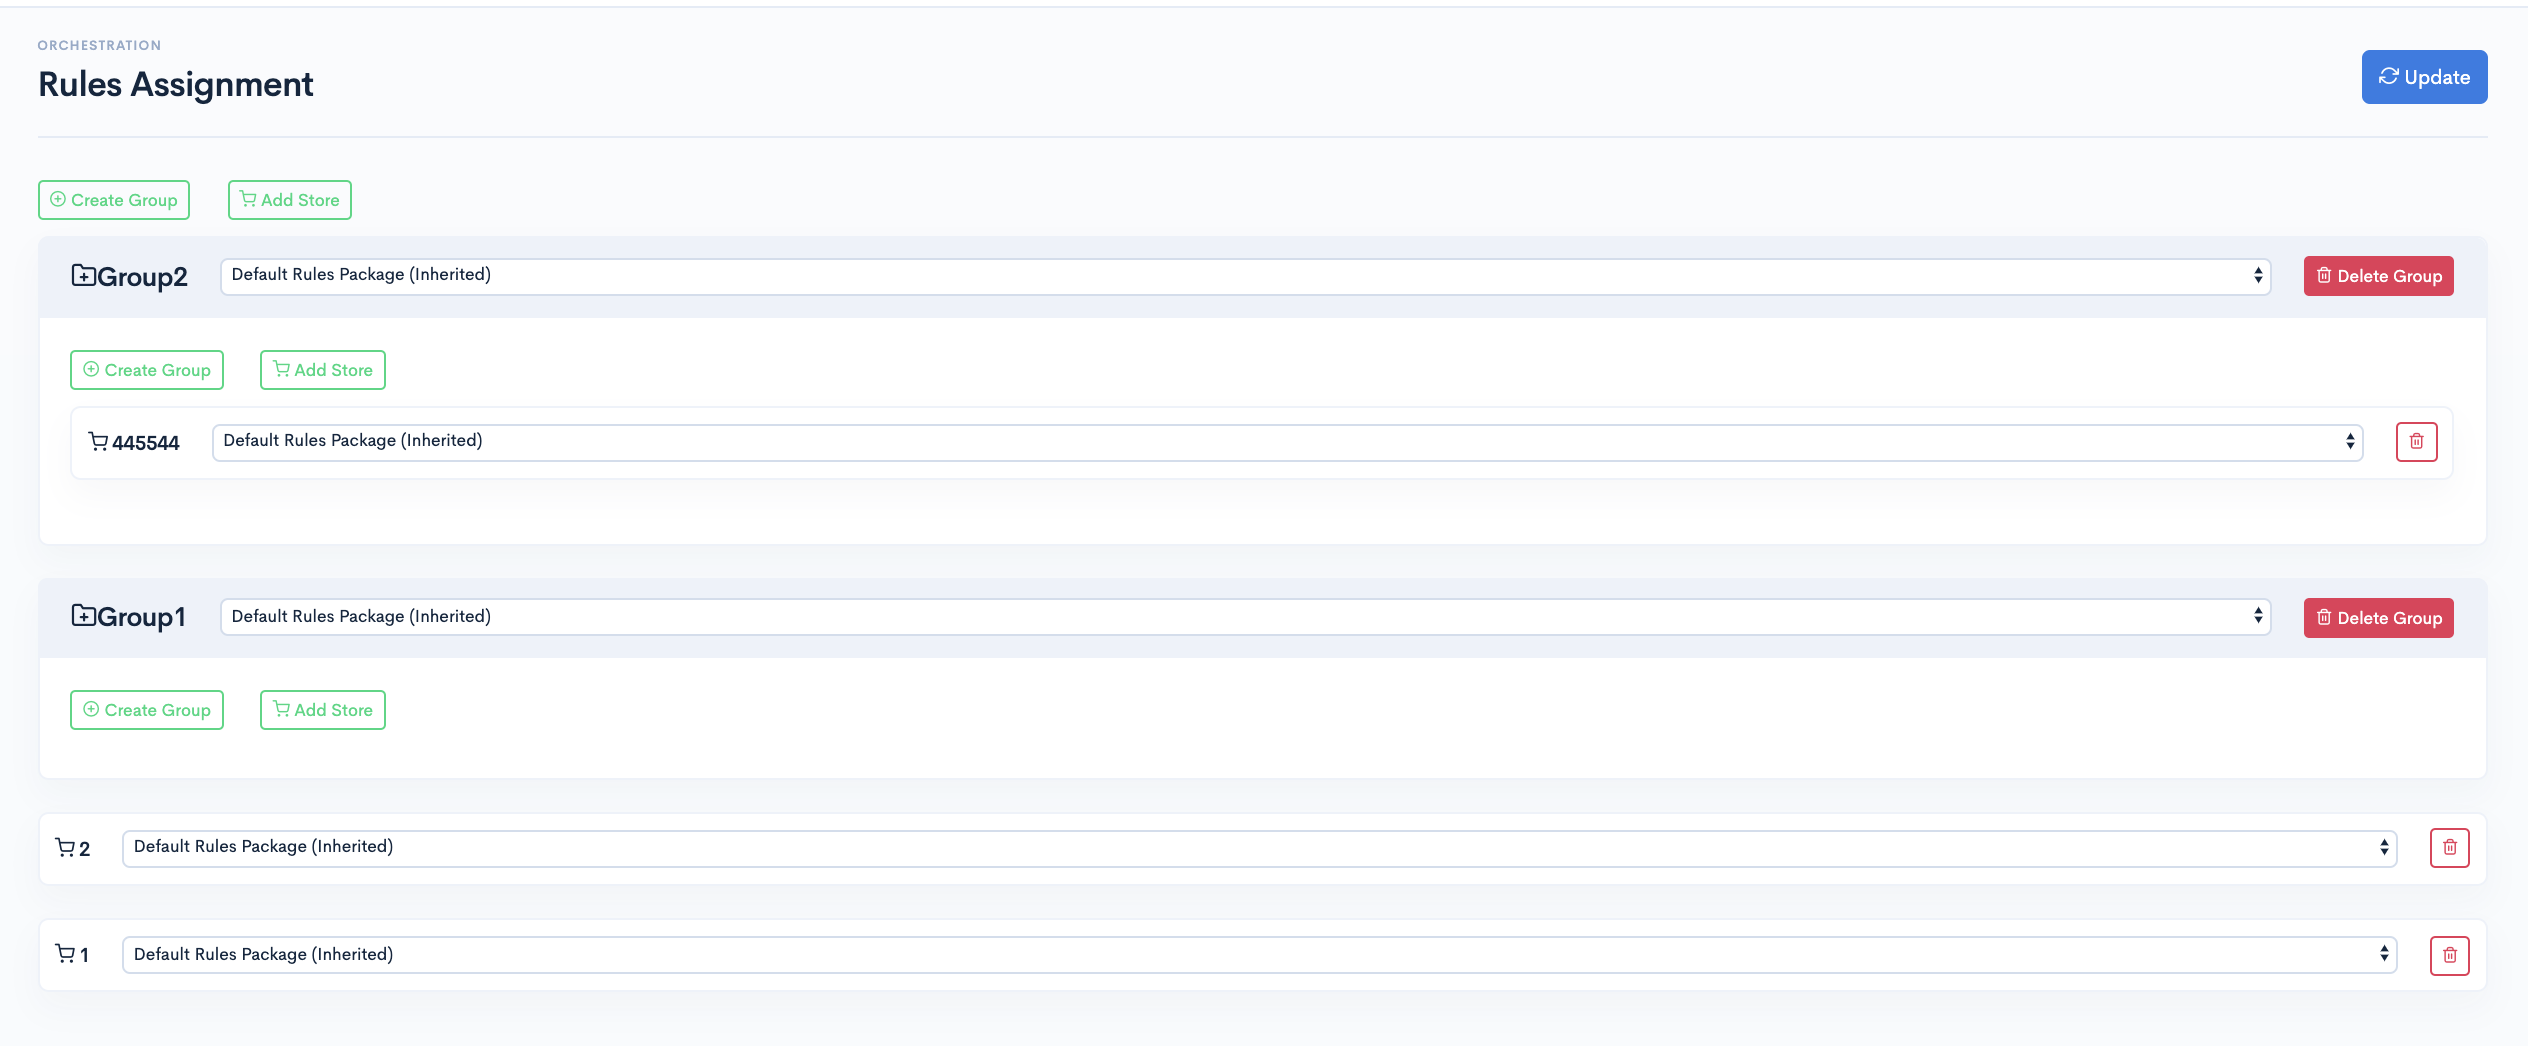
Group
Group is nothing but the collection of stores. All the stores under the group by default inherits the business rule package which is assigned to Group.
- After Successful login to Delivery Solutions page
- Click on the Orchestration Tab from the left side panel
- Select Assignment under the Orchestration
- Click on Create Group Sign to add a group
- A new window will open as shown below
- Click on Group to create a group.
- You will be asked to give Group Name in an input box as shown below
- Click on Save New Group to create the group


- Once the group has been created, It will have the Default Rule Packaged assigned to it.
- Select the package name from the dropdown list to assign a package to the group Example: Group Name is Group1 and the package assigned to it is Default Rule Package
- Click on Update to save the changes

- This is how you can create group within groups

- You can add a subgroup to the newly created group.
- Click on the Create Group button.
- You will be asked to provide Group details in the form
- Click on Save New Group to add a store
- You will be asked to select stores from the dropdown list
- Select the Store from the list
- Click on Add New Store button
Store
Instead of creating a group of stores. Businesss can also assign business rules to stores directly.
- This is how you can add a store and assign rule
- After Successful login to Delivery Solutions page
- Click on the Orchestration Tab from the left side panel
- Select Assignment under the Orchestration
- Click on Add New Store to add a store
- A collapsible window will expand to seek details
- You will be asked to select stores from the dropdown list.
- Click on Save New Store to add a store
Important
Double Click on Group Name to Rename the name and hit Enter
Table Of Content
Labels
Configuration
Businesss can generate labels to be sticked on the orders before delivery. Our Labeler service generates labels in PDF format based on business's configuration for their labels (logo, elements, etc..). It can be generated by a direct call to our labeler service URL. Currently Labels are required to be generated within 30 seconds as it has a 30 second timeout.
Labels Configuration
Label Preferences can be set at each Business level. Labels can be generated by Delivery Solutions or Delivery Service Provider. Delivery Solutions provide option to opt Both.
Page size can also be set under this section.
This is how Labels Configurations Form looks like
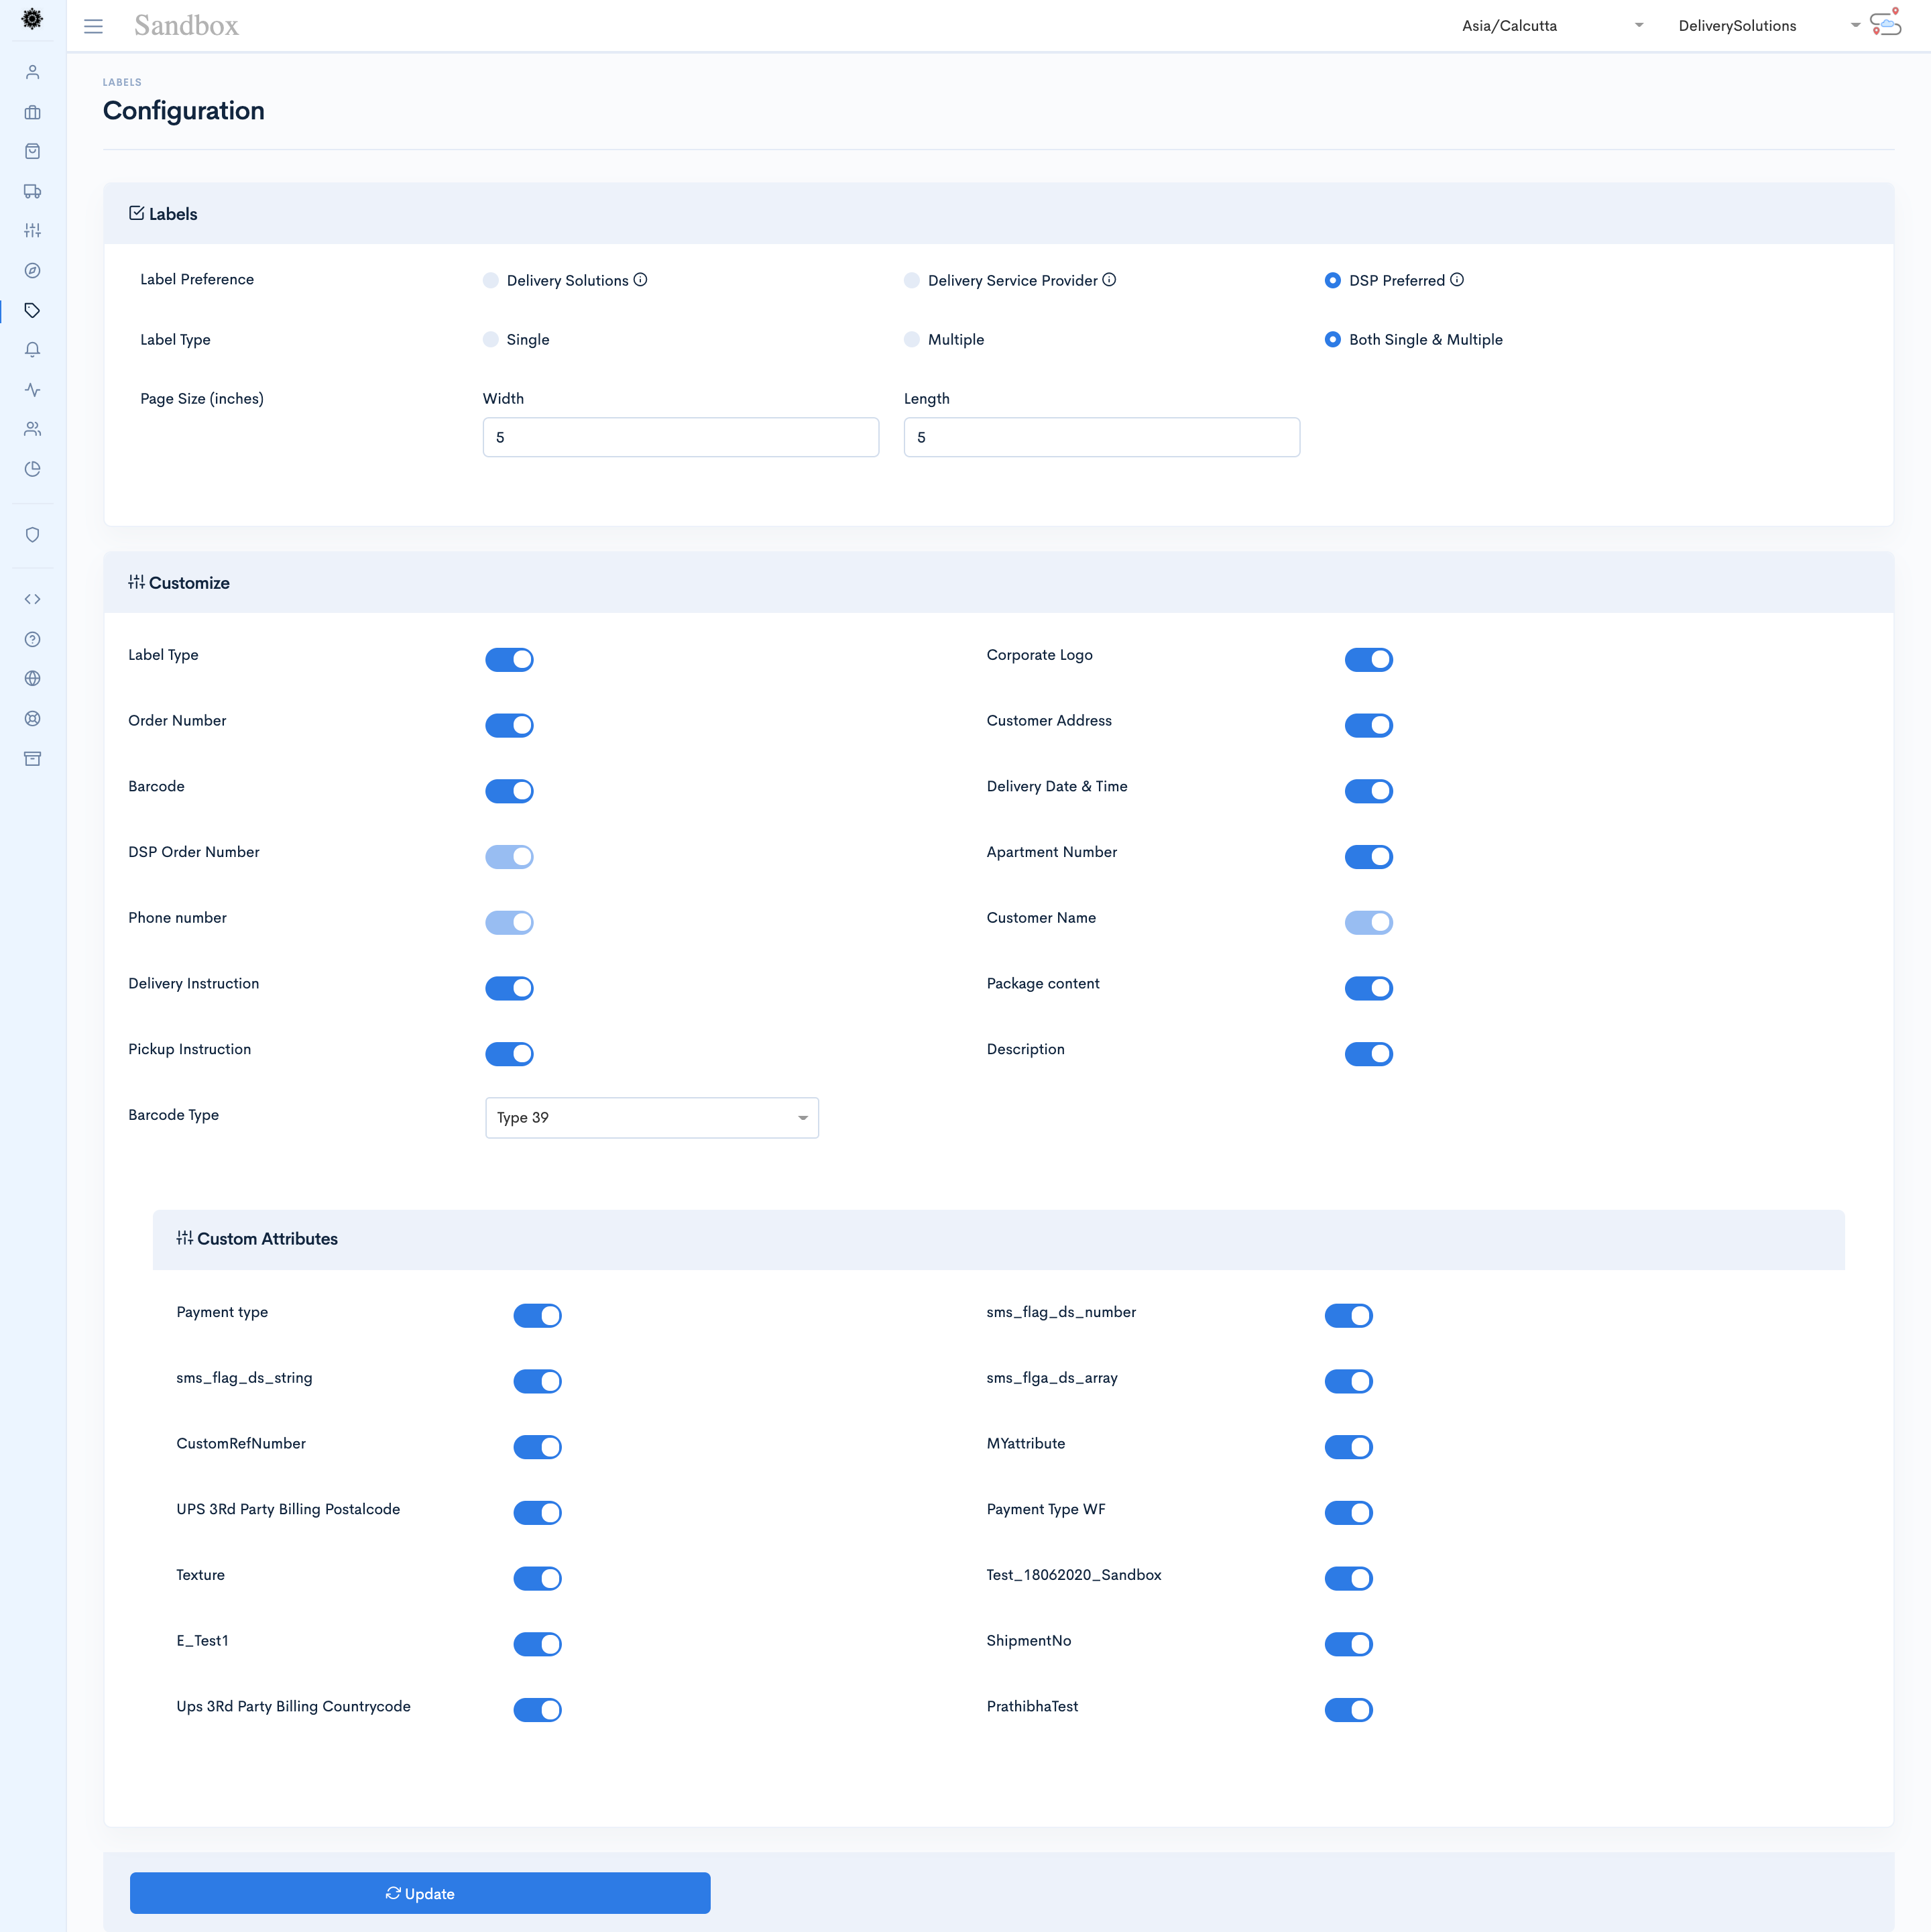
- After Successful login to Delivery Solutions page
- Click on the “Labels” Tab from the left side panel
- Select “Generate” under the Orchestration
- You will see Generate Labels page opened in the right side of the panel as shown in the above image.
- Select the checkboxes against details you want to be printed on the label.
- Click on “Update” button to save the changes
Basic
Label FormThe seeks information for below fields:
| Field Name | Description |
|---|---|
| Label Type | Type of the Label to be shown on Label. such as Single Multiple Both Single & Multiple |
| Corporate Logo | Upload Business Logo of recommended size 300px * 200px |
| Order Number | DS/External Order Number based on the settings set under Profile. |
| Customer Name | Customer Name whom order needs to be delivered |
| Delivery Instruction | Delivery Instruction for Driver |
| Apartment Number | Apartment Number mentioned while placing order |
| Barcode | Barcode to be shown as per the type configured |
| Delivery Date & Time | Date and Time of Delivery |
| DSP Order Number | Order Number generated by DSP |
| Phone Number | Contact Number of the Business |
| Customer Address | Customer Delivery Address including City, Zip, State |
| Package Content | Content in Package as selected in Package Details section while placing order |
| Pickup Instructions | Store or Pick Up Locations Instructions for Driver |
| Barcode Type | linear pattern for encoding data – black bars and white spaces
Type 39 - Lower Data Density Type 128- Higher Data Density |
| Description | Package Description. |
| Custom Attributes | Custom Attributes can be printed on Labels. |
Sample Label
This is how Sample Label looks like

Table Of Content
Post Purchase
Customer Notification
Notifications section helps you in setting up SMS or Email notification for Customers.
This is how Communication Page looks like
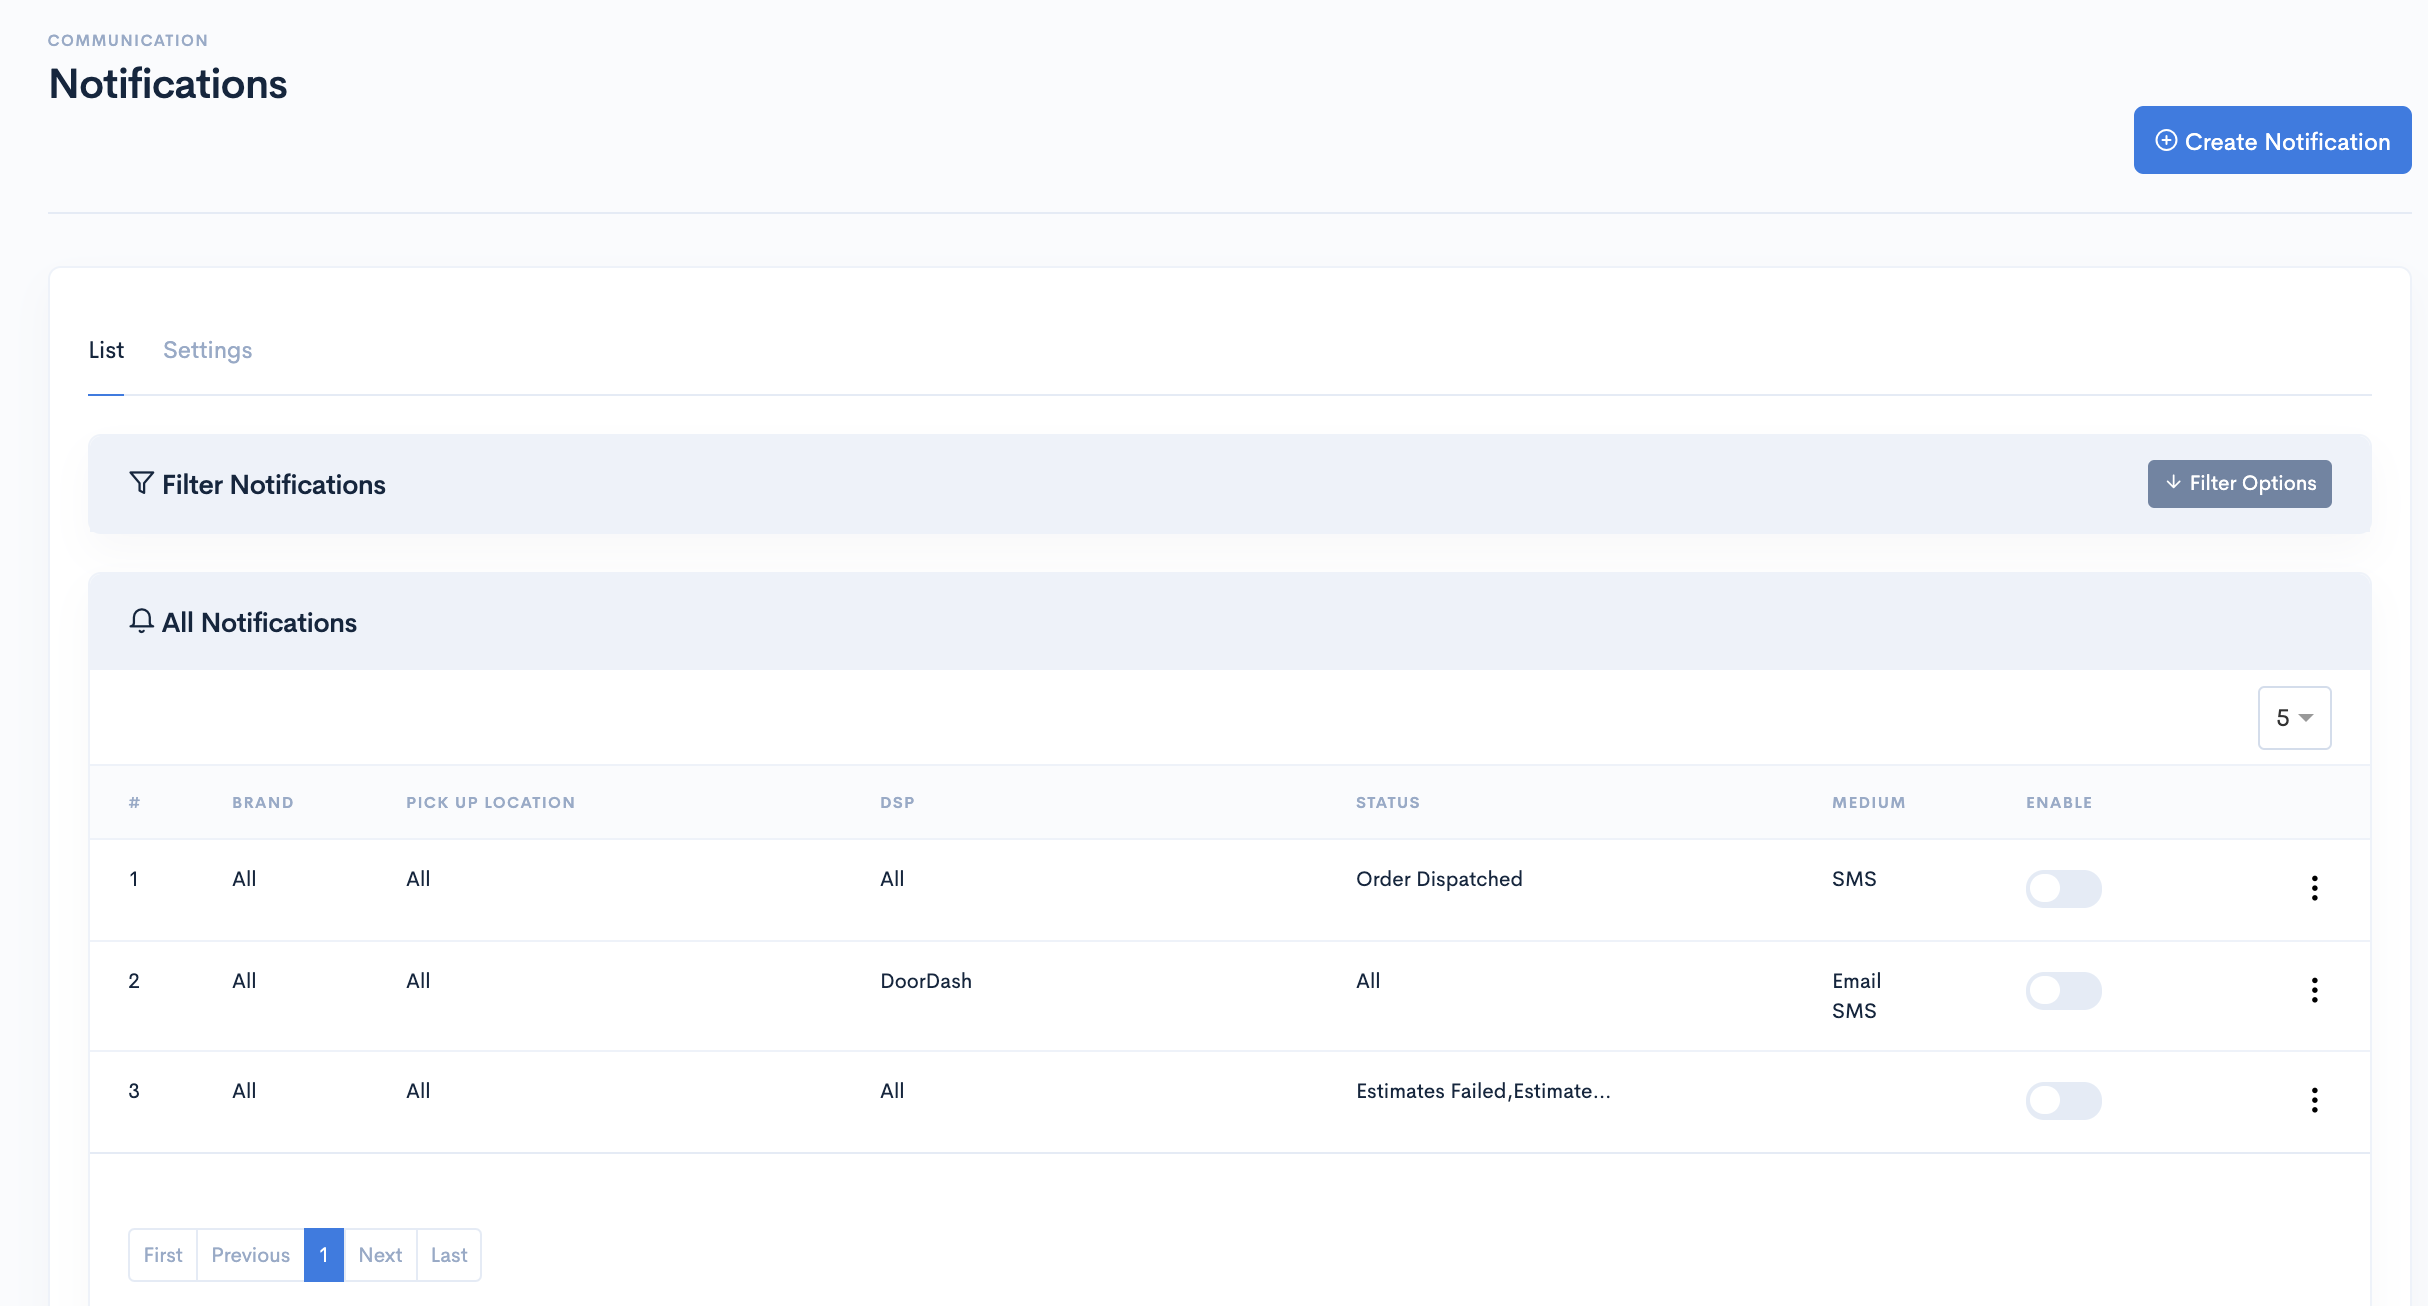
There are two sections under this page.
Settings section shows the sender name and sender id set for customer notifications.
List section lets you create email and sms notifications.

- After Successful login to Delivery Solutions page
- Click on the Communication Tab from the left side panel
- Select Notification under the Communication.
- Click on the button Create Notification.
- This is how the create notification page looks like.

- Click on Save button to save the changes.
Basic
Label FormThe seeks information for below fields:
| Field Name | Description |
|---|---|
| Assign | Notification can be set at 2 level and will get inheritted to subsequent layer.
Brand: Select this radio button to enable notification to all stores under the brand. Pick Up Location: Select this radio to enable notification to all orders under the pickup location. Assigned All: This toggle remains enabled by default and notifications applies to all store/orders. |
| Notification Preference | SMS: Check this checkbox to enable SMS notifications. Email: Check this checkbox to enable Email notifications. |
| Apply | Status: Order status for which notification is to be sent. DSP: DSP for which notification is to be sent. Assigned All: Enable respective toggle to set notifications for all status/dsp. |
| Email: | Subject:This option is only available for Email. Visual Editor:Visual Editor to design the template for Email. Code:HTML Code to design the template for Email. Preview:To view the preview of the code/visual editor. |
| SMS | SMS text to be sent to customer in SMS. |
| Fields | Eligible fields to be used in template. Drag and Drop these fields in pallette in order to use them. |
Table Of Content
Post Purchase
Live Tracking
Live tracking feature enables you to provide your customers with real-time driver locations and ETAs which are presented in an aesthetic and fully customized web tracking experience.
Live Tracking page is mainly divided into 3 sections.
- Live Tracking Configuration
- Customer Proximity Configuration
- Custom Domain Configuration
Live Tracking Configuration
Live tracking configuration page allows you to configure the fields to be shown on the Order Tracking page.
This is how Live Tracking Page looks like
| Field Name | Description |
|---|---|
| Pick Tracking | Select the preference of Order Tracking.
Delivery Solutions: Delivery Service Provider: DSP Prefferred: |
| Pick Your Theme | Select a theme for the tracking page. |
| Color | Customize the color of the page and font to match with your frontend.
Primary Color: Color to be used to show Order Number. Secondary Color: Color to be used to show Estimate Delivery Time Background Color: Background color of the tracking page. |
| Live Tracking Map | Customize the markers on the map.
Show Details On Marker: show details about customer address, dsp name etc on marker. Business Marker Logo: Use Business logo as a Store Marker. Provider Marker Logo: Use DSP logo as a Driver Marker. |
| Bullet Start Bar | Customize the Order details shown on the top of the page.
Status: Show Order's current status Show Event Time: Show the time of order statuses. Show Estimated Time: Show estimated delivery time. |
| Header | Customize the text to be shown on header.
Title: Add Title of the page Eg. XYZ's Order Tracking Alignment: Set alignment of the Title. |
| Business Logo | Upload a business logo to show as a Store Marker and on the top of the page.
External Link: An external link of the image. |
| Dropoff Details | Select the dropoff fields to be shown on page.
Customer Name: Customer Name associated with the order. Customer Phone: Phone Number associated with the Order. Customer Email: Email Address associated with the order. Customer Address: Delivery Address associated with the order. Delivery Instructions: Delivery Instructions associated with the order. |
| Pickup Details | Select the pickup fields to be shown on page.
Store Manager Name: Customer Name associated with the order. Store Phone: Phone Number associated with the Store. Store Email: Email Address associated with the Store. Store Address: Delivery Address associated with the Store. Pickup Instructions: Pickup Instructions associated with the Store. |
| Driver Details | Customize the details you would like to show about driver.
Driver Name: Name of the Driver Driver Phone: Phone Number associated with Driver. Vehicle: Vehicle Number of the Driver. Provider: Name of the Provider. |
| Order Details | Customize the details you would like to show pertaining to order.
Order Value: Order Amount Order Type: Type of order such as Delivery, Curbside and Pickup. |
| Custom Attributes | Customize which order attributes you would like to show |
| Footer | Customize the details you would like to show in bottom of the page.
Title: Title can be the business name. Alignment: Set alignment of the Title. Terms & Conditions: Your business's terms and conditions page URL. Privacy Policy: Your business's Privacy Policy's page URL. Copyrigh: Your business's Copyright text or page URL. |
| Customize Tracking Page | Customize the details you would like to show for the page.
Favicon: Your business's favicon to be shown on browser. Tab Title: Name to be shown on Browser's tab. Google Analytics Tracking Code: Google Analytics tracking code if any. |
Customer Proximity Configuration
Customer Proximity page allows you to configure the fields to be shown on the customer app. This configuration applies to customers who preferred curbside or in-store pickup.
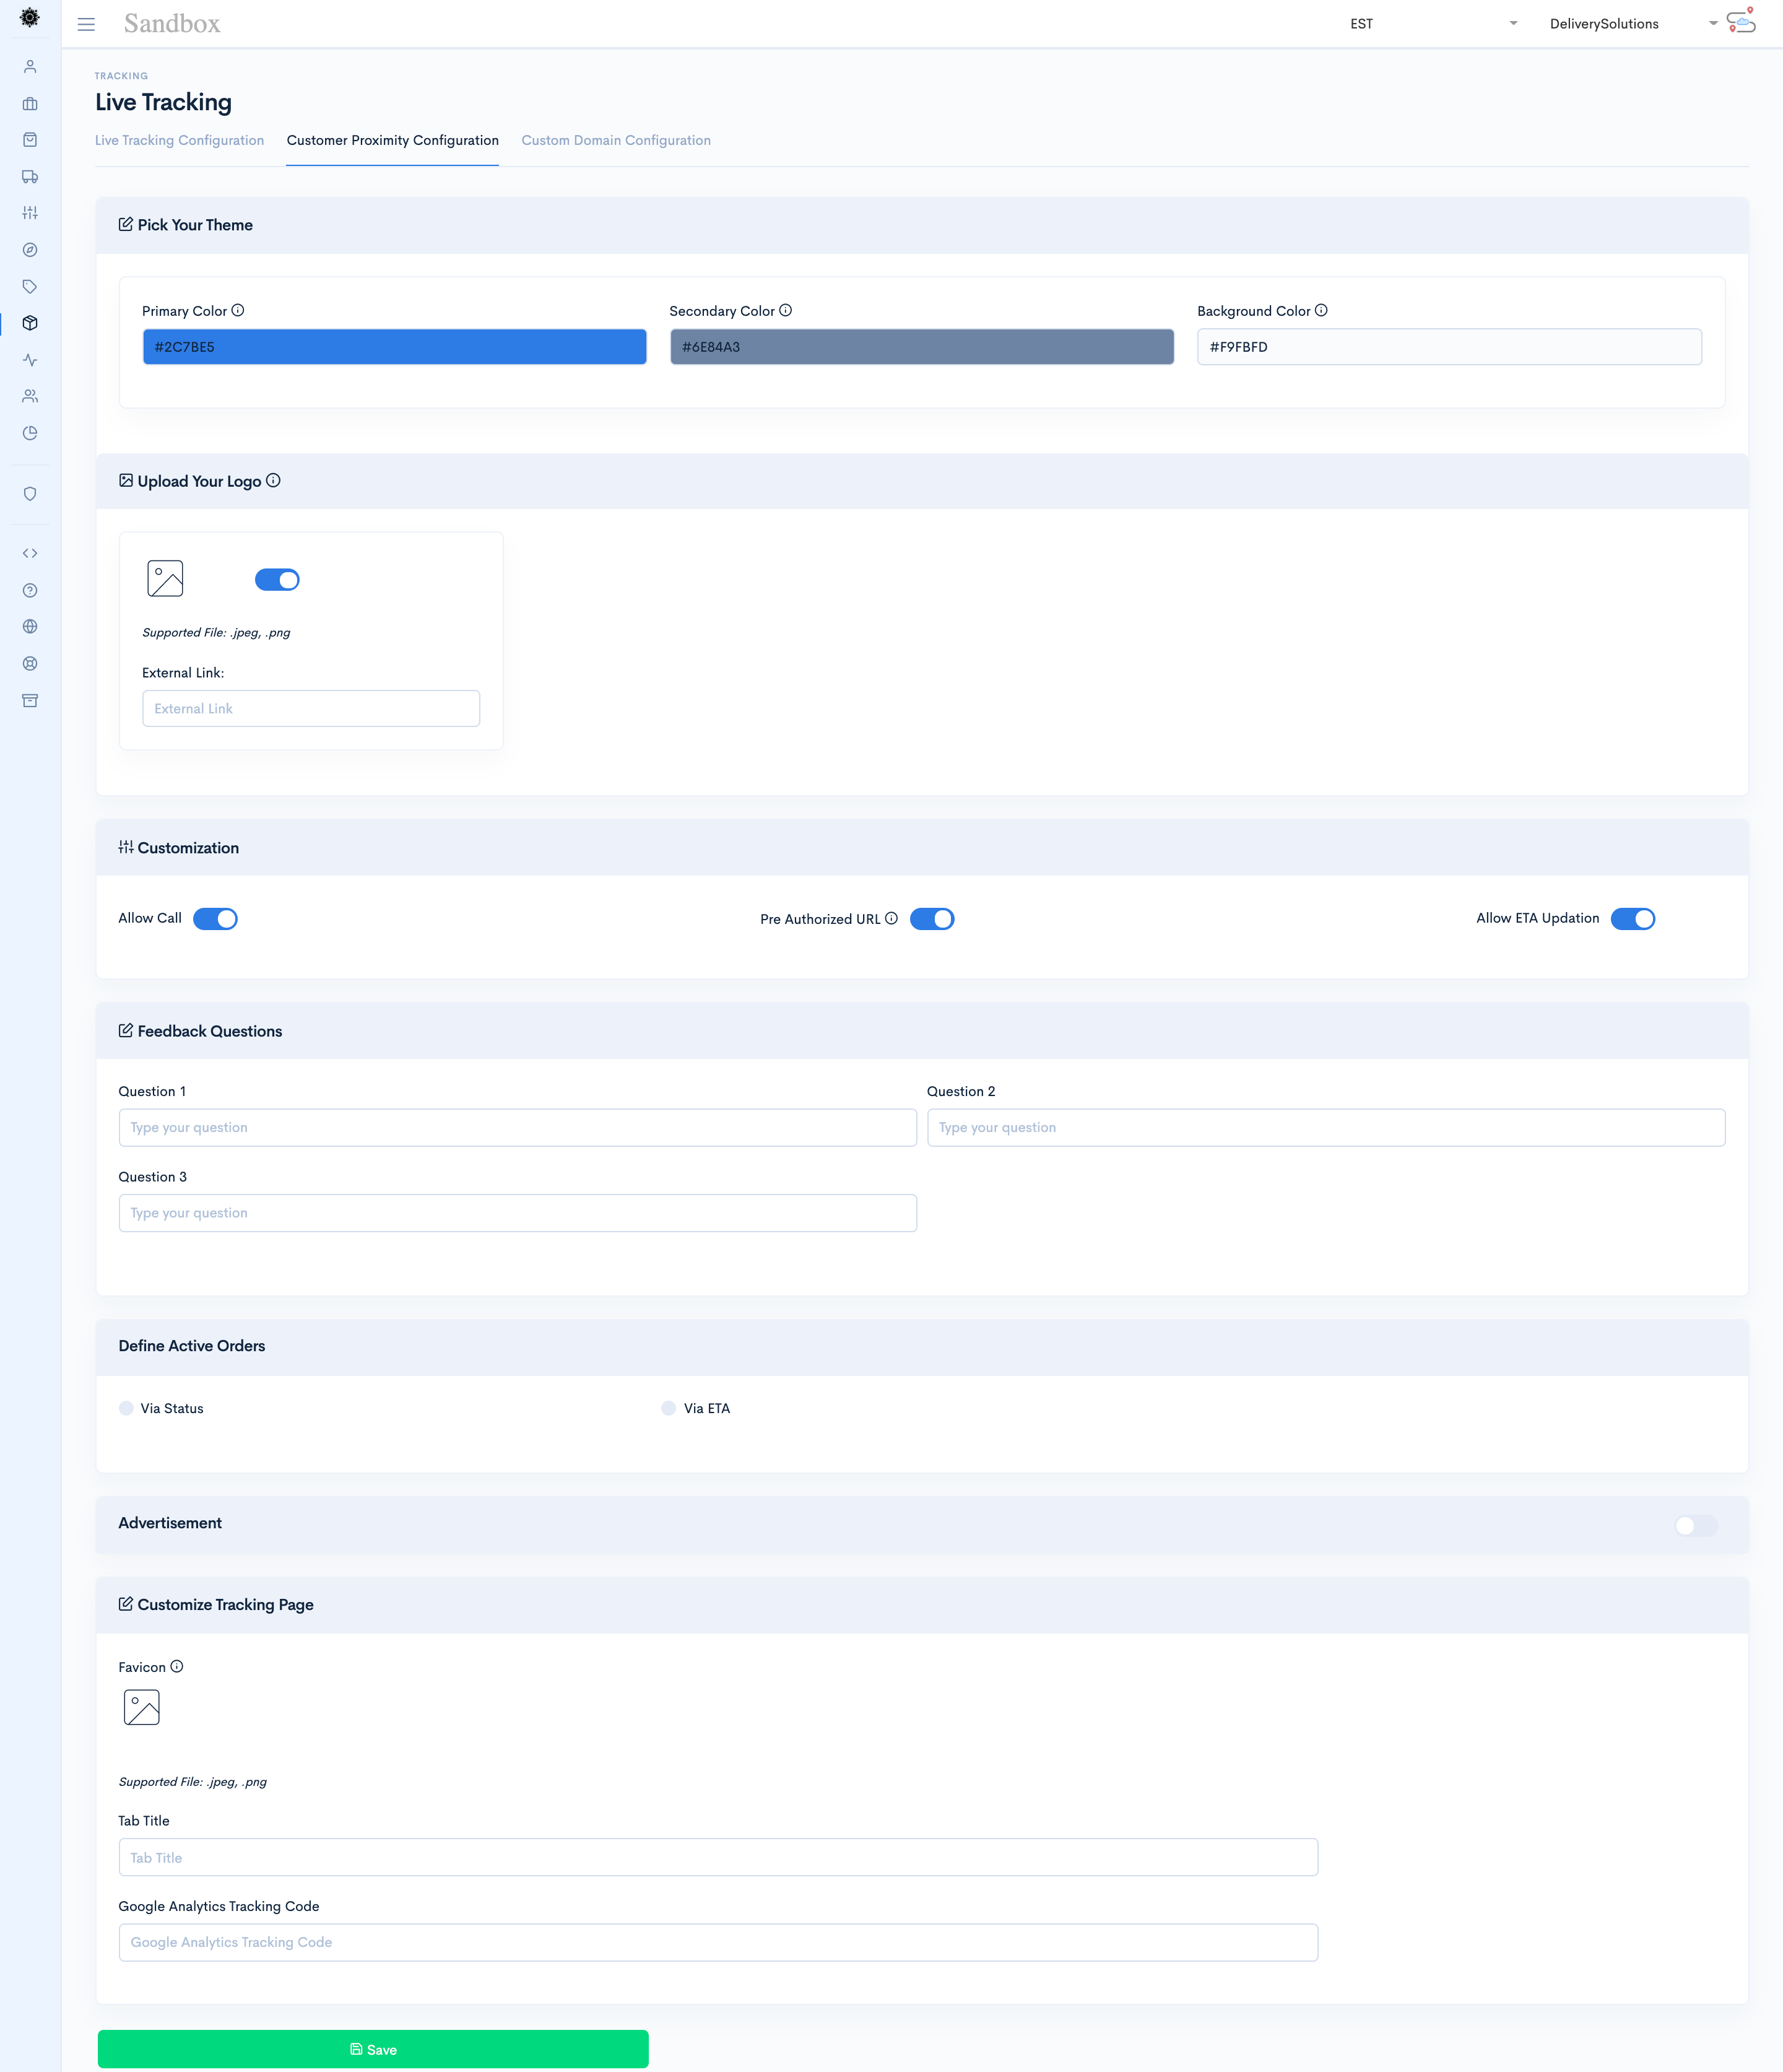
| Field Name | Description |
|---|---|
| Pick Your Theme | Select a theme for the tracking page. |
| Color | Customize the color of the page and font to match with your frontend.
Primary Color: Color to be used to show Order Number. Secondary Color: Color to be used to show Estimate Delivery Time Background Color: Background color of the tracking page. |
| Update Your Logo | Upload a business logo to show as a Store Marker and on the top of the page.
External Link: An external link of the image. |
| Customization | Allow Call: Customer can call driver.
Pre Authorized URL: dynamic customer tracking URL along with token and order information. Allow ETA Updation: ETAs to be allowed to be updated. |
| Feedback Questions | Add feedback questions. |
| Define Active Orders | Customize the way active orders should be shown.
Via Status: based on the status of the orders. Via ETA: based on the Customer's ETA. |
| Advertisement | Allows you to advertisement in the page.
Advertisement Image: Upload the image of the Advertisement. Click Through URL: URL to be redirected on click of Advertisement Image. |
| Customize Tracking Page | Customize the details you would like to show for the page.
Favicon: Your business's favicon to be shown on browser. Tab Title: Name to be shown on Browser's tab. Google Analytics Tracking Code: Google Analytics tracking code if any. |
Custom Domain Configuration
Custom Domain page allows you to add your business domain in the tracking page URL.
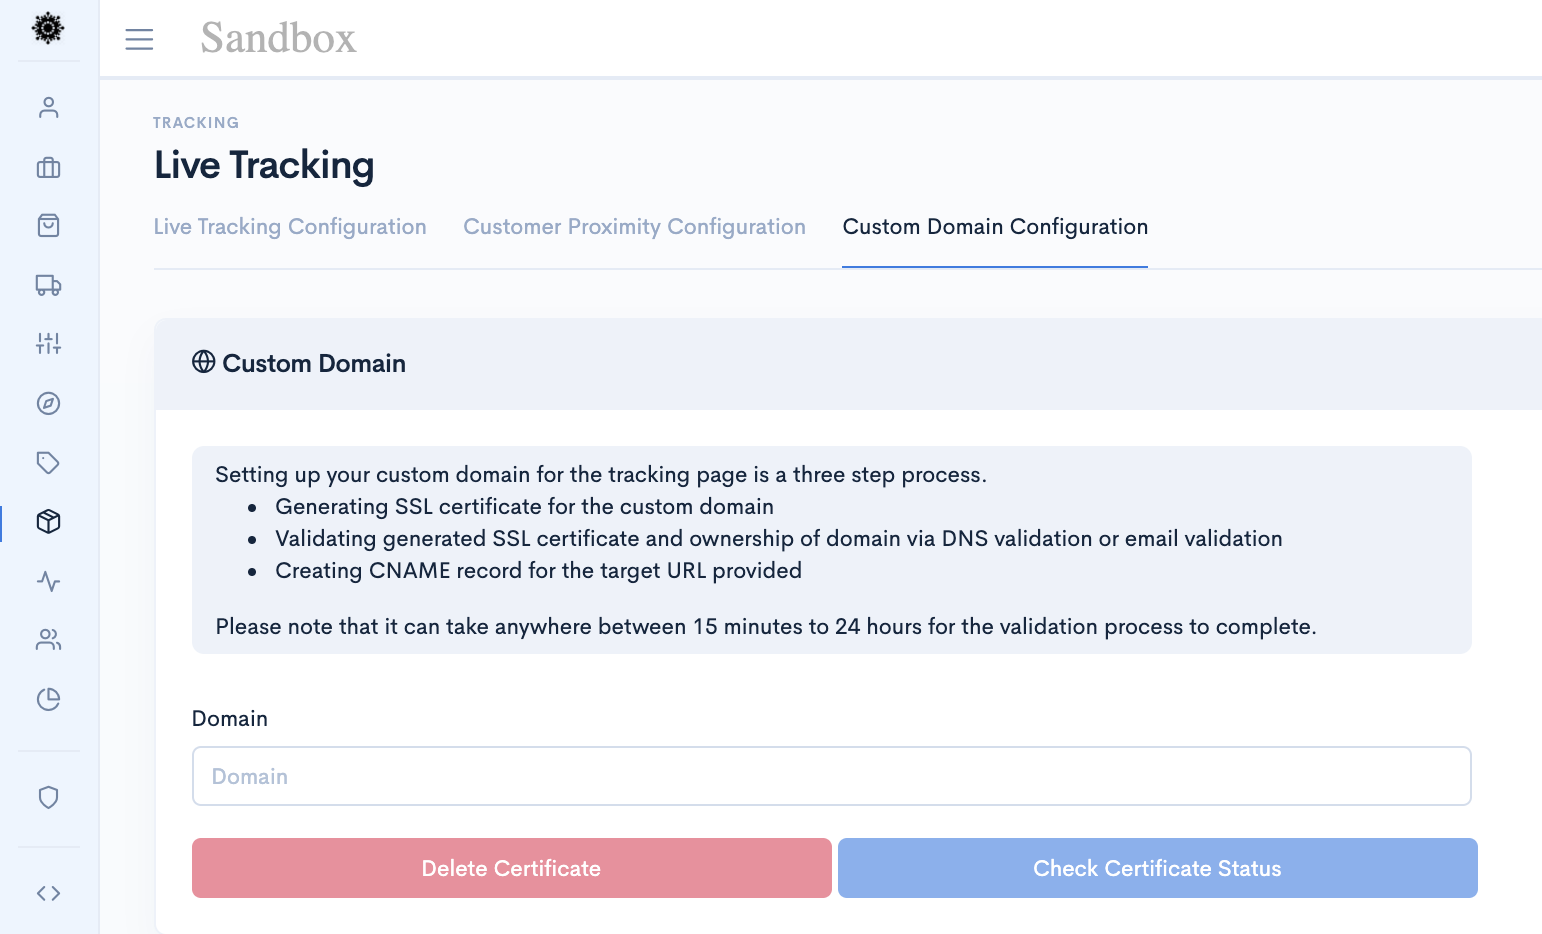
| Field Name | Description |
|---|---|
| Domain | Business Domain |
Service Consumptions
Our Service Consumptions dashboard shows a high level view of API usage. Service consumption is mostly measured through Delivery Assurance and Labeler API calls.
This is how Service Consumptions dashboard looks like
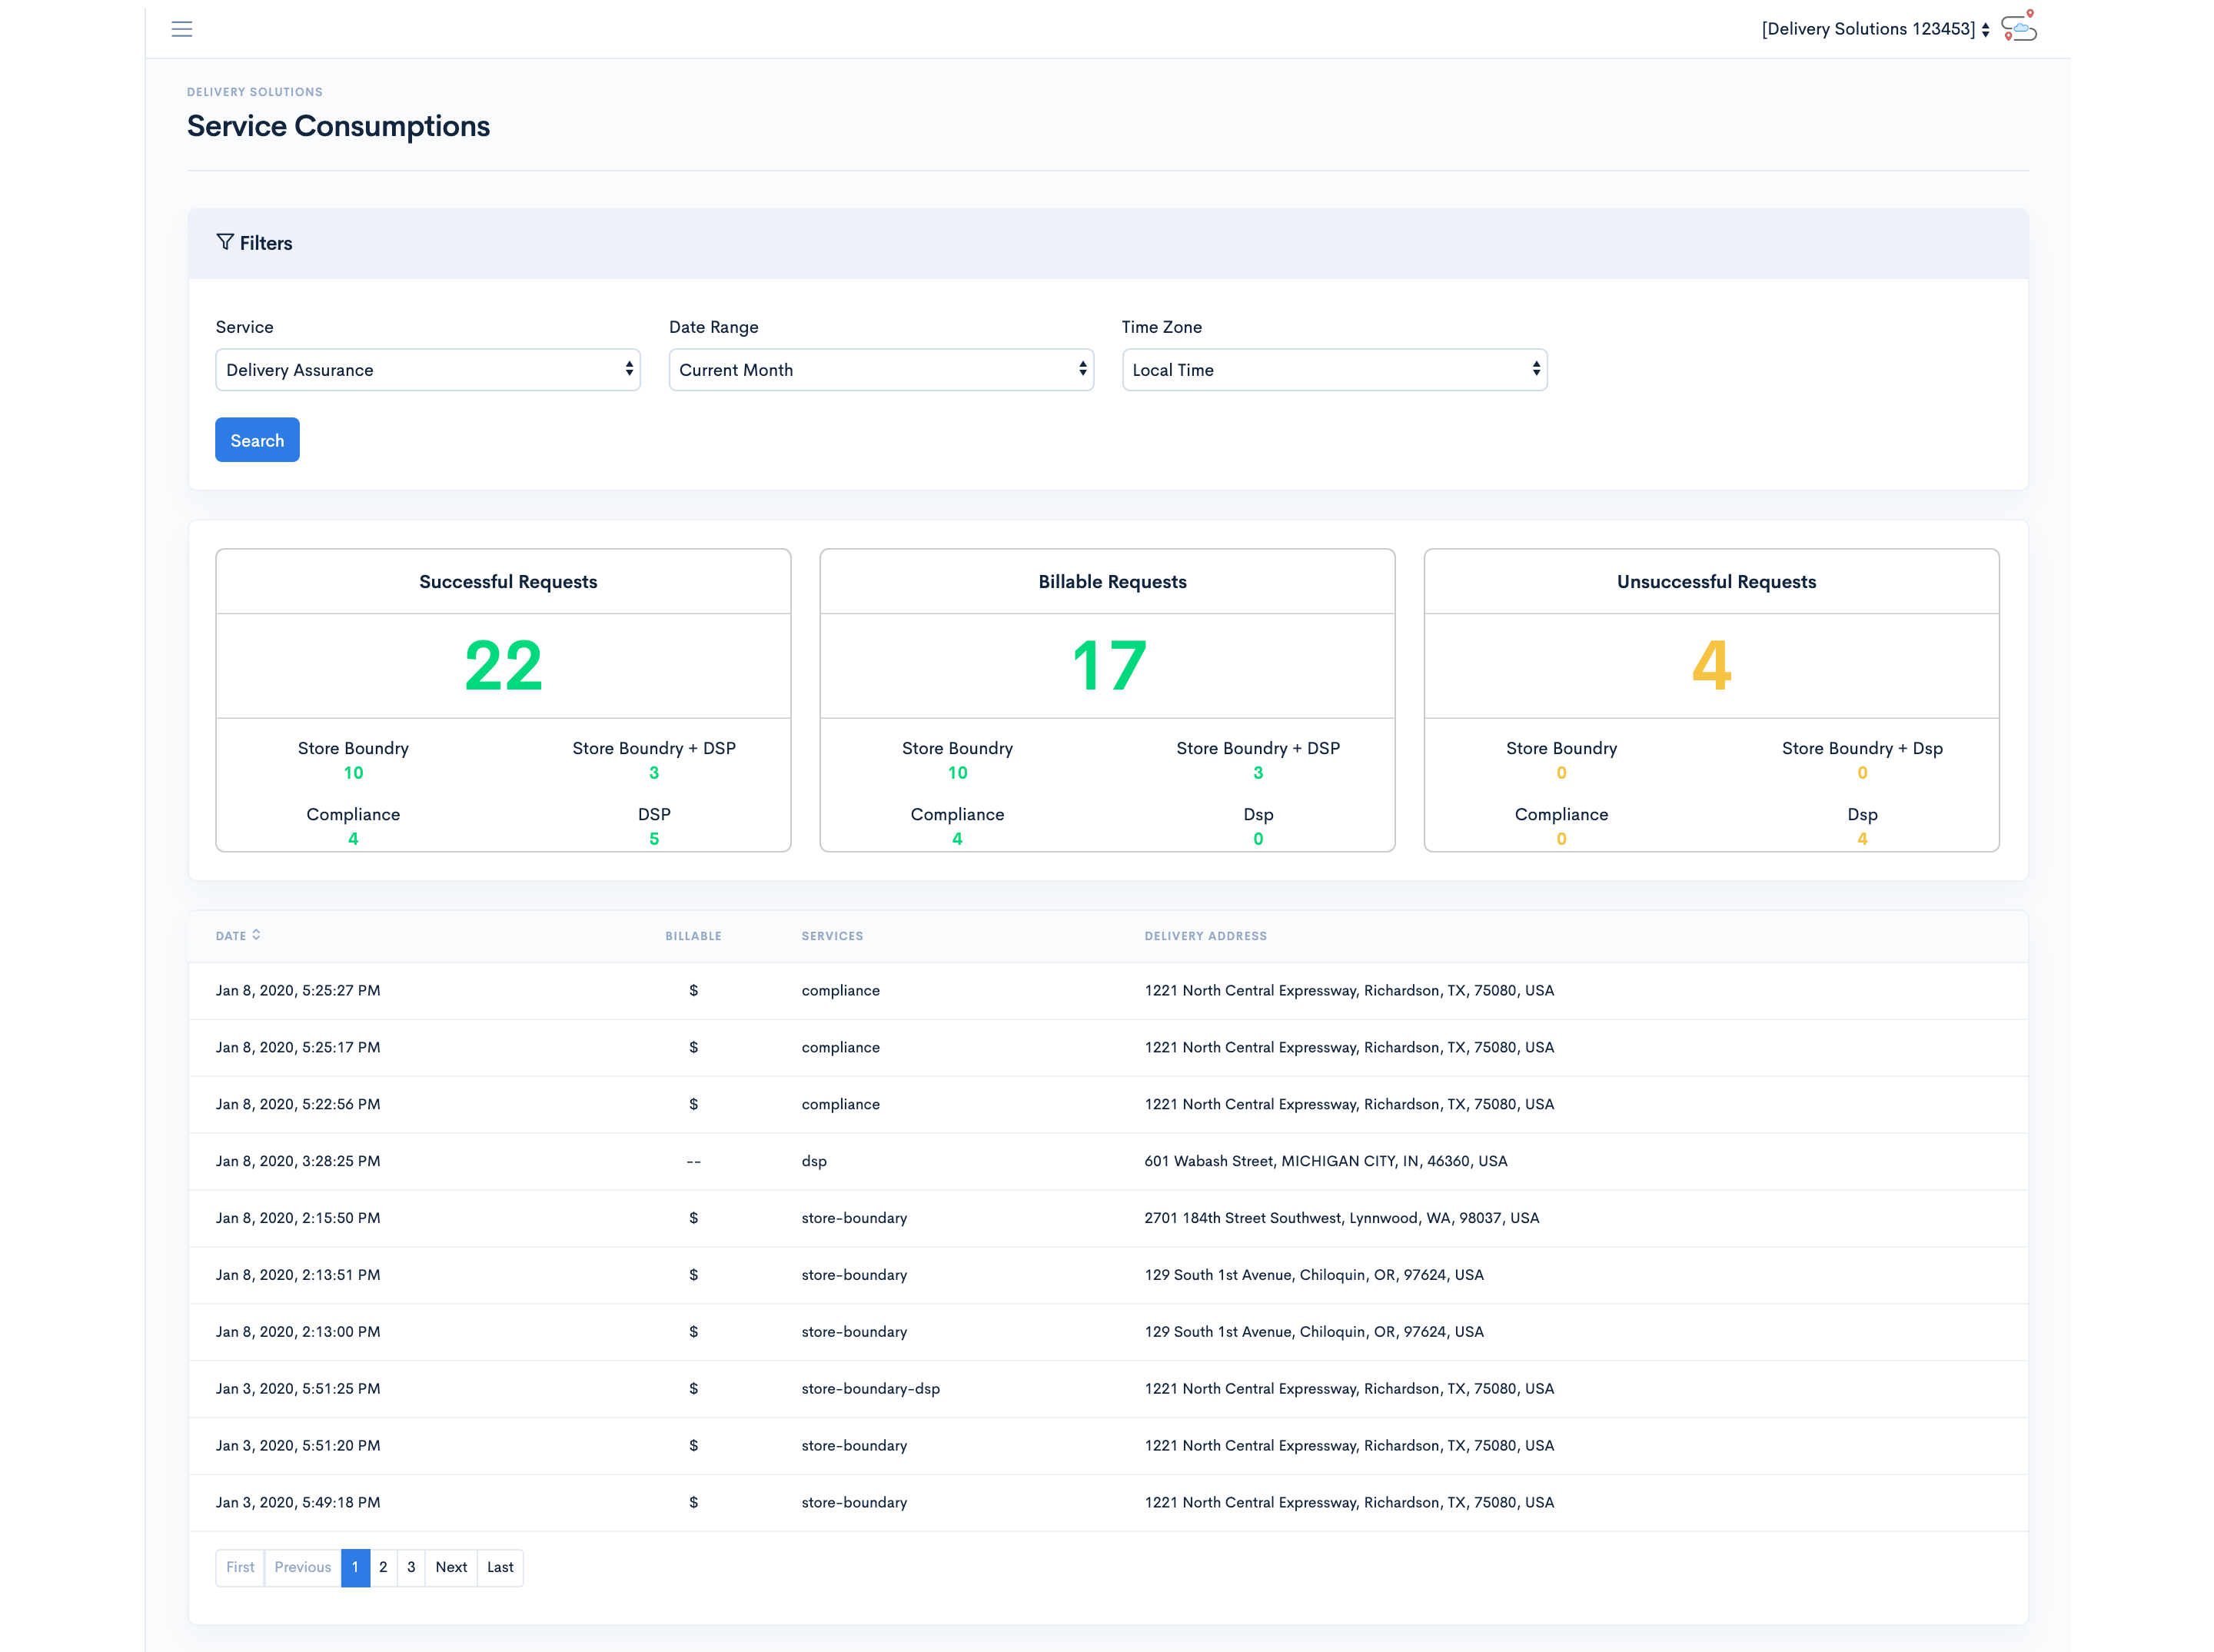
Service Consumptions uses below filters
Basic
| Field Name | Description |
|---|---|
| Service |
List of Services called
|
| Date Range | The range of dates between which a particular service is called. |
| Time Zone | A specific timezone of the date range. |
| Requests |
Type of Requests
|
Table Of Content
Users & Roles
Create Users, Roles and Permissions under this section
Users & Roles
Roles
Role is a group of related skills with a level of authority to perform a given task. The higher the Role the higher the level of acces and permissions to the Delivery Solutions Pages and Modules.
Role comprises set of responsibilities such creating a Role/Staff under the role and assign permissions to the same.
Add Role
Create a new Role and assign privilege to the group in this section.
This is how Add New Role page looks like
- After Successful login to Delivery Solutions page.
- Click on the Users & Roles Tab from the left side panel.
- Select Roles under the Users & Roles section.
- You will see Roles page opened in the right panel.
- Click on Add Role button.
- You will be redirected to Add New Role form.
- Fill in the details in the form.
- Click on Save button to create the Role.
Basic
Add New Role form seeks information for below fields:
| Field Name | Description |
|---|---|
| Role Name | Unique name of the Group |
| Template | Templates are predefined set of access on modules given to a specific role. |
Edit Role
Create a new group and assign privilege to the group in this section.
- After Successful login to Delivery Solutions page
- Click on the Users & Roles Tab from the left side panel
- Select Roles under the Users & Roles
- You will see Users page opened in the right side of the panel
- Click on Edit
to edit the group details
- You will be redirected to Edit Role Page
- modify the details in the page
- Click on Update button to save the changes
Delete Role
Businesss can delete the existing Roles
- After Successful login to Delivery Solutions page
- Click on the Users & Roles Tab from the left side panel
- Select Roles under the Users & Roles
- You will see Users page opened in the right side of the panel
- Click on to delete the Role.
- A Popup window will open to seek confirmation as shown below.
- Click on Ok button to delete the group permanently.

Enable Or Disable Role
Instead of deleting the group. Make the group inactive in just one click
- After Successful login to Delivery Solutions page
- Click on the Users & Roles Tab from the left Menu
- Select Roles under the Users & Groups
- You will see Roles page opened in the right panel
- If the Role is already Disabled, the toggle button of the Group will look like this
- Swipe Right Toggle button to make the group Enable
- A popup window will open to seek confirmation as shown below.
- An Enabled Role toggle will look like this

- After Successful login to Delivery Solutions page
- Click on the Users & Roles Tab from the left Menu
- Select Roles under the Users & Groups
- You will see Roles page opened in the right panel
- If the Role is already Enabled, the toggle button of the Group will look like this
- Swipe Left Toggle button to make the group Disable
- A popup window will open to seek confirmation as shown below.
- A Disabled Role toggle will look like this

Show Permissions
Businesss can view the permissions set for the group in this section
- After Successful login to Delivery Solutions page
- Click on the Users & Roles Tab from the left side Menu
- Select Roles under the Users & Role
- You will see Roles page opened in the right side of the panel
- Click on
 button against the Role name
- A collapsible window will get open on the same panel showing all permissions as below.
Table Of Content
Users & Roles
Users
Delivery solutions allow you to manage Users and their credentials.
Add User
Create a new user and set the credentials for the same.
This is how Create New User page looks like
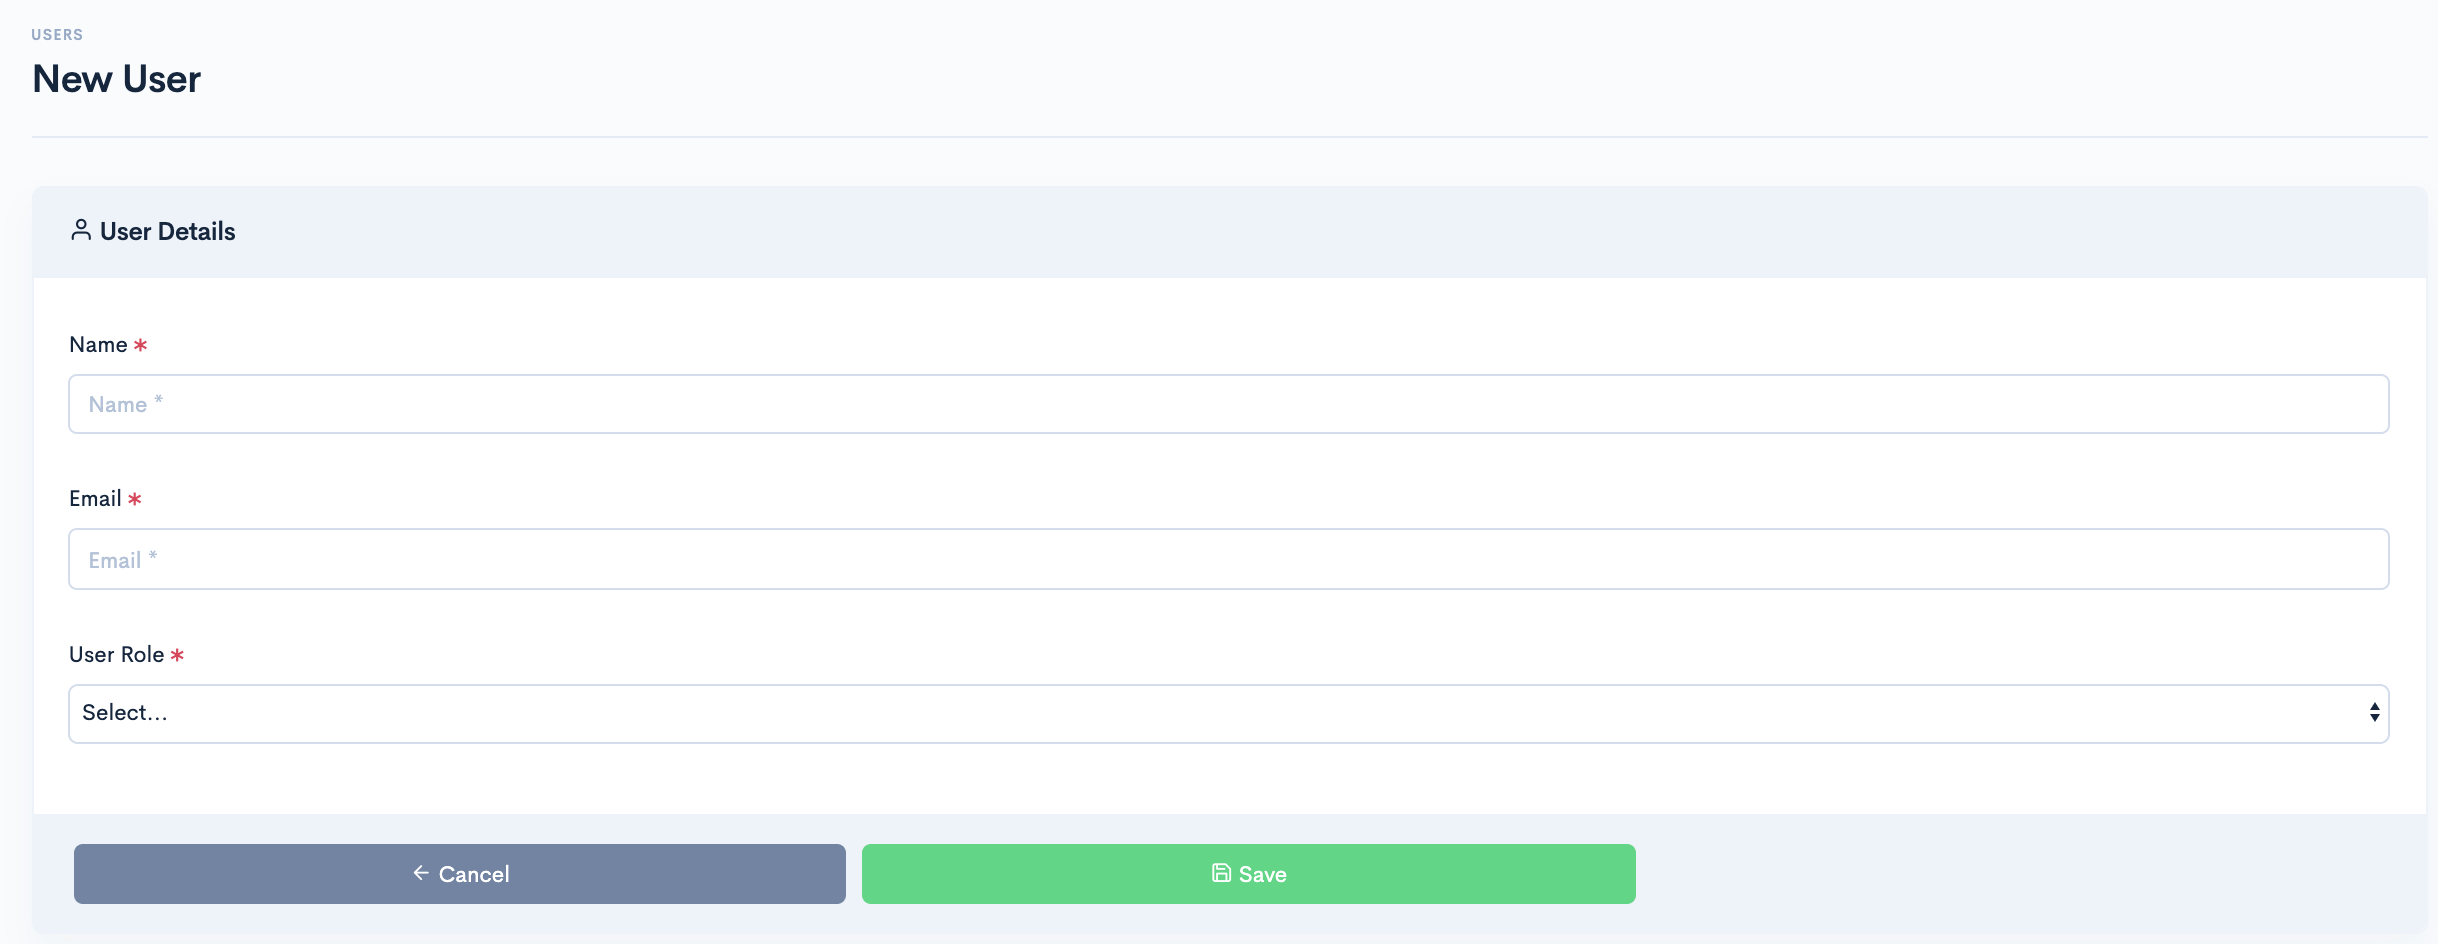
- After Successful login to Delivery Solutions page
- Click on the Users & Roles Tab from the left side panel
- Select Users under the Users & Roles
- You will see Users page opened in the right side of the panel
- Click on Create User button
- You will be redirected to Create User
- Fill in the details in the page
- Click on Save button to create the User
Basic
The Create New User page seeks information for below fields:| Field Name | Description |
|---|---|
| Name | Name of the user |
| Email Address of the User | |
| Password | Alphanumeric 8 Digit password |
| Confirm Password | Confirmation of the password |
| User Role | Group user will be a part of |
| Set as Super Admin | User will be given Admin level access if the toggle button is enabled |
Edit User
Business Admins can edit the basic details of the user such as Name and Role.
- After Successful login to Delivery Solutions page
- Click on the Users & Roles Tab from the left side panel
- Select Users under the Users & Roles
- You will see Users page opened in the right side of the panel as below
- Click on button against user name.
- You will be redirected to Edit User Page.
- Modify the details in the form
- Click on Update button to save the changes.
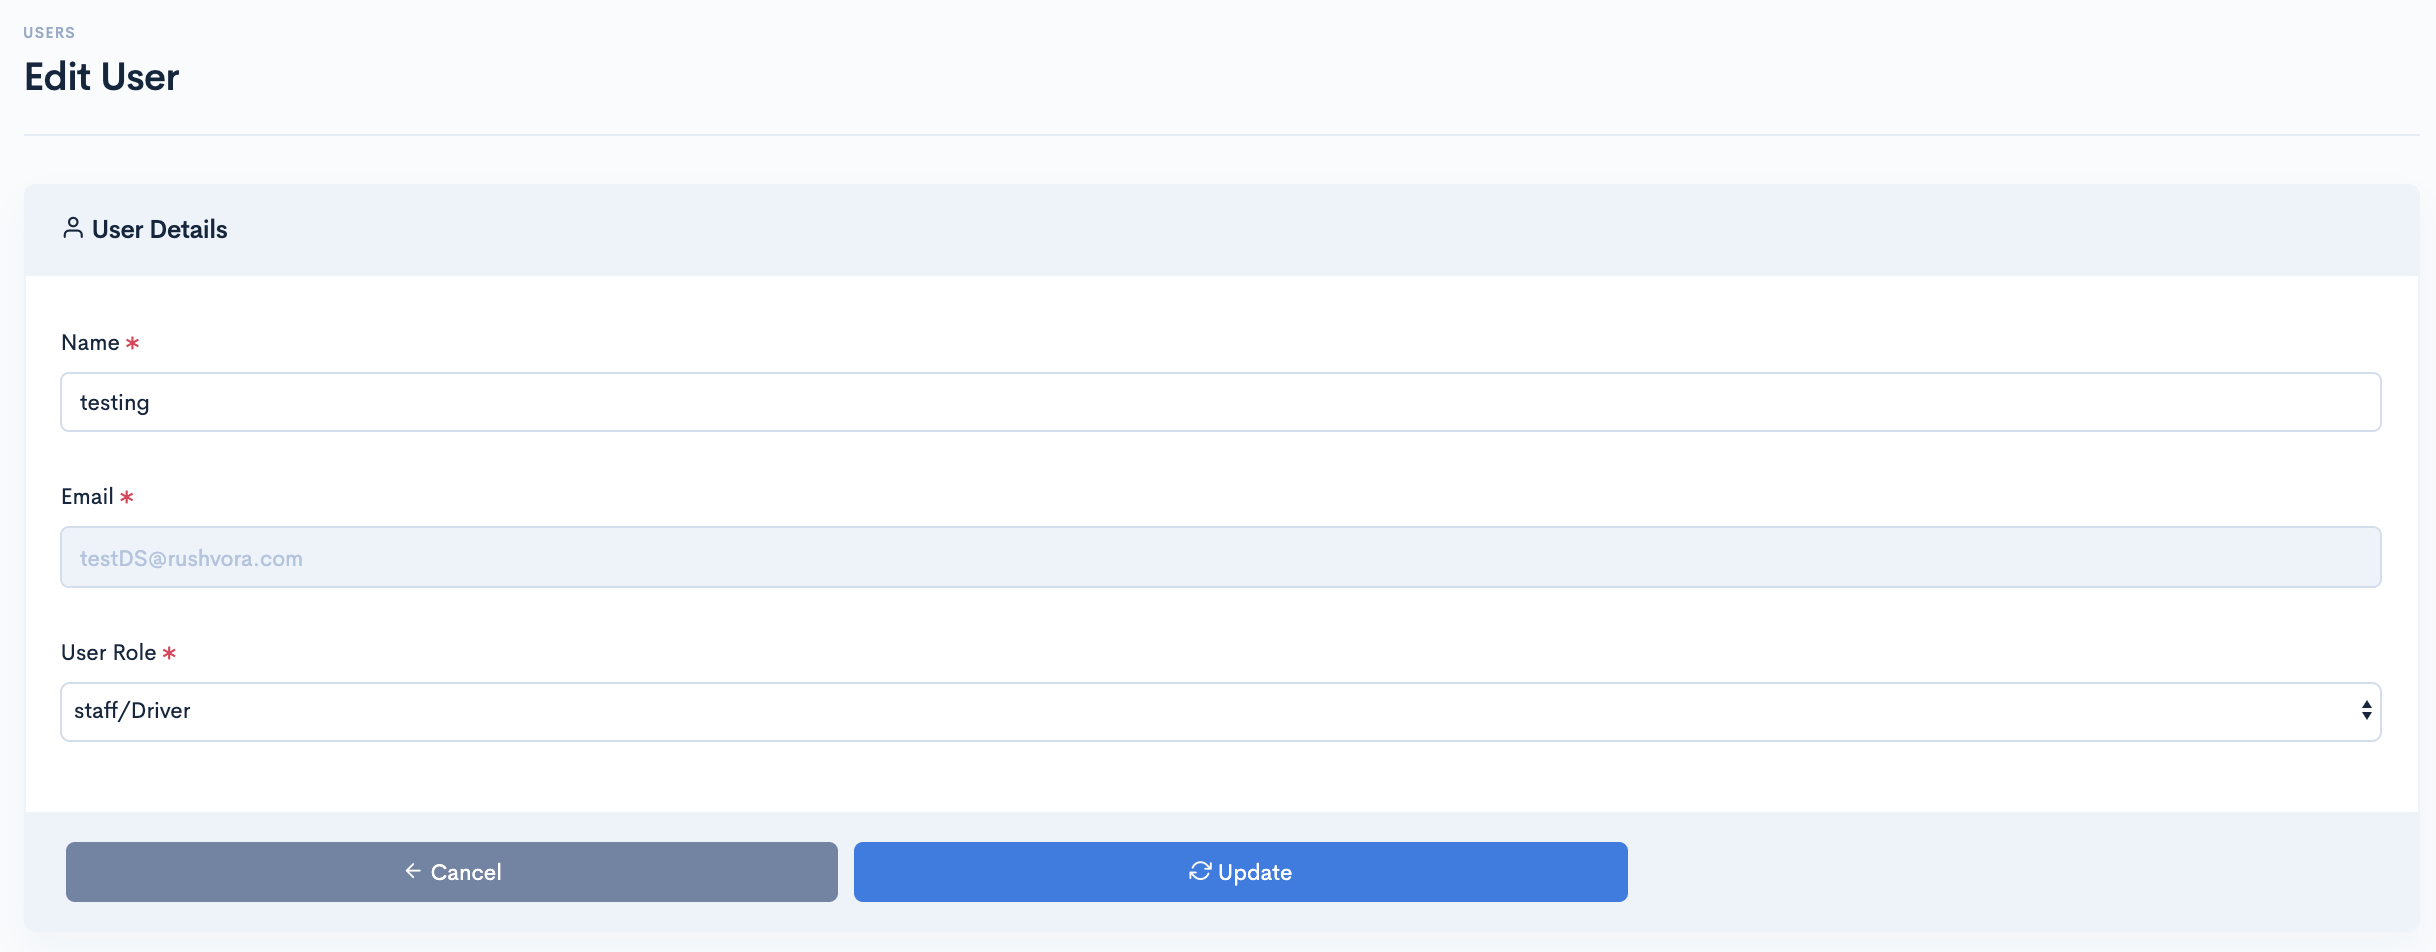
Delete User
Businesss can delete the existing users.
- After Successful login to Delivery Solutions page
- Click on the Users & Roles Tab from the left side panel
- Select Users under the Users & Roles
- You will see Users page opened in the right side of the panel as below
- Click on button against user name.
- A Popup window will open to seek confirmation as shown below.
- Click on Ok button to delete the User permanently.

Active Or Inactive User
Instead of deleting the user. Make the user inactive in just one click.
- After Successful login to Delivery Solutions page
- Click on the Users & Roles Tab from the left side panel
- Select Users under the Users & Roles
- You will see Users page opened in the right side of the panel as below
- If the User is Inactive, the toggle button of the User will look like this
- Swipe Right Toggle button to make the User Enable
- A Popup window will open to seek confirmation as shown below.
- The Active User icon will look like this

- After Successful login to Delivery Solutions page
- Click on the Users & Roles Tab from the left side panel
- Select Users under the Users & Roles
- You will see Users page opened in the right side of the panel as below
- If the User is active, the toggle button of the User will look like this
- Swipe left Toggle button to make the User Disable
- A Popup window will open to seek confirmation as shown below.
- The Active User icon will look like this

Table Of Content
Users & Roles
Role Templates
There are various role templates already available in DS which can be utilised by Account Managers.
Below are the role templates created in Delivery Solutions.
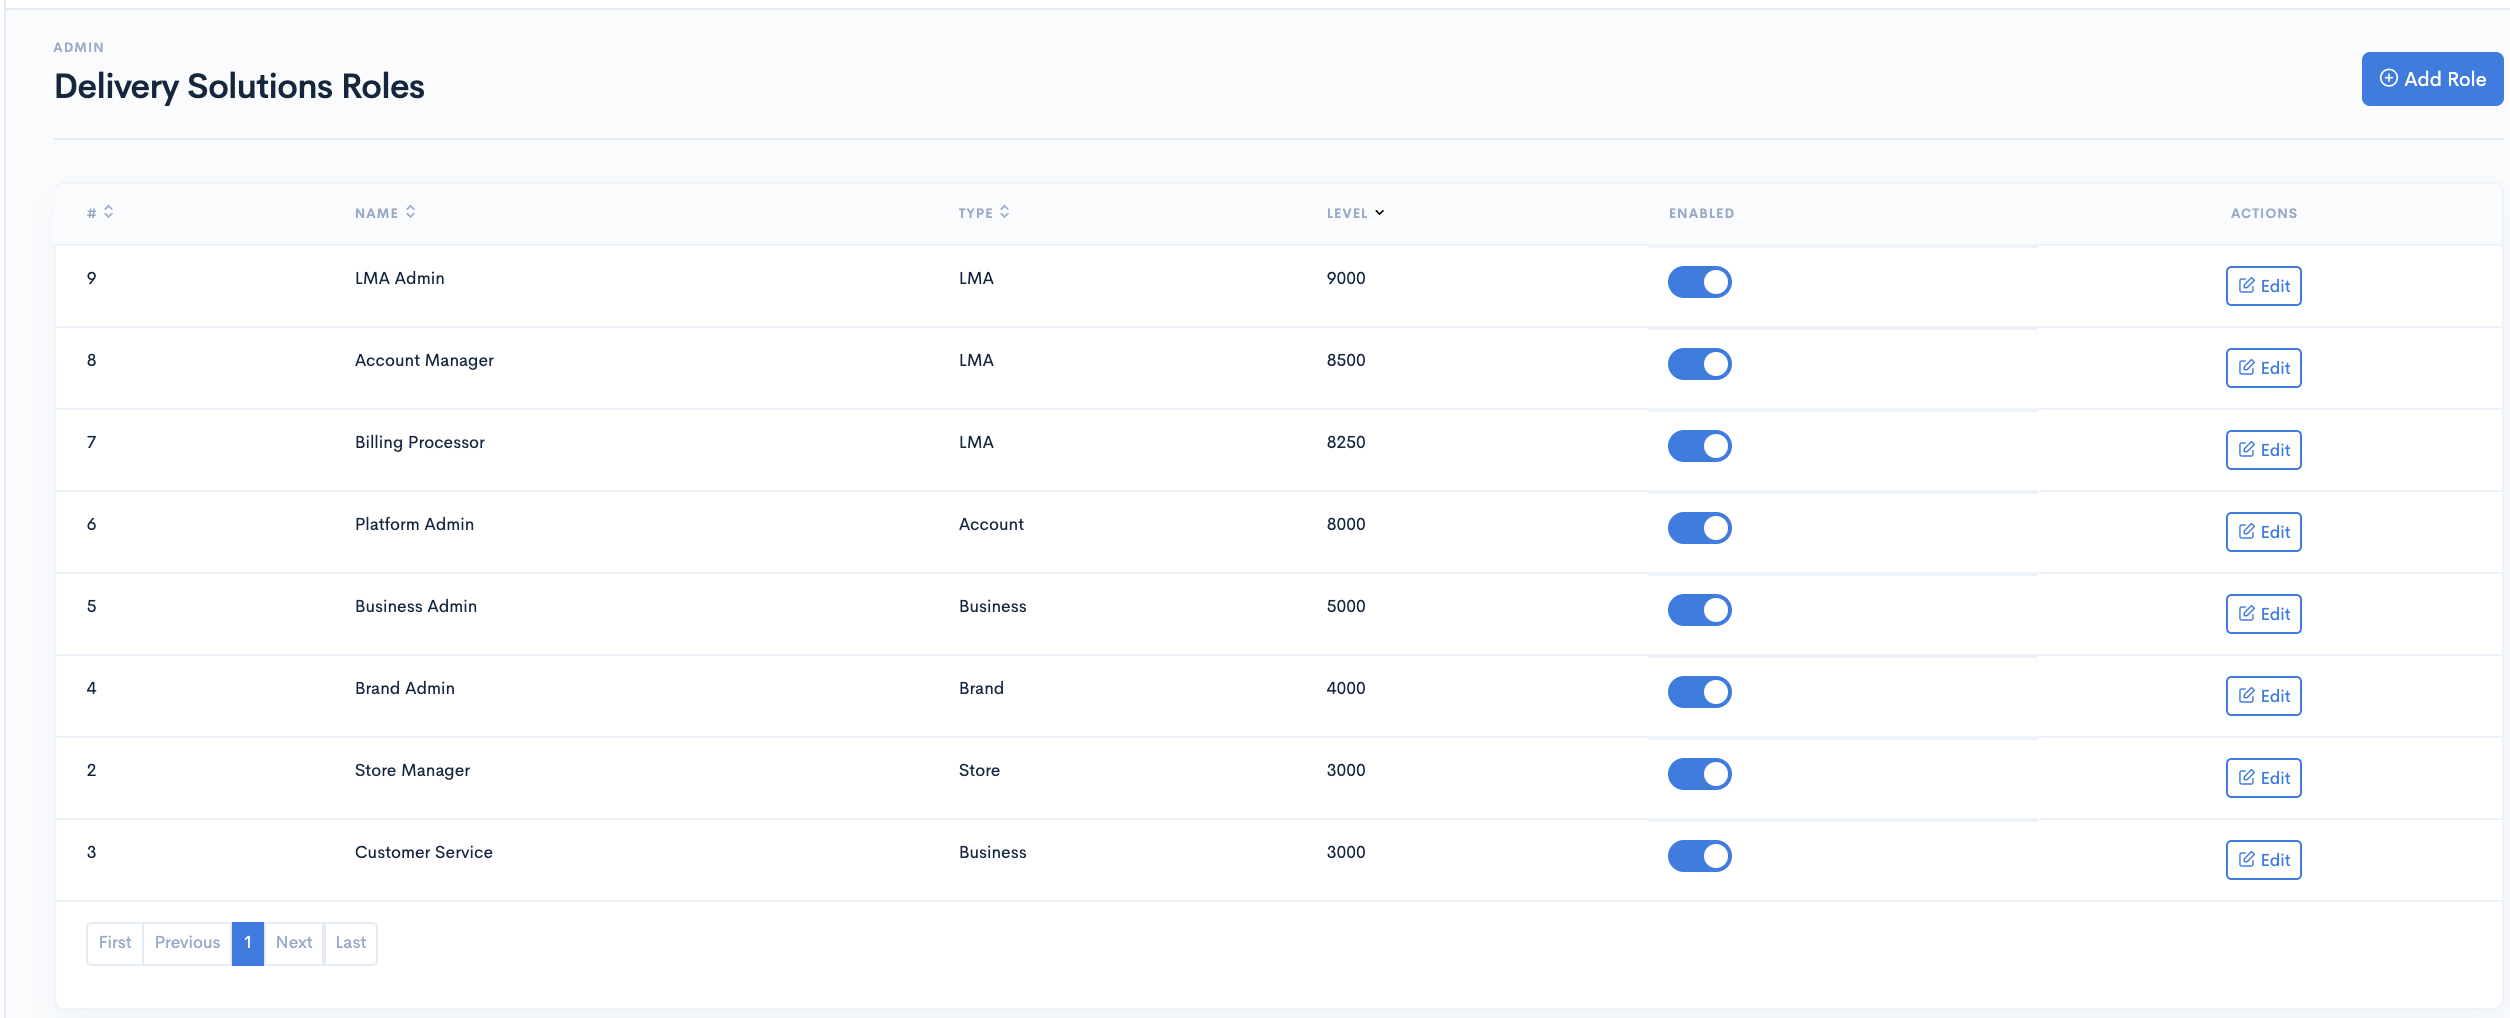
Account Manager
Account Manager can handle multiple businesses under this role. This role has the highest level of permissions.
Account Manager has access to all Business APIs. Thus He/She needs to mentioned AccountID (Tenant ID) of business at the time of creating store or order under the business.
Below are the default permissions given to the Account Manager

Billng Processor
Billing Processor has a similar level of access as Account Manager. Billing Processor can view and Edit the businesses created by Account Manager
Below are the default permissions given to the Billing Processor
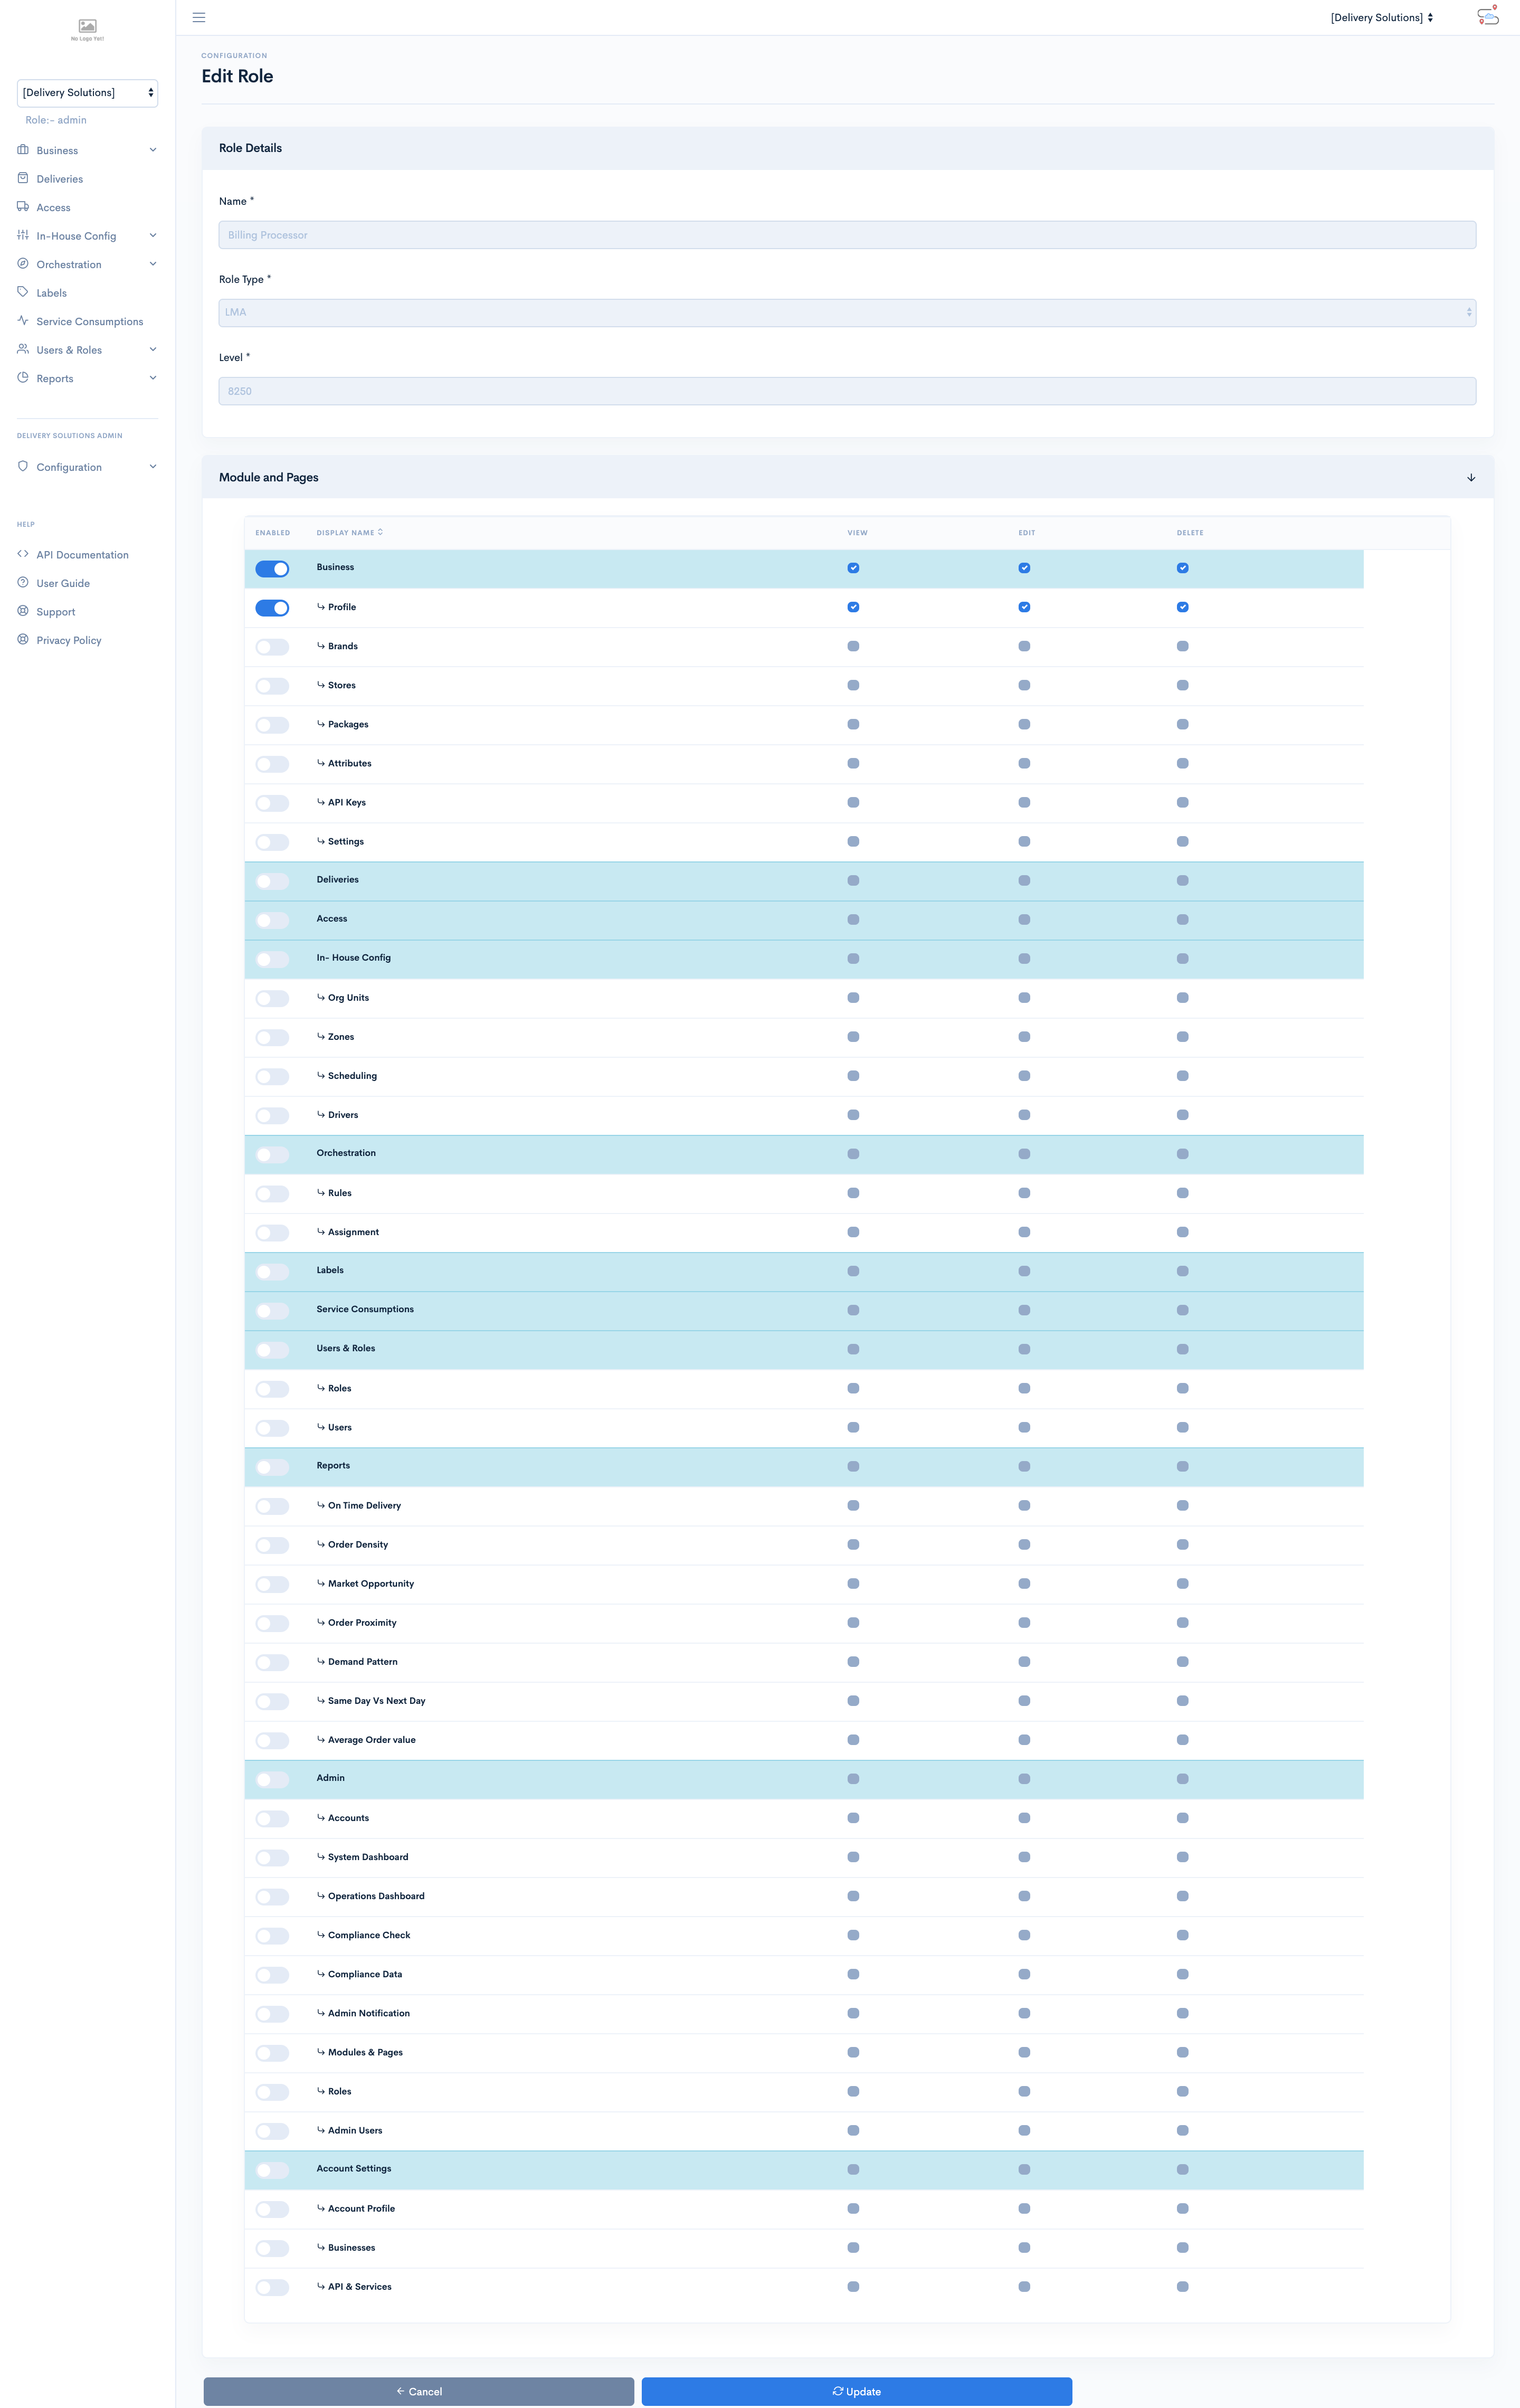
Platform Admin
Platform Admin has access to create and manage businesses under this role. Platform Admin can navigate to Account Settings, Businesses, Create Business pages and can modify the appropriate details.
Please note while creating business, Platform Admin can select for which modules he wants to give access to and for which modules he wants to restrict access for that particular business and users. By restricting access to particular modules, business users will not be able to utilize that module in their day to day activity, for example if Private Fleet module is restricted to any particular business, that business will not be able to use their own fleet of drivers to deliver orders through Delivery Solutions.
Below are the default permissions given to the Account Manager
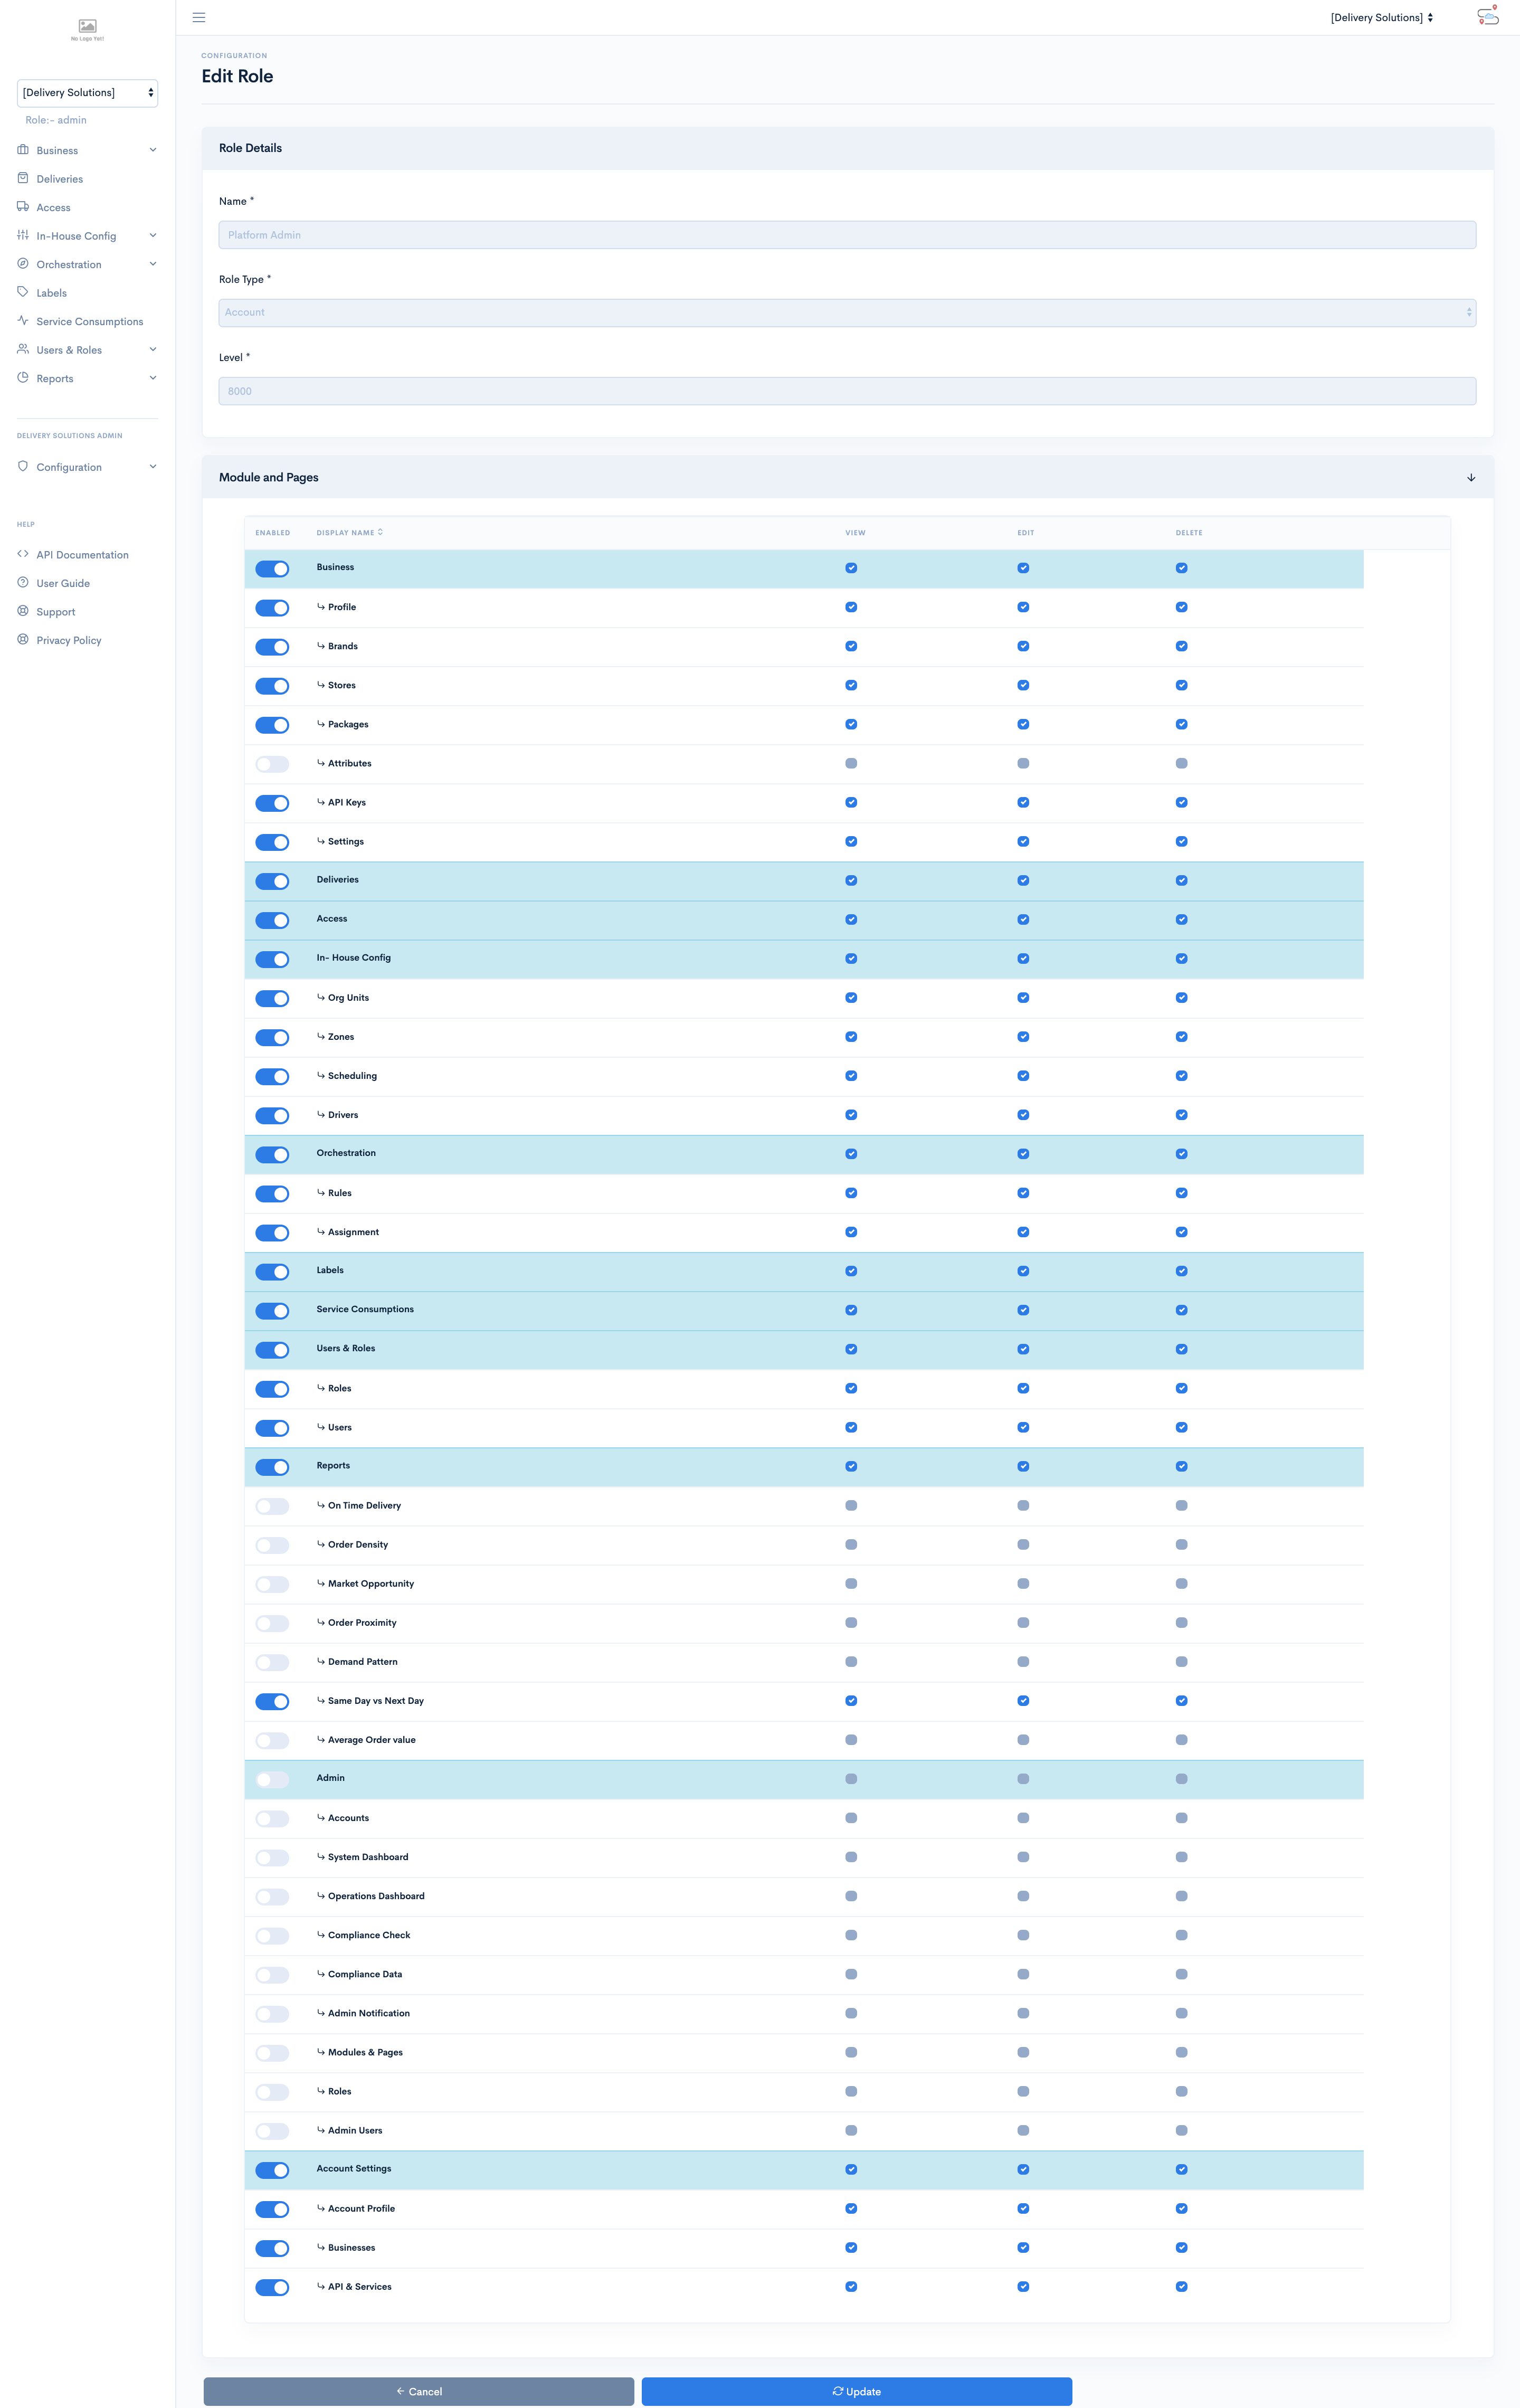
Business Admin
Business Admin can configure all business related modules which local to the business, He/She cannot modify other Business's brand, stores. He/She can also configure Brands, Stores, Automatic retries for failed orders in case of temporarily network failure at DSP
Below are the default permissions given to the Account Manager
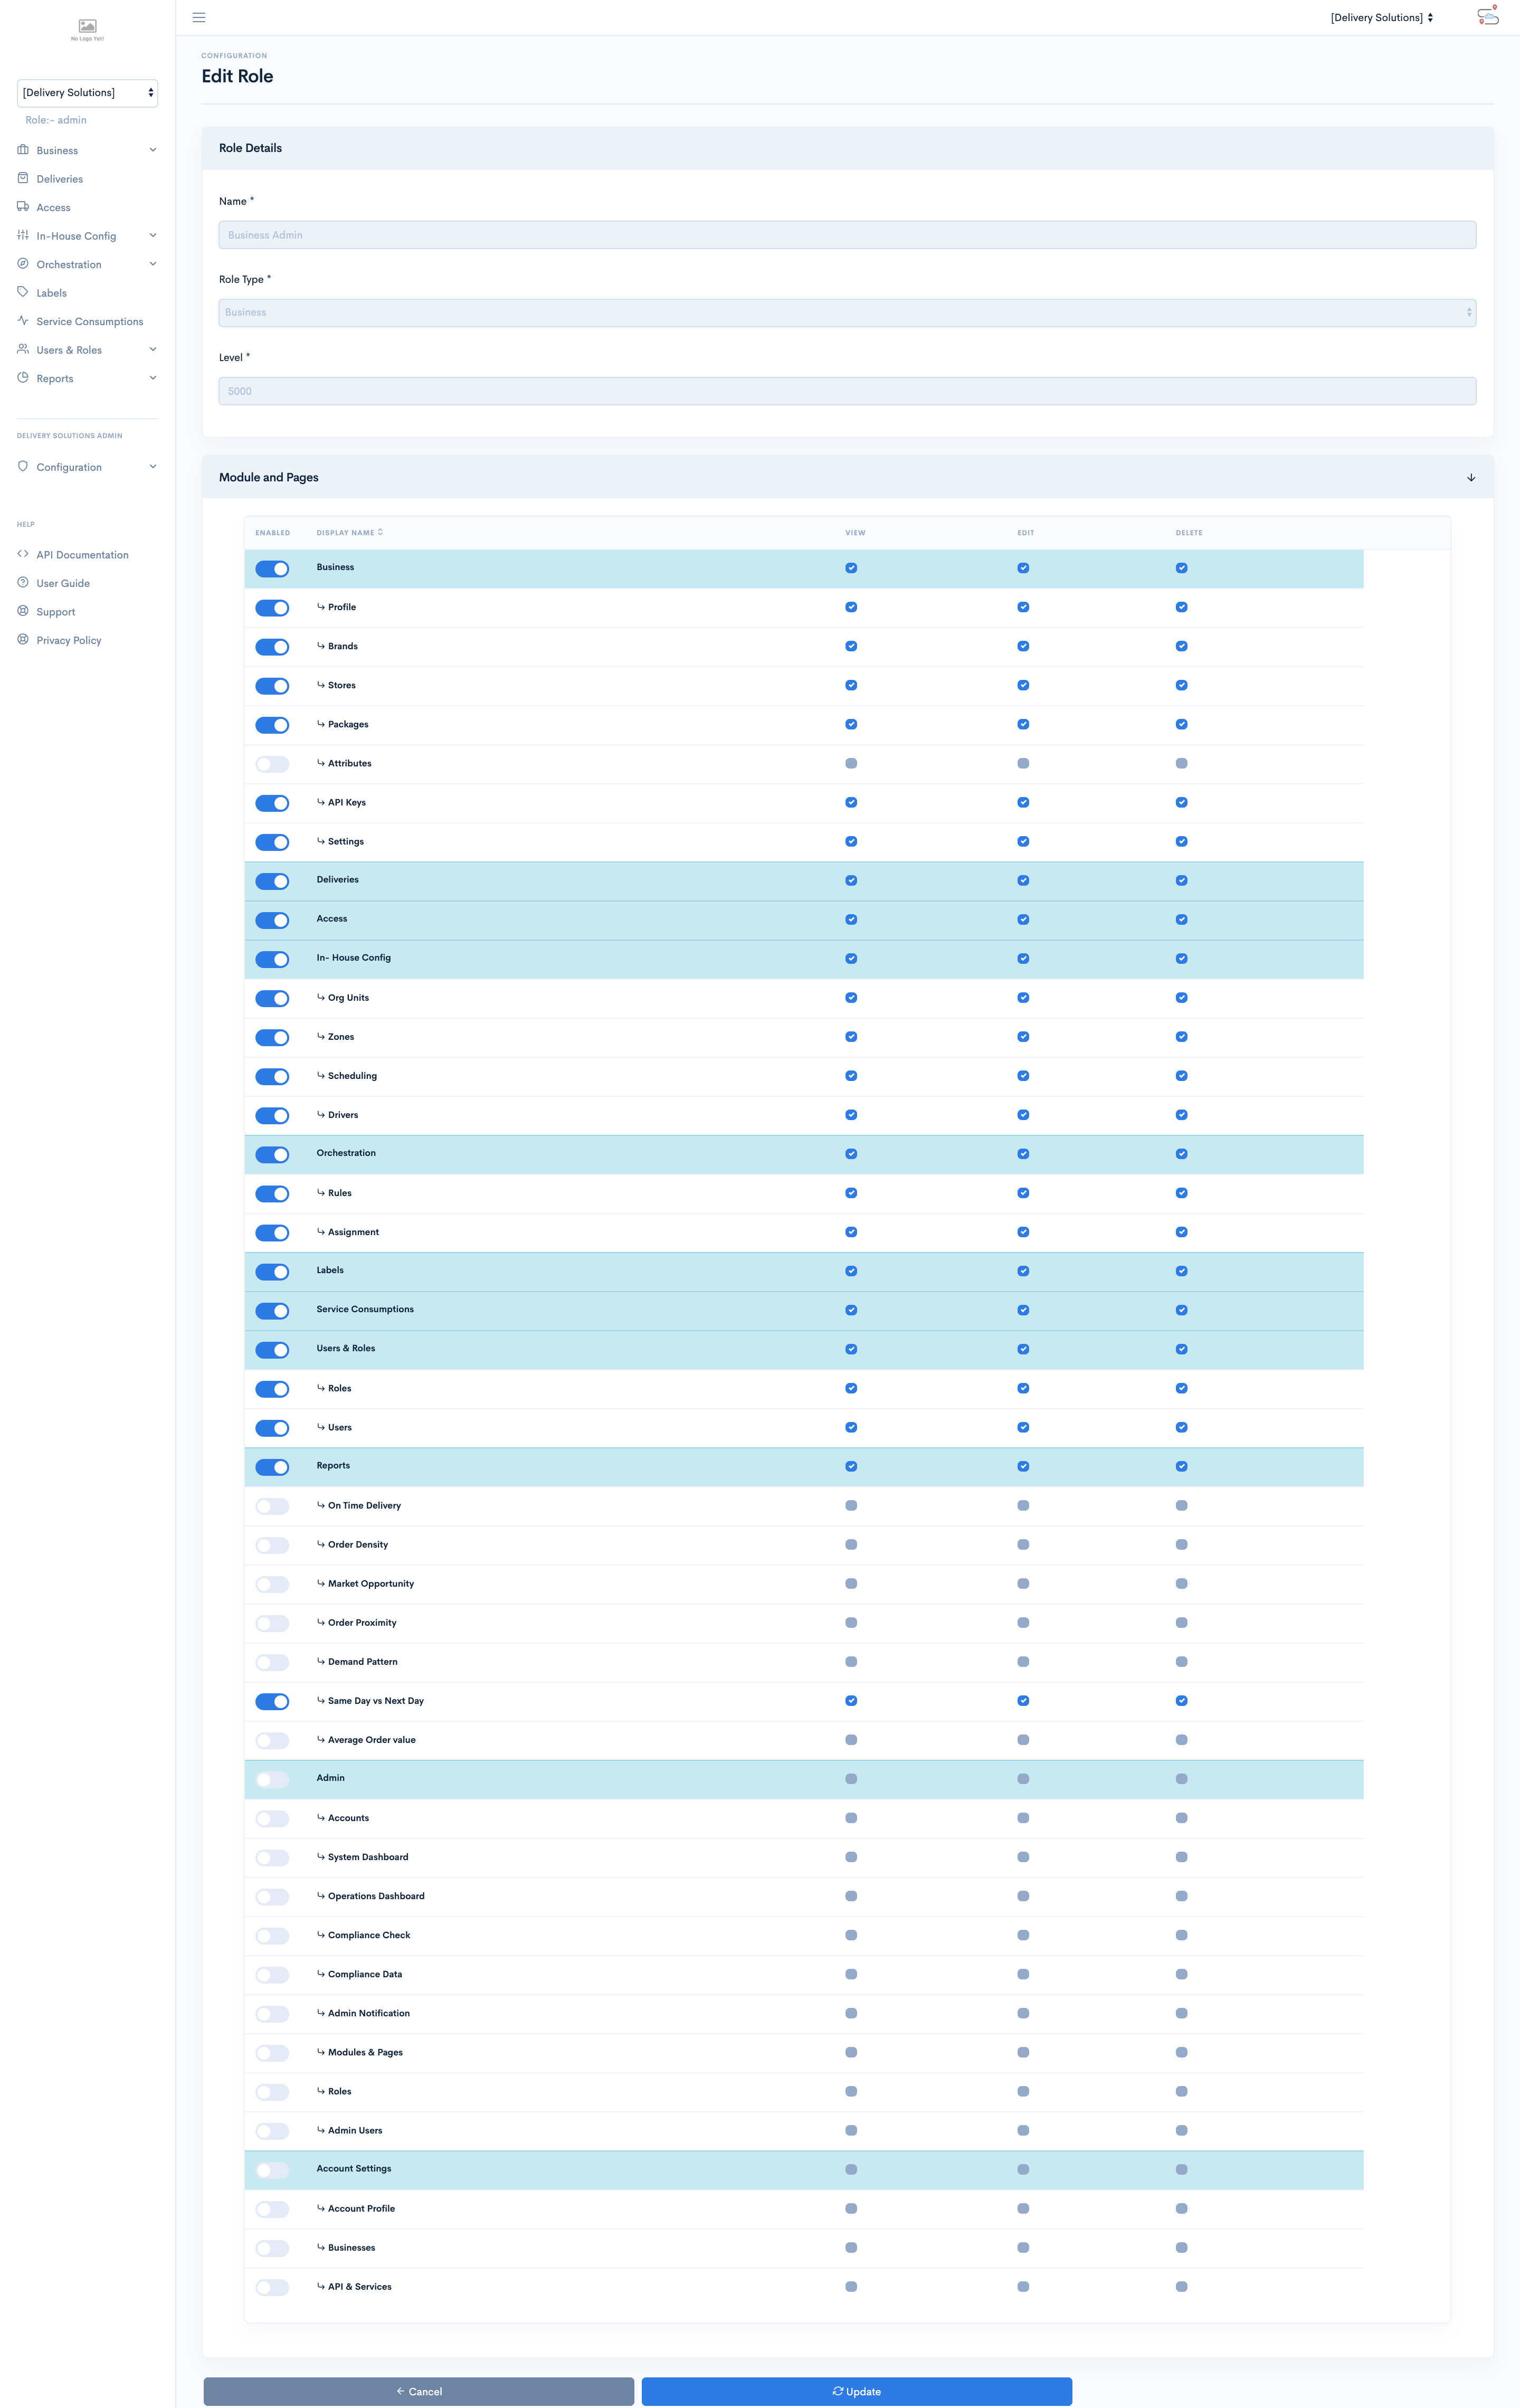
Brand Admin
Brand Admin has access to all stores, orders falling under the brand. Brand Admin cannot modify or view the orders pertaining to other Brands.
Below are the default permissions given to the Brand Admin

Store Manager
Store manager has access to only Stores pertaining to his account. Store Manager can only view the boundaries of other stores and can edit only stores pertaining to its account.
Below are the default permissions given to the Store Manager
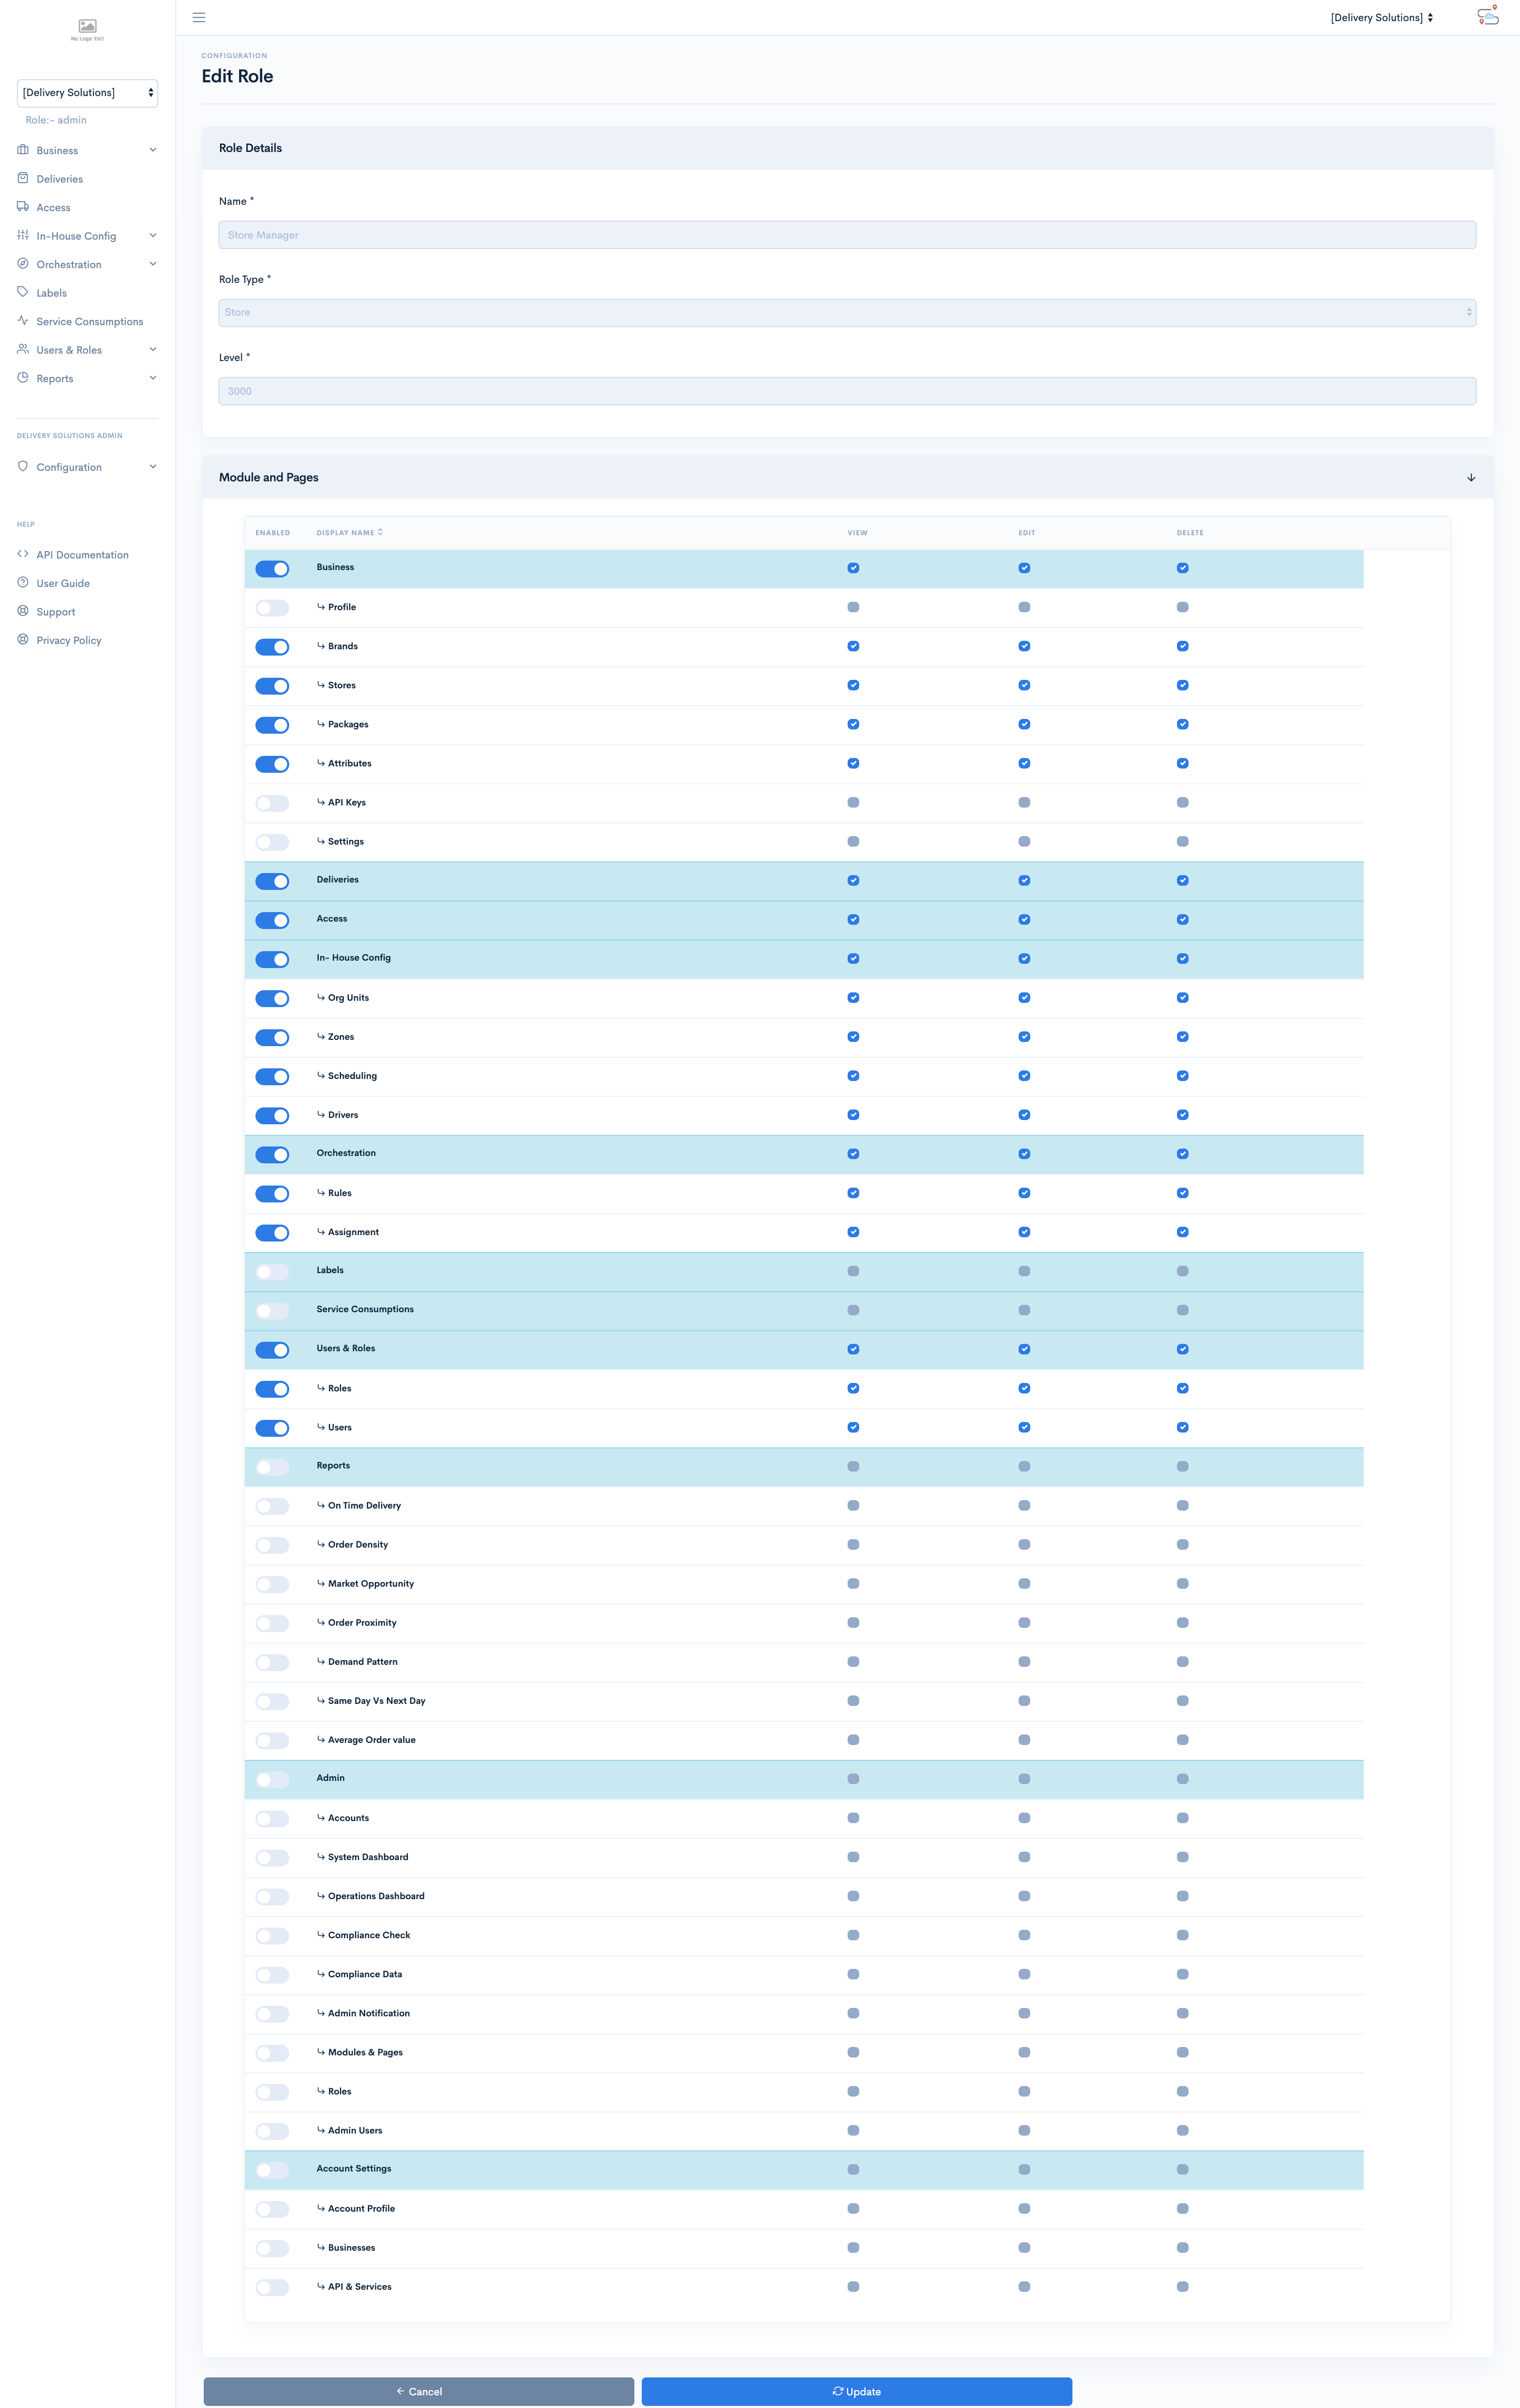
Customer Service
Customer Service manager has the minimum level of access to the modules and pages. Such Role has only access to view the modules and pages
Below are the default permissions given to the Customer Service.
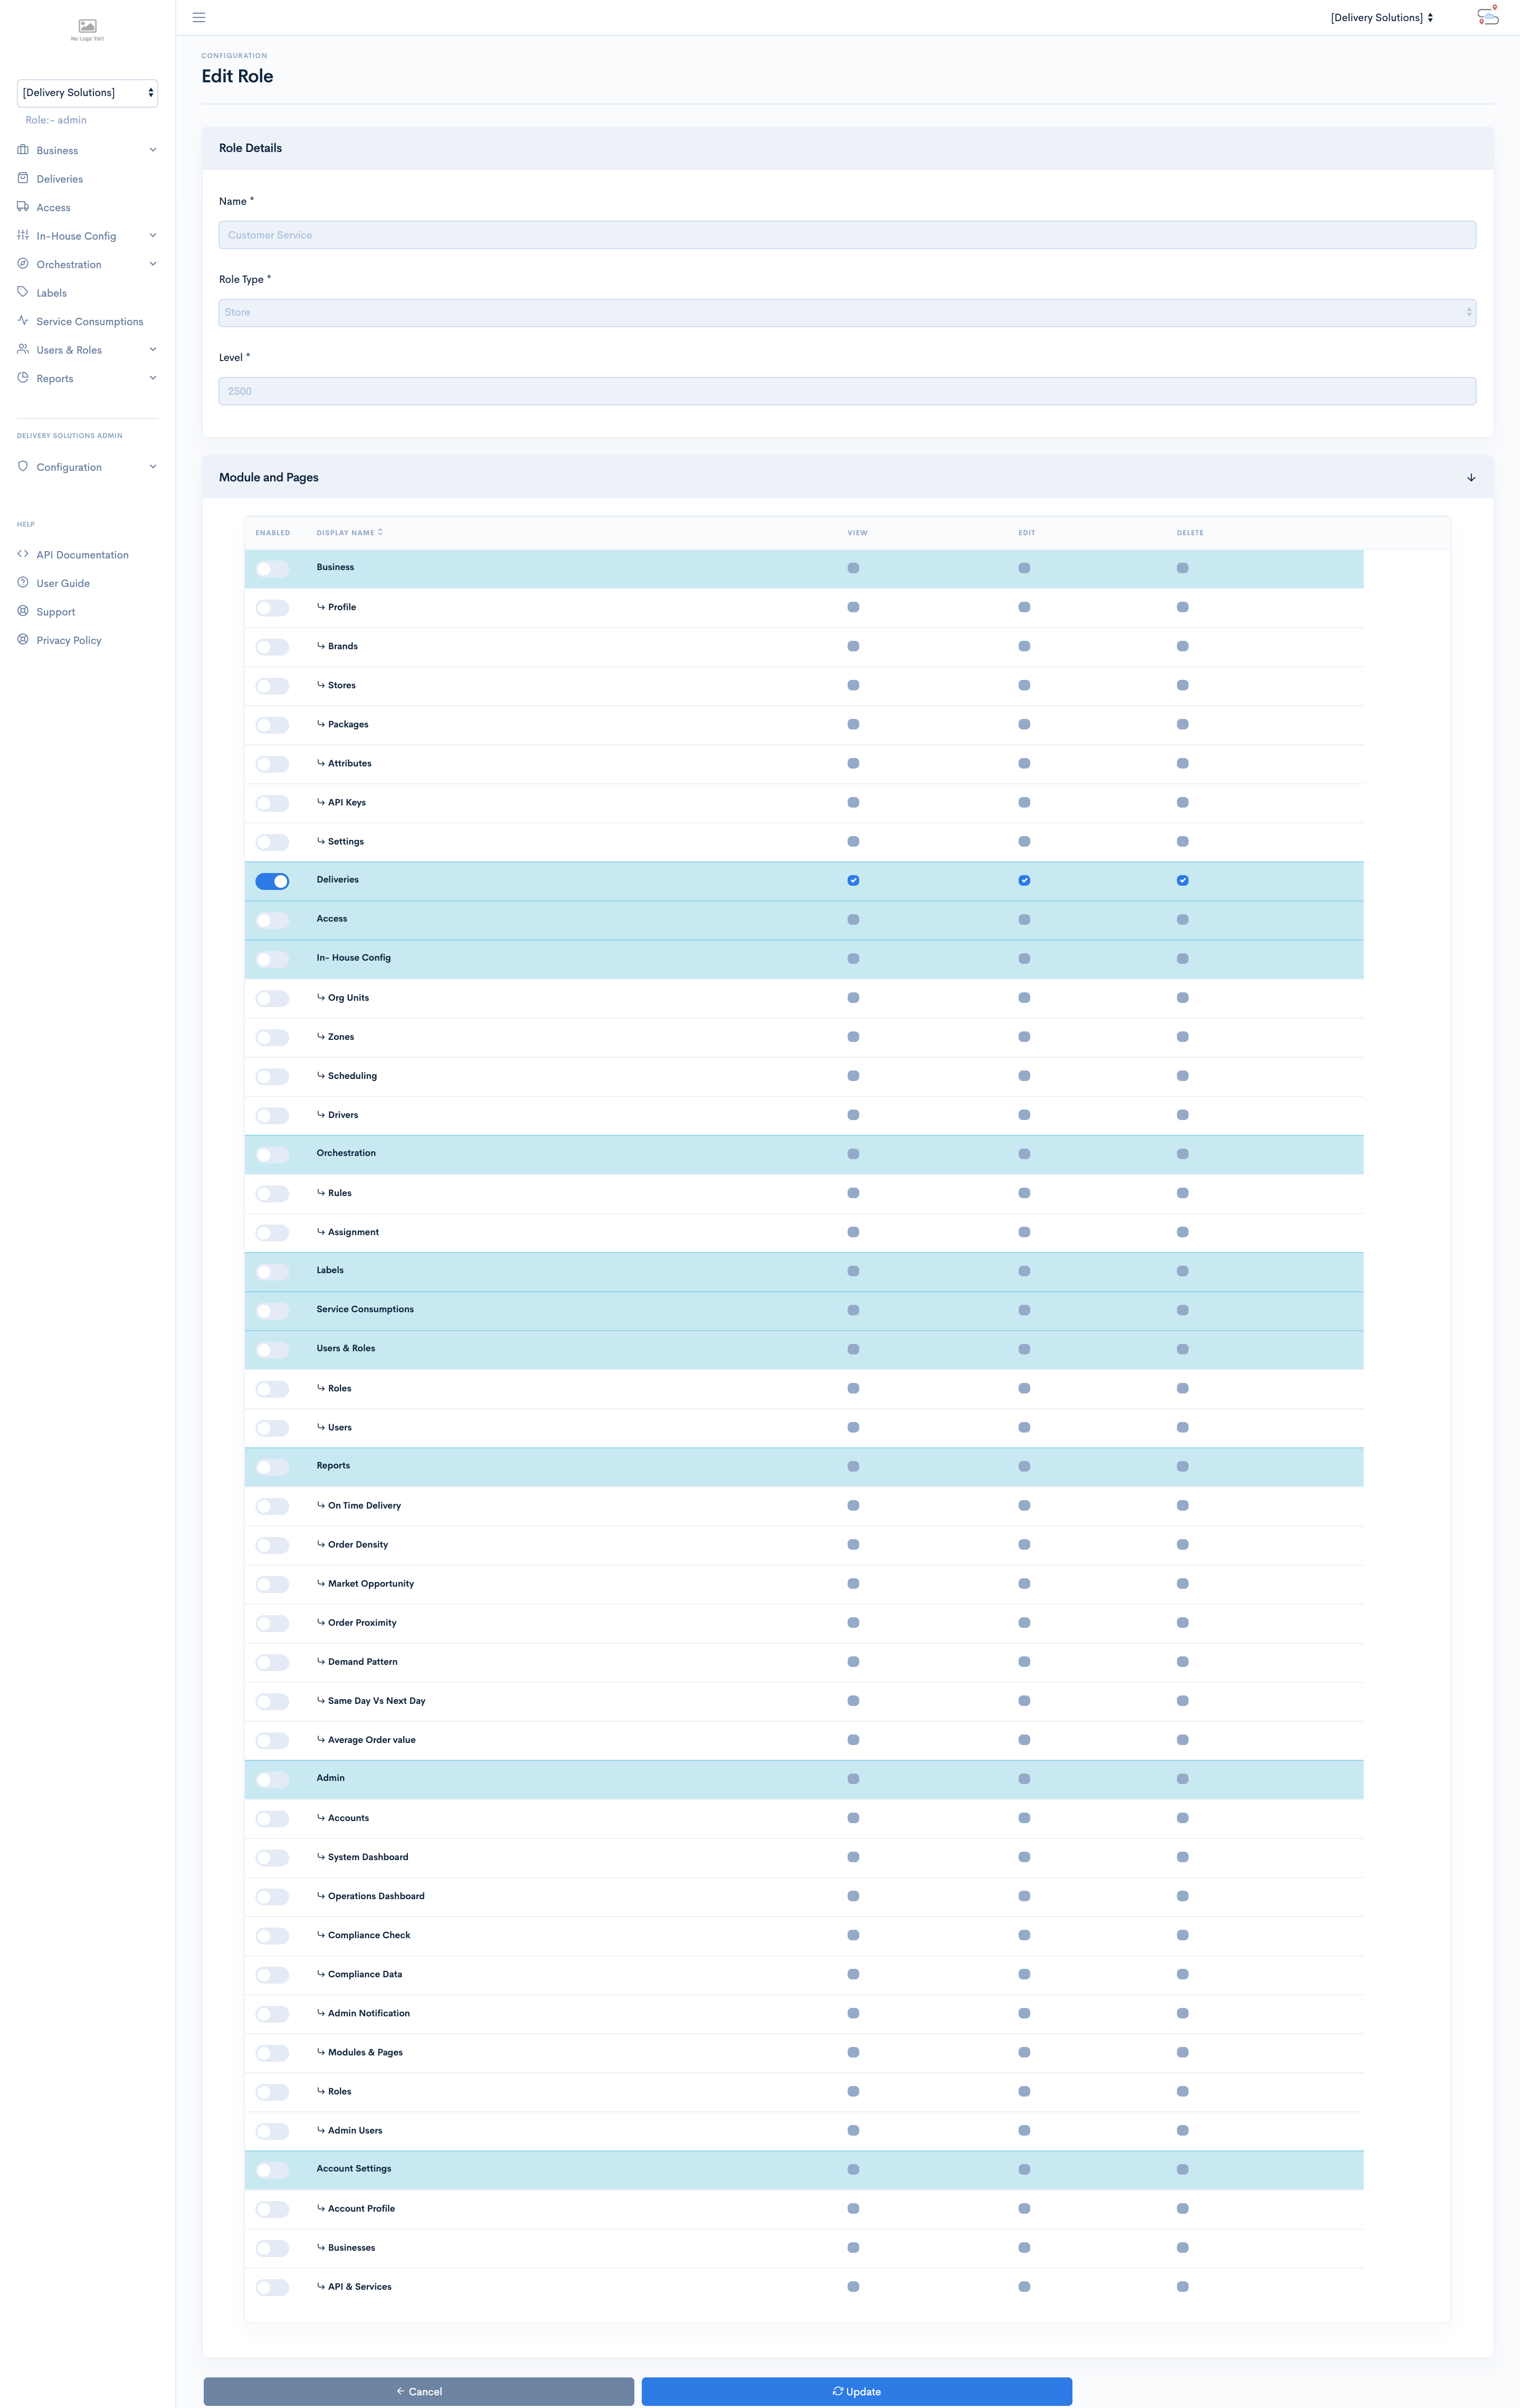
Reports
Delivery Solutions allows to generate various reports to summarize a large dataset in visual form. This will help Businesss to clarify the trends, estimate the key values at a glance and permits a visual check of the accuracy and reasonableness of calculations.
All the reports can be generated based on the key filters provided in the filter tab.
This is how the filter tab looks like on all the reports.
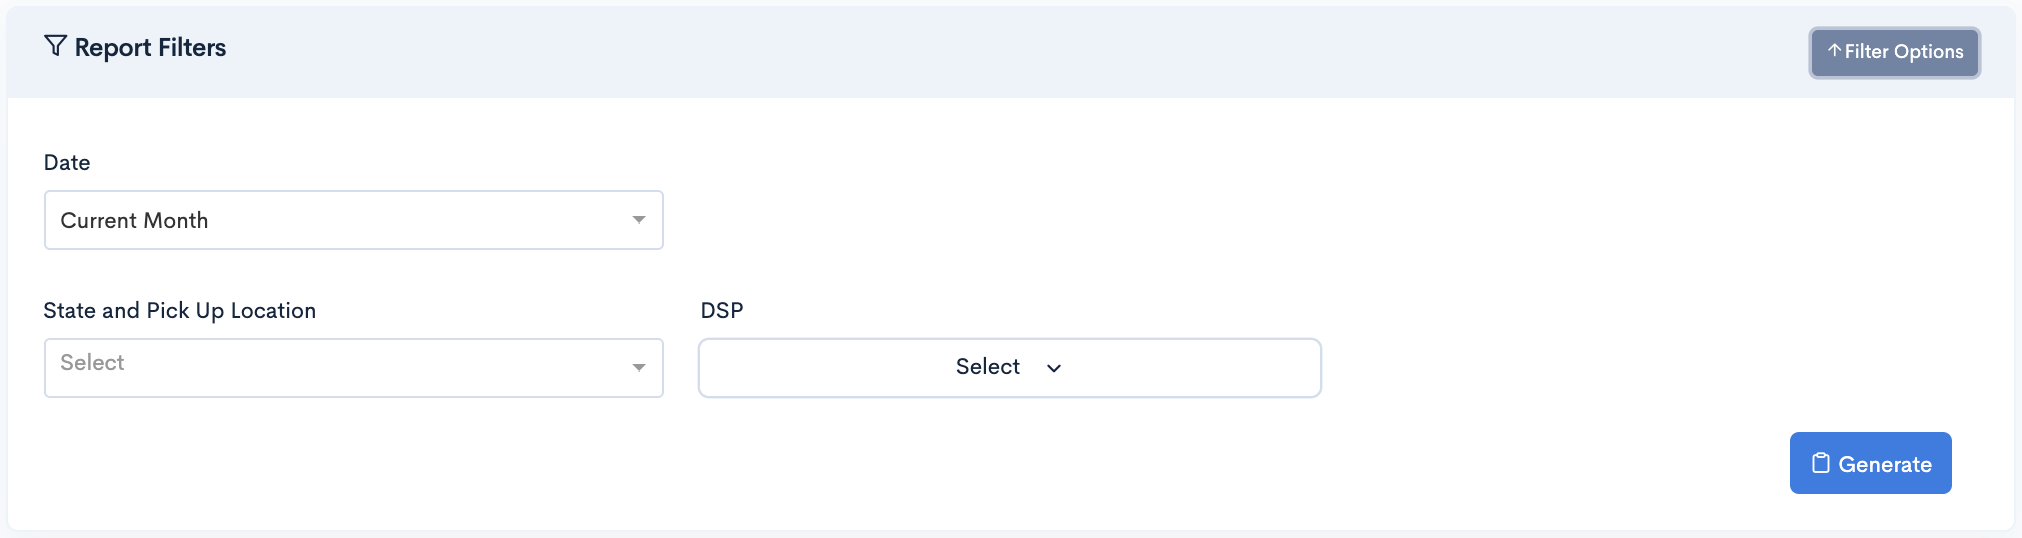
The Filters contains below fields on which reports can be generated
| Field Name | Description |
|---|---|
| Date | Date filter allows you to generate reports based on the below criteria: Last 7 Days Current Month Date Range List of Months other than current month |
| State | List of States where Store and Order lies. |
| DSP | Orders with DSPs which Business has configured for order delivery. |
On Time Delivery Report
On Time Delivery Report shows the average delivery time between the DSP and delivery addresses in Percentage. The On Time report presents the data in form of Mean Graph where central value is the average of delivery time.
The Higher the mean central value, the more the order delivery on time. Filters of the report allows you to generate the report based on the month, State and Store and DSP.
Select the DSP name in the Report to remove its data from the graph.
This is how the report looks like.
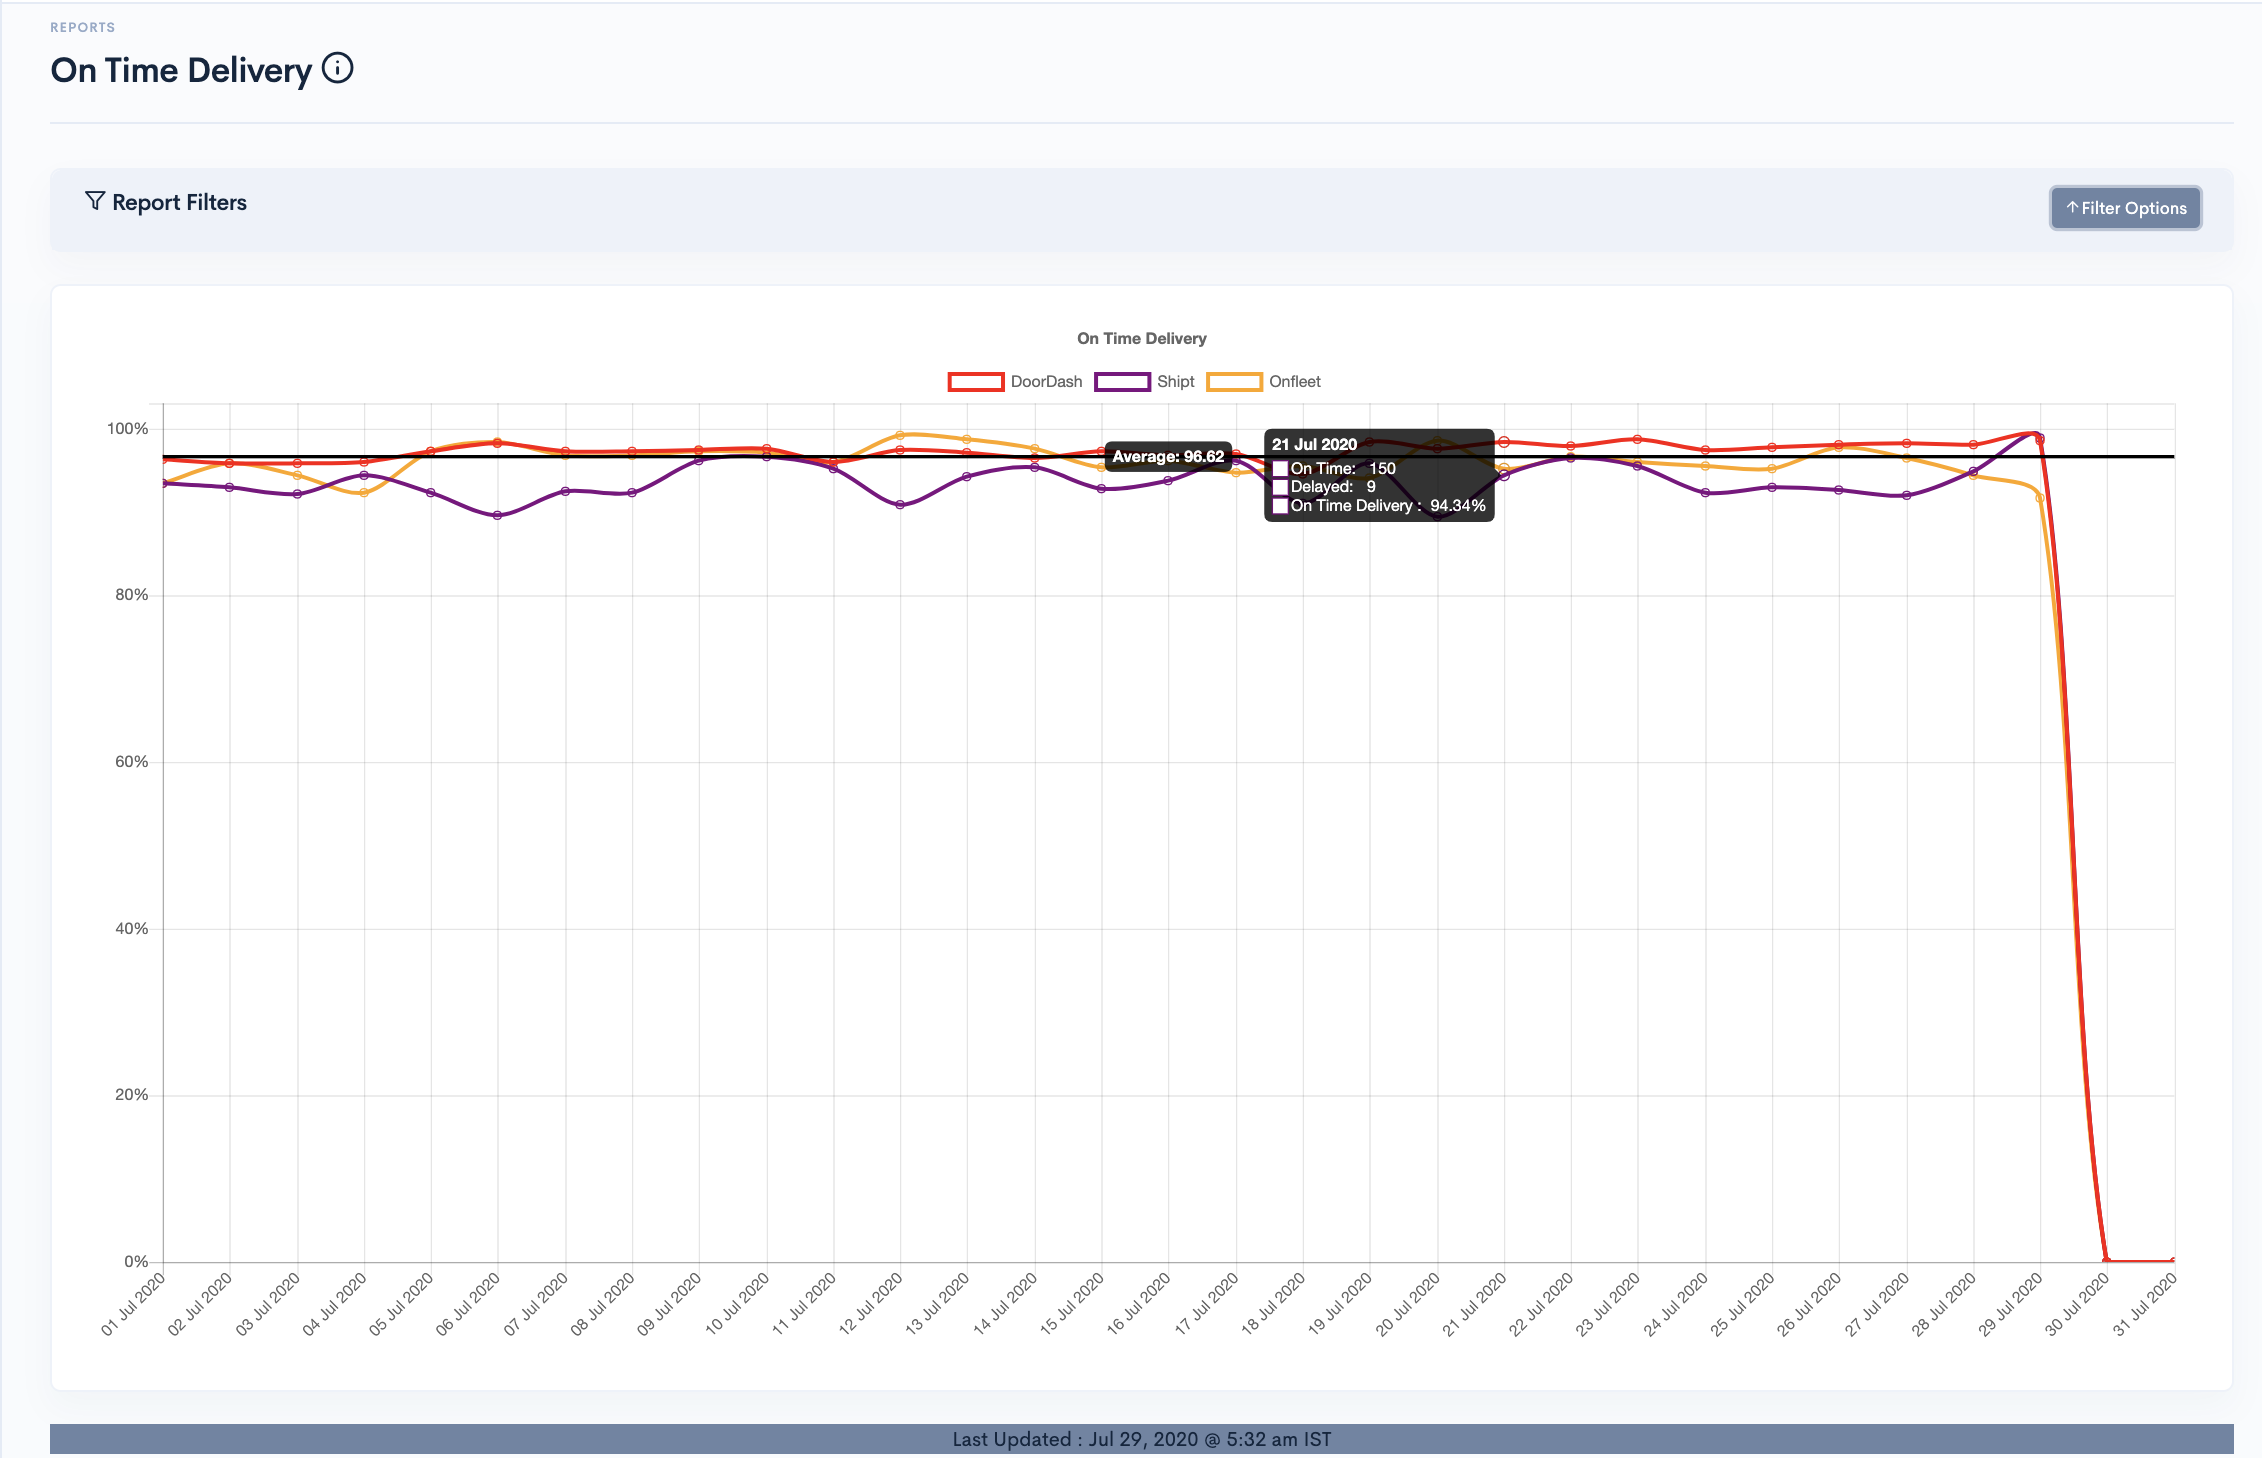
Order Density Report
Order Density Report shows the data for regions where DSPs were able to deliver the order successfully. The density data are plotted on the map with store markers and their respective boundaries where orders were delivered successfully by DSPs
Filters of the report allows you to generate the report based on the month, State and Store and DSP. The available checkboxes above the map can be helpful to omit boundaries and stores upon deselection.
This is how the report looks like.
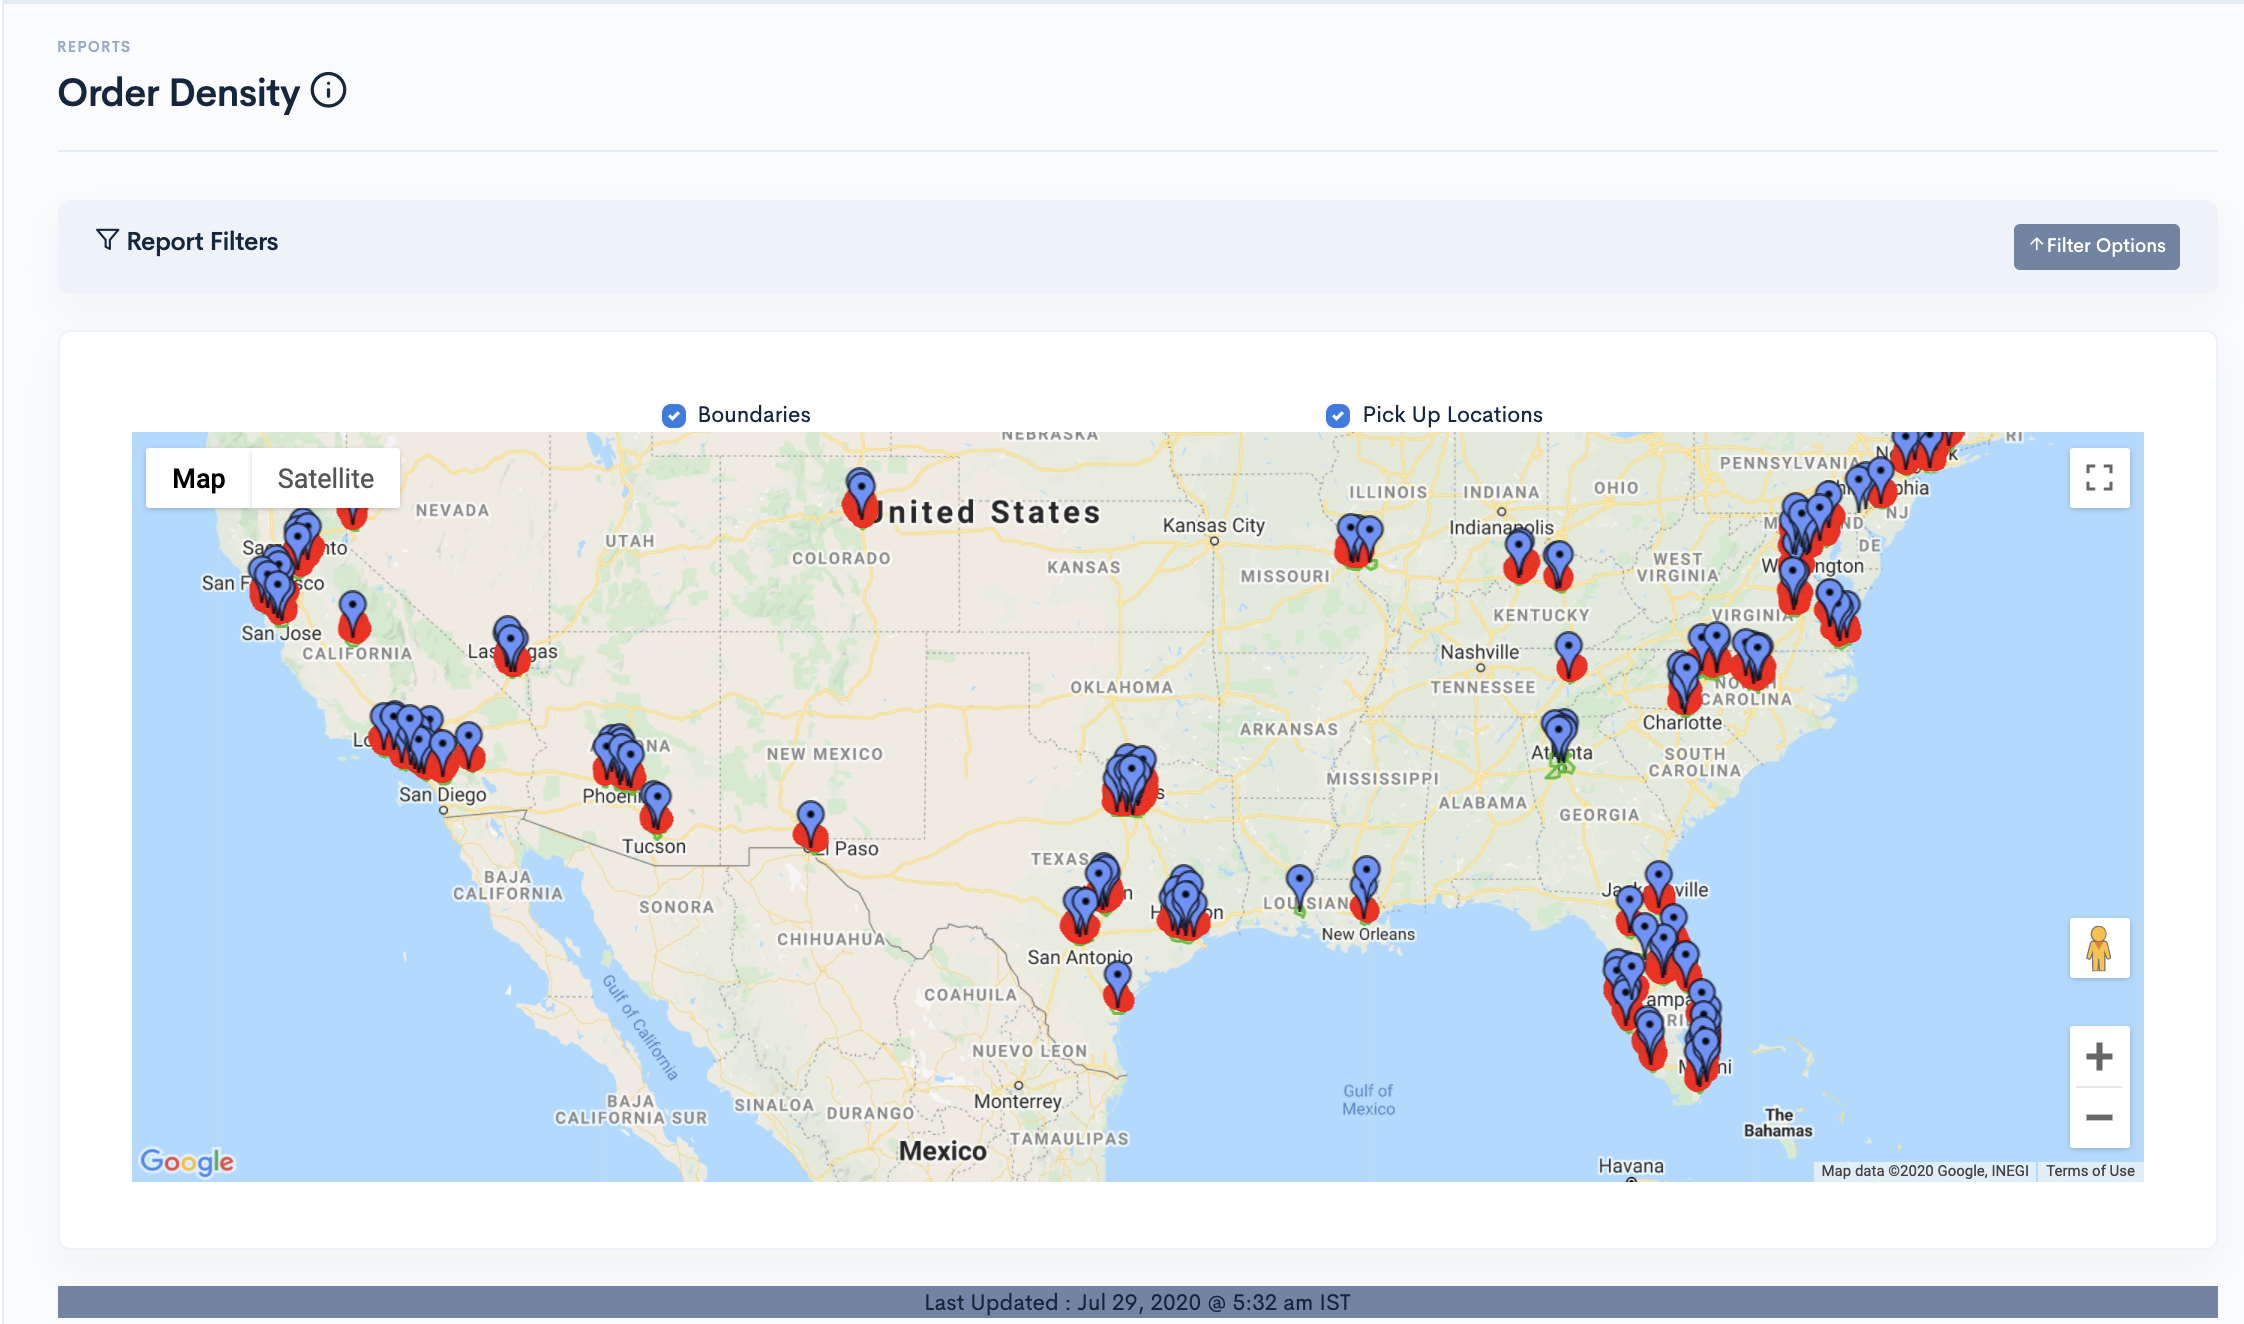
Market Opportunity
Market Opportunity Reports shows the addresses from where the order requests came but the location is out of DSP and Store coverage. The data are shown in form of heat diagram having red and orange dots as a markers. Red dots indicates the addresses which are out of Store and DSP coverage. Orange dots indicates the addresses which are in Store boundary but not in DSP coverage area.
Filters of the report allows you to generate the report based on the month, State and Store and DSP. The available checkboxes above the map can be helpful to omit boundaries and stores upon deselection.
This is how the report looks like.
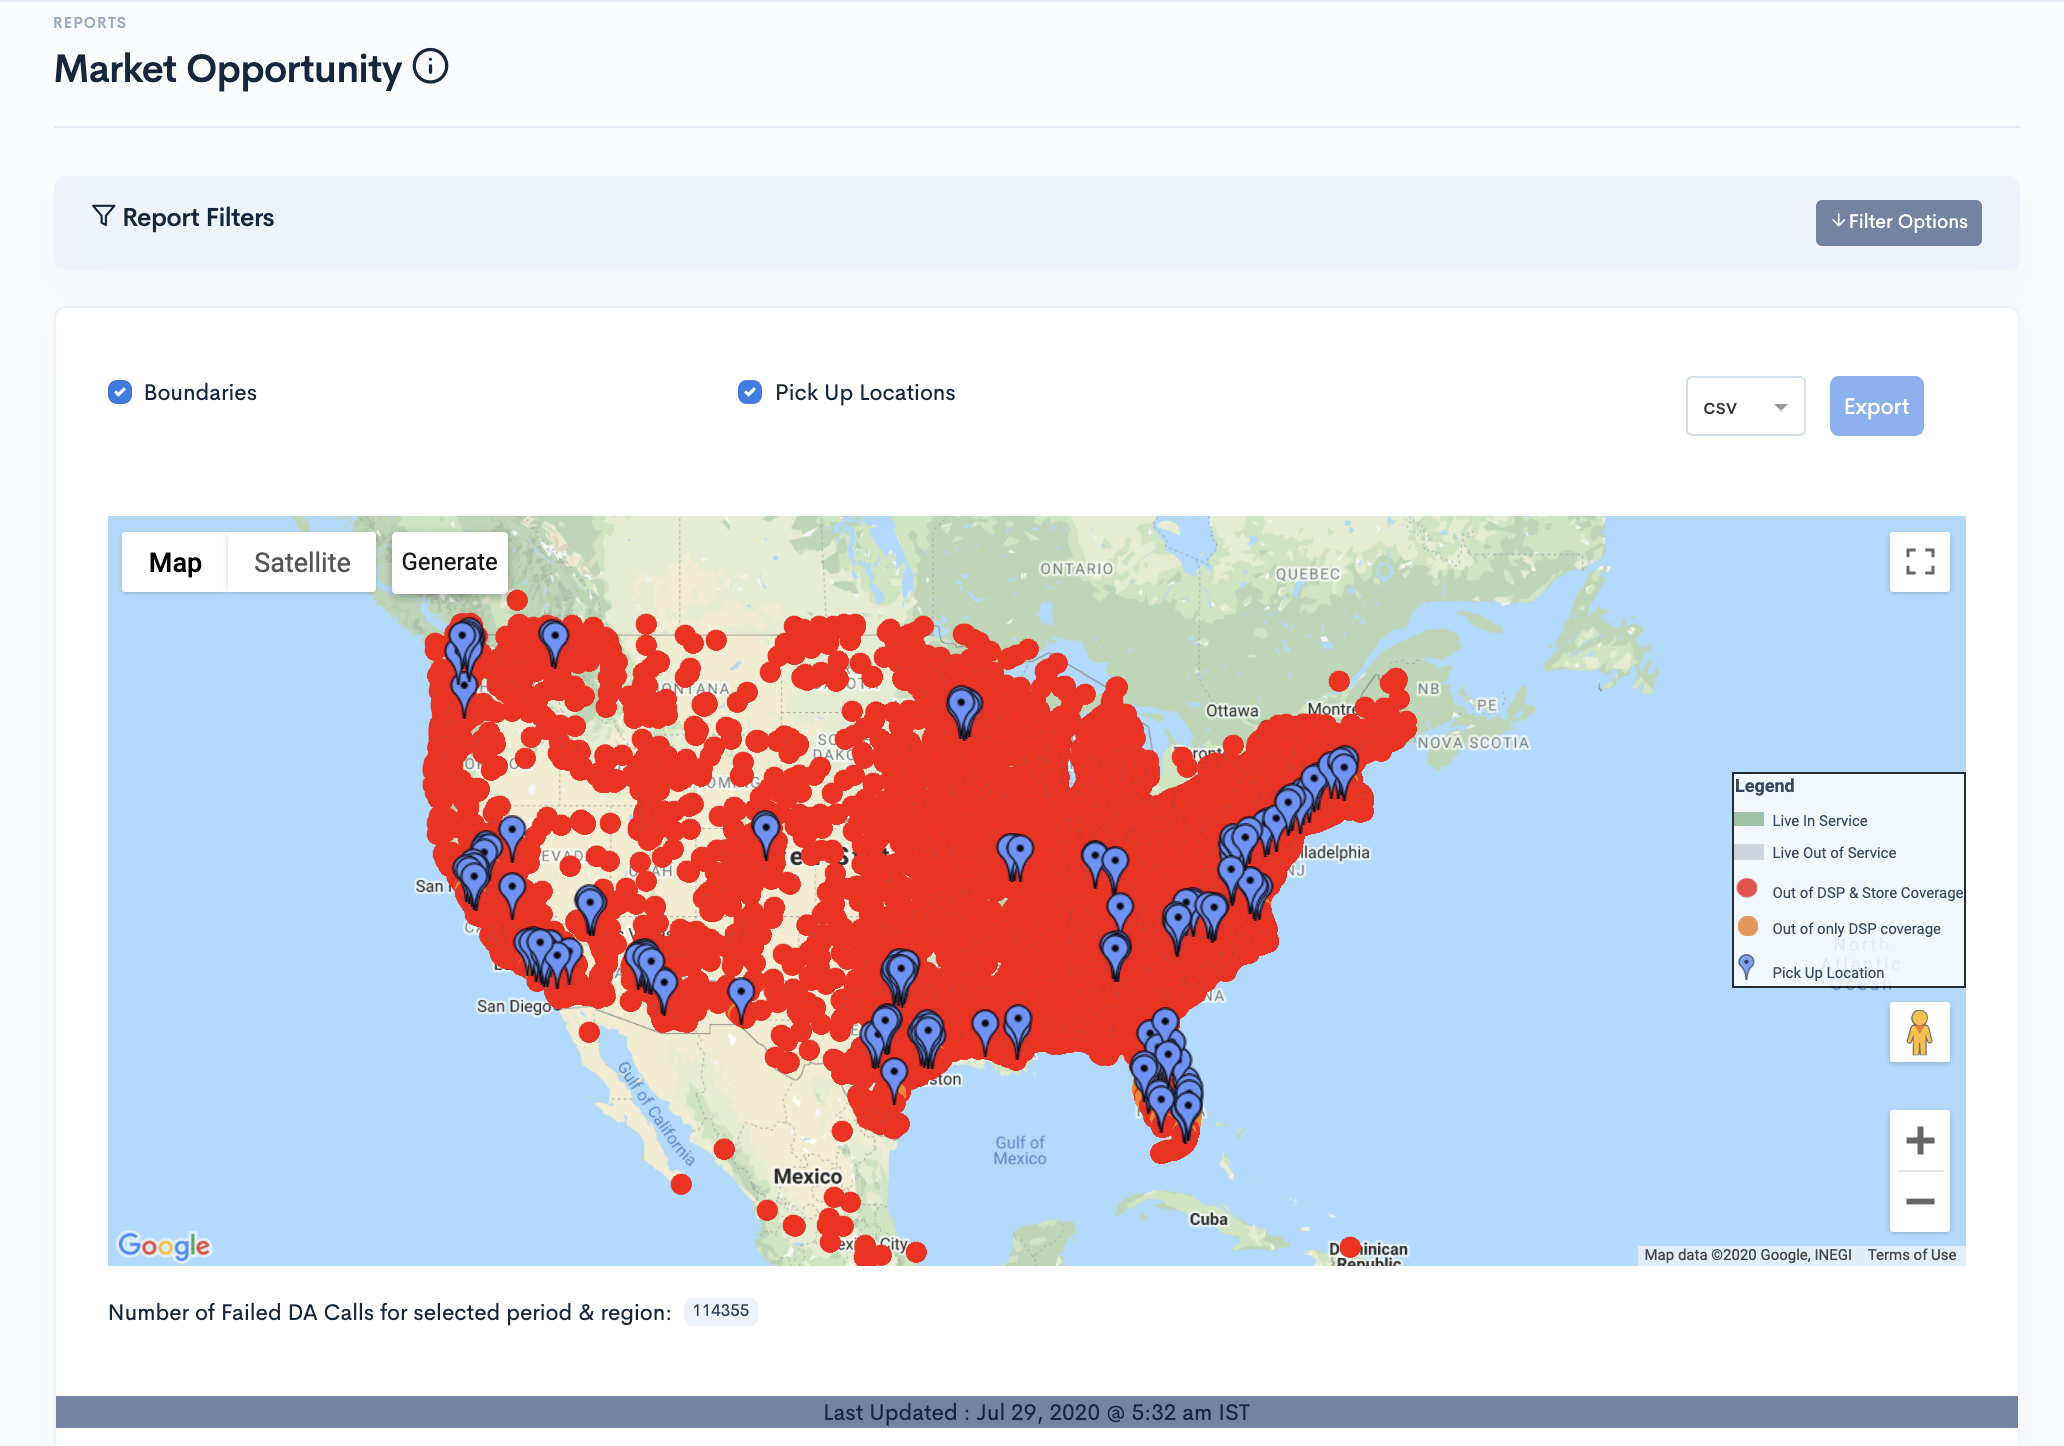
Order Proximity Report
Order Proximity Report shows the average distance between the stores and customer addresses in Miles. The Proximity report presents the data with rectangular bars with heights or lengths proportional to the values that they represent.
The Higher the bar, the higher the amount of distance of delivery addresses from the store. Filters of the report allows you to generate the report based on the month, State and Store and DSP.
This is how the report looks like.
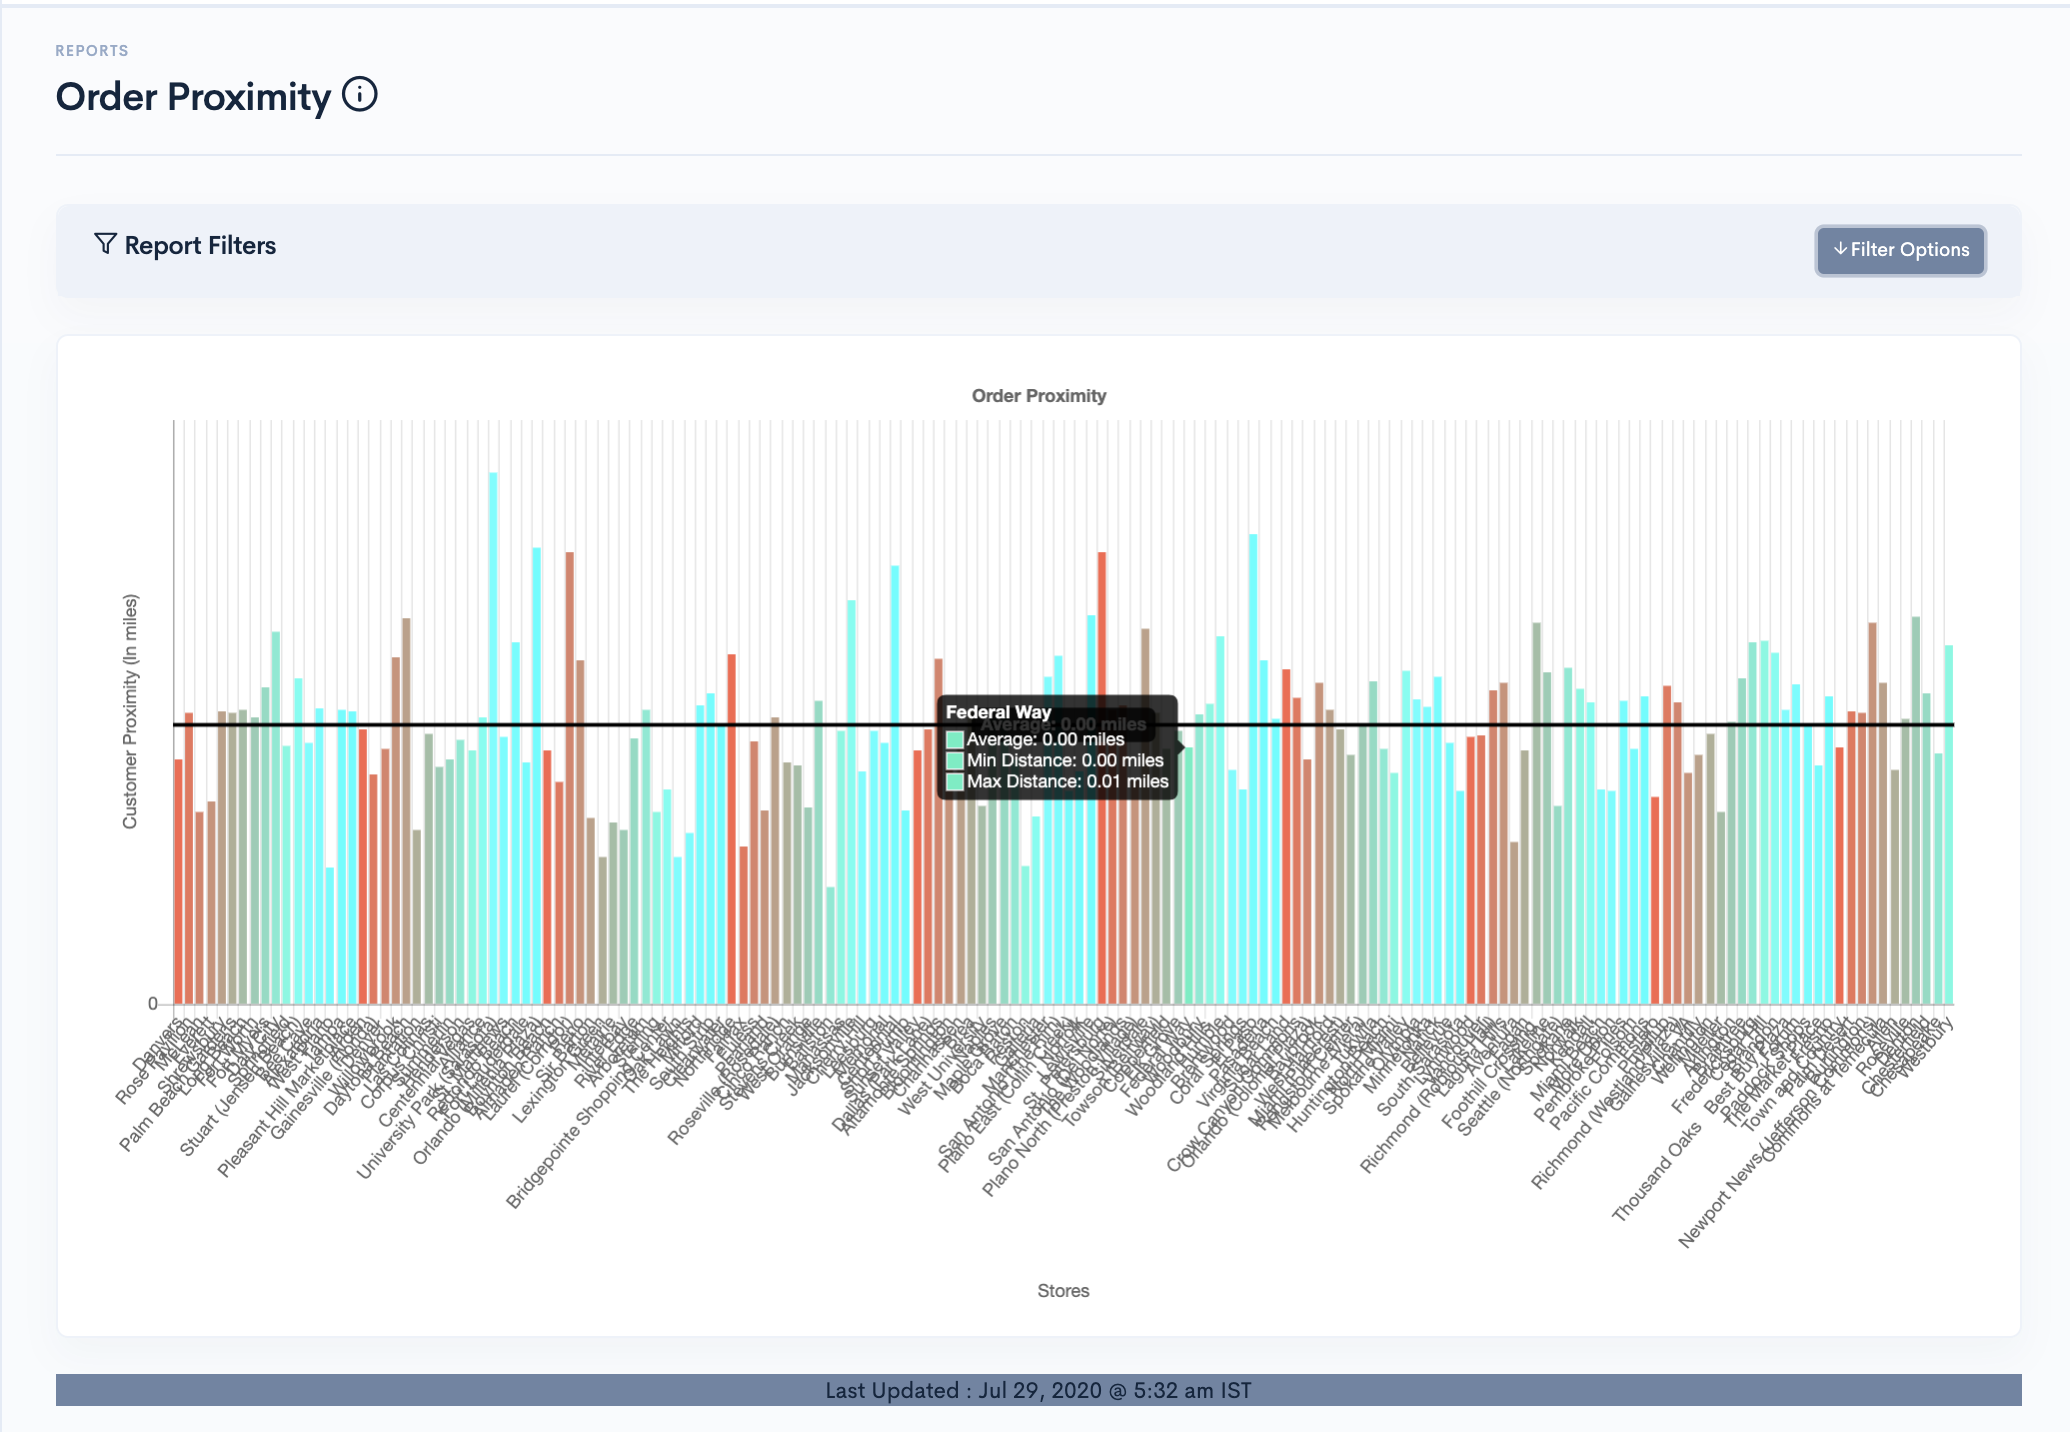
Demand Pattern Report
Demand pattern analysis is an emerging area in supply chain management (SCM) that analyzes customer and demand data to better predict demand across multiple time horizons in a demand-driven value network. Similarly Demand Pattern Reports shows number of Orders placed on Daily(hourly),Weekly,Monthly and Quarterly basis.
The Higher the bar, the higher the number of deliveries took place on the mentioned date. Filters of the report allows you to generate the report based on the month, State and Store and DSP.
Select the day in legends in the Report to remove its data from the graph.
This is how the report looks like.
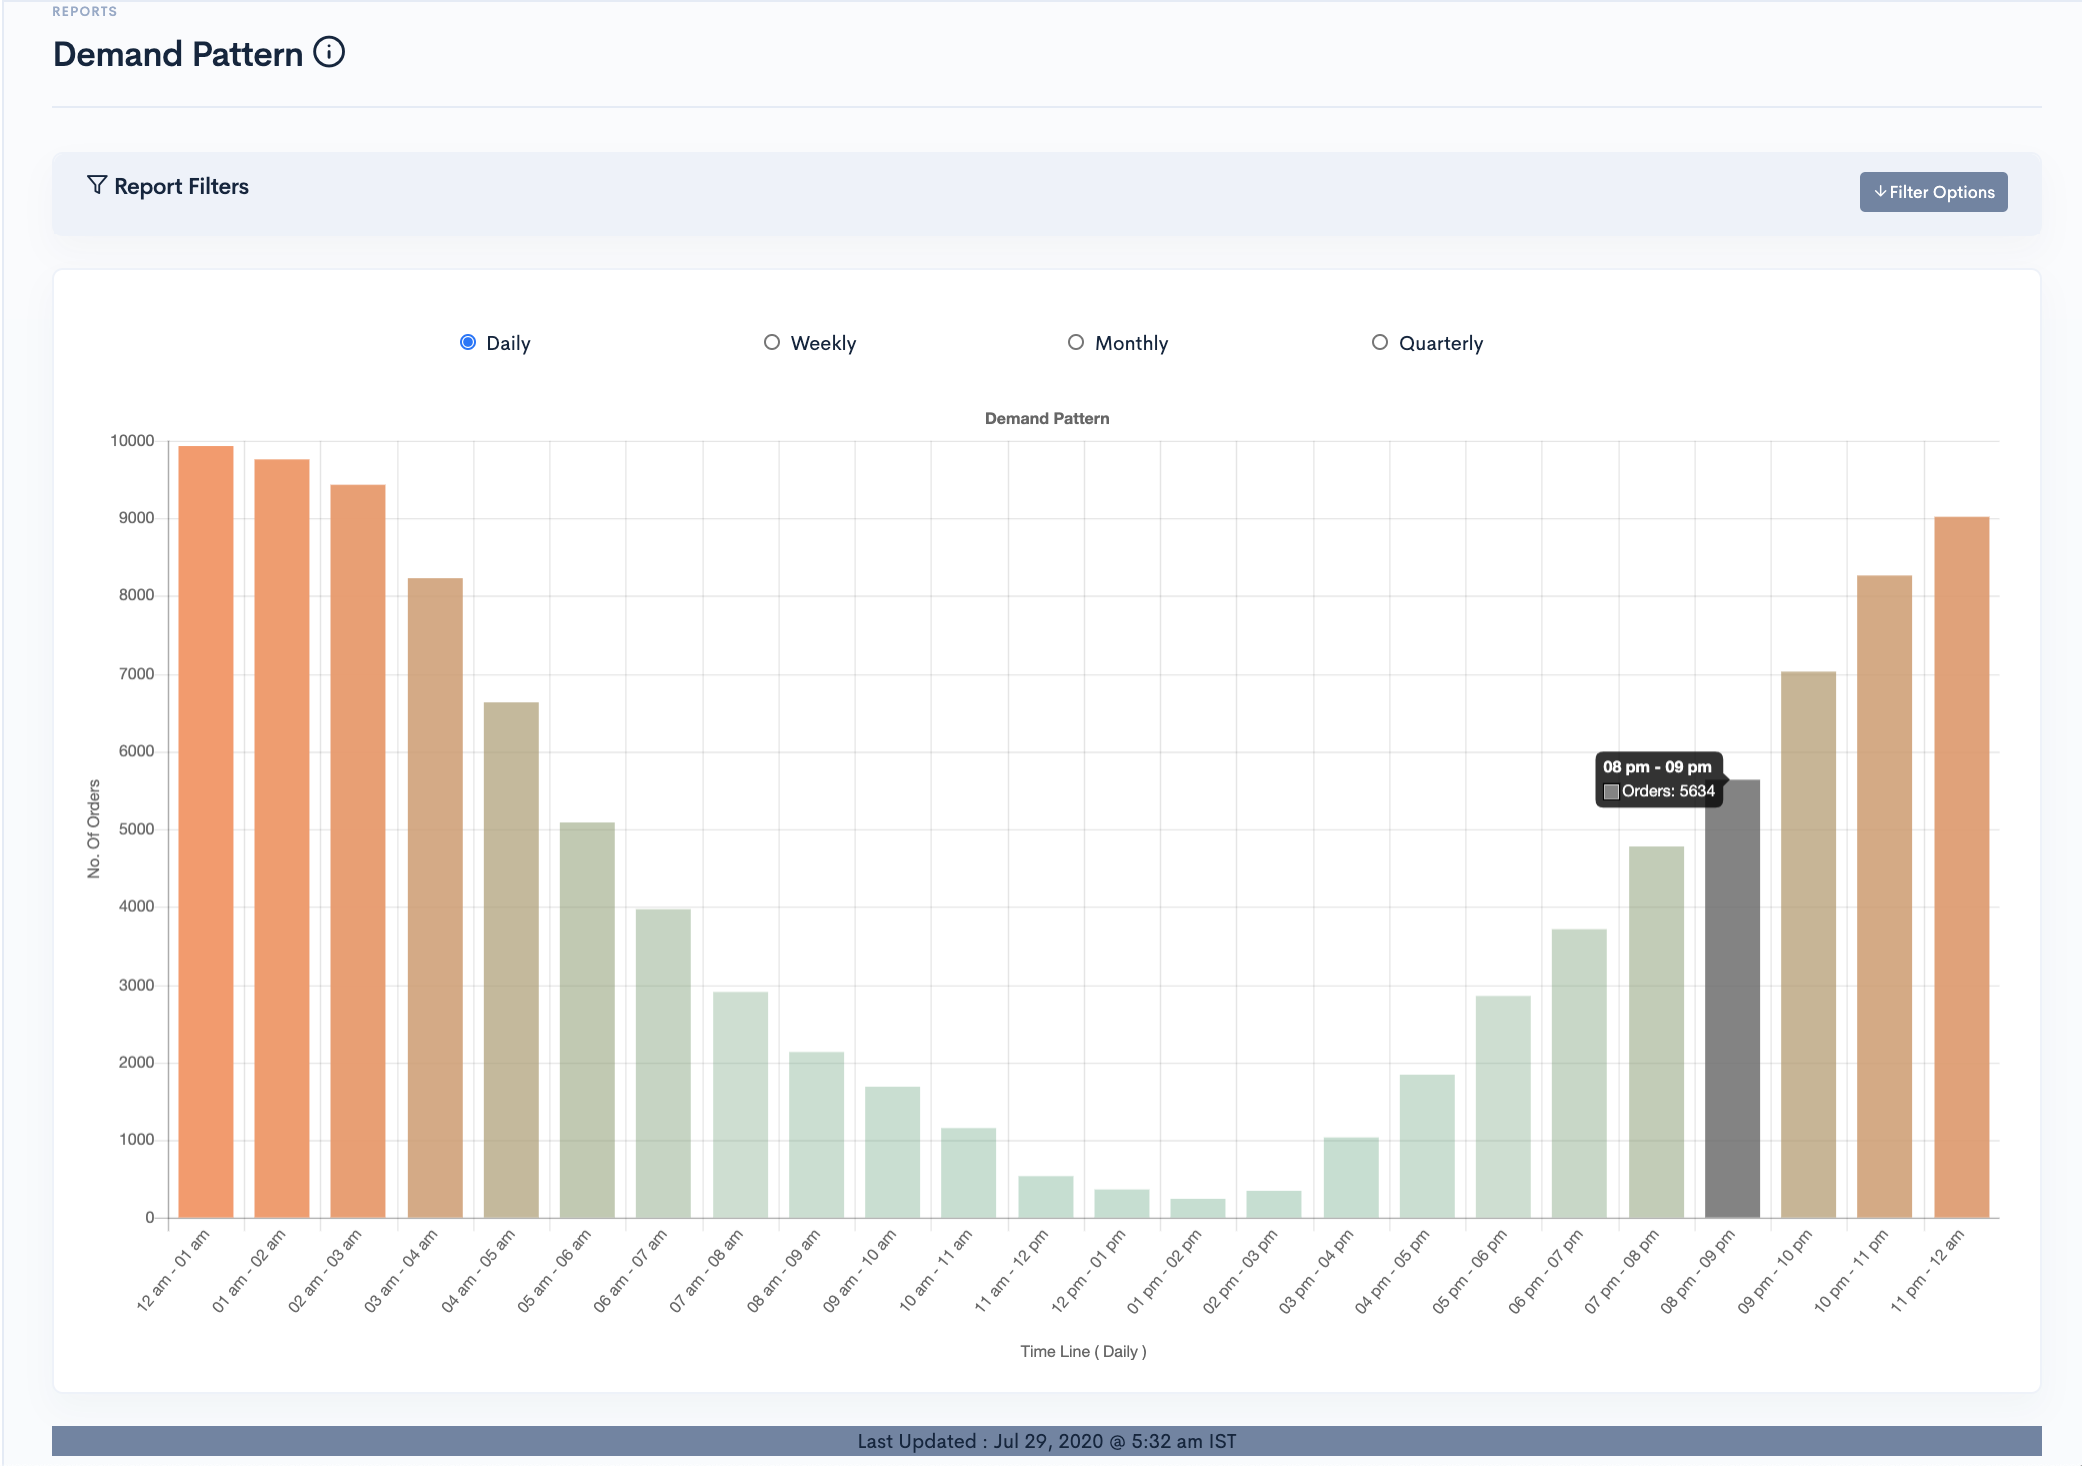
Sameday Vs Nextday Delivery Report
Order Delivery Date can be different from the Order Created Date since Delivery Solutions allow to schedule the orders beforehand.
Two Reports- Created Date Vs Delivery Date
- Created Time Vs Delivery Time
Created Date Vs Delivery Date delivery report shows the number of orders delivered on the same day when order was placed with number of orders delivered on the next day. The data is presented with 2 rectangular bars adjacent to each other showing the delivery data.
The Higher the bar, the higher the number of deliveries took place on the mentioned date.Filters of the report allows you to generate the report based on the month, State and Store and DSP. Select the day in legends in the Report to remove its data from the graph.
This is how the reated Date Vs Delivery Date Creport looks like
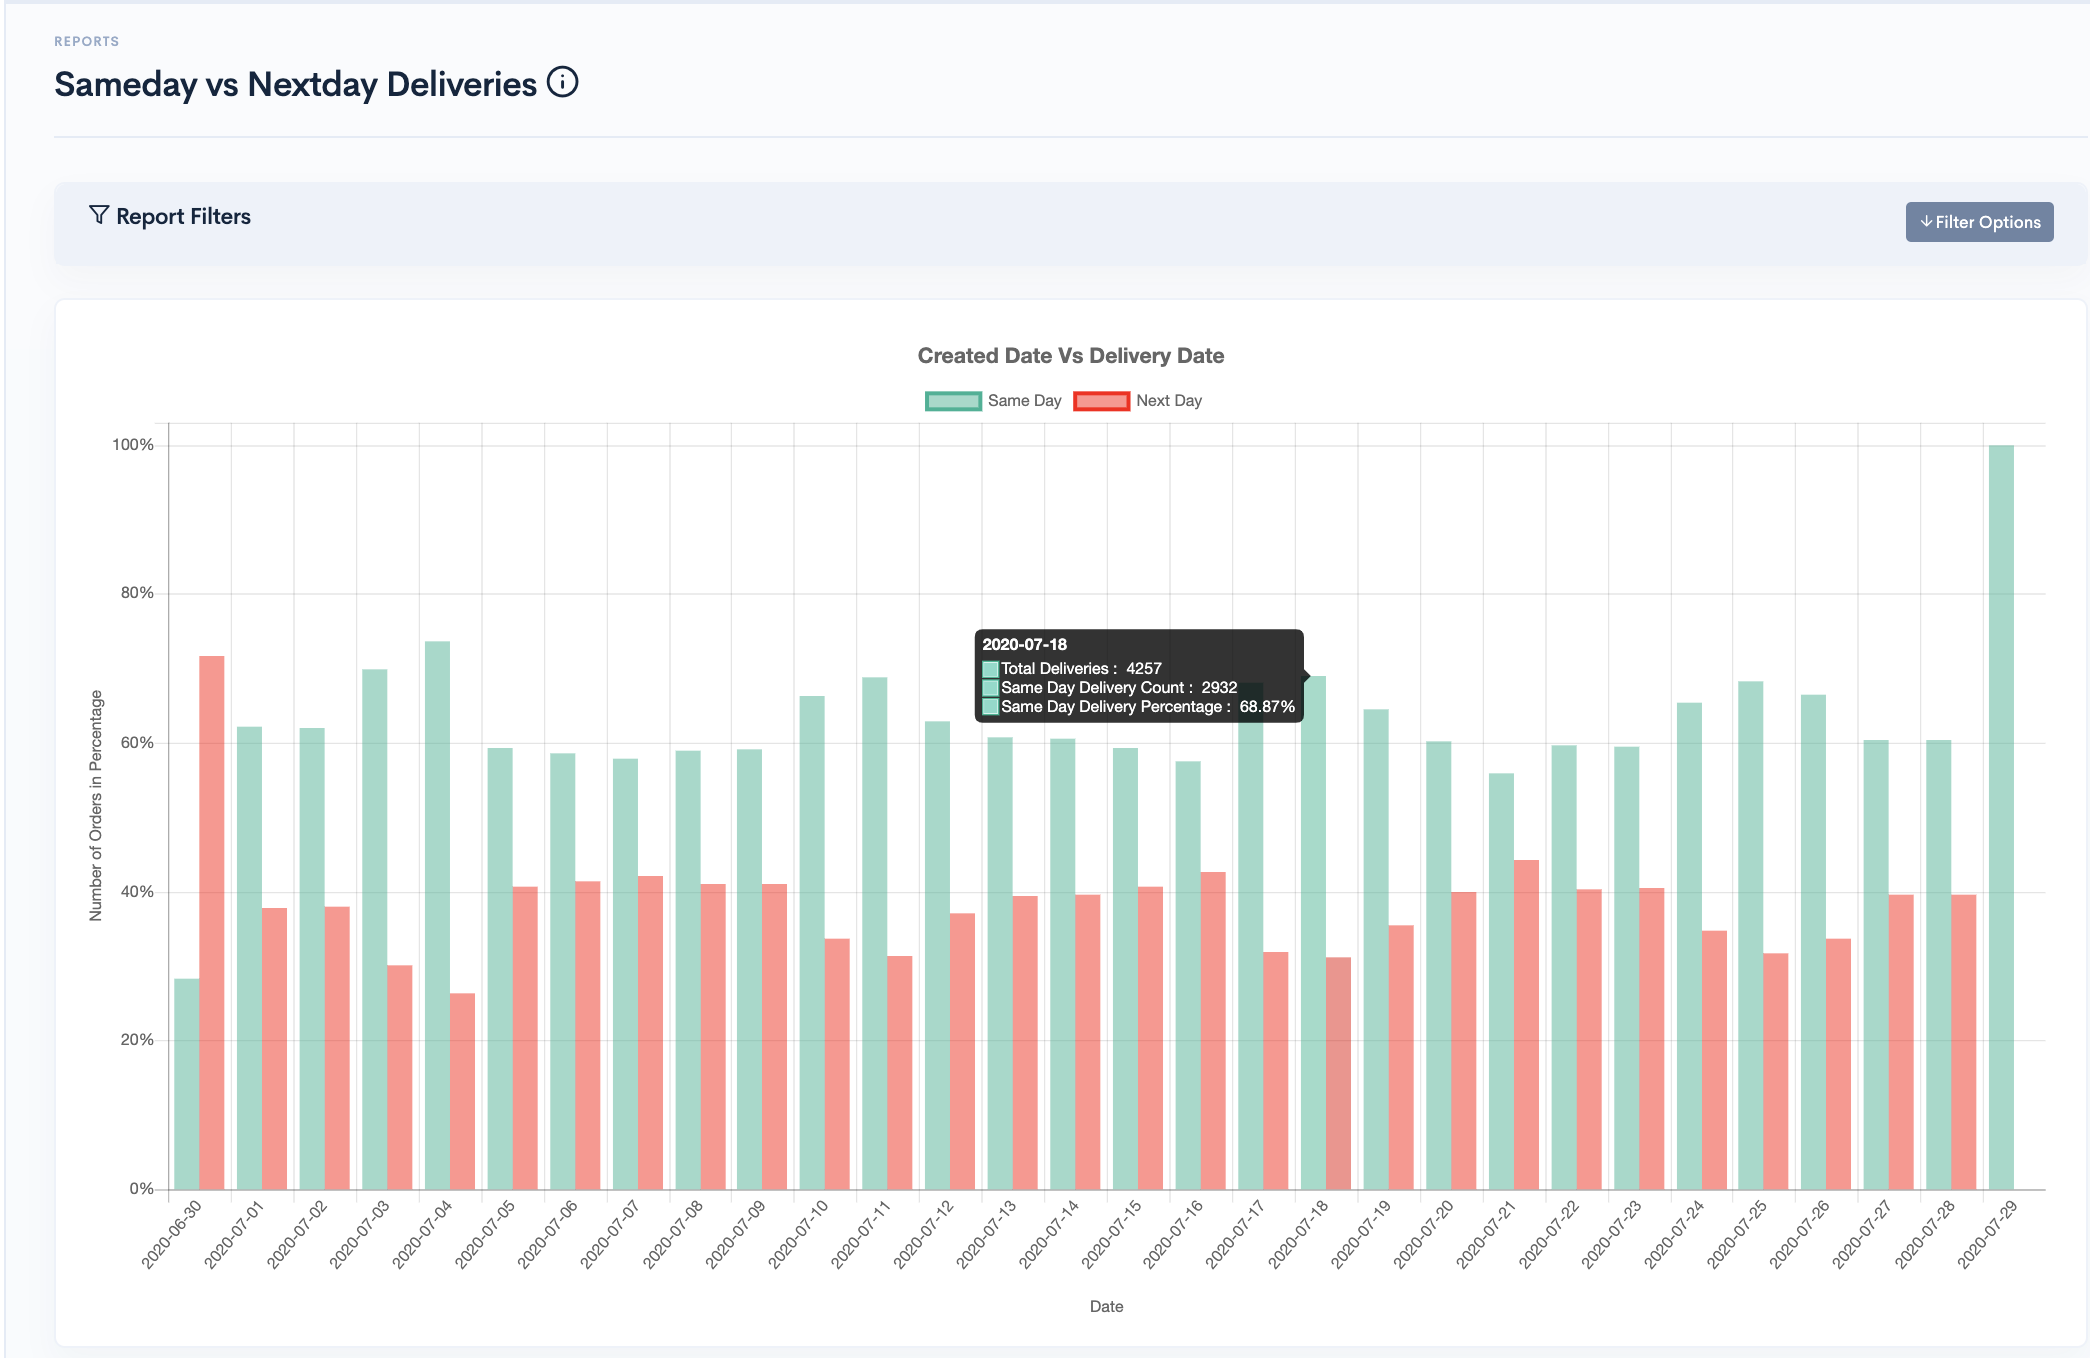
Created Time Vs Delivery Time delivery report shows the number of orders delivered within how many hours from the time the order was placed. The data is presented with stacked area chart.
The broader the area, the higher the amount of time deliveries took place. The higher the graph, the higher the number of orders. Filters of the report allows you to generate the report based on the month, State and Store and DSP. Select the day in legends in the Report to remove its data from the graph.
This is how the Created Time Vs Delivery Time Creport looks like
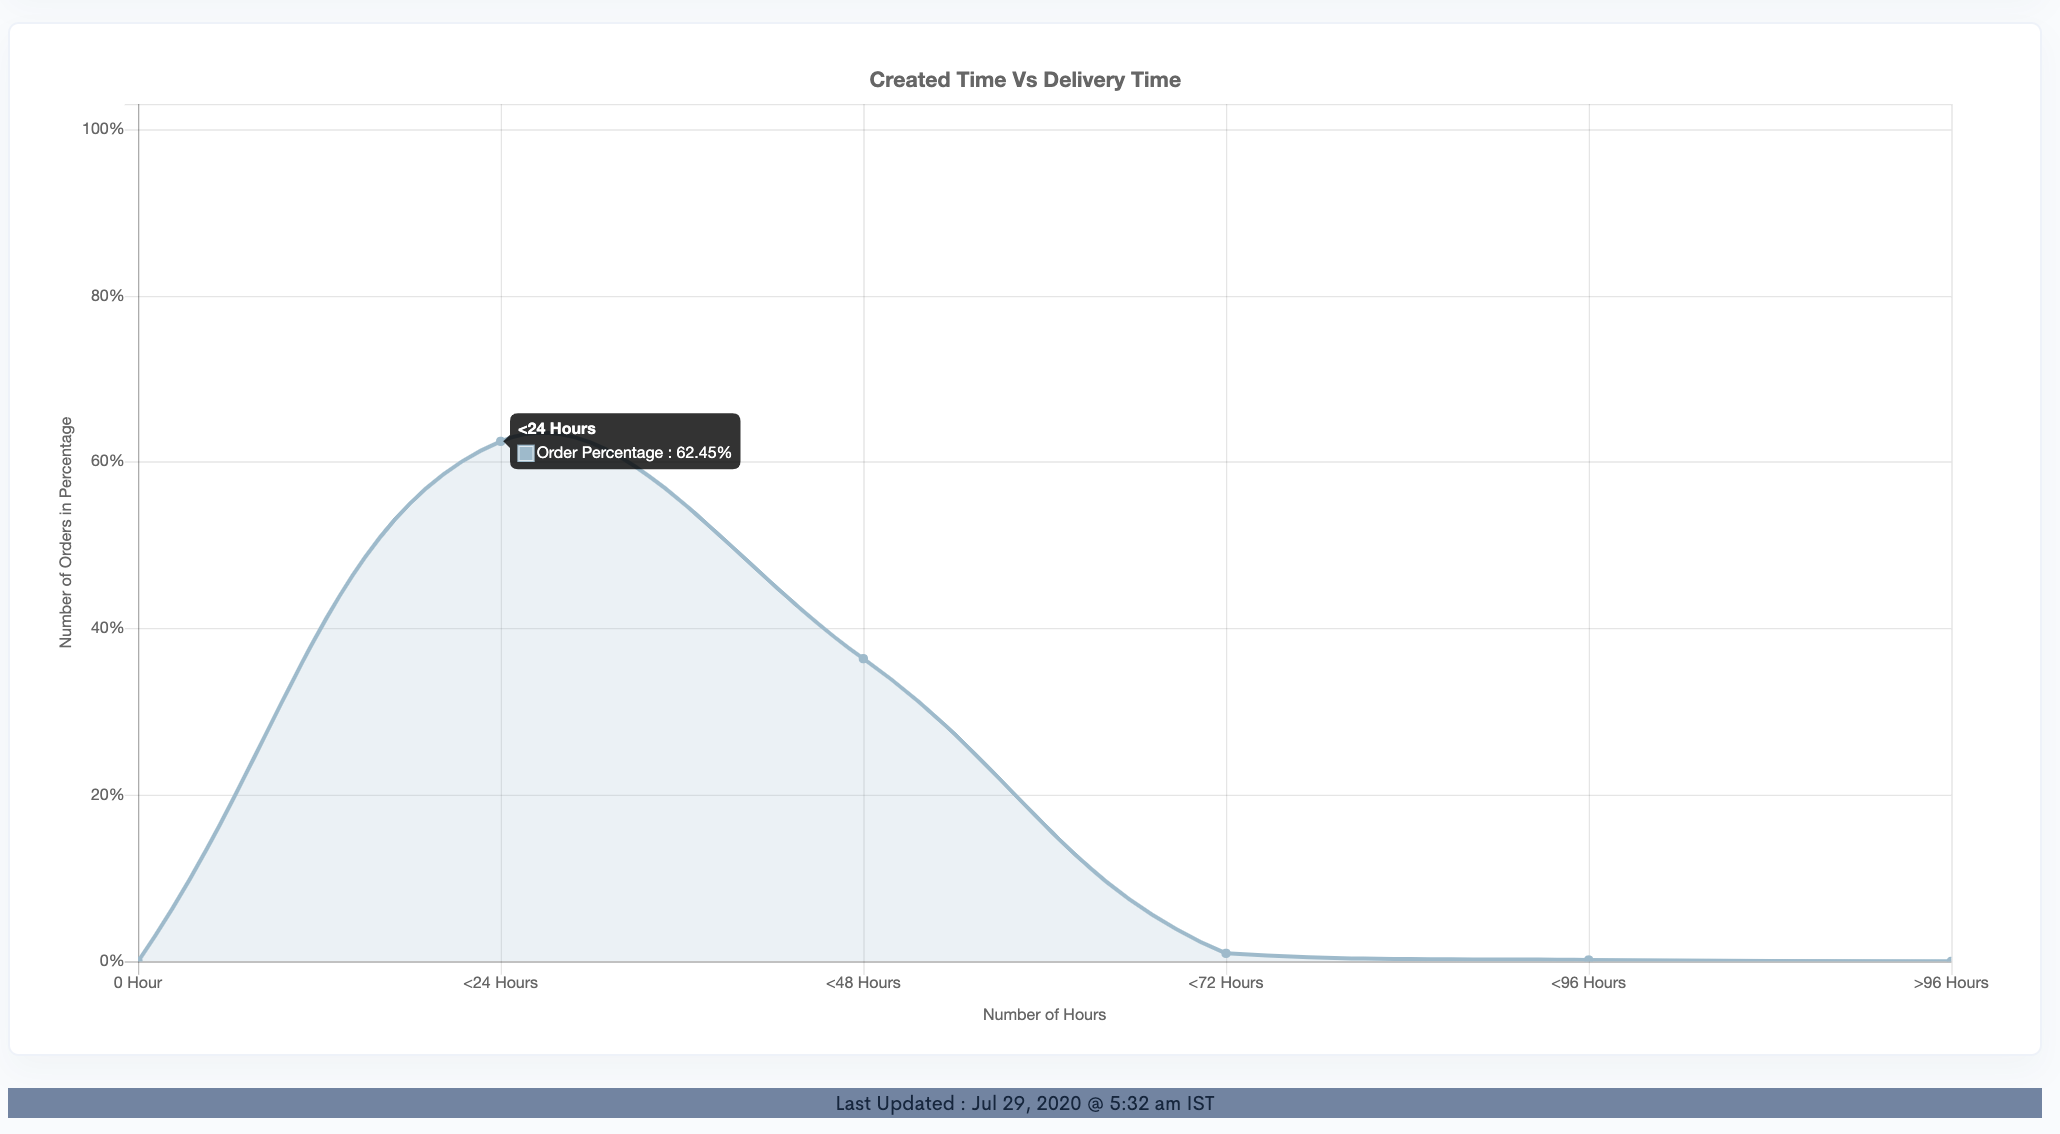
Average Order Value Report
Average Order Value Report shows the average order and tip amount of the Orders placed on Daily(hourly),Weekly,Monthly and Quarterly basis.
The Higher the bar, the higher the number of order amount and tips received on the mentioned date. Filters of the report allows you to generate the report based on the month, State and Store and DSP.
Select the day in legends in the Report to remove its data from the graph.
This is how the report looks like.